Full Trust European Hosting

BLOG about Full Trust Hosting and Its Technology - Dedicated to European Windows Hosting Customer

AngularJS Hosting Europe - HostForLIFE :: Get Browser Type and Version Using Angular and Bootstrap

clock February 20, 2024 06:04 by author Peter

This article explains how to retrieve the browser name and version from the Angular application. In certain cases, you may also need to obtain the browser name in Angular, depending on your requirements. If the Angular application is open on Internet Explorer Legacy, Edge, Firefox, Chrome, Safari, Opera, or another browser, we can quickly identify it. This article walks us through the process of adding a reusable method to an Angular application and demonstrates how to quickly identify the browser and version.


Note: Before beginning this session, please read my earlier essay (linked below) about Angular applications.

D:\EmployeeManagement\CallWebAPIAngular> ng g s services/detect-browser

Then you can service and its related files are shown below
PS D:\EmployeeManagement\CallWebAPIAngular> ng g s services/detect-browser
CREATE src/app/services/detect-browser.service.spec.ts (393 bytes)
CREATE src/app/services/detect-browser.service.ts (142 bytes)


Step 2. Configure browser name with version detection method
After creating the DetectBrowserService, add the getBrowserNameAndVersion() method to return an object with name and version keys. This method will fetch the User-Agent strings on the browser in which the Angular application is loaded.

Open the ~app\services\detect-browser.service.ts file and add as shown below.
import { Injectable } from '@angular/core';
@Injectable({
  providedIn: 'root'
})
export class DetectBrowserService {
  constructor() { }
  getBrowserNameAndVersion() {
    var ua = navigator.userAgent,
        tem,
        M = ua.match(/(opera|chrome|safari|firefox|msie|trident(?=\/))\/?\s*(\d+)/i) || [];

    if (/trident/i.test(M[1])) {
        tem = /\brv[ :]+(\d+)/g.exec(ua) || [];
        return { name: 'IE', version: (tem[1] || '') };
    }
    if (M[1] === 'Chrome') {
        tem = ua.match(/\bEdg\/(\d+)/);
        if (tem != null) {
            return { name: 'Edge(Chromium)', version: tem[1] };
        }
        tem = ua.match(/\bOPR\/(\d+)/);
        if (tem != null) {
            return { name: 'Opera', version: tem[1] };
        }
    }
    M = M[2] ? [M[1], M[2]] : [navigator.appName, navigator.appVersion, '-?'];
    if ((tem = ua.match(/version\/(\d+)/i)) != null) {
        M.splice(1, 1, tem[1]);
    }
    return {
      name: M[0],
      version: M[1]
    };
  }
}


Here, we detect the name and version of the browser by creating a new service with a common method. The getBrowserNameAndVersion method returns an object with name and version keys. This method is fetching the User-Agent string that provides the browser information.

Step 3. Detect browser name with version
Now, we will import the DetectBrowserService in the AppComponent‘s constructor function. The service instance method named getBrowserNameAndVersion() will assign the name and version object to the browserNameAndVersion variable.

Open the app.component.ts file and add as shown below

import { Component } from '@angular/core';
import { DetectBrowserService } from './services/detect-browser.service';

@Component({
  selector: 'app-root',
  templateUrl: './app.component.html',
  styleUrls: ['./app.component.css']
})
export class AppComponent {
  title = 'Display Browser Name & Version';

  public requiredVersion = 98;
  public isBrowserOutdated: boolean | undefined;
  public browserVersion = '';
  browserNameAndVersion: any;

  constructor(
    detectBrowserService: DetectBrowserService
  ) {
    this.browserNameAndVersion = detectBrowserService.getBrowserNameAndVersion();
    this.browserVersion = this.browserNameAndVersion.version;
    if (parseFloat(this.browserNameAndVersion.version) < this.requiredVersion) {
      this.isBrowserOutdated = true;
    }
  }
}

Here we configure for displaying browser name and version along with browser up-to-date or not.

this.browserNameAndVersion = detectBrowserService.getBrowserNameAndVersion();
this.browserVersion = this.browserNameAndVersion.version;
if (parseFloat(this.browserNameAndVersion.version) < this.requiredVersion) {
  this.isBrowserOutdated = true;
}


Step 4. HTML template to show browser name with version
Update the HTML template of AppComponent to display the browser name and version. Open the app.component.html file and update it as shown below:

<div class="card bg-danger text-white">
  <div class="card-body text-center">
    <h1>{{ title }}</h1>
  </div>
  <table class="table table-striped mt-5">
    <thead>
    </thead>
    <tbody>
      <tr>
        <td><h4>Browser Name: {{ browserNameAndVersion.name | titlecase }}</h4></td>
        <td><h4>Current Browser Version: {{ browserNameAndVersion.version | titlecase }}</h4></td>
        <td><h4>Required Version: {{ requiredVersion }}</h4></td>
      </tr>
    </tbody>
  </table>
</div>

<div class="toast show" style="position: fixed; top: 60%; left: 50%; width: 30em; height: 17em; margin-top: -9em; margin-left: -15em; border: 1px solid #ccc; background-color: #f3f3f3; color: red; font-weight: 900; font-size: larger;">
  <div class="toast-header">
    Angular Detect Browser Name and Version
    <button type="button" class="btn-close" data-bs-dismiss="toast"></button>
  </div>
  <div class="toast-body">
    <div class="base-block" *ngIf="isBrowserOutdated">
      <h1>Oops</h1>
      <h3>Browser is outdated</h3>
      <h5>
        Your {{ browserNameAndVersion.name }} browser is outdated ({{ browserNameAndVersion.version }}) as less than required Version
        ({{ requiredVersion }}) and no longer supported, please update your browser.
      </h5>
    </div>

    <div class="base-block" *ngIf="!isBrowserOutdated">
      <h1>Cheers!</h1>
      <h3>Browser is up to date</h3>
      <h5>
        Your {{ browserNameAndVersion.name }} browser is updated ({{ browserNameAndVersion.version }}).
      </h5>
    </div>
  </div>
</div>


Use the interpolation to display the browser name and version with the help of the interpolation. An Interpolation is defined using the double curly braces that permit the user to bind a value to a UI element. Also, we will use the angular pipe to transform the value in the title case.

<td>
  <h4>Browser Name: {{ browserNameAndVersion.name | titlecase }}</h4>
</td>
<td>
  <h4>Current Browser Version: {{ browserNameAndVersion.version | titlecase }}</h4>
</td>
<td>
  <h4>Required Version: {{ requiredVersion }}</h4>
</td>

Check browser is up-to-date or not based on some condition using the *ngIf directive.
<div class="toast-body">
  <div class="base-block" *ngIf="isBrowserOutdated">
    <h1>Oops</h1>
    <h3>Browser is outdated</h3>
    <h5>
      Your {{ browserNameAndVersion.name }} browser is outdated ({{ browserNameAndVersion.version }}) as less than required Version
      ({{ requiredVersion }}) and no longer supported, please update your browser.
    </h5>
  </div>

  <div class="base-block" *ngIf="!isBrowserOutdated">
    <h1>Cheers!</h1>
    <h3>Browser is up to date</h3>
    <h5>
      Your {{ browserNameAndVersion.name }} browser is updated ({{ browserNameAndVersion.version }}).
    </h5>
  </div>
</div>


Step 5. Add Bootstrap to make the page responsive
<!doctype html>
<html lang="en">
<head>
  <meta charset="utf-8">
  <title>Title Service Example</title>
  <base href="/">
  <meta name="viewport" content="width=device-width, initial-scale=1">
  <link rel="icon" type="image/x-icon" href="favicon.ico">
  <link href="https://cdn.jsdelivr.net/npm/[email protected]/dist/css/bootstrap.min.css" rel="stylesheet">
  <script src="https://cdn.jsdelivr.net/npm/[email protected]/dist/js/bootstrap.bundle.min.js"></script>
</head>
<body>
  <app-root></app-root>
</body>
</html>


Output

Finally, run the application by executing the ng serve command in the terminal window. It opens the application at the following URL: http://localhost:4200/
Checking Chrome Browser is up to date i.e. based required Version

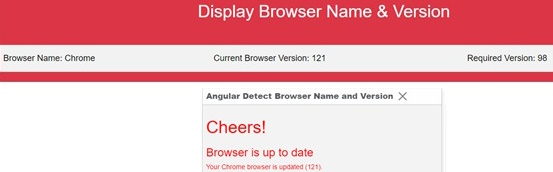
Checking whether Chrome Browser is up to date or not i.e. based on the Required Version

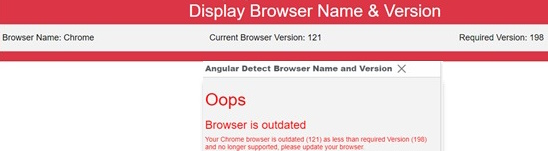
Checking whether another Browser is up to date or not i.e. based on the Required Version

Why is it necessary to set up the browser detection procedure?
To let users know that their current browser or version isn't compatible with correctly loading the application, we need to identify the name and version of their browser. They can then use the newest browsers that are out there. Modern Javascript and CSS principles are supported by a wide range of web browsers accessible today, all of which are completely compatible with the most recent version of WebKit. In this situation, we must identify the browser's name and version in order to let users know that their current browser or a different one isn't compatible with correctly loading the program and that they can upgrade to the newest version.


AngularJS Hosting Europe - HostForLIFE :: Which Angular Modifiers Are Important?

clock January 22, 2024 07:12 by author Peter

In Angular, key modifiers are special keys that you can use in combination with other keys to capture specific keyboard events. These modifiers help you distinguish between different key combinations and provide more flexibility in handling user input.


Key modifiers in Angular
Here are some key modifiers commonly used in Angular.
$event: This is a special variable that you can use to access the native event object in your event handler. For example.

<input (keyup)="onKeyUp($event)">

In the component:

onKeyUp(event: KeyboardEvent): void {
    // Access event properties, such as event.keyCode, event.key, etc.
}

(keyup.enter) and (keyup.esc): These are examples of key modifiers for specific keys. They allow you to handle events triggered by the Enter key or the Escape key.

<input (keyup.enter)="onEnterKey()" (keyup.esc)="onEscapeKey()">

In the component
onEnterKey(): void {
    // Handle Enter key press
}

onEscapeKey(): void {
    // Handle Escape key press
}


(keydown.space): Similar to (keyup.enter), this allows you to handle events triggered by the Space key.
<button (keydown.space)="onSpaceKey()">Click me with Space</button>

In the component
onSpaceKey(): void {
    // Handle Space key press
}

(keyup.shift): You can use this to handle events triggered when the Shift key is released.
<input (keyup.shift)="onShiftKeyUp()">

In the component
onShiftKeyUp(): void {
    // Handle Shift key release
}


(keydown.ctrl) and (keydown.meta): These modifiers allow you to handle events when the Ctrl (Control) key or the Meta key (Command key on Mac) is pressed.
<input (keydown.ctrl)="onCtrlKeyDown()" (keydown.meta)="onMetaKeyDown()">

In the component:
onCtrlKeyDown(): void {
    // Handle Ctrl key press
}

onMetaKeyDown(): void {
    // Handle Meta key press
}

With the help of these key modifiers, it is possible to record particular key-related events and carry out actions in response to user input. They make your Angular applications more interactive by enabling you to react to keyboard inputs in a more sophisticated


AngularJS Hosting Europe - HostForLIFE :: Observable Management Using NgIf and Async Pipe

clock January 18, 2024 08:01 by author Peter

When the component loads, Angular's async pipe subscribes to an Observable or Promise and returns the value that was last emitted. Every time a new value is emitted, the async pipe designates the component that needs to be examined for modifications. When the component is destroyed, it will automatically unsubscribe. Additionally, the async pipe immediately unsubscribes from the current Observable or Promise and subscribes to a new one when the reference of an expression changes.

An illustration of an observable-based async pipe


Our basic component subscribes to the currentTime$ observable via the async pipe. Every time the observable emits a new value, the value that is displayed is automatically updated.

import { Component } from '@angular/core';
import { Observable, interval } from 'rxjs';

@Component({
  selector: 'app-root',
  template: `
    <h1>Async Pipe Example</h1>
    <p>Current time: {{ currentTime$ | async }}</p>
  `
})
export class AppComponent {
  currentTime$: Observable<Date>;

  constructor() {
    this.currentTime$ = interval(1000).pipe(
      map(() => new Date())
    );
  }
}

The currentTime$ observable is created using the interval an operator from RxJS, which emits a sequential number every 1 second.
We then use the map operator to transform the emitted number into a Date object representing the current time.
In the template, we use the async pipe to directly bind the value of currentTime$ to the {{ currentTime$ | async }} expression, which will automatically handle subscribing and unsubscribing from the observable.
This way, the template will always display the current time, updating every second as new values are emitted by the observable.

When should I use Async Pipe with ngIf?
When you wish to conditionally show content based on the outcome of an asynchronous operation or the existence of data from an asynchronous source, you can use the ngIf directive and async pipe.

Here are some typical situations in which ngIf and async pipe might be used.

  • Data Loading: ngIf with async pipe can be used to display a loading message or spinner until the data is loaded and ready to be displayed when retrieving data from an API or carrying out an asynchronous action.
  • Authentication and Authorization: ngIf with async pipe can conditionally show or hide specific UI components based on the user's permissions and access privileges when implementing authentication and authorization in an application.
  • Conditional Rendering: ngIf with async pipe is used to conditionally render different sections of a template based on the status of the asynchronous operation if you have conditional logic in your template that depends on the outcome of an asynchronous operation.

Example of ngIf and Async Pipe

Here, we have an AppComponent that declares an Observables called data$. The data$ observable simulates an asynchronous data retrieval using the of operator and delay operator from RxJS.
import { Component } from '@angular/core';
import { Observable, of } from 'rxjs';
import { delay } from 'rxjs/operators';
>
@Component({
  selector: 'app-root',
  template: `
    <div *ngIf="data$ | async as data; else loading">
      <h1>Data is loaded:</h1>
      <p>{{ data }}</p>
    </div>

    <ng-template #loading>
      <h1>Loading data...</h1>
    </ng-template>
  `,
})
export class AppComponent {
  data$: Observable<string>;

  constructor() {
    // Simulating an asynchronous data retrieval
    this.data$ = of('Hello, world!').pipe(delay(2000));
  }
}


TypeScript

  • We conditionally display content in the template based on the completion of the data$ observable by using the ngIf directive.
  • Before assigning the value to the data variable using the as syntax, the data$ observable must be subscribed to and retrieved using the async pipe.
  • The loaded data is shown inside the ngIf block, and a loading message is shown inside the ng-template with the #loading reference.
  • The template will show the value that is emitted by the data$ observable. The loading notice will appear until then.
  • The async pipe handles subscription and automatically updates the UI when the observable emits new values or when it completes.

By using ngIfwith asyncpipe, you can simplify your code and let Angular handle the management of subscriptions and automated changes of the view when the asynchronous operation finishes or emits new values. In general, you can write more succinct and clear code for managing asynchronous operations and conditional rendering in Angular applications by utilizing ngIf with async pipe.


AngularJS Hosting Europe - HostForLIFE :: Using Angular CLI 17.0.6, Node: 20.0.1, and npm 10.2.3 on Windows, Create Your First Angular

clock December 19, 2023 06:08 by author Peter

On November 6, 2023, Angular 17 was launched, and I wanted to create my first application with it. These instructions will help you create your first Angular 17 application. With the exception of a few advanced capabilities that must be enabled, this is essentially the same if you have expertise with earlier Angular versions. In addition to a fresh style, Angular 17 introduces several new capabilities for developers and performance. Additionally, Angular17 has well-managed documentation.

Developing an Angular 17 Application
Required conditions

Install the most recent LTS version of NODE JS. I've utilized 20.10.0. Installing and downloading this can be done at https://nodejs.org/en.
During installation, make sure to tick the set Path in the Environment Variables option.

Installing Angular CLI is a required that will be done concurrently with node js installation.
After the installation is complete, use CMD to verify the installed version of the node.

Enter "node -v" in the command window. This screen grab below displays the version that I have installed.

After Node js has been successfully installed, Typescript needs to be installed. Try using the admin version of cmd. Given that folder rights were restricted, I knew I had to take this action. I've included some instructions below in case you're operating through a proxy.

CMD "npm install –g typescript" should be run.

if any of the following mistakes happen. CERT_IN_CHAIN_SELF SIGNED.

I got around the certificate, which is the above error, with this cmd. "npm config set strict-ssl false" Strict SSL configuration will now be set to false. If the installation goes well, it will seem like the screen below, which indicates that the installation was successful.

Run the command "npm install -g @angular/cli@latest" as shown above the screen. It does say about funding which is to ask for funds.
Some of these packages installed are probably asking for funds. (optional)

You can check the version installed using the command "ng version"

Now that the prerequisites have been met, use the command "ng new {APPName}" to begin building a new Angular17 application. The CLI will inquire about the type of styling you want to use and whether you need to enable Server-Side Rendering (SSR) and Static Site Generation (SSG/Prerendering) when you create a new application.

When user interaction with the backend is required, server-side rendering is employed.

To launch the ng serve –o application, use this command. Your browser will launch it at http://localhost:4200/.


Thank you, and Hopefully, this article helped you get started with creating an angular 17 application.


AngularJS Hosting Europe - HostForLIFE :: ng-container, ng-template, and ng-content

clock August 25, 2023 08:22 by author Peter

ng-container
By enabling you to apply Angular directives without including additional items in the DOM (Document Object Model), the ng-container functions as a kind of transparent container. It is frequently employed when you wish to structure or conditionally include elements in your template.


As an illustration, consider creating a product page. If the product is in stock, you want to display the product details; otherwise, you want to display a notification stating the product is unavailable.

<ng-container *ngIf="productAvailable; else outOfStockTemplate">
  <div>Product Name: {{ productName }}</div>
  <div>Price: {{ productPrice }}</div>
</ng-container>

<ng-template #outOfStockTemplate>
  <div>This product is currently out of stock.</div>
</ng-template>

ng-template
The ng-template is like a template blueprint that doesn't get displayed immediately. It's used to define sections of your template that can be reused and conditionally rendered using structural directives.

Example: Let's say you're creating a list of blog posts. You want to show different styles for featured posts and regular posts.
<ul>
  <ng-container *ngFor="let post of posts">
    <ng-container *ngTemplateOutlet="post.featured ? featuredTemplate : regularTemplate; context: { post: post }"></ng-container>
  </ng-container>
</ul>

<ng-template #featuredTemplate let-post>
  <li class="featured">{{ post.title }}</li>
</ng-template>

<ng-template #regularTemplate let-post>
  <li>{{ post.title }}</li>
</ng-template>


ng-content
The ng-content is used to allow external content to be included within the template of your component. It's ideal for making more adaptable components that can be used in a variety of situations. Consider designing a card component that can display a variety of content.
<div class="card">
  <div class="card-header">
    <ng-content select=".card-title"></ng-content>
  </div>
  <div class="card-content">
    <ng-content></ng-content>
  </div>
  <div class="card-footer">
    <ng-content select=".card-actions"></ng-content>
  </div>
</div>


Now, when you use this component, you can provide custom content for each section:
<app-card>
  <div class="card-title">Card Title</div>
  <p>This is the content of the card.</p>
  <div class="card-actions">
    <button>Edit</button>
    <button>Delete</button>
  </div>
</app-card>


By combining these concepts, you can create components that are more dynamic and adaptable. ng-container, ng-template, and ng-content help you organize and structure your templates in a way that makes your code more readable and maintainable.


AngularJS Hosting Europe - HostForLIFE :: Important RxJS Operators

clock August 21, 2023 08:54 by author Peter

RxJS (Reactive Extensions for JavaScript) is a sophisticated tool used in Angular applications for handling asynchronous and event-based programming with observables. RxJS provides a diverse set of operators for manipulating, transforming, combining, and managing observables in a flexible and functional manner. These operators facilitate reactively working with data streams and asynchronous processes.


Here's a rundown of some of the most common RxJS operators and how they can be utilized in Angular:
map

The map operator is used to transform observable values into new ones. This is frequently used to do data transformations.

import { map } from 'rxjs/operators';

observable.pipe(
  map(data => data * 2)
).subscribe(result => console.log(result));


filter
The filter operator is used to remove values from an observable depending on a criterion.
import { filter } from 'rxjs/operators';

observable.pipe(
  filter(data => data > 5)
).subscribe(result => console.log(result));


mergeMap (flatMap)
The mergeMap operator is used to merge multiple observables into a single observable by applying a function to each emitted value and flattening the resulting observables.
import { mergeMap } from 'rxjs/operators';

observable.pipe(
  mergeMap(data => anotherObservable(data))
).subscribe(result => console.log(result));


switchMap
The switchMap the operator is similar to mergeMap, but it switches to a new inner observable whenever a new value is emitted from the source observable, canceling the previous inner observable.
import { switchMap } from 'rxjs/operators';

observable.pipe(
  switchMap(data => anotherObservable(data))
).subscribe(result => console.log(result));


debounceTime
The debounceTime operator delays emitted values for a specified amount of time and only emits the last value within that time frame.
import { debounceTime } from 'rxjs/operators';
inputObservable.pipe(
  debounceTime(300)
).subscribe(value => console.log(value));

combineLatest
The combineLatest operator combines the latest values from multiple observables whenever any of the observables emit a new value.
import { combineLatest } from 'rxjs/operators';

combineLatest(observable1, observable2).subscribe(([value1, value2]) => {
  console.log(value1, value2);
});

catchError
The catchError operator is used to handle errors emitted by an observable by providing an alternative observable or value.
import { catchError } from 'rxjs/operators';
import { of } from 'rxjs';

observable.pipe(
  catchError(error => of('An error occurred: ' + error))
).subscribe(result => console.log(result));


These are just a few examples of the many RxJS operators available. Using RxJS operators effectively can help you manage complex asynchronous workflows, handle data transformations, and create more responsive and reactive Angular applications.

Happy Learning :)


AngularJS Hosting Europe - HostForLIFE :: Improving Performance through Angular Change Detection Techniques

clock May 19, 2023 08:27 by author Peter

Change detection is an integral component of Angular that ensures the user interface is in alignment with the state of the application. ChangeDetectionStrategy is Angular's default detection strategy.Standard, which examines for modifications to all components and their templates on each JavaScript event or timer tick.


Nevertheless, this default strategy may result in superfluous and expensive change detection cycles, particularly in large-scale applications. Alternative strategies, such as OnPush, enter into play at this point. The OnPush strategy optimizes change detection by focusing solely on a component's inputs and references.

Using the OnPush strategy, Angular determines if a component's input properties have changed. If the input values remain the same, Angular assumes that the component's state hasn't changed and skips its change detection entirely. This optimization can significantly improve the performance of your Angular application, especially when used strategically.

import { Component, Input, ChangeDetectionStrategy } from '@angular/core';

@Component({
  selector: 'app-user',
  template: `
    <h2>{{ user.name }}</h2>
    <p>{{ user.email }}</p>
  `,
  changeDetection: ChangeDetectionStrategy.OnPush
})
export class UserComponent {
  @Input() user: User;
}

In this example, the UserComponent has the OnPush change detection strategy defined. By doing so, we instruct Angular to only perform change detection if the user input property changes.

When using the OnPush strategy, it is essential to ensure that the user input property is immutable. If you update the user object's properties, Angular won't detect the changes, as it relies on reference comparison.

To optimize performance further, you can utilize the ChangeDetectorRef to manually trigger change detection when necessary:

import { Component, Input, ChangeDetectionStrategy, ChangeDetectorRef } from '@angular/core';

@Component({
  selector: 'app-user',
  template: `
    <h2>{{ user.name }}</h2>
    <p>{{ user.email }}</p>
    <button (click)="updateUser()">Update</button>
  `,
  changeDetection: ChangeDetectionStrategy.OnPush
})
export class UserComponent {
  @Input() user: User;

  constructor(private cdr: ChangeDetectorRef) {}

  updateUser() {
    // Update the user object
    this.cdr.markForCheck(); // Trigger change detection
  }
}


In the above example, we inject the ChangeDetectorRef and call its markForCheck() method to manually trigger change detection when the user clicks the "Update" button.

By understanding and utilizing Angular's change detection strategies, especially the OnPush strategy, you can significantly enhance the performance of your Angular applications. By minimizing unnecessary change detection cycles, your app will run more efficiently and provide a smoother user experience.

Remember to carefully analyze your application's requirements and components' state before choosing a change detection strategy. Applying the OnPush strategy to components that rarely change or have immutable input properties can lead to noticeable performance improvements.


AngularJS Hosting Europe - HostForLIFE :: Interceptors In Angular Along With Benefits

clock April 10, 2023 08:33 by author Peter

In Angular, an interceptor is a middleware that intercepts HTTP requests and responses. Interceptors are used to manipulate or transform HTTP requests and responses globally. This means you can modify HTTP requests and responses in one place and affect all the requests and responses that go through that place.


Ininterceptors In Angular
Interceptors are a powerful tool in Angular as they can be used for a wide variety of tasks, such as,
    Adding authorization headers to requests
    Logging requests and responses
    Adding or removing parameters from requests
    Transforming response data

How to implement an interceptor in Angular?
To implement an interceptor in Angular, you need to create a class that implements the HttpInterceptor interface. The HttpInterceptor interface has two methods to implement: intercept() and, optionally, handleError().

So let's start. Here's an example of an interceptor that adds an authorization header to every HTTP request,
import { Injectable } from '@angular/core';
import { HttpInterceptor, HttpRequest, HttpHandler, HttpEvent } from '@angular/common/http';
import { Observable } from 'rxjs';

@Injectable()
export class AuthInterceptor implements HttpInterceptor {
    intercept(request: HttpRequest < any > , next: HttpHandler): Observable < HttpEvent < any >> {
        // Get the access token from your authentication service
        const accessToken = this.authService.getAccessToken();
        // Clone the request and add the authorization header
        const authRequest = request.clone({
            headers: request.headers.set('Authorization', `Bearer ${accessToken}`)
        });
        // Pass the cloned request to the next handler in the chain
        return next.handle(authRequest);
    }
}


In this example, the AuthInterceptor class implements the HttpInterceptor interface and overrides the intercept() method. In the intercept() method, we get the access token from our authentication service and clone the incoming request, adding an authorization header. We then pass the cloned request to the next handler in the chain using the next.handle() method.

To use this interceptor, register it with the Angular HTTP client. You can do this by providing it in the provider's array of your AppModule,
import { NgModule } from '@angular/core';
import { BrowserModule } from '@angular/platform-browser';
import { HttpClientModule, HTTP_INTERCEPTORS } from '@angular/common/http';

import { AuthInterceptor } from './auth.interceptor';

@NgModule({
    imports: [BrowserModule, HttpClientModule],
    providers: [{
        provide: HTTP_INTERCEPTORS,
        useClass: AuthInterceptor,
        multi: true
    }]
})
export class AppModule {}


In this example, we import the HttpClientModule and our AuthInterceptor class. We then provide our interceptor in the provider's array using the HTTP_INTERCEPTORS token. The multi-option is set to true, which means that this interceptor is added to the existing array of HTTP interceptors rather than replacing it.
Benefits of using interceptors in Angular

    Interceptors allow the manipulation of HTTP requests and responses globally, making it easy to implement cross-cutting concerns such as authentication and error handling.
    Interceptors can reduce code duplication by providing a centralized place to modify requests and responses.
    Interceptors can be easily added or removed, making it easy to change the behavior of your application without having to modify every HTTP request and response.

Summary
Interceptors are a powerful Angular tool that allows you to manipulate HTTP requests and responses globally. They can be used for various tasks and provide a centralized place to modify requests and responses. By using interceptors, you can reduce code duplication and easily add or remove functionality from your application.


AngularJS Hosting Europe - HostForLIFE :: TypeScript Versions In Angular

clock March 14, 2023 07:24 by author Peter

TypeScript is a superset of JavaScript and is widely used for developing large-scale applications. Angular, one of the most popular front-end frameworks is built using TypeScript. When working with Angular, knowing which version of TypeScript is being used in your project is important. In this blog post, we'll discuss identifying the TypeScript version in an Angular project.


Angular uses TypeScript as its primary language, meaning you will need to have TypeScript installed on your machine to develop Angular applications. Once you have TypeScript installed, you can check the version of TypeScript in your Angular project in the following ways:

Package.json file
The TypeScript version can be found in the package.json file of your Angular project. Open the package.json file and look for the "typescript" section. You will see the version of TypeScript that your Angular project is using. For example:
"devDependencies": {
   "typescript": "^4.3.5"
}

Angular CLI
You can also check the TypeScript version using the Angular CLI. Open your terminal and run the following command in the root directory of your Angular project:
ng version

This command will display the version of Angular, TypeScript, and other packages used in your project.

TypeScript Compiler
Another way to check the TypeScript version is to use the TypeScript compiler. Open your terminal and run the following command in the root directory of your Angular project:
tsc --version

This command will display the version of TypeScript installed on your machine. If the version displayed matches the version specified in the package.json file, that is the version used in your Angular project.

The following table summarizes version compatibility between Angular, TypeScript, and Node.

In conclusion, identifying the TypeScript version in an Angular project is important when developing large-scale applications. You can check the version of TypeScript using the package.json file, Angular CLI, or TypeScript compiler. Once you have identified the TypeScript version, you can use it to ensure that your code is compatible with the specific version of TypeScript being used in your Angular project.


AngularJS Hosting Europe - HostForLIFE :: How To Prevent XSS(Cross Site Scripting) Attacks In Angular?

clock March 9, 2023 08:08 by author Peter

Hello, here we are going to discuss how to prevent XSS attacks or Cross-Site Scripting in angular applications.

When we make any web application, then security is an important part of an application where we need to secure our web application from various attacks, one of which is an XSS attack or cross-site scripting attack.

What is XSS(Cross-Site Scripting)
XSS is a kind of injection attack. Let’s consider you have an application, and that application contains the contact form or registration form, where the user enters either their queries or their information in the input field or text Area field.

For example, what happens if a hacker gives a malicious script injected in the contact form text are Like the below script and clicks on submit
<script>alert(“XSS Attack");"</script>

Now, in this case, it will open a popup, and behind the screen, the website will send the request to the hacker’s computer with the current system cookies information or your crucial information will be in the attacker's system, even if you will not even realize it that XSS attack is happening.

Generally, an XSS attack happens on DOM elements (Object data model), like input, and text area Fields, so to prevent our website from an XSS attack we need to check whether the request contains the script or not, and if it contains then we need to handle such kind of condition.

How to prevent XSS attacks in Angular?

When we create an angular application then there is also a chance to happen an XSS attack, so let’s understand it with an example.

XSS Escaping/bypass security in Angular
To prevent cross-site scripting (XSS) attacks in the angular application, we can use the built-in angular cross-site scripting (XSS) protection.

This is enabled automatically by the angular CLI.

Now let’s create an angular application and write the below code in app.component.ts
import { Component } from '@angular/core';
import { Router } from '@angular/router';
import { Angular15Service } from './angular15.service';

@Component({
    selector: 'app-root',
    templateUrl: './app.component.html',
    styleUrls: ['./app.component.css']
})
export class AppComponent {
    title = 'angular 15 App';
    username = '';
    constructor() {}
    ngOnInit() {}
}


And write the below code in app.component.html
<p >{{title}}</p>
<label for="username">Name: </label>
<textarea id="username" [(ngModel)]="username" placeholder="Name"> </textarea>
<p>{{ username }}</p>

Here we can see, we are using Two-way data binding.

So when we give any value to the text area field, the same value we are printing in the paragraph using “interpolation”

When we are running the above code and give any value in TextArea then interpolation will not able to take input as HTML and display the full input as the plain text on your web application page, this mechanism is generally called “contextual escaping” like below
<script>alert(“XSS Attack");"</script>

Angular Input Sanitization
Now let’s take another example, not instead of taking username value instead of using interpolation, here we use innerHTML.

So now let’s change the HTML code like below
<p >{{title}}</p>
<label for="username">Name: </label>
<textarea id="username" [(ngModel)]="username" placeholder="Name"> </textarea>
<p [innerHTML]="username"></p>

Now let’s run your application and see the output, unlike the interpolation, [innerHTML] also shows the text Area input value.

If you give input values as <script> format in the text area like below
<script>alert(“XSS Attack");"</script>

You will see [InnerHTML] automatically understand the <script> tag as the unsafe tag and remove it and don’t print it like below, this is called “sanitization” in Angular.

After entering the above script, you see the inspect element, which shows

So in angular unlike [innerHTML], angular has another tag like [style], [href] as well which recognizes the <script> tag.

Sanitization function in Angular

Another way to prevent the XSS attack, we can use an angular build-in function called sanitization function like the bypassSecurityTrustHtml() function.

So to sanitize the <script> tag to the page, below is the example

Below is the app.component.html
<p >{{title}}</p>
<p [innerHTML]="username"></p>

Below is the app.component.ts code
import { Component } from '@angular/core';
import { Router } from '@angular/router';
import { Angular15Service } from './angular15.service';

@Component({
    selector: 'app-root',
    templateUrl: './app.component.html',
    styleUrls: ['./app.component.css']
})
export class AppComponent {
    title = 'angular 15 App';
    username = '';
    constructor() {}
    ngOnInit() {}
}


Here we have a taken username object type of SafeHtml, it is a marker interface that gives security to the web applications from untrusted script execution on the browser.

DomSanitizer is used to sanitize the DOM element.

When you run the above code, it contains <script> tag hence we can see on the browser it doesn’t print it on the browser.

So if you are working with the angular application, it automatically secures the angular application from an XSS attack.


About HostForLIFE

HostForLIFE is European Windows Hosting Provider which focuses on Windows Platform only. We deliver on-demand hosting solutions including Shared hosting, Reseller Hosting, Cloud Hosting, Dedicated Servers, and IT as a Service for companies of all sizes.

We have offered the latest Windows 2019 Hosting, ASP.NET 5 Hosting, ASP.NET MVC 6 Hosting and SQL 2019 Hosting.


Tag cloud

Sign in