
August 25, 2023 08:22 by
 Peter
Peterng-container
By enabling you to apply Angular directives without including additional items in the DOM (Document Object Model), the ng-container functions as a kind of transparent container. It is frequently employed when you wish to structure or conditionally include elements in your template.

As an illustration, consider creating a product page. If the product is in stock, you want to display the product details; otherwise, you want to display a notification stating the product is unavailable.
<ng-container *ngIf="productAvailable; else outOfStockTemplate">
<div>Product Name: {{ productName }}</div>
<div>Price: {{ productPrice }}</div>
</ng-container>
<ng-template #outOfStockTemplate>
<div>This product is currently out of stock.</div>
</ng-template>
ng-template
The ng-template is like a template blueprint that doesn't get displayed immediately. It's used to define sections of your template that can be reused and conditionally rendered using structural directives.
Example: Let's say you're creating a list of blog posts. You want to show different styles for featured posts and regular posts.
<ul>
<ng-container *ngFor="let post of posts">
<ng-container *ngTemplateOutlet="post.featured ? featuredTemplate : regularTemplate; context: { post: post }"></ng-container>
</ng-container>
</ul>
<ng-template #featuredTemplate let-post>
<li class="featured">{{ post.title }}</li>
</ng-template>
<ng-template #regularTemplate let-post>
<li>{{ post.title }}</li>
</ng-template>
ng-content
The ng-content is used to allow external content to be included within the template of your component. It's ideal for making more adaptable components that can be used in a variety of situations. Consider designing a card component that can display a variety of content.
<div class="card">
<div class="card-header">
<ng-content select=".card-title"></ng-content>
</div>
<div class="card-content">
<ng-content></ng-content>
</div>
<div class="card-footer">
<ng-content select=".card-actions"></ng-content>
</div>
</div>
Now, when you use this component, you can provide custom content for each section:
<app-card>
<div class="card-title">Card Title</div>
<p>This is the content of the card.</p>
<div class="card-actions">
<button>Edit</button>
<button>Delete</button>
</div>
</app-card>
By combining these concepts, you can create components that are more dynamic and adaptable. ng-container, ng-template, and ng-content help you organize and structure your templates in a way that makes your code more readable and maintainable.
August 21, 2023 08:54 by
PeterRxJS (Reactive Extensions for JavaScript) is a sophisticated tool used in Angular applications for handling asynchronous and event-based programming with observables. RxJS provides a diverse set of operators for manipulating, transforming, combining, and managing observables in a flexible and functional manner. These operators facilitate reactively working with data streams and asynchronous processes.
Here's a rundown of some of the most common RxJS operators and how they can be utilized in Angular:
map
The map operator is used to transform observable values into new ones. This is frequently used to do data transformations.
import { map } from 'rxjs/operators';
observable.pipe(
map(data => data * 2)
).subscribe(result => console.log(result));
filter
The filter operator is used to remove values from an observable depending on a criterion.
import { filter } from 'rxjs/operators';
observable.pipe(
filter(data => data > 5)
).subscribe(result => console.log(result));
mergeMap (flatMap)
The mergeMap operator is used to merge multiple observables into a single observable by applying a function to each emitted value and flattening the resulting observables.
import { mergeMap } from 'rxjs/operators';
observable.pipe(
mergeMap(data => anotherObservable(data))
).subscribe(result => console.log(result));
switchMap
The switchMap the operator is similar to mergeMap, but it switches to a new inner observable whenever a new value is emitted from the source observable, canceling the previous inner observable.
import { switchMap } from 'rxjs/operators';
observable.pipe(
switchMap(data => anotherObservable(data))
).subscribe(result => console.log(result));
debounceTime
The debounceTime operator delays emitted values for a specified amount of time and only emits the last value within that time frame.
import { debounceTime } from 'rxjs/operators';
inputObservable.pipe(
debounceTime(300)
).subscribe(value => console.log(value));
combineLatest
The combineLatest operator combines the latest values from multiple observables whenever any of the observables emit a new value.
import { combineLatest } from 'rxjs/operators';
combineLatest(observable1, observable2).subscribe(([value1, value2]) => {
console.log(value1, value2);
});
catchError
The catchError operator is used to handle errors emitted by an observable by providing an alternative observable or value.
import { catchError } from 'rxjs/operators';
import { of } from 'rxjs';
observable.pipe(
catchError(error => of('An error occurred: ' + error))
).subscribe(result => console.log(result));
These are just a few examples of the many RxJS operators available. Using RxJS operators effectively can help you manage complex asynchronous workflows, handle data transformations, and create more responsive and reactive Angular applications.
Happy Learning :)
August 8, 2023 08:27 by
PeterIn this article, we will go over the fundamentals of observable and subject. The distinction between them is further demonstrated through practical examples and the various types of subjects.
What exactly is Angular?
Angular is a popular open-source JavaScript web application framework. It was created by Google and is presently maintained by the Google Angular Team. Angular enables developers to create dynamic, single-page applications (SPAs) and offers a disciplined way to developing complicated online apps.
Visible in Angular
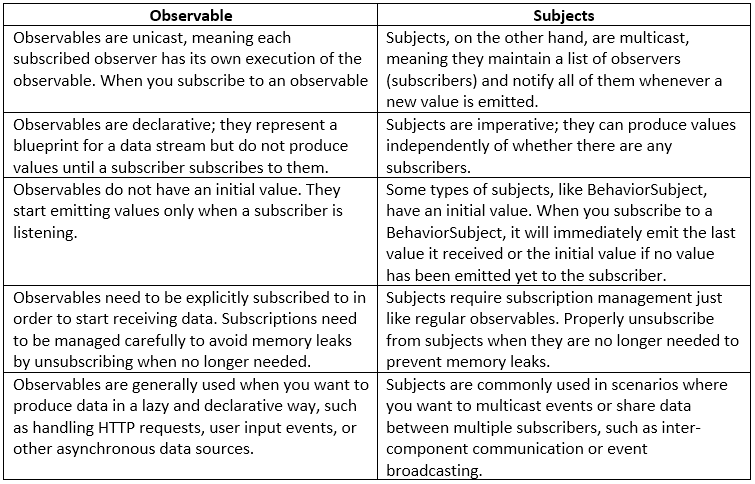
- Observables are a component of the Reactive Extensions for JavaScript (RxJS) library in Angular.
- Observables allow you to send messages between components of your program.
- Observables are a useful tool in reactive programming that is widely used to handle asynchronous actions and data streams.
- Observables allow you to subscribe to and get notifications when new data or events are emitted, allowing you to react in real-time to changes.
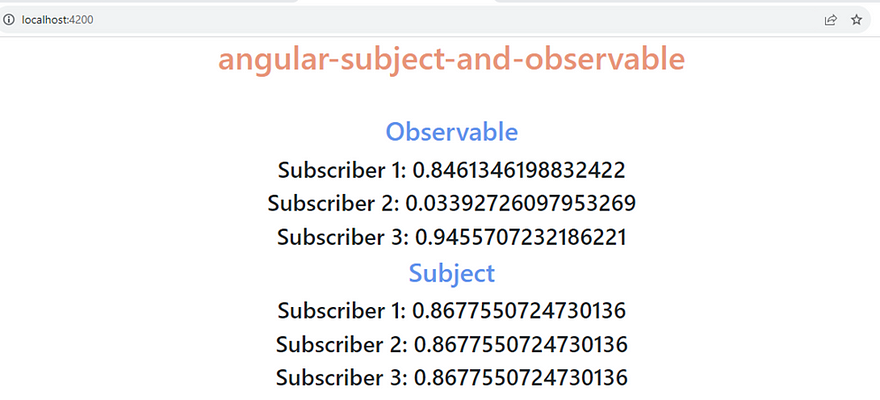
//------------------Observables are unicast-----------------
//observable
let observable = new Observable<number>(ele =>
ele.next(Math.random()))
//first subscriber
observable.subscribe(result => {
this.first_subscriber_observable = result;
console.log(result)
})
//second subscriber
observable.subscribe(result => {
this.second_subscriber_observable = result;
console.log(result)
})
//third subscriber
observable.subscribe(result => {
this.thrid_subscriber_observable = result;
console.log(result)
})
//--------------------------------------------------------
//------------------Subjects are multicast-----------------
//subject
let subject = new Subject<number>()
//first subscriber
subject.subscribe(result => {
this.first_subscriber_subject = result;
console.log(result)
})
//second subscriber
subject.subscribe(result => {
this.second_subscriber_subject = result;
console.log(result)
})
//third subscriber
subject.subscribe(result => {
this.third_subscriber_subject = result;
console.log(result)
})
subject.next(Math.random())
//--------------------------------------------------------
2. BehaviorSubject
The behavior subject is another type of subject in RxJS.
It has an initial value and will immediately emit the initial value to any subscriber as soon as they subscribe, even if no values have been emitted yet using the next() method.
After the initial value is emitted, it behaves like a regular Subject and notifies subscribers about new values emitted using next().
This is useful when you want to provide the last known value to new subscribers, such as the current state of an application or the latest data fetched from an API.
//----------Behavior Subject has default or last emitted value---------------
var behaviorSubject = new BehaviorSubject<number>(123)
behaviorSubject.subscribe(ele => {
this.first_subscriber_behaviorSubject = ele
console.log(`first subscriber ${ele}`)
})
behaviorSubject.next(456)
behaviorSubject.subscribe(ele => {
this.second_subscriber_behaviorSubject = ele
console.log(`second subscriber ${ele}`)
})
//--------------------------------------------------------------------------

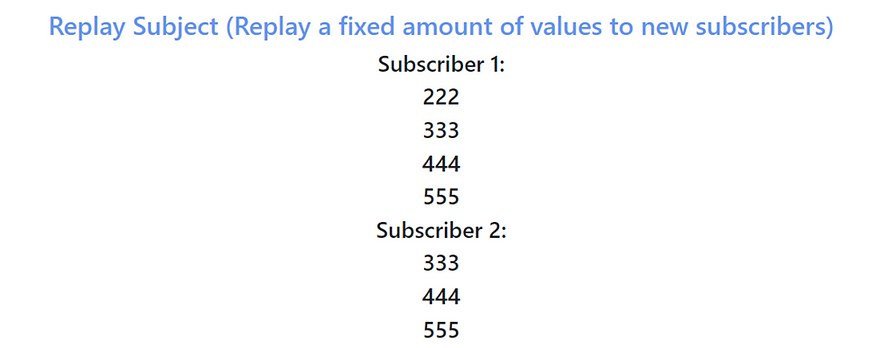
3. ReplaySubject
The ReplaySubject is a subject that can buffer and replay a specific number of values to new subscribers.
When you create a ReplaySubject, you can specify the buffer size, which determines how many previous values should be replayed to new subscribers.
This is useful when you want to provide a history of values to new subscribers or when you need to cache values for later use.
//---------------Replay subject buffers old values not default one-----------
const replaySuject = new ReplaySubject(2) //If we we want to show only last 2 buffered value otherwise it will show all
replaySuject.next(111)
replaySuject.next(222)
replaySuject.next(333)
replaySuject.subscribe(e => {
console.log(`First Subscriber ${e}`)
this.first_subscriber_replaySubject.push(e);
})
//new values show to existing subsriber
replaySuject.next(444)
replaySuject.subscribe(e => {
console.log(`Second Subscriber ${e}`)
this.second_subscriber_replaySubject.push(e);
})
replaySuject.next(555)
//--------------------------------------------------------------------------
4. AsyncSubject
- The AsyncSubject is a subject that only emits the last value when it completes.
- It will not emit any values until the subject’s complete() method is called. When completed, it will emit the last value (if any) to subscribers.
- This is useful when you need to wait for an operation to complete before emitting a final value, such as waiting for an HTTP request to finish and emitting the response as a single value.
//---------------Async subject sends the latest value to subscribers when it's completed-----------
const asyncSubject = new AsyncSubject<number>();
asyncSubject.subscribe(e =>
{
console.log(`First Subscriber: ${e}`)
this.first_subscriber_asyncSubject=e;
});
asyncSubject.next(111);
asyncSubject.next(222);
asyncSubject.next(333);
asyncSubject.next(444);
asyncSubject.subscribe(e => {
console.log(`Second Subscriber: ${e}`)
this.second_subscriber_asyncSubject=e;
});
asyncSubject.next(555);
asyncSubject.complete();
//--------------------------------------------------------------------------

August 2, 2023 10:51 by
PeterIn this article, learn about ng-container, ng-template, and ng-content in angular
In the context of Angular, ng-container, ng-template, and ng-content are three different Angular directives that serve different purposes. Let's explore each one:
ng-container
The ng-container directive is a non-rendered element that is used to group and manage structural directives, such as *ngIf, *ngFor, etc. It acts as a placeholder or wrapper for these structural directives when they need to be applied to multiple elements or when you want to use them without adding an additional DOM element. The ng-container itself doesn't create any extra elements in the final DOM, making it a useful tool for organizing and applying structural directives without affecting the layout.
<ng-container *ngIf="condition">
<!-- Elements to show when the condition is true -->
</ng-container>
ng-template
The ng-template directive defines an Angular template that can be used to encapsulate HTML markup and Angular code that won't be rendered immediately. It acts as a template placeholder and can be referenced using the *ngTemplateOutlet directive or by using the <ng-container> element with the *ngTemplateOutlet attribute. ng-template is particularly useful when you want to reuse a piece of HTML code with its associated logic in multiple places.
<ng-template #myTemplate>
<!-- Template content here -->
</ng-template>
<ng-container *ngTemplateOutlet="myTemplate"></ng-container>
ng-content
The ng-content directive is used to create content projection slots within a component. It allows you to pass content from the parent component to the child component's template. When you define <ng-content></ng-content> in the child component's template, it acts as a placeholder for the content that will be projected into it from the parent component.
Example. Parent Component Template.
<app-child>
<!-- Content to project into the app-child component -->
</app-child>
As per the above snippet, the content is within the <app-child> tag.
Happy learning :)
July 3, 2023 08:45 by
PeterReactive Extensions for JavaScript (RxJS) have become the backbone of modern Angular applications, enabling developers to handle complex asynchronous operations with elegance and ease. While many developers are familiar with basic RxJS operators, there are advanced patterns that can take your Angular development skills to the next level. In this article, we will explore some lesser-known yet powerful RxJS patterns that can significantly improve your developer experience.
1. Canceling Previous Requests with SwitchMap
One common scenario is handling user input, such as search queries, that trigger API calls. To prevent outdated responses and save bandwidth, we can use the switchMap operator. It automatically cancels previous requests when a new request is made.
Let's take a look at an example.
import { fromEvent } from 'rxjs';
import { switchMap } from 'rxjs/operators';
// Get the search input element
const searchInput = document.getElementById('search-input');
// Create an observable from input events
const searchObservable = fromEvent(searchInput, 'input').pipe(
map((event: any) => event.target.value),
switchMap(searchTerm => makeApiCall(searchTerm))
);
searchObservable.subscribe(response => {
// Handle the API response
});
2. Throttling API Calls with DebounceTime
In scenarios where user input or events trigger API calls, we might want to throttle the rate of API requests to avoid overloading the server. The debounceTime operator can help us achieve this by delaying the emission of values from an Observable. Let's see it in action.
import { fromEvent } from 'rxjs';
import { debounceTime, distinctUntilChanged } from 'rxjs/operators';
// Get the search input element
const searchInput = document.getElementById('search-input');
// Create an observable from input events
const searchObservable = fromEvent(searchInput, 'input').pipe(
map((event: any) => event.target.value),
debounceTime(300),
distinctUntilChanged(),
switchMap(searchTerm => makeApiCall(searchTerm))
);
searchObservable.subscribe(response => {
// Handle the API response
});
3. Sharing Cached Results with ShareReplay
Sometimes, we want multiple subscribers to receive the same cached result from an Observable. The shareReplay operator enables us to achieve this by caching and sharing emitted values. This is useful in scenarios where we want to avoid redundant API calls. Let's take a look.
import { interval } from 'rxjs';
import { take, shareReplay } from 'rxjs/operators';
// Create an interval observable that emits values every second
const sourceObservable = interval(1000).pipe(
take(5),
shareReplay(1) // Cache and share the emitted values
);
// Subscriber 1
sourceObservable.subscribe(value => {
console.log(`Subscriber 1: ${value}`);
});
// Subscriber 2
setTimeout(() => {
sourceObservable.subscribe(value => {
console.log(`Subscriber 2: ${value}`);
});
}, 3000);
4. Sequential Requests with ExhaustMap
In certain scenarios, we may need to perform a series of actions that depend on the completion of previous actions. The exhaustMap operator allows us to achieve this by ignoring new source values until the current inner Observable completes. Let's see it in action.
import { fromEvent } from 'rxjs';
import { exhaustMap } from 'rxjs/operators';
// Get the button element
const button = document.getElementById('button');
// Create an observable from button click events
const clickObservable = fromEvent(button, 'click').pipe(
exhaustMap(() => performAction())
);
clickObservable.subscribe(() => {
// Handle the action completion
});
5. Error Handling and Retries with RetryWhen
Handling errors and implementing retry logic is essential for robust applications. The `retryWhen` operator allows us to handle errors and retry the Observable based on specific conditions. Let's take a look.
import { throwError, timer } from 'rxjs';
import { mergeMap, retryWhen, delayWhen } from 'rxjs/operators';
// Create an observable that throws an error
const errorObservable = throwError('Something went wrong!');
// Retry the observable after a delay
errorObservable.pipe(
retryWhen(errors =>
errors.pipe(
mergeMap((error, index) => {
if (index === 2) {
return throwError('Max retries reached'); // Throw error after 3 attempts
}
return timer(2000); // Retry after a 2-second delay
})
)
)
).subscribe({
next: () => console.log('Success!'),
error: (error) => console.log(`Error: ${error}`)
});
By harnessing the power of advanced RxJS patterns in Angular, we can greatly enhance our developer experience. The switchMap, debounceTime, shareReplay, exhaustMap, retryWhen, and other operators provide us with powerful tools to handle complex asynchronous scenarios, improve performance, and build robust applications.
June 26, 2023 08:27 by
PeterInformation exchange between various application components is essential, and Angular is not an exception. Angular provides a number of built-in methods to facilitate this prevalent practise. Nonetheless, there may be instances in which these default approaches are insufficient, necessitating the implementation of more creative solutions.
In this session, we will investigate a few of the most common methods for component communication.
The resources I used to create this tutorial are listed below.
- Visual Studio Code
- Node 18.14.0
- Angular 15
Input and Output Properties (Parent-Child Communication)'s source code can be downloaded from GitHub.
- You can transfer data between parent and offspring components using input properties.
- Define an input property in the secondary component using @Input(), and then bind the property in the parent component.
- Employ output properties with events to communicate from the child component to the parent component.
- Define an output property in the child component using @Output() and emit events with EventEmitter.
Let's examine the sample code below, which will give you an overview of parent-to-child and child-to-parent communications.
Parent Component
- Input and Output Properties (Parent-Child Communication)
- You can use input properties to pass data from parent to child components.
- Define an input property in the child component using the @Input() decorator, and then bind the property in the parent component.
- Use output properties with events to communicate from the child component back to the parent component.
- Define an output property in the child component using the @Output() decorator and emit events using EventEmitter.
Let us look at the sample code below, which will give you an overview of parent-to-child and child-to-parent communications.
Parent Component
import { Component } from '@angular/core';
@Component({
selector: 'app-parent',
template: `
<h1>Parent Component</h1>
<input [(ngModel)]="parentMessage"/>
<p>{{ childMessage }}</p>
<app-child [message]="parentMessage" (notify)="onNotify($event)"></app-child>`
})
export class IOParentComponent {
parentMessage = 'Message from parent';
childMessage ="";
onNotify(message: string) {
this.childMessage =message;
}
}
Child Component
import { Component, Input, Output, EventEmitter } from '@angular/core';
@Component({
selector: 'app-child',
template: `
<h2>Child Component</h2>
<p>{{ message }}</p>
<input [(ngModel)]="childMessage"/>
<button (click)="notifyParent()">Notify Parent</button>
`
})
export class IOChildComponent {
@Input() message: string ='';
@Output() notify = new EventEmitter<string>();
childMessage: string ='Message from child';
notifyParent() {
this.notify.emit(this.childMessage);
}
}
Services (Cross-Component Communication) using RxJS Observables and Subjects
- Create a service that can be injected into the components needing to communicate.
- The service acts as a shared source of data and functionality.
- Components can subscribe to data streams or invoke methods provided by the service to communicate with each other.
Let us take a look at the example
Shared Service
import { Injectable } from '@angular/core';
import { Subject } from 'rxjs';
@Injectable()
export class DataService {
private dataSubject = new Subject<string>();
setData(data: string) {
this.dataSubject.next(data);
}
getData() {
return this.dataSubject.asObservable();
}
}
Component 1
import { Component } from '@angular/core';
import { DataService } from './dataservice.service';
@Component({
selector: 'app-scomponent1',
template: ` <h1>Component 1</h1>
<input type="text" [(ngModel)]="message">
<button (click)="sendMessage()">Send Message</button>
<app-component2>/</app-component2>`
})
export class SComponentOne {
message: string="";
constructor(private dataService: DataService) { }
sendMessage() {
this.dataService.setData(this.message);
}
}
Component 2
import { Component } from '@angular/core';
import { DataService } from './dataservice.service';
@Component({
selector: 'app-component2',
template: `
<h1>Component 2</h1>
<p>{{ receivedMessage }}</p>
`
})
export class SComponentTwo {
receivedMessage: string ='';
constructor(private dataService: DataService) { }
ngOnInit() {
this.dataService.getData().subscribe(message => {
this.receivedMessage = message;
});
}
}
The below reference link explains the Mediator and Service Bus approaches for component communication in Angular.
Component communication in Angular for Senior devs by 'iamprovidence'
These are some of the commonly used methods for component communication in Angular. The choice of method depends on the specific requirements of your application and the relationship between the components involved.
June 19, 2023 07:45 by
PeterWhen it comes to building dynamic Angular applications, handling pluralization is a common requirement. Angular provides a powerful directive called ngPlural that simplifies the process of displaying content based on numeric values. This article will explore the ngPlural directive and learn how to leverage its capabilities effectively.
What is ngPlural?
The ngPlural directive allows us to present different content based on numeric values in our Angular templates. It provides a concise and elegant way to handle pluralization scenarios. By utilizing ngPlural, we can eliminate the need for conditional logic and achieve more maintainable code.
Implementation of ngPlural
To start using ngPlural, we need to import the CommonModule in our Angular module. This ensures that the necessary directives and components are available in our application. Once imported, we can use ngPlural in our templates.
import { CommonModule } from '@angular/common';
@NgModule({
imports: [
CommonModule
],
// ...
})
export class AppModule { }
The ngPlural directive works in conjunction with ngPluralCase. Inside the ngPlural element, we define multiple ngPluralCase elements that correspond to specific numeric values or conditions. Angular evaluates the ngPluralCase blocks and renders the appropriate content based on the value provided to ngPlural.
In our template, we can define different cases using the ngPluralCase directive. We specify the value or condition for each case, allowing Angular to determine which content to display. We can have special cases for values like "=0" or "=1", and a generic "other" case that covers all other values.
<div [ngPlural]="numItems">
<ng-template ngPluralCase="=0">No items</ng-template>
<ng-template ngPluralCase="=1">One item</ng-template>
<ng-template ngPluralCase="other">{{ numItems }} items</ng-template>
</div>
Best Practices and Tips
- Be mindful of the data type: Ensure that the variable bound to ngPlural is of a numeric type, as ngPlural evaluates values based on strict equality.
- Consider internationalization: If your application requires localization, use Angular's internationalization (i18n) features in combination with ngPlural to handle pluralization rules specific to different languages.
- Handle complex conditions: ngPlural supports more advanced conditions by allowing you to use expressions within ngPluralCase blocks. This flexibility enables you to handle custom pluralization scenarios efficiently.
A ngPlural directive is a powerful tool for handling pluralization in Angular applications. By using ngPlural and ngPluralCase, we can easily display content based on numeric values, providing a seamless user experience. With the knowledge gained from this article, you're well-equipped to implement ngPlural and enhance your Angular applications with dynamic pluralization capabilities.
June 14, 2023 10:42 by
PeterAngular v16 introduces a new way to manage state in Angular applications called Signals. Signals are a more lightweight and flexible alternative to Angular's built-in Change Detection mechanism. Signals can be used to track changes to data in your application and trigger the re-rendering of components only when necessary. This can lead to significant performance improvements in large applications.
How to Use Angular Signals?
To use Signals, you first need to import the Signal class from the @angular/core library. Once you have imported the Signal class, you can create a new signal by calling the new Signal() constructor. The new Signal() constructor takes one argument, which is the initial value of the signal.
Once you have created a new signal, you can subscribe to it by calling the subscribe() method. The subscribe() the method takes a callback function as its argument. The callback function will be called whenever the value of the signal changes.
You can also use signals to create computed values. Computed values are derived values that are updated whenever the values of their dependencies change. To create a computed value that depends on a signal, you use the | async pipe.
Example
The following example shows how to use Signals to track changes to a user's name and age.
import { Component, OnInit } from '@angular/core';
import { Signal } from '@angular/core';
@Component({
selector: 'my-app',
templateUrl: './app.component.html',
styleUrls: ['./app.component.css']
})
export class AppComponent implements OnInit {
name = new Signal('');
age = new Signal(0);
constructor() {}
ngOnInit() {
this.name.subscribe(() => {
console.log('Name changed to', this.name.value);
});
this.age.subscribe(() => {
console.log('Age changed to', this.age.value);
});
}
}
The app.component.html file contains the following code.
<h1>Angular Signals Demo</h1>
<input [(ngModel)]="name" placeholder="Enter your name">
<h2>Age</h2>
<input [(ngModel)]="age" placeholder="Enter your age">
When the user changes the value of the name or age input, the corresponding signal will be updated. The callback function that is subscribed to the signal will then be called. In this case, the callback function will log the new value of the signal to the console.
Angular Signals is a powerful new tool for managing state in Angular applications. Signals can be used to track changes to data in your application and trigger the re-rendering of components only when necessary. This can lead to significant performance improvements in large applications.
June 6, 2023 10:29 by
PeterWe have mostly faced this issue while migrating from AngularJS to a higher version; since the angular higher version does not support ng-init we can use the directive to achieve that,
Init Directive(ng-init.directive.js)
We can generate a directive using the following comment ng g d [directivename], which can declare the selector name which we are going to use in the element as an attribute.
And we going set the output() emitter for the directive, which is going to init for us.
@Directive({
selector: '[ngInit]'
})
export class NgInitDirective implements OnInit {
@Output()
ngInit: EventEmitter<any> = new EventEmitter();
ngOnInit() {
this.ngInit.emit();
}
}
App.Module.ts for a particular module
Register the custom pipe in the module where you want to use it. For example, open the app.module.ts file and import and add NgInitDirective to the import array:
@NgModule({
declarations: [....,....],
imports: [
NgInitDirective
],
providers: [ ....]
App.Component.html
In your component's template, pass the desired value, which needs to be initialized as parameters to the (ngInit):
By assigning the value which needs to initialize before rendering the particular <div> or <span>.
<div (ngInit)="AlreadyShown=false">
<div *ngFor="let row of data">
....
....
</div>
</div>
May 19, 2023 08:27 by
PeterChange detection is an integral component of Angular that ensures the user interface is in alignment with the state of the application. ChangeDetectionStrategy is Angular's default detection strategy.Standard, which examines for modifications to all components and their templates on each JavaScript event or timer tick.
Nevertheless, this default strategy may result in superfluous and expensive change detection cycles, particularly in large-scale applications. Alternative strategies, such as OnPush, enter into play at this point. The OnPush strategy optimizes change detection by focusing solely on a component's inputs and references.
Using the OnPush strategy, Angular determines if a component's input properties have changed. If the input values remain the same, Angular assumes that the component's state hasn't changed and skips its change detection entirely. This optimization can significantly improve the performance of your Angular application, especially when used strategically.
import { Component, Input, ChangeDetectionStrategy } from '@angular/core';
@Component({
selector: 'app-user',
template: `
<h2>{{ user.name }}</h2>
<p>{{ user.email }}</p>
`,
changeDetection: ChangeDetectionStrategy.OnPush
})
export class UserComponent {
@Input() user: User;
}
In this example, the UserComponent has the OnPush change detection strategy defined. By doing so, we instruct Angular to only perform change detection if the user input property changes.
When using the OnPush strategy, it is essential to ensure that the user input property is immutable. If you update the user object's properties, Angular won't detect the changes, as it relies on reference comparison.
To optimize performance further, you can utilize the ChangeDetectorRef to manually trigger change detection when necessary:
import { Component, Input, ChangeDetectionStrategy, ChangeDetectorRef } from '@angular/core';
@Component({
selector: 'app-user',
template: `
<h2>{{ user.name }}</h2>
<p>{{ user.email }}</p>
<button (click)="updateUser()">Update</button>
`,
changeDetection: ChangeDetectionStrategy.OnPush
})
export class UserComponent {
@Input() user: User;
constructor(private cdr: ChangeDetectorRef) {}
updateUser() {
// Update the user object
this.cdr.markForCheck(); // Trigger change detection
}
}
In the above example, we inject the ChangeDetectorRef and call its markForCheck() method to manually trigger change detection when the user clicks the "Update" button.
By understanding and utilizing Angular's change detection strategies, especially the OnPush strategy, you can significantly enhance the performance of your Angular applications. By minimizing unnecessary change detection cycles, your app will run more efficiently and provide a smoother user experience.
Remember to carefully analyze your application's requirements and components' state before choosing a change detection strategy. Applying the OnPush strategy to components that rarely change or have immutable input properties can lead to noticeable performance improvements.