Full Trust European Hosting

BLOG about Full Trust Hosting and Its Technology - Dedicated to European Windows Hosting Customer

AngularJS Hosting Europe - HostForLIFE :: Angular Components Communication

clock September 28, 2021 08:48 by author Peter

In the real-time project, we won't get the chance to work with only this type of component communication, we will come across scenarios where we will have to transfer the data between the components where there won't be any relationship.

The question is how to do that?
And the answer is the Subject or the BehaviourSubject.

The Subject and the BehaviourSubject
The Subject and the BehaviourSubject are the types of Observables that are provided by the RxJS library, this library is basically the one that provides us the ability to work asynchronously in the application.

This statement might not be clear at the moment but don't worry we will be discussing everything in detail.

There are a lot of features provide by this library but those are not in focus at the moment, so we are skipping that for now.

Implementation

Let's do a simple activity to understand the Subject and the BehaviourSubject.
Let's create a fresh/simple Angular application, we just need the basic structure in place that's it. I already have one created with a navigation menu which can be ignored for now.

Now I want to place two independent components on the UI and transfer data between those, so I created two simple components and placed those side by side in appComponent.html file.

The first component is having the textbox and the button and the second is having the label with default value as "nothing".

What I am looking for is to transfer the textbox value from component1 to the label of component2.

Above is the code of the appComponent.html file. I have used a few of the bootstrap classes for a better look and feel which can be ignored for now.
Now, in order to link these two components, I need to have something in common, for that, I have created a common service with the below code.

private subject = new Subject < any > ();
sendMessage(message: string) {
    this.subject.next({
        text: message
    });
}
getMessage(): Observable < any > {
    return this.subject.asObservable();
}

Let's understand this line by line.
First, I created an instance of a Subject of type any, then used that Subject as per the requirement.

The method sendMessage is used to populate the Subject.
The method getMessage is used to fetch the populated values from the Subject.

There is a method next available to the Subject which is used to populate the data in it and as we discussed earlier that it is a type of Observable so the return type of getMessage method will be Observable.

Now, how to use the Subject in the component classes?

The above screenshot shows the code written in component1 and in its code-behind file. We are just passing the value entered in the textbox to the common service to populate the Subject on the click event of the button. Notice that in this component we have the click event from where we can populate the data in the Subject.


Above is the code of component2 and its code-behind. In this, we are subscribing to the data which was populated in the Subject, and initializing its value to a class level property whose default value is "nothing", and ultimately binding it to the UI.

As Subject is a type of Observable, so whenever there is a change in its value the subscribe method gets invoked and subscribes to the latest value.

This is how a Subject or the BehaviourSubect is implemented.

Conclusion

The Subject or the BehaviourSubject is a type of Observable provided by the RxJS library.
These are used at the global level and can be subscribed from any component.

Note
The only difference between the Subject and the BehaviourSubject is that the BehaviourSubject needs some default value at the time of instance creation however it is not required for a Subject. The rest of the things are the same for both.


Windows Server 2016 SSD Hosting - HostForLIFE :: Automating Database And Folder Backups On Windows Server

clock September 20, 2021 07:34 by author Peter

It is unnecessary to state the importance of having an automated backup strategy for your servers.
Every server administrator has to go through the tiring job of setting up backups which include writing scripts, scheduling tasks, setting up alerts, and so on.
To simplify this task, I have designed a simple utility to help server administrators and database administrators automate backups. This utility can automate MSSQL, MySQL, and Folder backups.
 
This an open-source project hosted at GitHub.
 
You are welcome to suggest new features or contribute your own.
 
Part 1 - Installing the utility


  • Download the setup file from the GitHub repository (Installer\bin folder)
  • Install on the server where you need to set up backups

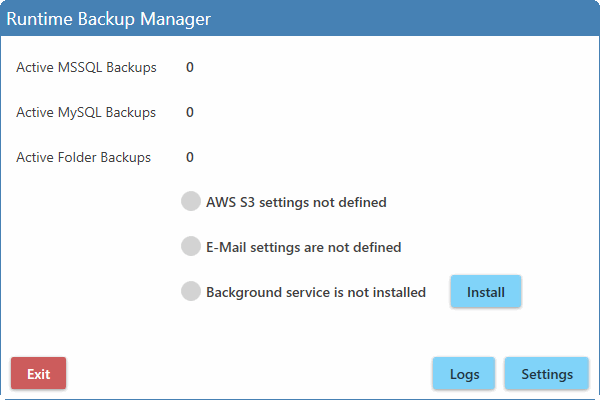
After you run the application, you will see the following screen:
Part 2 - Defining Backup Jobs
Click on the 'Settings' button on the bottom right to configure backup jobs.
On the first tab, 'MSSQL Server', click on the 'Add' button to add a new MSSQL backup.
 
Define the server details as shown below. Check 'Enable Backup' and specify the backup time
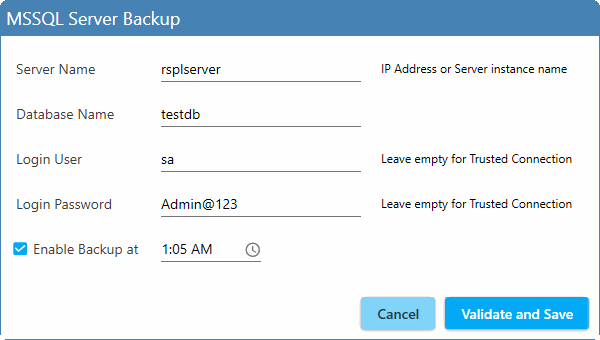

After entering the details, click on 'Validate and Save'.
The utility will try to connect with the MSSQL Server using the given credentials.
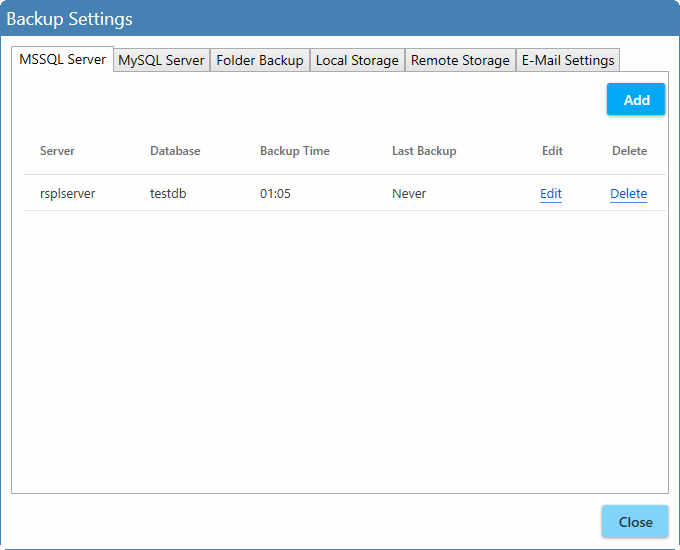
If the connection is successful, the entry will be saved and you will see it in the list as shown below,
Similarly, go to the second tab 'MySQL Server', and click on the 'Add' button to add a MySQL backup.


You can also backup specific server folders by using the 'Folder Backup' tab.
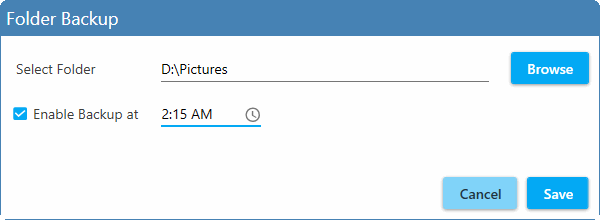

Part 3 - Specifying Local Storage Location
After defining the backup jobs, go to the 'Local Storage' tab and designate a folder on your server where you wish to store the backups.
Be careful that this folder should not be one of the backup folders, otherwise the program may behave unexpectedly.
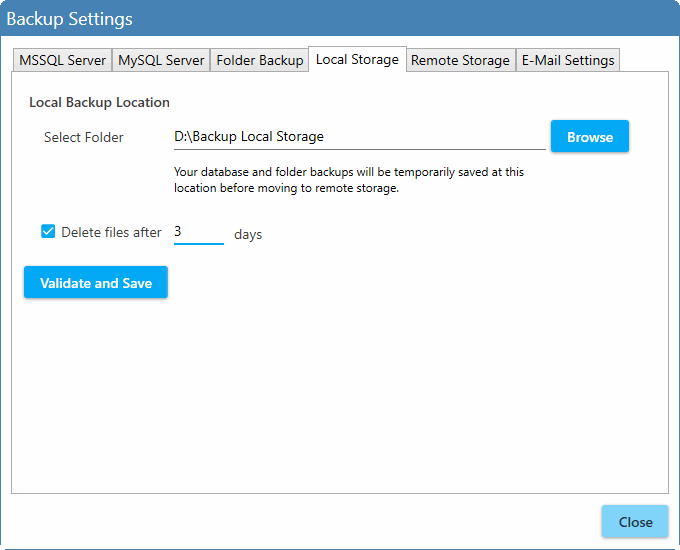
Since all backups will be stored in this folder, it is recommended to set an auto-delete policy as shown above.
 
You can set a longer duration like 15 days or so as per your convenience.
 
Part 4 - Remote Storage

After backing up files locally on the server itself, we need to move them to remote storage.
Currently, the utility supports Amazon S3 backups. Go to the 'Remote Storage' tab and define your AWS credentials to automatically move files from 'Local Storage' to 'Remote Storage'.
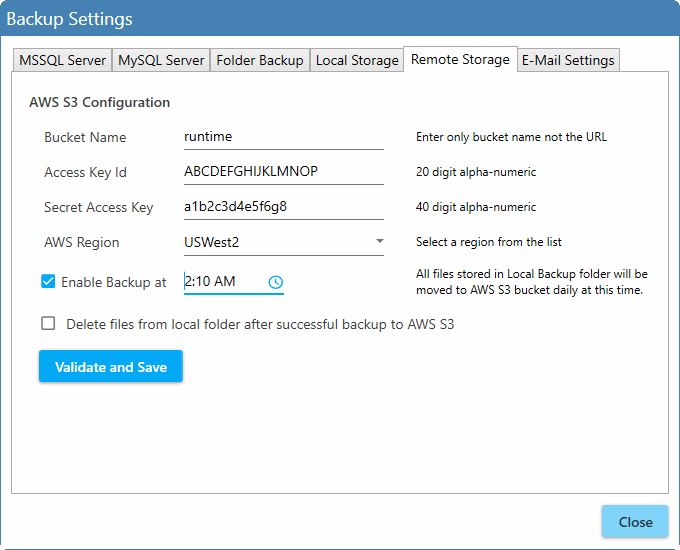
You can also select the option to auto-delete files immediately after they are uploaded to AWS S3.
Click on 'Validate and Save' to check if the credentials entered by you are valid to write to the AWS S3 bucket.
 
Part 5 - E-Mail Alerts
You can easily set e-mail alerts to notify you of successful/failed backup jobs (both local and remote backups)
Click on the 'E-Mail Settings' tab and define your SMTP credentials as shown below.
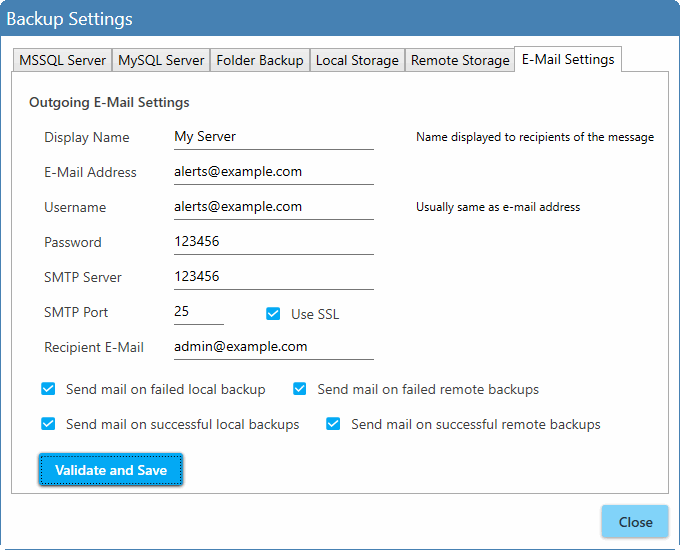

There are four types of alerts available:

  • Send mail on failed local backup
  • Send mail on failed remote backup
  • Send mail on successful local backup
  • Send mail on successful remote backup

Click on 'Validate and Save' to check your e-mail credentials. This will send a test mail to the 'Recipient E-Mail' address. Click 'Close' to go back to the main screen.

The number of backups defined will appear here. It will also show the status of AWS S3 settings and E-Mail settings. Click on the 'Install' button to install a backup service to process your jobs in the background. This may take a couple of seconds. The status will change, as shown below:
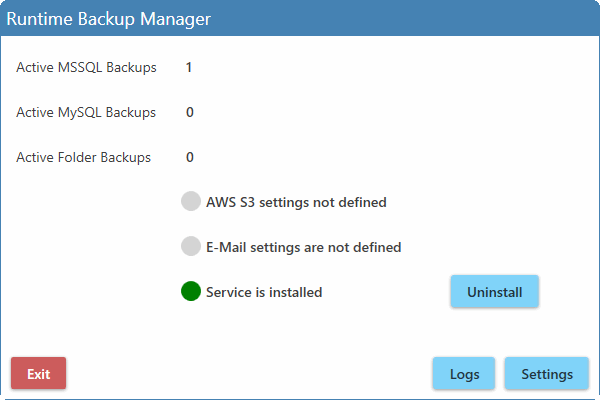

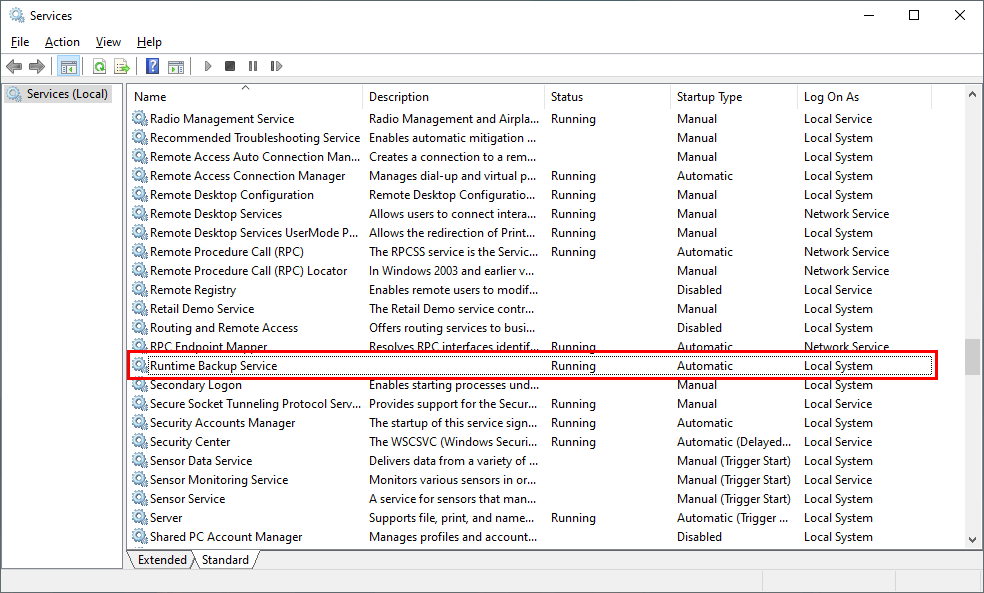
To view logs, click on the 'Logs' button. Here you can find the logs of backup jobs and results for troubleshooting purposes. After this, you can click on 'Exit' to close the User Interface. The backup service will keep running in the background and will take care of defined backup jobs. To verify the backup service status, open 'services.msc' and check for service name 'Runtime Backup Service'
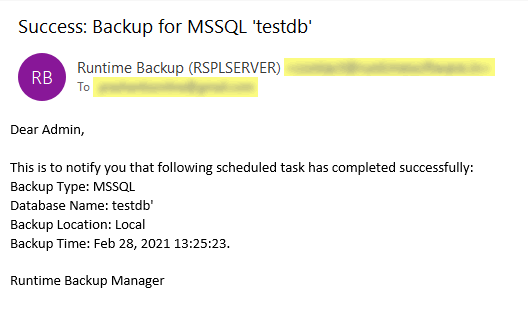
Here is a sample e-mail sent by the utility:

I hope this will help your business and save you lots of time in managing multiple backup scripts and configuring alerts. Using this unified interface, you can automate your backup jobs easily.


AngularJS Hosting Europe - HostForLIFE :: How Components Communicate With Each Other In Angular?

clock September 14, 2021 09:33 by author Peter

For better understanding, you should have a basic knowledge about what are components and how to build an application using that.

Components are the building blocks of Angular. So we need to understand how components communicate with each other.

There are three ways:
    parent to child - sharing data via input
    child to parent - sharing data via viewChild with AfterViewInit
    child to parent - sharing data via output and EventEmitter

Parent to child - sharing data via input
To share data from parent component to child component we use@input decorator.
Let’s configure the parent component and child component,
import { Component } from '@angular/core';

@Component({
  selector: 'app-parent',
  template: ` <app-child [childMessage]="message"></app-child> `,
  styleUrls: ['./parent.component.css']
})

export class ParentComponent {
  message = “I am a parent"
  constructor() { }
}

If you see the above code, <app-child> is used as a directive in the parent component. we are using property binding to bind the properties between child and parent, Binding child’s childMessage property with message property from the parent component.
import { Component, Input } from '@angular/core';

@Component({
  selector: 'app-child',
  template: ` {{ message }}  `,
  styleUrls: ['./child.component.css']
})
export class ChildComponent {
  @Input() childMessage: string;
  constructor() { }
}

To use@input decorative, we have to first import it from @angular/core . Next will decorate childMessage with @input decorative with type string. Lastly, display the message from the parent into the child template using string interpolation.

Child to parent - sharing data via ViewChild and AfterViewInit

It allows the child component to be injected into parent competent so that the parent component gets access to its child’s attributes and functions. We must note that parents will get access only after the view is initialized.

Let’s configure the parent component and child component
import { Component, ViewChild, AfterViewInit } from '@angular/core';
import { ChildComponent } from "../child/child.component";

@Component({
  selector: 'app-parent',
  template: `
    Message: {{ message }}
    <app-child></app-child>
  `,
  styleUrls: ['./parent.component.css']
})


export class ParentComponent implements AfterViewInit {

  @ViewChild(ChildComponent) child;
  constructor() { }

  Message:string;

  ngAfterViewInit() {
    this.message = this.child.message
  }
}

import { Component} from '@angular/core';

@Component({
  selector: 'app-child',
  template: `  `,
  styleUrls: ['./child.component.css']
})

export class ChildComponent {
  message = 'Hello Angular!';
  constructor() { }
}


We have to import ViewChild,AfterViewInit from angular/core, and the child component and use AfterViewInit life cycle hook so that we get access to the attributes in the child component. In the child component, we are passing the value for the message.

Child to parent - sharing data via output and EventEmitter
You use this approach when you want to share the data on button clicks or other events. The child component uses @output to send the data to the parent by creating an event with the help of an EventEmitter which is imported from @angular/core.

Let’s configure the parent component and child component
import { Component, Output, EventEmitter } from '@angular/core';

@Component({
  selector: 'app-child',
  template: `
      <button (click)="message()">Send Message</button>
 `,
  styleUrls: ['./child.component.css']
})
export class ChildComponent {
  message: string = "Hey I am child !"
  @Output() messageEvent = new EventEmitter<string>();
 constructor() { }
  sendMessage() {
    this.messageEvent.emit(this.message)
  }
}

import { Component } from '@angular/core';

@Component({
  selector: 'app-parent',
  template: `
    Message: {{message}}
    <app-child (messageEvent)="receiveMessage($event)"></app-child>
  `,
  styleUrls: ['./parent.component.css']
})
export class ParentComponent {
    constructor() { }
    Message:string;
    receiveMessage($event) {
        this.message = $event
    }
}

First, we have to import output and EventEmitter from the @anguar/core , then we are creating an event messageEvent using EventEmitter . when the button is clicked it calls the function sendMessage and calls the emit with the message. we are using event binding property with the child selector . The parent can now subscribe to this messageEvent that’s outputted by the child component, then run the receive message function whenever this event occurs.

I hope you understand how to pass data between the parent and child components.


Windows Server SSD Hosting - HostForLIFE :: Set Default Browser To Microsoft Edge Using PowerShell

clock September 13, 2021 09:51 by author Peter

This article will cover the steps to set the Microsoft EDGE as Default Browser using PowerShell if the current browser is Internet Explorer.

Need for the change

In 2021, Microsoft stops support for Internet Explorer for most Azure and Office 365 applications, forcing all the windows customers to use other Browsers or Microsoft EDGE as the Default browser to get web application support.

Microsoft also provided the documentation to set Microsoft EDGE as default using GPO by configuring DefaultAssociationsConfiguration. Here is the link to change the default browser for all users.

I thought of a solution that only changes the default browser if the current default is Internet Explorer, not changing anything for the user with Chrome or Firefox. I use simple PowerShell If condition to achieve the solution.

It's a simple three-step process.

    First, create the default associations configuration file as per the Microsoft document and store that to Network Share with access to all users.
    Second, use the PowerShell command to capture the current default browser.
    Third, use the if condition in PowerShell to match & create the registry key for DefaultAssociationsConfiguration.

I use the Microsoft document from the link to create an XML file that sets Microsoft Edge as the default application for specific protocols.
<?xml version="1.0" encoding="UTF-8"?>
<DefaultAssociations>
  <Association ApplicationName="Microsoft Edge" ProgId="MSEdgeHTM" Identifier=".html"/>
  <Association ApplicationName="Microsoft Edge" ProgId="MSEdgeHTM" Identifier=".htm"/>
  <Association ApplicationName="Microsoft Edge" ProgId="MSEdgeHTM" Identifier="http"/>
  <Association ApplicationName="Microsoft Edge" ProgId="MSEdgeHTM" Identifier="https"/>
</DefaultAssociations>

Store the XML to Network Share e.g. \\NetworkShare\EDGE\defaultapplication.XML

The next step is to capture the default browser details from the system using PowerShell.

To do that, we will check the registry value of ProgId at HKCU:\Software\Microsoft\Windows\Shell\Associations\UrlAssociations\http\UserChoice.

$Path = (Get-ItemProperty HKCU:\Software\Microsoft\Windows\Shell\Associations\UrlAssociations\http\UserChoice -Name ProgId).ProgId
$Path


The table shows the meaning of each value,

Value Data Browser
IE.HTTP Internet Explorer
ChromeHTML Chrome
MSEdgeHTM EDGE
FirefoxHTML-308046B0AF4A39CB Firefox


The next step is to create registry value DefaultAssociationsConfiguration at HKLM:\SOFTWARE\Policies\Microsoft\Windows\System and set the value data to the XML file on Network Share (\\NetworkShare\EDGE\defaultapplication.XML) using PowerShell.

$RegistryPath = 'HKLM:\SOFTWARE\Policies\Microsoft\Windows\System'
$Name = "DefaultAssociationsConfiguration"
$value = '\\NetworkShare\EDGE\defaultapplication.XML'

New-ItemProperty -Path $registryPath -Name $name -Value $value -PropertyType String -Force | Out-Null

Now merge both the PowerShell command and use the IF condition to match the value to IE.HTTP. This way, the script will only create the Registry value if the condition match else it exits the script.
$Path = (Get-ItemProperty HKCU:\Software\Microsoft\Windows\Shell\Associations\UrlAssociations\http\UserChoice -Name ProgId).ProgId
$RegistryPath = 'HKLM:\SOFTWARE\Policies\Microsoft\Windows\System'
$Name = "DefaultAssociationsConfiguration"
$value = '\\NetworkShare\EDGE\defaultapplication.XML'
$result = "IE.HTTP"
IF($Path - eq $result) {
    New - ItemProperty - Path $registryPath - Name $name - Value $value - PropertyType String - Force | Out - Null
}
ELSE {
    Exit
}


At the next reboot, the system will update Microsoft EDGE as a default browser.

This small PowerShell script will allow the System admins to change the default browser from Internet Explorer to Microsoft Edge without bothering Chrome and Firefox users.

Feel free to change the $result value in the command to use this script with any browser.

The administrator can use this script as a Logon script using GPO or Task Sequence in SCCM to push this configuration.

We have used the Basic PowerShell command to verify the default browser and change to Microsoft EDGE if the current default is Internet Explorer.


Crystal Report 2013 Hosting France - HostForLIFE :: How to pass Crystal Report Parameters Programmatically?

clock September 10, 2021 08:16 by author Peter

You can pass parameter values to a crystal report programmatically using ReportDocument.DataDefinition.ParameterFields member, which represents a collection of parameters associated with a report.

 
Before you use ParameterFields, you must import CrystalReport.Engine namespace by adding the following line to your code:
    Imports CrystalDecisions.CrystalReports.Engine

In my report, I have two parameters called ParameterName1 and ParameterName2 and I want to pass values as "Parameter1Value" and "Parameter2Value" respectively. If you have more than 2 parameters, just repeat the same steps between "START" and "END" commented lines. Also, read the comments in the code carefully.
' Create a report instance. This is the class added to your project  
' when you added the report to the project  
Dim report As MyReport = New MyReport  
   
' Fill data in DataSet here. Skip this step if your report is calling  
' a stored procedure direct  
Dim ds As DataSet = New DataSet  
' ds = GetDataFromDatabase()  
   
Dim crParameterDiscreteValue As ParameterDiscreteValue  
Dim crParameterFieldDefinitions As ParameterFieldDefinitions  
Dim crParameterFieldLocation As ParameterFieldDefinition  
Dim crParameterValues As ParameterValues  
         
'  
' Get the report parameters collection.  
'  
crParameterFieldDefinitions = report.DataDefinition.ParameterFields  
   
' Add a parameter value - START  
crParameterFieldLocation = crParameterFieldDefinitions.Item("@ParameterName1")  
crParameterValues = crParameterFieldLocation.CurrentValues  
crParameterDiscreteValue = New CrystalDecisions.Shared.ParameterDiscreteValue  
crParameterDiscreteValue.Value = "Parameter1Value"  
crParameterValues.Add(crParameterDiscreteValue)  
crParameterFieldLocation.ApplyCurrentValues(crParameterValues)  
' Add a parameter value - END  
   
crParameterFieldLocation = crParameterFieldDefinitions.Item("@ParameterName2")  
crParameterValues = crParameterFieldLocation.CurrentValues  
crParameterDiscreteValue = New CrystalDecisions.Shared.ParameterDiscreteValue  
crParameterDiscreteValue.Value = "Parameter2Value"  
crParameterValues.Add(crParameterDiscreteValue)  
crParameterFieldLocation.ApplyCurrentValues(crParameterValues)  
   
'  
' Set report's DataSource. Skip this step if your report is calling a   
' stored procedure direct in the report.  
'  
report.SetDataSource(ds)  
   
'  
' Set CrystalReportViewer.ReportSource  
'  
   
CrystalReportViewer1.ReportSource = report


AngularJS Hosting Europe - HostForLIFE :: Angular - Reactive Forms

clock September 8, 2021 08:32 by author Peter

Angular provides two approaches,
    Reactive-driven forms  
    Template-driven forms

Understanding the difference between template and reactive forms
    Template driven forms are asynchronous while, reactive forms are synchronous
    In the Reactive driven approach, most of the logic is from the components whereas, in the template-driven approach most of the logic resides in the template.

When to use template-driven approach
    When no complex validations are required in the form.
    When you migrate from angular js to angular 2+, it’s easier to consider this approach

When to use reactive driven approach
When form, becomes the key part of the app we must use a reactive-driven approach as it is predictable, reusable, testable.
How to build a reactive form in 4 steps

We need to import ReactiveFormMoudle in the root folder,
import { BrowserModule } from '@angular/platform-browser';
import { NgModule } from '@angular/core';
import { ReactiveFormsModule } from '@angular/forms';
import { AppRoutingModule } from './app-routing.module';
import { AppComponent } from './app.component';
@NgModule({
  declarations: [
    AppComponent
  ],
  imports: [
    BrowserModule,
    AppRoutingModule,
    ReactiveFormsModule
  ],
  providers: [],
  bootstrap: [AppComponent]
})
export class AppModule { }


Create form module in the component using - FormGroup, FormControl, and  FormArrays

In the reactive form, we will use FormGroup, FormControl, FormArray as they are the building block of an angular form.

First, let us try to understand what does those terminology means in simple words
     FormControl - It is a class that is used to get and set the value and validate the form control.
     FormGroup and FormArray - It represents the collections of form controls.

Now we need to go to app.compotents.ts and import FormGroup, FormControl & validator from the @angular/forms
import { FormGroup, FormControl, Validators } from '@angular/forms'

The next step is to create a FormGroup and Add FormControl inside the FormGroup.
schoolForm = new FormGroup({})

As you can see, we have an instance for form group and named it as schoolForm.

Under the schoolForm, we have three formControl instances representing the properties' first name, last name, country.
schoolForm = new FormGroup({
  firstname: new FormControl(),
  lastname: new FormControl(),
  country: new FormControl()
})


Building of HTML form
You would have noticed that we have enclosed it in a <form> and included three input felids first name, last name, country.
<form [formGroup]=" schoolForm "  (ngSubmit)="onSubmit()">
  <p>
    <label for="firstname">First Name </label>
    <input type="text" id="firstname" name="firstname" formControlName="firstname" >
  </p>
  <p>
    <label for="lastname">Last Name </label>
    <input type="text" id="lastname" name="lastname" formControlName=" lastname " >
  </p>
  <p>
    <label for="country">country </label>
    <input type="text" id=" country " name=" country " formControlName=" country " >
  </p>
  <p>
    <button type="submit">Submit</button>
  </p>
</form>


To connect the model and the template, add the following,
<form [formGroup]="schoolForm">

Next, we need to bind form fields to the FormControl models and use the formControlName directive.
<input type="text" id="firstname" name="firstname" formControlName="firstname" >

Lastly, we have to submit the form
(ngSubmit)="onSubmit()"

We have already got the submit button in our form. The ngSubmit binds itself to the click event of the submit button.

Get data in the Component class

To receive the form data in the component class. We have to create the onSubmit method in the component class.
onSubmit() {
  console.log(this. schoolForm.value);
}


We are using the,
console.log(this.contactForm.value)

To send the value of our form data to the console window.

I hope you understand about forms and how to use the reactive form in angular.


About HostForLIFE

HostForLIFE is European Windows Hosting Provider which focuses on Windows Platform only. We deliver on-demand hosting solutions including Shared hosting, Reseller Hosting, Cloud Hosting, Dedicated Servers, and IT as a Service for companies of all sizes.

We have offered the latest Windows 2019 Hosting, ASP.NET 5 Hosting, ASP.NET MVC 6 Hosting and SQL 2019 Hosting.


Tag cloud

Sign in