Full Trust European Hosting

BLOG about Full Trust Hosting and Its Technology - Dedicated to European Windows Hosting Customer

AngularJS Hosting Europe - HostForLIFE :: Which Angular Modifiers Are Important?

clock January 22, 2024 07:12 by author Peter

In Angular, key modifiers are special keys that you can use in combination with other keys to capture specific keyboard events. These modifiers help you distinguish between different key combinations and provide more flexibility in handling user input.


Key modifiers in Angular
Here are some key modifiers commonly used in Angular.
$event: This is a special variable that you can use to access the native event object in your event handler. For example.

<input (keyup)="onKeyUp($event)">

In the component:

onKeyUp(event: KeyboardEvent): void {
    // Access event properties, such as event.keyCode, event.key, etc.
}

(keyup.enter) and (keyup.esc): These are examples of key modifiers for specific keys. They allow you to handle events triggered by the Enter key or the Escape key.

<input (keyup.enter)="onEnterKey()" (keyup.esc)="onEscapeKey()">

In the component
onEnterKey(): void {
    // Handle Enter key press
}

onEscapeKey(): void {
    // Handle Escape key press
}


(keydown.space): Similar to (keyup.enter), this allows you to handle events triggered by the Space key.
<button (keydown.space)="onSpaceKey()">Click me with Space</button>

In the component
onSpaceKey(): void {
    // Handle Space key press
}

(keyup.shift): You can use this to handle events triggered when the Shift key is released.
<input (keyup.shift)="onShiftKeyUp()">

In the component
onShiftKeyUp(): void {
    // Handle Shift key release
}


(keydown.ctrl) and (keydown.meta): These modifiers allow you to handle events when the Ctrl (Control) key or the Meta key (Command key on Mac) is pressed.
<input (keydown.ctrl)="onCtrlKeyDown()" (keydown.meta)="onMetaKeyDown()">

In the component:
onCtrlKeyDown(): void {
    // Handle Ctrl key press
}

onMetaKeyDown(): void {
    // Handle Meta key press
}

With the help of these key modifiers, it is possible to record particular key-related events and carry out actions in response to user input. They make your Angular applications more interactive by enabling you to react to keyboard inputs in a more sophisticated


AngularJS Hosting Europe - HostForLIFE :: Observable Management Using NgIf and Async Pipe

clock January 18, 2024 08:01 by author Peter

When the component loads, Angular's async pipe subscribes to an Observable or Promise and returns the value that was last emitted. Every time a new value is emitted, the async pipe designates the component that needs to be examined for modifications. When the component is destroyed, it will automatically unsubscribe. Additionally, the async pipe immediately unsubscribes from the current Observable or Promise and subscribes to a new one when the reference of an expression changes.

An illustration of an observable-based async pipe


Our basic component subscribes to the currentTime$ observable via the async pipe. Every time the observable emits a new value, the value that is displayed is automatically updated.

import { Component } from '@angular/core';
import { Observable, interval } from 'rxjs';

@Component({
  selector: 'app-root',
  template: `
    <h1>Async Pipe Example</h1>
    <p>Current time: {{ currentTime$ | async }}</p>
  `
})
export class AppComponent {
  currentTime$: Observable<Date>;

  constructor() {
    this.currentTime$ = interval(1000).pipe(
      map(() => new Date())
    );
  }
}

The currentTime$ observable is created using the interval an operator from RxJS, which emits a sequential number every 1 second.
We then use the map operator to transform the emitted number into a Date object representing the current time.
In the template, we use the async pipe to directly bind the value of currentTime$ to the {{ currentTime$ | async }} expression, which will automatically handle subscribing and unsubscribing from the observable.
This way, the template will always display the current time, updating every second as new values are emitted by the observable.

When should I use Async Pipe with ngIf?
When you wish to conditionally show content based on the outcome of an asynchronous operation or the existence of data from an asynchronous source, you can use the ngIf directive and async pipe.

Here are some typical situations in which ngIf and async pipe might be used.

  • Data Loading: ngIf with async pipe can be used to display a loading message or spinner until the data is loaded and ready to be displayed when retrieving data from an API or carrying out an asynchronous action.
  • Authentication and Authorization: ngIf with async pipe can conditionally show or hide specific UI components based on the user's permissions and access privileges when implementing authentication and authorization in an application.
  • Conditional Rendering: ngIf with async pipe is used to conditionally render different sections of a template based on the status of the asynchronous operation if you have conditional logic in your template that depends on the outcome of an asynchronous operation.

Example of ngIf and Async Pipe

Here, we have an AppComponent that declares an Observables called data$. The data$ observable simulates an asynchronous data retrieval using the of operator and delay operator from RxJS.
import { Component } from '@angular/core';
import { Observable, of } from 'rxjs';
import { delay } from 'rxjs/operators';
>
@Component({
  selector: 'app-root',
  template: `
    <div *ngIf="data$ | async as data; else loading">
      <h1>Data is loaded:</h1>
      <p>{{ data }}</p>
    </div>

    <ng-template #loading>
      <h1>Loading data...</h1>
    </ng-template>
  `,
})
export class AppComponent {
  data$: Observable<string>;

  constructor() {
    // Simulating an asynchronous data retrieval
    this.data$ = of('Hello, world!').pipe(delay(2000));
  }
}


TypeScript

  • We conditionally display content in the template based on the completion of the data$ observable by using the ngIf directive.
  • Before assigning the value to the data variable using the as syntax, the data$ observable must be subscribed to and retrieved using the async pipe.
  • The loaded data is shown inside the ngIf block, and a loading message is shown inside the ng-template with the #loading reference.
  • The template will show the value that is emitted by the data$ observable. The loading notice will appear until then.
  • The async pipe handles subscription and automatically updates the UI when the observable emits new values or when it completes.

By using ngIfwith asyncpipe, you can simplify your code and let Angular handle the management of subscriptions and automated changes of the view when the asynchronous operation finishes or emits new values. In general, you can write more succinct and clear code for managing asynchronous operations and conditional rendering in Angular applications by utilizing ngIf with async pipe.


AngularJS Hosting Europe - HostForLIFE :: What Does an Angular Protractor Mean?

clock January 5, 2024 06:44 by author Peter

Angular Protractor
An end-to-end (E2E) testing framework created especially for Angular applications is called Protractor. It is a popular open-source tool for automating Angular application testing that was created by the Google Angular team. Here are a few additional Protractor details:


Built on WebDriverJS
WebDriverJS, the JavaScript binding for Selenium WebDriver, is the foundation upon which Protractor is constructed. A popular framework for browser automation, Selenium WebDriver enables programmers to create scripts that automate browser interactions.

Features Specific to Angles
With capabilities that make testing Angular-specific functionality easier, Protractor is designed with Angular apps in mind. It is aware of the inner workings of Angular apps, including how asynchronous activities are handled and the Angular digest cycle.

Automated Holding
The automated waiting mechanism of Protractor is one of its primary characteristics. As asynchronous operations are common in Angular apps, Protractor automatically waits for Angular to stabilize before carrying out commands. This aids in managing situations where page elements are still loading or updating.

Declarative Grammar
Protractor tests are created in a behavior-driven development (BDD) methodology, usually with a declarative syntax. For developers who are familiar with popular testing frameworks like Jasmine or Mocha, Protractor can be utilized with them.

Support for Page Object Models
The Page Object Model (POM) is a design pattern that Protractor recommends using to manage and organize the structure of your automation code. This aids in developing a test codebase that is more modular and maintainable.

Testing Across Browsers
Cross-browser testing is supported by Protractor, enabling you to run your tests across various browsers, including Chrome, Firefox, and Safari. This makes it more likely that your Angular application will function properly in different browsers.

Combining Testing Frameworks with Integration
Popular testing frameworks such as Mocha and Jasmine are easily integrated with Protractor. This makes it possible for developers to take advantage of the testing tools offered by these frameworks, such as test reporting, assertions, and descriptive test names.

Configuration File: Protractor uses a configuration file, usually called protractor.conf.js, in which you can set up the browser's configurations, the testing framework, and other parameters. This facilitates test suite configuration and management.

This is a basic illustration of a file used to configure Protractor:

exports.config = {
  framework: 'jasmine',
  capabilities: {
    browserName: 'chrome'
  },
  specs: ['spec.js'],
  baseUrl: 'http://localhost:4200'
};

An effective solution for automating Angular application end-to-end testing is Protractor. It is a great option for large-scale Angular application testing because of its features and design, which are well suited to the subtleties of Angular development.


Node.js Hosting - HostForLIFE :: Using Express to Create a Node.js API with Swagger Support

clock January 2, 2024 06:50 by author Peter

Overview of Swagger in Node.js
An effective tool for planning, creating, and documenting APIs is Swagger. It gives developers a consistent vocabulary to define RESTful APIs, which facilitates their comprehension, consumption, and interaction with API endpoints. Swagger can be very helpful when producing documentation for Node.js applications that is both machine- and human-readable.

Essential Elements of Swagger
Swagger Specification/OpenAPI: A standard for characterizing RESTful APIs, the Swagger Specification is now the OpenAPI Specification. It establishes a format for machine-readable documentation of the architecture and operation of APIs.

The specification describes parameters, authentication techniques, request/response formats, API endpoints, and more in JSON or YAML.

A user-friendly interface for visualizing and interacting with the Swagger/OpenAPI documentation is called Swagger UI. It enables developers to test endpoints, investigate the API, and comprehend the typical formats for requests and responses.

The Swagger Specification is used to automatically construct the User Interface (UI), which offers an interactive method of interacting with the API.

Swagger Codegen: Based on the Swagger Specification, this tool creates client libraries, server stubs, and API documentation. This can be especially useful for preserving consistency between an API's client and server components.

Integrating Swagger in a Node.js API

To integrate Swagger into a Node.js API, you can follow these step-by-step:
Step 1. Install Necessary Packages

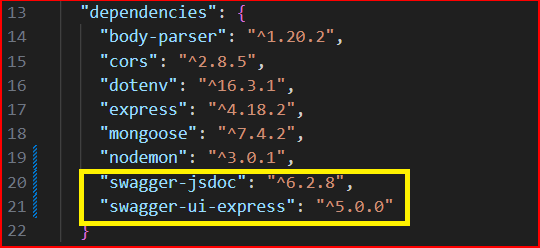
Use npm to install the two required packages, such as express, swagger-jsdoc, and swagger-ui-express.

1. Swagger-jsdoc

npm install swagger-jsdoc --save

2. Swagger-ui-express
npm install swagger-ui-express --save

Go to the project folder and open the terminal to install the required packages.

You can verify whether the package.json package was added or not after installation.
Step 2. Create Swagger Configuration
Write a Swagger configuration file that describes the API using JSDoc comments in the code. This configuration includes information such as API title, version, paths, parameters, and responses.

index.js

const options = {
  definition: {
    openapi: '3.0.0',
    info: {
      title: 'Student Management System',
      version: '1.0.0',
      description: 'Student Management System covered Create, Read, Update, and Delete operations using a Node.js API',
    },
    servers:[
      {url:'http://localhost:5000/api'}, //you can change you server url
    ],
  },

  apis: ['./routes/*.js'], //you can change you swagger path
};

Step 3: Use Swagger Middleware Integration
For your Express.js application, you can use middleware packages such as swagger-jsdoc and swagger-ui-express to integrate Swagger. This middleware serves the Swagger UI and dynamically creates the Swagger Specification.

index.js
1. Import the middleware packages that are needed.

const swaggerUi = require('swagger-ui-express');
const swaggerJsdoc = require('swagger-jsdoc');

JavaScript

2 . Initialize Swagger-jsdoc.

const specs = swaggerJsdoc(options);

JavaScript

3. Serve Swagger documentation using Swagger UI.

app.use('/api-docs', swaggerUi.serve, swaggerUi.setup(specs));

JavaScript
Step 4. Define API Routes

Define the API routes using Express.js as usual. Swagger will automatically pick up the route information from the code comments.

Add the Swagger in studentRoute.js

1. API route : router.get("/student", getAllStudents);
Get all students
/**
 * @swagger
 * /student:
 *   get:
 *     summary: Get a list of all students
 *     tags: [Students]
 *     responses:
 *       200:
 *         description: Successful response
 *         content:
 *           application/json:
 *             example:
 *               data: [{}]
 *       400:
 *         description: Bad Request
 *         content:
 *          application/json:
 *            example:
 *             error:
 *              message: "Bad Request"
 */
//Get All Students
router.get("/student", getAllStudents);


2. API route: router.get("/student/:id", getStudent);

Get the Student by ID
/**
 * @swagger
 * /student/{id}:
 *   get:
 *     summary: Get a student by ID
 *     tags: [Students]
 *     parameters:
 *       - name: id
 *         in: path
 *         required: true
 *         description: The ID of the student
 *         schema:
 *           type: string
 *         example:
 *             658918e852a0131af4c0aab1
 *     responses:
 *       200:
 *         description: Successful response
 *         content:
 *           application/json:
 *             example:
 *               data: [{}]
 *       404:
 *         description: Student not found
 */


//Get the Student
router.get("/student/:id", getStudent);


3. API route: router.post("/student", createStudent);
Create a new student
/**
 * @swagger
 * /student:
 *   post:
 *     summary: Create a new student
 *     tags: [Students]
 *     requestBody:
 *       description: Student object to be added
 *       required: true
 *       content:
 *         application/json:
 *           schema:
 *             type: object
 *             properties:
 *               name:
 *                 type: string
 *               address:
 *                 type: string
 *               dateOfBirth:
 *                 type: date
 *               gender:
 *                 type: string
 *               phoneNum:
 *                 type: integer
 *             example:
 *                name: "John Doe"
 *                address: "Colombo - Srilanka "
 *                dateOfBirth: 07/14/1990
 *                gender: "male"
 *                phoneNum: 01145252525
 *     responses:
 *       201:
 *         description: Successful response
 *         content:
 *           application/json:
 *             example:
 *               data: [{}]
 *       400:
 *         description: Invalid request
 */


//Create Student
router.post("/student", createStudent);


4. API route: router.put("/student/:id", updateStudent);
Update a student by ID

/**
 * @swagger
 * /student/{id}:
 *   put:
 *     summary: Update a student by ID
 *     description: Update the details of a student by providing the student ID.
 *     tags: [Students]
 *     parameters:
 *       - in: path
 *         name: id
 *         description: The ID of the student to be updated.
 *         required: true
 *         schema:
 *           type: string
 *     requestBody:
 *       description: Updated student information
 *       required: true
 *       content:
 *         application/json:
 *           schema:
 *             type: object
 *             properties:
 *               name:
 *                 type: string
 *               address:
 *                 type: string
 *               dateOfBirth:
 *                 type: string
 *                 format: date
 *               gender:
 *                 type: string
 *               phoneNum:
 *                 type: integer
 *     responses:
 *       200:
 *         description: Successful update
 *         content:
 *           application/json:
 *             example:
 *               message: 'Student updated successfully'
 *       404:
 *         description: Student not found
 *         content:
 *           application/json:
 *             example:
 *               message: 'Student not found'
 */


//put the Student
router.put("/student/:id", updateStudent);


5. API route: router.delete("/student/:id", deleteStudent);
Delete a student by ID
/**
 * @swagger
 * /student/{id}:
 *   delete:
 *     summary: Delete a student by ID
 *     tags: [Students]
 *     parameters:
 *       - name: id
 *         in: path
 *         required: true
 *         description: The ID of the student
 *         schema:
 *           type: integer
 *         example:
 *             658918e852a0131af4c0aab1
 *     responses:
 *       204:
 *         description: Student deleted successfully
 *       404:
 *         description: Student not found
 */
//Delete the Student
router.delete("/student/:id", deleteStudent);


Step 5. Run The Application
Start the Node.js application, npm start
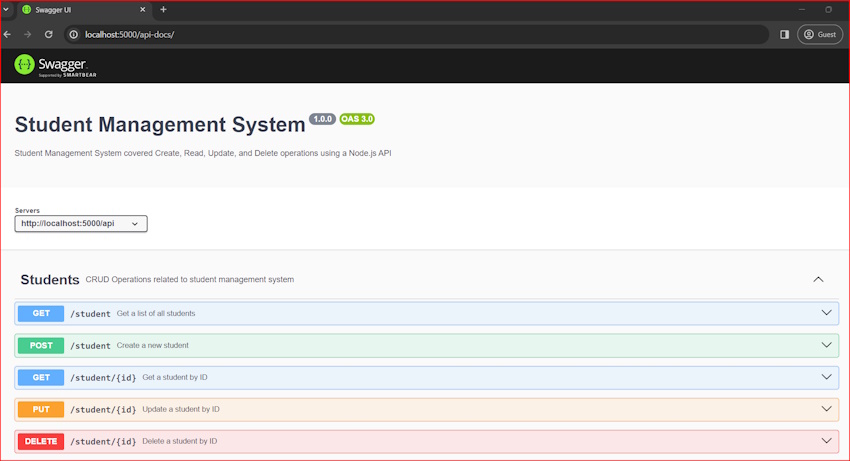
Access the Swagger documentation by visiting the specified endpoint, usually /api-docs or a custom path. Example:  http://localhost:5000/api-docs/

Following these steps, you can enhance your Node.js API with interactive and well-documented Swagger/OpenAPI documentation, making it easier for developers to understand, test, and integrate with your API.

1. Go to the swagger path  http://localhost:5000/api-docs/
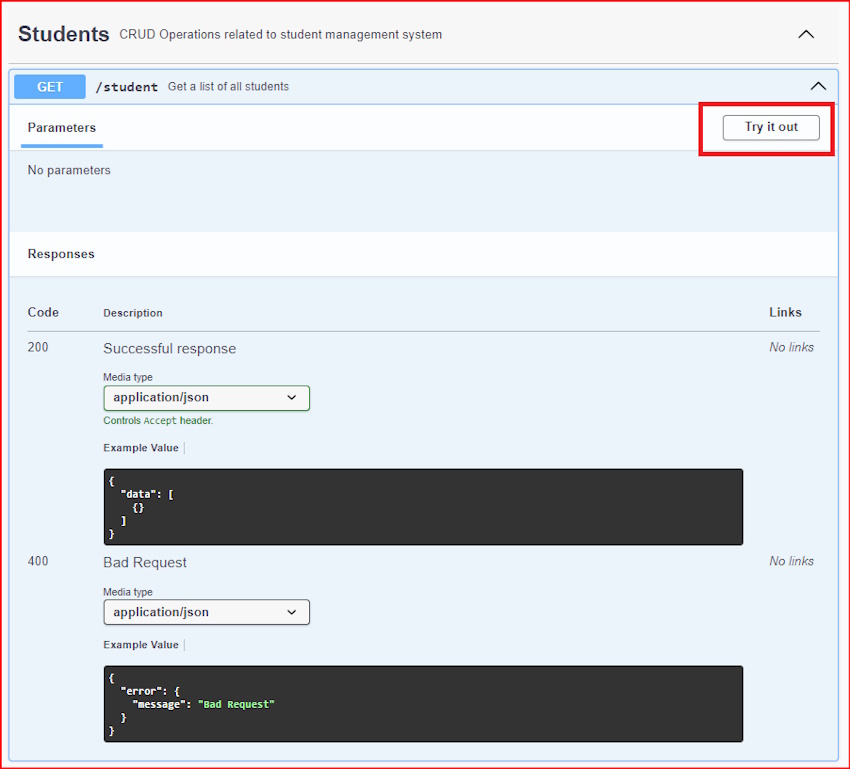
2. Click on the Try it out button.
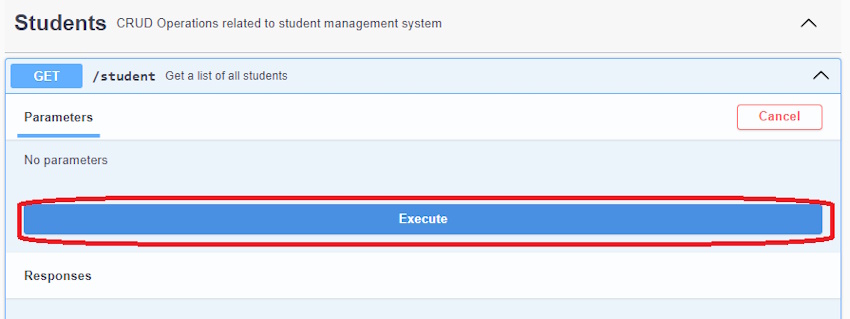
3. Click on the Execute button, and get the response.
4. Get the Response.
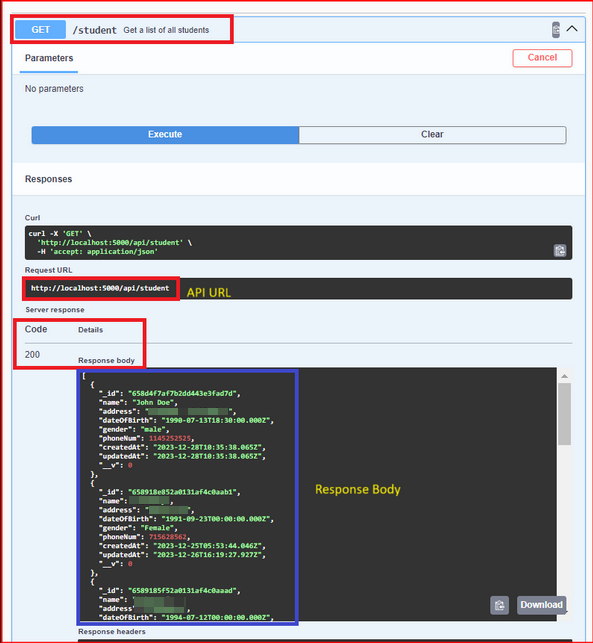
 

The tutorial walks readers through the process of using Express to create a Node.js API that supports Swagger. To include Swagger into a Node.js API, install the required libraries, make a Swagger configuration file, then use Express.js to define the API routes.

With an emphasis on using Swagger annotations in JSDoc comments to automatically generate interactive Swagger documentation, the book offers thorough code examples for every step. The last section explains how to launch the application and use Swagger UI to view the documentation, which enables developers to easily comprehend, test, and work with the API. The procedures are illustrated clearly in the accompanying photos, which also show how to use the Swagger UI and submit API queries.


About HostForLIFE

HostForLIFE is European Windows Hosting Provider which focuses on Windows Platform only. We deliver on-demand hosting solutions including Shared hosting, Reseller Hosting, Cloud Hosting, Dedicated Servers, and IT as a Service for companies of all sizes.

We have offered the latest Windows 2019 Hosting, ASP.NET 5 Hosting, ASP.NET MVC 6 Hosting and SQL 2019 Hosting.


Tag cloud

Sign in