Full Trust European Hosting

BLOG about Full Trust Hosting and Its Technology - Dedicated to European Windows Hosting Customer

AngularJS Hosting Europe - HostForLIFE :: Angular Pagination

clock June 29, 2022 08:01 by author Peter

Pagination is a very basic function that we need in every application. So let's try to understand how we can apply pagination in our angular app. To implement pagination we are using PrimeNG DataTable Pagination


What is PAGINATION?
Pagination is a component that displays page informations like page-number | total-records. To implement pagination we need to manipulate our data and split it into page collection.

Getting Started
First Install the required libraries
npm install bootstrap
npm install primeng
npm install primeicons
npm install @angular/cdk


Second add the reference in styles
"styles": [
   "node_modules/bootstrap/dist/css/bootstrap.min.css",
   "node_modules/primeng/resources/themes/saga-blue/theme.css",
   "node_modules/primeng/resources/primeng.min.css",
   "node_modules/primeicons/primeicons.css",
   "src/styles.scss"
 ],


Third register the module in app.module.ts file
import { TableModule } from 'primeng/table';

imports: [
      //  PrimeNG  Modules
      TableModule
  ]


Fourth step is to define the datatable. Now open the component.html file and add the ptable
<p-table></p-table>

Rows and TotalRecords
Rows, Rows Per Page, Current Page Report Template and other datatable options we need to define how many pages the paginator should display. Paginator below will have 10 rows per page.
<p-table [value]="userList" [paginator]="true" [rows]="10" [showCurrentPageReport]="true" responsiveLayout="scroll" currentPageReportTemplate="Showing {first} to {last} of {totalRecords} entries" [rowsPerPageOptions]="[10,25,50]">
</p-table>


Defining the table header
<ng-template pTemplate="header">
   <tr>
      <th>Name</th>
      <th>Email</th>
      <th>Mobile</th>
      <th>DOB</th>
      <th>isActive</th>
      <th>Action</th>
   </tr>
</ng-template>

Defining the table body
<ng-template pTemplate="body" let-user>
   <tr [ngClass]="{'inActive': user.isActive == false}">
      <td>{{user.name}}</td>
      <td>{{user.email}}</td>
      <td>{{user.mobile}}</td>
      <td>{{user.dob | date:'d/M/yyyy'}}</td>
      <td>{{user.isActive}}</td>
      <td>
         <a pButton pRipple type="button" [routerLink]="['/update-user',user.id]" icon="pi pi-user-edit"
            class="p-button-rounded"></a>
         <a pButton pRipple type="button" (click)="remove(user.id)" style="margin-left: 5px;"
            icon="pi pi-trash" class="p-button-rounded"></a>
      </td>
   </tr>
</ng-template>


Defining table footer where we add various options like add new user
<ng-template pTemplate="paginatorleft">
            <a [routerLink]="['/add-user']" class="btn btn-primary">Add New</a>
</ng-template>


Complete Code
<div class="container" style="margin-top: 20px;">
    <p-table [value]="userList" [paginator]="true" [rows]="10" [showCurrentPageReport]="true" responsiveLayout="scroll"
        currentPageReportTemplate="Showing {first} to {last} of {totalRecords} entries"
        [rowsPerPageOptions]="[10,25,50]">
        <ng-template pTemplate="header">
            <tr>
                <th>Name</th>
                <th>Email</th>
                <th>Mobile</th>
                <th>DOB</th>
                <th>isActive</th>
                <th>Action</th>
            </tr>
        </ng-template>
        <ng-template pTemplate="body" let-user>
            <tr [ngClass]="{'inActive': user.isActive == false}">
                <td>{{user.name}}</td>
                <td>{{user.email}}</td>
                <td>{{user.mobile}}</td>
                <td>{{user.dob | date:'d/M/yyyy'}}</td>
                <td>{{user.isActive}}</td>
                <td>
                    <a pButton pRipple type="button" [routerLink]="['/update-user',user.id]" icon="pi pi-user-edit"
                        class="p-button-rounded"></a>
                    <a pButton pRipple type="button" (click)="remove(user.id)" style="margin-left: 5px;"
                        icon="pi pi-trash" class="p-button-rounded"></a>
                </td>
            </tr>
        </ng-template>
        <ng-template pTemplate="paginatorleft">
            <a [routerLink]="['/add-user']" class="btn btn-primary">Add New</a>
        </ng-template>
    </p-table>
</div>

Open the component file and add the below mentioned methods for pagination
import { Component, OnInit } from '@angular/core';
import { UserService } from '../service/user.service';
import { User } from '../User';

@Component({
    selector: 'app-user-list',
    templateUrl: './user-list.component.html',
    styleUrls: ['./user-list.component.css']
})
export class UserListComponent implements OnInit {
    userList: User[] = [];
    first = 0;
    rows = 10;
    constructor(private userService: UserService) {}
    ngOnInit(): void {
        // Get Users from UserService
        this.userList = this.userService.getUsers();
    }
    //****************PrimeNG DataTable Pagination method Start*********************** */
    //***************Reference: https://primefaces.org/primeng/showcase/#/table/page********** */
    next() {
        this.first = this.first + this.rows;
    }
    prev() {
        this.first = this.first - this.rows;
    }
    reset() {
        this.first = 0;
    }
    isLastPage(): boolean {
        return this.userList ? this.first === (this.userList.length - this.rows) : true;
    }
    isFirstPage(): boolean {
        return this.userList ? this.first === 0 : true;
    }
    //****************PrimeNG DataTable Pagination Method End*********************** */
    // ********************User To Remove User from User List*************************/
    remove(id: number) {
        this.userService.removeUser(id);
        this.userList = this.userService.getUsers();
    }
}


Run the application using npm start.


European Blazor Hosting - HostForLIFE :: Blazor Route Parameter

clock June 20, 2022 10:12 by author Peter

In this article, we are going to discuss route parameters in Blazor. A route parameter is defined in the URL by wrapping its name in a pair of {braces} along with @page declaration.

Example; @page “/employee/{employeeId}

For this tutorial I’m using Microsoft Visual Studio Community 2022 (64-bit) – Preview with Version 17.2.0 Preview 5.0.

Parameter value capture

Value of a parameter can be captured by simply adding a property with the same name and decorating it with an attribute [Parameter]
[Parameter]
public string FruitCode { get; set; }

For demo purposes, I’m using the Counter.razor component in which I am adding three anchor tags with parameter value
<li><a href="/counter/Orange">Orange</a></li>
<li><a href="/counter/Mango">Mango</a></li>
<li><a href="/counter/Apple">Apple</a></li>

The route will look like below
@page "/counter"
@page "/counter/{FruitCode}"


Here {FruitCode} is the parameter

When you click on Orange – the value “Orange” will be passed as parameter in the URL

If you look at the image, in the address bar, you can see that “Orange” has been passed and the same has been displayed as “Selected Fruit: Orange”. The entire code from Counter.razor component has been given below for reference.
@page "/counter"
@page "/counter/{FruitCode}"
<PageTitle>Counter</PageTitle>
<h1>Counter</h1>
<p role="status">Current count: @currentCount</p>
<p role="banner"> Selected Fruite : @FruitCode</p>
<button class="btn btn-primary" @onclick="IncrementCount">Click me</button>
<h1>Select a Fruit</h1>
<ul>
  <li><a href="/counter/Orange">Orange</a></li>
  <li><a href="/counter/Mango">Mango</a></li>
  <li><a href="/counter/Apple">Apple</a></li>
</ul>
@code {
    private int currentCount = 0;
 [Parameter]
    public string FruitCode { get; set; }
    private void IncrementCount()
    {
        currentCount++;
    }
}

Note
As we are navigating to the same page,

    The component will not be destroyed before navigation.
    OnInitialized lifecycle methods will not be executed.

Route Parameter Constraints
To define a constraint for a parameter it is suffixed with a colon and then the constraint type. For example, :int will only match the component’s URL if it contains a valid integer value in the right position.

The route looks like below
@page "/counter"
@page "/counter/{CurrentCount:int}"


Please refer to the Microsoft documentation for more details.
Thank you for reading my article. Please leave your comments in the comment box below.


AngularJS Hosting Europe - HostForLIFE :: Show File Upload Progress With Multiple Files In Angular

clock June 15, 2022 08:47 by author Peter

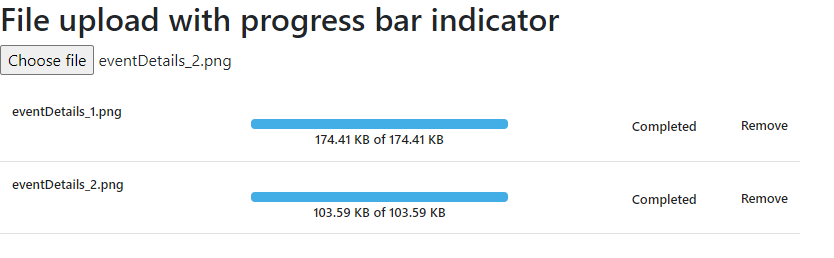
This article demonstrates the file upload with progress bar indicator showing how bytes or percentage has been completed.

Create Angular application
Let's create an angular application using angular cli.

We need to have node.js and angular cli installed on our pc to get started with angular application.

First we have to make sure that node.js is installed. You can download node.js from here.

In order to make sure that we have Angular CLI installed, open the command prompt and type the below command and press Enter:
npm install -g @angular/cli

Create a new project with choice of your name by entering name in command prompt like this:
ng new FileUploadProgress

Let's create a service for file upload. code of angular service looks like this:
import { Injectable } from '@angular/core';
import { HttpHeaders, HttpClient, HttpEventType } from '@angular/common/http';
import { map } from 'rxjs/operators';

@Injectable()
export class MediaService {
  fileSizeUnit: number = 1024;
  public isApiSetup = false;

  constructor(private http: HttpClient) {}

  getFileSize(fileSize: number): number {
    if (fileSize > 0) {
      if (fileSize < this.fileSizeUnit * this.fileSizeUnit) {
        fileSize = parseFloat((fileSize / this.fileSizeUnit).toFixed(2));
      } else if (
        fileSize <
        this.fileSizeUnit * this.fileSizeUnit * this.fileSizeUnit
      ) {
        fileSize = parseFloat(
          (fileSize / this.fileSizeUnit / this.fileSizeUnit).toFixed(2)
        );
      }
    }

    return fileSize;
  }

  getFileSizeUnit(fileSize: number) {
    let fileSizeInWords = 'bytes';

    if (fileSize > 0) {
      if (fileSize < this.fileSizeUnit) {
        fileSizeInWords = 'bytes';
      } else if (fileSize < this.fileSizeUnit * this.fileSizeUnit) {
        fileSizeInWords = 'KB';
      } else if (
        fileSize <
        this.fileSizeUnit * this.fileSizeUnit * this.fileSizeUnit
      ) {
        fileSizeInWords = 'MB';
      }
    }

    return fileSizeInWords;
  }

  uploadMedia(formData: any) {
    const headers = new HttpHeaders().set('Content-Type', 'application/json');

    return this.http
      .post(`http://yourapiurl`, formData, {
        headers,
        reportProgress: true,
        observe: 'events',
      })
      .pipe(
        map((event) => {
          switch (event.type) {
            case HttpEventType.UploadProgress:
              const progress = Math.round((100 * event.loaded) / event.total);
              return { status: 'progress', message: progress };

            case HttpEventType.Response:
              return event.body;
            default:
              return `Unhandled event: ${event.type}`;
          }
        })
      );
  }
}


Here, if you see we have used HttpClient to send POST request with multi-part form data to the server.

Please check uploadMedia method in the above code. HttpClient's post method's third parameter expects options object. The notable properties in our case are reportProgress and observe.

In order to get the progress reportProgress must be set to true and observe must be set to 'events'.

Here, inside map function of rxjs, we will check for the event type in swtich case statements. Rather than using integer values to compare, we can use  HttpEventType enum provided by the package @angular/common/http. In our case, only two enum values are useful such as UploadProgress and Response.

In both cases, I have decided to use the common object having two properties such as status and message.

status can have two values such as 'progress' and 'completed', later one will be returned from the server which will be handled by case HttpEventType.Response.

Also, this service contains two other methods such as getFileSize and getFileSizeUnit. These methods will be used to show the file size and it's unit either bytes, KB or MB.

Let's see how to use this service into our component.

Let's create a new component and typescript code looks like this:
import { Component, OnInit } from '@angular/core';
import { Subject } from 'rxjs';
import { takeUntil } from 'rxjs/operators';
import { MediaService } from '../media.service';

@Component({
  selector: 'app-media',
  templateUrl: './media.component.html',
  styleUrls: ['./media.component.css'],
})
export class MediaComponent implements OnInit {
  uploadedMedia: Array<any> = [];

  constructor(private mediaService: MediaService) {}

  ngOnInit() {}

  onFileBrowse(event: Event) {
    const target = event.target as HTMLInputElement;
    this.processFiles(target.files);
  }
  processFiles(files) {
    for (const file of files) {
      var reader = new FileReader();
      reader.readAsDataURL(file); // read file as data url
      reader.onload = (event: any) => {
        // called once readAsDataURL is completed

        this.uploadedMedia.push({
          FileName: file.name,
          FileSize:
            this.mediaService.getFileSize(file.size) +
            ' ' +
            this.mediaService.getFileSizeUnit(file.size),
          FileType: file.type,
          FileUrl: event.target.result,
          FileProgessSize: 0,
          FileProgress: 0,
          ngUnsubscribe: new Subject<any>(),
        });

        this.startProgress(file, this.uploadedMedia.length - 1);
      };
    }
  }

  async startProgress(file, index) {
    let filteredFile = this.uploadedMedia
      .filter((u, index) => index === index)
      .pop();

    if (filteredFile != null) {
      let fileSize = this.mediaService.getFileSize(file.size);
      let fileSizeInWords = this.mediaService.getFileSizeUnit(file.size);
      if (this.mediaService.isApiSetup) {
        let formData = new FormData();
        formData.append('File', file);

        this.mediaService
          .uploadMedia(formData)
          .pipe(takeUntil(file.ngUnsubscribe))
          .subscribe(
            (res: any) => {
              if (res.status === 'progress') {
                let completedPercentage = parseFloat(res.message);
                filteredFile.FileProgessSize = `${(
                  (fileSize * completedPercentage) /
                  100
                ).toFixed(2)} ${fileSizeInWords}`;
                filteredFile.FileProgress = completedPercentage;
              } else if (res.status === 'completed') {
                filteredFile.Id = res.Id;

                filteredFile.FileProgessSize = fileSize + ' ' + fileSizeInWords;
                filteredFile.FileProgress = 100;
              }
            },
            (error: any) => {
              console.log('file upload error');
              console.log(error);
            }
          );
      } else {
        for (
          var f = 0;
          f < fileSize + fileSize * 0.0001;
          f += fileSize * 0.01
        ) {
          filteredFile.FileProgessSize = f.toFixed(2) + ' ' + fileSizeInWords;
          var percentUploaded = Math.round((f / fileSize) * 100);
          filteredFile.FileProgress = percentUploaded;
          await this.fakeWaiter(Math.floor(Math.random() * 35) + 1);
        }
      }
    }
  }

  fakeWaiter(ms: number) {
    return new Promise((resolve) => {
      setTimeout(resolve, ms);
    });
  }

  removeImage(idx: number) {
    this.uploadedMedia = this.uploadedMedia.filter((u, index) => index !== idx);
  }
}


Now, add below code in HTML file of this component:
<h2>File upload with progress bar indicator</h2>
<input type="file" accept=".jpg,.jpeg,.png" (change)="onFileBrowse($event)" />
<div class="media-upload-table-container" *ngIf="uploadedMedia.length > 0">
  <table class="media-upload-table table table-borderless">
    <thead>
      <tr>
        <th style="width: 246px"></th>
        <th class="media-progress-bar"></th>
        <th style="width: 100px;"></th>
      </tr>
    </thead>
    <tbody>
      <tr *ngFor="let media of uploadedMedia; let i = index">
        <td>
          <div class="d-flex flex-row align-items-center">
            <!-- <div style="margin-right: 8px;">
                <img  class="add-media-img" src="{{media.FileUrl}}">
              </div> -->
            <div class="media-file-name">
              <span style="word-wrap: break-word; white-space: pre-line">
                {{ media.FileName }}
              </span>
            </div>
          </div>
        </td>
        <td style="vertical-align:middle;">
          <div class="d-flex flex-column" style="margin-top: 18px;">
            <div>
              <div class="first-progress">
                <div
                  [ngStyle]="{ 'width.%': media.FileProgress }"
                  class="second-progress"
                ></div>
              </div>
            </div>
            <div class="text-center">
              {{ media.FileProgessSize }} of {{ media.FileSize }}
            </div>
          </div>
        </td>
        <td style="vertical-align:middle;text-align: right;">
          <div class="media-upload-check">
            <span *ngIf="media.FileProgress === 100"> Completed</span>
          </div>
        </td>
        <td style="vertical-align:middle;">
          <a class="remove-media-txt" (click)="removeImage(i)"> Remove </a>
        </td>
      </tr>
    </tbody>
  </table>
</div>

If you see in above typescript code of the new component we have just created, there is a method startProgress. Here, we are using uploadedMedia array to keep track of the media uploaded by the user and it will show the progress of each uploaded file in the grid.

If you have noticed, our media service typescript code has one boolean flag isApiSetup. Here. We are using this flag to decide whether we want to upload files on actual server or not.

If you want to use the actual API of server then follow below steps,

  • Set value of isApiSetup to true and we will use the file upload on the server. here when 'progress' or 'completed' status received we will calculate file size and update it in the relevant object in the list.
  • Also, file object in the list has ngUnsubscribe property which is used in takeUntil operator of rxjs. So once, the user removes the file before 100% completion, we will send some value to it. So, file upload on the server will be canceled.

If you want to use the just fake waitor to simulate the working of file upload,

  • Set value of isApiSetup to false and we will use fake waiter to emulate the file upload rather than uploading the file on the server. It is useful if there is no api developed for file upload but still you want to check and modify and design of progress bar, percentage, file size etc. so, you don't have to rely on the api to test and modify the design.
  • In this case, fakeWaitor method will return the promise which will be resolved after a certain amount of time in parameter and this will be continuously done until for loop variable has reached to value of original file size.

Now, we need to use our component and service both in our application and for that we need to update app.module.ts file (which will be generated automatically by angular cli when new project is created).

Typescript code for app.module.ts looks like this,
import { NgModule } from '@angular/core';
import { BrowserModule } from '@angular/platform-browser';
import { FormsModule } from '@angular/forms';
import { AppComponent } from './app.component';
import { MediaComponent } from './media/media.component';
import { MediaService } from './media.service';
import { HttpClientModule } from '@angular/common/http';


@NgModule({
  imports: [BrowserModule, FormsModule, HttpClientModule],
  declarations: [AppComponent, MediaComponent],
  bootstrap: [AppComponent],
  providers: [MediaService],
})
export class AppModule {}


That’s it. Fire the following command to see the charm!
ng serve

Now, open your browser and visit this URL: http://localhost:4200/ to see it in action.

Here are a few snapshots of this application:


Node.js Hosting - HostForLIFE :: How To Check If A File Exists In NodeJS?

clock June 14, 2022 10:31 by author Peter

Node.js comes bundled with the file system module which allows the developers to interact with the file system of the operating system. This module is commonly used to create, read, update, delete and rename a file. However, before we start performing the above-mentioned operations it is always a better idea to check if the file we're trying to access exists in the file system. And the file system module provides multiple ways to perform this check.

Using existsSync method
The easiest way to test if a file exists in the file system is by using the existsSync method. All you need to do is pass the path of the file to this method.
const fs = require('fs');
const path = './my-awesome-file.txt';

if (fs.existsSync(path)) {
  console.log('file exists');
} else {
  console.log('file not found!');
}


The existsSync method will return true if the file exists and else it'll return false.
    One thing that we need to keep in mind is this method is synchronous in nature. that means that it’s blocking.

Using exists method (Deprecated)
The exists method checks for the existence of a file asynchronously. It accepts two parameters:

    Path to the file
    Callback function to execute once path is verified passing a boolean parameter value to the function as its argument.

const fs = require('fs');
const path = './my-awesome-file.txt';

fs.exists(path, function (doesExist) {
  if (doesExist) {
    console.log('file exists');
  } else {
    console.log('file not found!');
  }
});

The parameter value will be true when the file exists otherwise it'll be false.

Using accessSync method
The accessSync method is used to verify the user’s permission for the specified path. If the path is not found, it will throw an error that we need to handle using try...catch block.

This method accepts two parameters as follows,
    Path to the file
    Mode of verification

The mode parameter is optional. It specifies the accessibility checks that need to be performed.0

Following constants can be used as the second parameter to specify the mode.
    fs.constants.R_OK to check for read permission
    fs.constants.W_OK to check for write permission
    fs.constants.X_OK to check for execute permission


If the second parameter is not provided it defaults to  fs.constants.F_OK constant.
const fs = require('fs');
const path = './my-awesome-file.txt';

try {
  fs.accessSync(path);
  console.log('file exists');
} catch (err) {
  console.log('file not found');
  console.error(err);
}

The above code verifies the existence of my-awesome-file.txt file:

If you wish to determine the write and read access, you can pass the mode parameter with a bitwise OR operator as follows:
const fs = require('fs');
const path = './my-awesome-file.txt';

try {
  fs.accessSync(path, fs.constants.R_OK | fs.constants.W_OK);
  console.log('read/write access');
} catch (err) {
  console.log('no access:');
  console.error(err);
}

Using access method
The access method is basically the asynchronous version of accessSync method.

The access method allows the developers to verify the existence or permissions of a specified path asynchronously.

The method accepts three parameters, first two parameters are the same as accessSync method parameters, and last parameter is a callback function:
    Path to the file
    Mode of verification
    The callback function to execute

const fs = require('fs')
const path = './my-awesome-file.txt'

fs.access(path, fs.F_OK, (err) => {
  if (err) {
    console.error(err)
    return;
  } else {
    console.log('file exists')
  }
})


existsSync, exists, accessSync, and access are the four methods that allow the developers to verify if the file exists in the file system. It’s recommended to use existsSync method if you only wish to check for the existence of a file. When you wish to check for specific permissions as well as the existence of the file, you can use either accessSync or access method. The exists method is deprecated from node.js and hence needs to be avoided. 


About HostForLIFE

HostForLIFE is European Windows Hosting Provider which focuses on Windows Platform only. We deliver on-demand hosting solutions including Shared hosting, Reseller Hosting, Cloud Hosting, Dedicated Servers, and IT as a Service for companies of all sizes.

We have offered the latest Windows 2019 Hosting, ASP.NET 5 Hosting, ASP.NET MVC 6 Hosting and SQL 2019 Hosting.


Tag cloud

Sign in