Full Trust European Hosting

BLOG about Full Trust Hosting and Its Technology - Dedicated to European Windows Hosting Customer

AngularJS Hosting Europe - HostForLIFE :: Async Validation In Angular

clock August 30, 2022 07:47 by author Peter

In this article, I will explain how to implement Async Validation In Angular. Angular does not provide built-in type async Validation implmentation, it provides only for sync validation. The implementation of async validator is very similar to the sync validator. The only difference is that the async Validators must return the result of the validation as an observable or as Promise. In this article, we will create an async validator for the Existing user. We will check the user exists or not using async validator.

Prerequisites
    Angular 12
    HTML/Bootstrap

For this article, I have created an Angular project using Angular 12. For creating an Angular project, we need to follow the following steps:

Create Project
I have created a project using the following command in the Command Prompt.
ng new AsyncValidatorExample

Open a project in Visual Studio Code using the following commands.
cd AsyncValidatorExample
Code .


Now in Visual Studio, your project looks like as below.


Rules for Async Validator
For creating an Async Validator there are following rules which need to be followed:
    The function must implement the AsyncValidatorFn Interface, which defines the signature of the validator function.
    The function should be returned in following observable or promise.
    If input is valid then must return null, or ValidationErrors if the input is invalid.

AsyncValidatorFn
AsyncValidatorFn is a predefine interface which defines the type of the validator function.

Signature of AsyncValidatorFn
interface AsyncValidatorFn {
  (control: AbstractControl): Promise<ValidationErrors | null> | Observable<ValidationErrors | null>
}

Let's create User Service that will check input user exists or not. For now, we will check it with local parameter not will API call.
import { Injectable } from '@angular/core';
import { of } from 'rxjs';
import { delay } from 'rxjs/operators';

@Injectable({
  providedIn: 'root',
})
export class UserService {
  private usernames = ['Gajendra', 'Rohit', 'Rohan', 'Ajay'];

  checkIfUsernameExists(value: string) {
    return of(this.usernames.some((a) => a.toLocaleUpperCase() === value.toLocaleUpperCase())).pipe(
      delay(1000)
    );
  }
}

Let's create Async Validator to check if the username exists against that method.
import {
  AbstractControl,
  AsyncValidatorFn,
  ValidationErrors,
} from '@angular/forms';
import { Observable } from 'rxjs';
import { map } from 'rxjs/operators';
import { UserService } from './user.service';

export class UsernameValidator {
  static createValidator(userService: UserService): AsyncValidatorFn {
    return (control: AbstractControl): Observable<ValidationErrors> => {
      return userService
        .checkIfUsernameExists(control.value)
        .pipe(
          map((result: boolean) =>
            result ? { usernameAlreadyExists: true } : null
          )
        );
    };
  }
}


Use Of Async Validator

this.fb.group({
    username: [
      null,
      [UsernameValidator.createValidator(this.userService)],
      updateOn: 'blur'
    ],
  });


App.Component.ts
import { Component } from '@angular/core';
import { FormBuilder, Validators } from '@angular/forms';
import { UserService } from './user.service';
import { UsernameValidator } from './username-validator';

@Component({
  selector: 'my-app',
  templateUrl: './app.component.html',
  styleUrls: ['./app.component.scss'],
})
export class AppComponent {
  constructor(private fb: FormBuilder, private userService: UserService) {}

  registrationForm = this.fb.group({
    username: [
      null,{
      asyncValidators:[UsernameValidator.createValidator(this.userService)],
      updateOn: 'blur'
}
    ],
  });
}


App.Component.html
<mat-form-field>
  <mat-label>Username</mat-label>
  <input matInput placeholder="Enter User Name here" formControlName="username" />
  <mat-error
    *ngIf="form.get('username').hasError('usernameAlreadyExists')"
  >
    Username already <strong>exists</strong>
  </mat-error>
</mat-form-field>

Let's Run the Project


European Visual Studio 2022 Hosting - HostForLIFE :: Error - PerfWatson2.exe Issue While Installing SSIS Projects In Visual Studio

clock August 23, 2022 07:07 by author Peter

Got the below error while installing the SQL Server Integration Services Projects for Visual Studio 2019.

Error
Please close following processes before continuing the setup:
PerfWatson2 (17784)

Followed the below steps and resolved the issue.

Step 1
Open the Task Manager and find for PerfWatson2.exe.

Step 2
Right Click on PerfWatson2.exe and Click on End task.


Issue is resolved and continue with the installation process.
Hope you have successfully resolved this issue.
Like and share your valuable feedback on this article.


AngularJS Hosting Europe - HostForLIFE :: Build Custom Audio Player With Audio Waveform In Angular

clock August 19, 2022 10:18 by author Peter

If you are working on a platform that needs to play some audio to a user, for example to sell an audio file, it's awesome to show its wave form. That way, the user will be impressed about the structure of the audio and of what your platform can do. To extract the information from the audio file, Web Audio API can be used. This allows you to extract frequency, waveform and other data from the audio file. Then, the received data from the audio source can be visualized as audio-waves. While dealing with the huge data that an audio waveform will have, drawing waveform smoothly and more quickly without lagging the web page is essential. As a developer, the performance of the page matters a lot, irrespective of the content shown on the page to the developer. So, I'm using CanvasJS chart to visualize the waveform. Note: CanvasJS can draw millions of datapoints in few milliseconds.


This tutorial shows how to create simple MP3 player using web audio API, and how to visualize audio files using CanvasJS. The underlying techniques work within plain JavaScript, Angular, React or any other JavaScript framework. In this case, I'm using Angular to create waveforms.

Browse & Read Audio File
The first step to play audio and visualize waveforms is to get the audio file. Let's add an input field to accept MP3 files. Here I've restricted it to allow the user to browse just MP3 files. However, web audio API supports WAV, MP3, AAC, OGG and other formats.
<input type="file" class="file-input"
       accept="audio/mp3"
       change)="onFileSelected($event)" #fileUpload>


Read Audio File
To fetch audio using the Web Audio API, we need to get an ArrayBuffer of audio data and pass it to a BufferSource. To get an audio buffer of the sound, you need to use the AudioContext.decodeAudioData method. The decoded AudioBuffer is resampled to the AudioContext's sampling rate, then passed to a callback or promise.
let margin = 10,
    chunkSize = 50,
    scaleFactor = (150 - margin * 2) / 2;
let audioContext = new AudioContext(),
    buffer = await file.arrayBuffer(),
    audioBuffer = await audioContext.decodeAudioData(buffer),
    float32Array = audioBuffer.getChannelData(0);
let array = [],
    i = 0,
    length = float32Array.length;
while (i < length) {
    array.push(float32Array.slice(i, i += chunkSize).reduce(function(total, value) {
        return Math.max(total, Math.abs(value));
    }));
}

Add Play / Pause & Stop Buttons
Add two buttons, one for play/pause and another to stop. When the audio is playing, the icon should show what the user can do by clicking that button. So, it will show the "Pause" icon when the audio is playing and "Play" icon when the audio is paused. To do this, we need to toggle between the play and pause states. In Web Audio API, you can check for the state of the audio-context, and based on the current state either resume the audio or suspend it.
togglePlaying = (event: any) => {
    if(audioContext.state === 'running') {
        audioContext.suspend().then(() => {
          buttonStatus = "Play";
        });
    }
    else if(audioContext.state === 'suspended') {
        audioContext.resume().then(() => {
          buttonStatus = "Pause";
        });
    }
}

When it comes to the stop option, this is pretty simple. Web Audio API has option to stop the source by calling stop() method.
stopPlaying = (event: any) => {
    source.stop();
}


Generate Datapoints from the Audio Data
CanvasJS supports varieties of chart types for different sets of data, including line, area, pie, range, and financial charts, etc. For our case, range-area suits well - it looks like audio waves. The only task for us to do is to generate datapoints, pass it to datapoints and call chart.render(). CanvasJS draws wave graphs like a charm.
let dps = []
for (let index in array) {
    dps.push({ x: margin + Number(index), y: [50 - array[index] * scaleFactor, 50 + array[index] * scaleFactor]});
}

this.chart.options.data[0].dataPoints = dps;
this.chart.render();


Add Audio Playing Effect to the Wave

When audio begins playing, it is an excellent idea to shade the region that has already played in the waveform. Add a stripline to show the shaded region in the chart and keep updating it every few milliseconds or second. Stop updating it once the audio stops playing.
source.onended = () => {
    chart.axisX[0].stripLines[0].set("endValue", chart.axisX[0].get("maximum"));
    clearInterval(intervalId);
}
let intervalId = setInterval(() => {
    chart.axisX[0].stripLines[0].set("endValue", audioContext.currentTime * (chart.data[0].dataPoints.length / audioBuffer.duration));
}, 250);


Yippee! You just built a custom audio player with play, pause and stop options, along with the audio waveform generated using CanvasJS range-area chart. You can also use column chart, range-column chart to show waves differently. You can even customize the look and feel of the audio player using simple CSS properties, and can match the same with the waveform by changing CanvasJS chart properties.

This waveform generated by CanvasJS chart can be integrated with an audio/video player to make it more appealing to the user. Library has more customization options to change the look and feel, which gives you more flexibility to customize the chart look and feel to match with your website/player theme. In this tutorial, I have disabled chart interactivity so as to showcase only the waveform. However, CanvasJS supports interactivity where it shows tooltip and highlights when you hover over the chart.


European Visual Studio 2022 Hosting - HostForLIFE :: Automating NuGet Package Uploads

clock August 9, 2022 07:44 by author Peter

The Challenge
When maintaining a larger number of NuGet packages, updating to a new version can become a tedious task. You need to upload all new packages, if there are dependencies between the different packages you also need to be fast in order to avoid breaking your packages. However, this task can also be automated - here's how.

Creating an API key
First of all, you need to create an API key that allows to push new packages to the NuGet server. Once logged in, you can choose the corresponding menu from here:

On the following page you can then choose the key name, the actions available for this key and the packages this key should apply to. In this example, I've used a global pattern to allow uploading all packages starting with combit.ListLabel:


After clicking "Create" you'll have the only chance ever to copy/view the generated key - make sure to use this opportunity wisely. Also, note that keys do have an expiration date. After this, you need to regenerate the key.


Using the Key for Automated Uploads
The next step is to use this key for an automated upload, of course. We've created a rather sophisticated batch file for this purpose which I'm sharing here. All required input is queried from the user. As the owner of this batch file may upload any packages on your behalf, make sure to store it in a very secure path only. The nuget push is repeated for each applicable package at the end.

@ECHO OFF

REM ==================================================================================================================================================
REM CONFIGURATION BEGIN
REM DO NOT EDIT BEFORE THIS LINE!
REM ==================================================================================================================================================
SET MajorVersion=27

SET NuGetExePath=.\nuget.exe

SET ApiKey=<Your API key>
SET Server=https://api.nuget.org/v3/index.json

REM ==================================================================================================================================================
REM CONFIGURATION END
REM DO NOT EDIT AFTER THIS LINE!
REM ==================================================================================================================================================

ECHO INFO: The NuGet version must match the format "Major.Minor.Patch[-Suffix]" (see examples):
ECHO    27.0.0-alpha1
ECHO    27.0.0-beta1
ECHO    27.0.0-beta2
ECHO    27.1.0
ECHO    27.2.1

SET NugetVersionString=%MajorVersion%

:UserPrompt_PrereleaseVersion
ECHO.
SET "UserChoice_PrereleaseVersion="
SET /P "UserChoice_PrereleaseVersion=Enter Pre-release version (values: "alpha" or "beta" without quotes; press 'Enter' to proceed without Pre-release version): %NugetVersionString%.0.0-"

IF /I "%UserChoice_PrereleaseVersion%" == "" (
    GOTO UserPrompt_MinorVersion
) ELSE (
    SET NugetVersionString=%NugetVersionString%.0.0-%UserChoice_PrereleaseVersion%
    GOTO UserPrompt_PrereleaseVersionSuffix
)

:UserPrompt_PrereleaseVersionSuffix
ECHO.
SET "UserChoice_PrereleaseVersionSuffix="
SET /P "UserChoice_PrereleaseVersionSuffix=Enter Pre-release version suffix (values: "2" and higher without quotes; press 'Enter' to proceed with Pre-release suffix default "1"): %NugetVersionString%"

IF /I "%UserChoice_PrereleaseVersionSuffix%" == "" (
    SET NugetVersionString=%NugetVersionString%1
) ELSE (
    SET NugetVersionString=%NugetVersionString%%UserChoice_PrereleaseVersionSuffix%
)

GOTO UserPrompt_FinalWarning

:UserPrompt_MinorVersion
ECHO.
SET "UserChoice_MinorVersion="
SET /P "UserChoice_MinorVersion=Enter Minor version (values: "1" or higher without quotes; press 'Enter' to proceed with default "0"): %NugetVersionString%."

IF /I "%UserChoice_MinorVersion%" == "" (
    SET NugetVersionString=%NugetVersionString%.0
) ELSE (
    SET NugetVersionString=%NugetVersionString%.%UserChoice_MinorVersion%
)

GOTO UserPrompt_PatchVersion

:UserPrompt_PatchVersion
ECHO.
SET "UserChoice_PatchVersion="
SET /P "UserChoice_PatchVersion=Enter Patch version (values: "1" or higher without quotes; press 'Enter' to proceed with default "0"): %NugetVersionString%."

IF /I "%UserChoice_PatchVersion%" == "" (
    SET NugetVersionString=%NugetVersionString%.0
) ELSE (
    SET NugetVersionString=%NugetVersionString%.%UserChoice_PatchVersion%
)

GOTO UserPrompt_FinalWarning

:UserPrompt_FinalWarning
ECHO.
IF /I NOT "%UserChoice_PrereleaseVersion%" == "" (
    SET PackageSourcePath=\\srvchk\prod\LL%MajorVersion%\%UserChoice_PrereleaseVersion%%UserChoice_PrereleaseVersionSuffix%\NuGet
) ELSE (
    SET PackageSourcePath=\\srvchk\prod\LL%MajorVersion%\Release\%MajorVersion%.00%UserChoice_MinorVersion%\NuGet
)

SETLOCAL EnableExtensions EnableDelayedExpansion
SET "UserChoice_FinalWarning=N"
SET /P "UserChoice_FinalWarning=WARNING: This cannot be undone. Really upload NuGet packages for version "%NugetVersionString%" ("%PackageSourcePath%") [Y/N]? "
SET "UserChoice_FinalWarning=!UserChoice_FinalWarning: =!"

IF /I "!UserChoice_FinalWarning!" == "N" ENDLOCAL & GOTO :EOF
IF /I NOT "!UserChoice_FinalWarning!" == "Y" GOTO UserPrompt_FinalWarning

ENDLOCAL
GOTO Upload

:Upload
REM Push packages to server
ECHO.
ECHO Uploading packages...
%NuGetExePath% push "%PackageSourcePath%\combit.ListLabel%MajorVersion%.%NugetVersionString%.nupkg" -ApiKey %ApiKey% -Source %Server%
%NuGetExePath% push "%PackageSourcePath%\combit.ListLabel%MajorVersion%.AdhocDesign.%NugetVersionString%.nupkg" -ApiKey %ApiKey% -Source %Server%
%NuGetExePath% push "%PackageSourcePath%\combit.ListLabel%MajorVersion%.AdhocDesign.Web.%NugetVersionString%.nupkg" -ApiKey %ApiKey% -Source %Server%
%NuGetExePath% push "%PackageSourcePath%\combit.ListLabel%MajorVersion%.CassandraDataProvider.%NugetVersionString%.nupkg" -ApiKey %ApiKey% -Source %Server%
%NuGetExePath% push "%PackageSourcePath%\combit.ListLabel%MajorVersion%.FirebirdConnectionDataProvider.%NugetVersionString%.nupkg" -ApiKey %ApiKey% -Source %Server%
%NuGetExePath% push "%PackageSourcePath%\combit.ListLabel%MajorVersion%.MongoDBDataProvider.%NugetVersionString%.nupkg" -ApiKey %ApiKey% -Source %Server%
%NuGetExePath% push "%PackageSourcePath%\combit.ListLabel%MajorVersion%.MySqlConnectionDataProvider.%NugetVersionString%.nupkg" -ApiKey %ApiKey% -Source %Server%
%NuGetExePath% push "%PackageSourcePath%\combit.ListLabel%MajorVersion%.NpgsqlConnectionDataProvider.%NugetVersionString%.nupkg" -ApiKey %ApiKey% -Source %Server%
%NuGetExePath% push "%PackageSourcePath%\combit.ListLabel%MajorVersion%.NuoDbConnectionDataProvider.%NugetVersionString%.nupkg" -ApiKey %ApiKey% -Source %Server%
%NuGetExePath% push "%PackageSourcePath%\combit.ListLabel%MajorVersion%.OdbcConnectionDataProvider.%NugetVersionString%.nupkg" -ApiKey %ApiKey% -Source %Server%
%NuGetExePath% push "%PackageSourcePath%\combit.ListLabel%MajorVersion%.OleDbConnectionDataProvider.%NugetVersionString%.nupkg" -ApiKey %ApiKey% -Source %Server%
%NuGetExePath% push "%PackageSourcePath%\combit.ListLabel%MajorVersion%.RedisDataProvider.%NugetVersionString%.nupkg" -ApiKey %ApiKey% -Source %Server%
%NuGetExePath% push "%PackageSourcePath%\combit.ListLabel%MajorVersion%.ReportServerIntegration.%NugetVersionString%.nupkg" -ApiKey %ApiKey% -Source %Server%
%NuGetExePath% push "%PackageSourcePath%\combit.ListLabel%MajorVersion%.SalesforceDataProvider.%NugetVersionString%.nupkg" -ApiKey %ApiKey% -Source %Server%
%NuGetExePath% push "%PackageSourcePath%\combit.ListLabel%MajorVersion%.SqlConnectionDataProvider.%NugetVersionString%.nupkg" -ApiKey %ApiKey% -Source %Server%
%NuGetExePath% push "%PackageSourcePath%\combit.ListLabel%MajorVersion%.Web.%NugetVersionString%.nupkg" -ApiKey %ApiKey% -Source %Server%
%NuGetExePath% push "%PackageSourcePath%\combit.ListLabel%MajorVersion%.Wpf.%NugetVersionString%.nupkg" -ApiKey %ApiKey% -Source %Server%
%NuGetExePath% push "%PackageSourcePath%\combit.ReportServer%MajorVersion%.ClientApi.%NugetVersionString%.nupkg" -ApiKey %ApiKey% -Source %Server%
%NuGetExePath% push "%PackageSourcePath%\combit.ReportServer%MajorVersion%.SharedTypes.%NugetVersionString%.nupkg" -ApiKey %ApiKey% -Source %Server%

PAUSE


The Result
Once executed, the package is uploaded and shows up with the newly created version. The result looks just like a "normal" upload, but the process is much less error prone and executed in a matter of seconds:


Wrapping Up
The presented batch file allows to automate the management of larger NuGet package zoos. We're using it successfully to maintain our roundabout 50 packages with 87k downloads on nuget.org. It will be a great help for others facing the same challenges.


AngularJS Hosting Europe - HostForLIFE :: How To Add Charts In Angular Material Components?

clock August 5, 2022 09:53 by author Peter

Angular Material is a UI component library based on material design, the UI standard developed by Google, that provides clean and intuitive components. Components can be easily integrated with angular apps, which helps in achieving elegant and consistent UI. You can also create beautiful dashboards using these components.

Dashboards generally contain charts representing useful data to make analysis easier. In this article, I will guide how to add charts in the material tab component. I will be using CanvasJS angular chart component, which supports 30+ chart types, like line, column, bar, pie, etc. This also makes our life easier using its simple API to customize the look and feel of the chart. It also comes with various features, like zooming, panning, export chart as image, etc. out of the box.
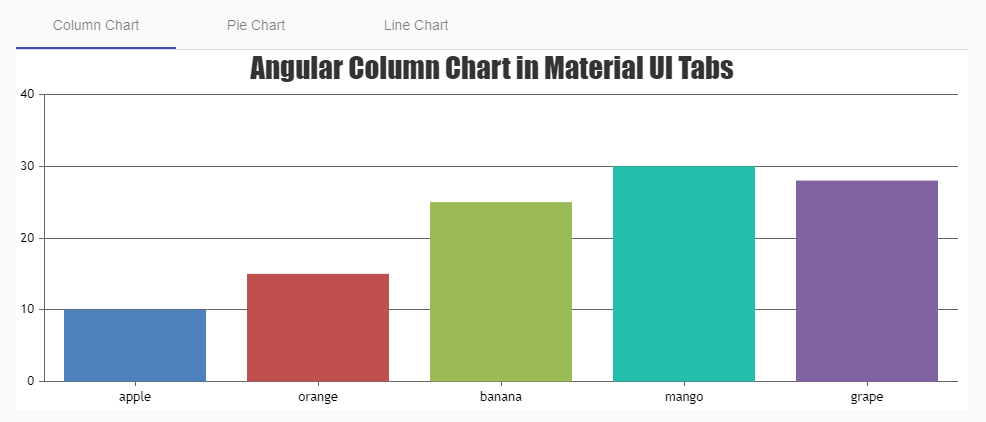
 

Steps By Steps Instructions
Step 1

Create a simple angular application using angular cli command. If you have already set up the angular application, you can skip this step.
ng new angular-charts-in-material-component

Step 2
Now, navigate to the project directory and install angular material using ng add command. This will also install Component Dev Kit(CDK), Animation Module. To make it simple, I will be using predefined themes and will enable BrowserAnimationModule.
ng add @angular/material

Step 3
Register and import the components in app.module.ts. In this tutorial, I will be using Material Tab Component (MatTabsModule). You can use other material components like dialog, expansion panel, etc. as per your needs.
import { MatTabsModule } from '@angular/material/tabs';
@NgModule({
    declarations: [
        AppComponent,
    ],
    imports: [..
        MatTabsModule.
    ],
    providers: [],
    bootstrap: [AppComponent]
})

Step 4
Now, we will add Material Tabs to the template file app.component.html. Add matTabContent directive attribute to each tab body so that content is shown only when it becomes active.
<div [@.disabled]="true">
  <mat-tab-group dynamicHeight>
    <mat-tab label="Column Chart">
    <ng-template matTabContent>
    </ng-template>
  </mat-tab>
  <mat-tab label="Pie Chart">
     <ng-template matTabContent>
     </ng-template>
  </mat-tab>
  <mat-tab label="Line Chart">
     <ng-template matTabContent>
     </ng-template>
   </mat-tab>
 </mat-tab-group>
</div>

Step 5
After adding tabs to the application, we will now add charts to individual tabs. Before doing that, we will need to install CanvasJS angular chart component and register it. Please refer to this tutorial for basic setup of chart components. After installing the chart components, we will define chart options for different charts to be shown inside individual tabs in our app.component.ts.
export class AppComponent {
    columnChartOptions = {
        animationEnabled: true,
        title: {
        text: 'Angular Column Chart in Material UI Tabs',
        },
        data: [
        {
            // Change type to "doughnut", "line", "splineArea", etc.
            type: 'column',
            dataPoints: [
            { label: 'apple', y: 10 },
            { label: 'orange', y: 15 },
            { label: 'banana', y: 25 },
            { label: 'mango', y: 30 },
            { label: 'grape', y: 28 },
            ],
        },
        ],
    };

    pieChartOptions = {
        animationEnabled: true,
        title: {
        text: 'Angular Pie Chart in Material UI Tabs',
        },
        theme: 'light2', // "light1", "dark1", "dark2"
        data: [
        {
            type: 'pie',
            dataPoints: [
            { label: 'apple', y: 10 },
            { label: 'orange', y: 15 },
            { label: 'banana', y: 25 },
            { label: 'mango', y: 30 },
            { label: 'grape', y: 28 },
            ],
        },
        ],
    };

    lineChartOptions = {
        animationEnabled: true,
        title: {
        text: 'Angular Line Chart in Material UI Tabs',
        },
        theme: 'light2', // "light1", "dark1", "dark2"
        data: [
        {
            type: 'line',
            dataPoints: [
            { label: 'apple', y: 10 },
            { label: 'orange', y: 15 },
            { label: 'banana', y: 25 },
            { label: 'mango', y: 30 },
            { label: 'grape', y: 28 },
            ],
        },
        ],
    };
}

Step 6
After adding the chart component, we will add the canvasjs-chart directive inside individual tab content with respective chart options defined in app.component.ts.
<div [@.disabled]="true">
<mat-tab-group>
  <mat-tab label="Column Chart">
    <ng-template matTabContent>
      <canvasjs-chart
        [options]="columnChartOptions"
        [styles]="{ width: '100%', height: '360px' }"
      ></canvasjs-chart>
    </ng-template>
  </mat-tab>
  <mat-tab label="Pie Chart">
    <ng-template matTabContent>
      <canvasjs-chart
        [options]="pieChartOptions"
        [styles]="{ width: '100%', height: '360px' }"
      ></canvasjs-chart>
    </ng-template>
  </mat-tab>
  <mat-tab label="Line Chart">
    <ng-template matTabContent>
      <canvasjs-chart
        [options]="lineChartOptions"
        [styles]="{ width: '100%', height: '360px' }"
      ></canvasjs-chart>
    </ng-template>
  </mat-tab>
</mat-tab-group>
</div>


Ta-da! We have successfully plotted a chart inside angular material tabs. Please check out this StackBlitz example for the complete working code.

To take this article to the next step, you can alos add charts inside different angular material components, like dialog, expansion panel, cards, etc. and create beautiful dashboards using it.

You can refer to this link if you want to know more about the other components in angular material. Also, check out this link if you are new to CanvasJS angular chart component and want to explore more about its customization and features.


About HostForLIFE

HostForLIFE is European Windows Hosting Provider which focuses on Windows Platform only. We deliver on-demand hosting solutions including Shared hosting, Reseller Hosting, Cloud Hosting, Dedicated Servers, and IT as a Service for companies of all sizes.

We have offered the latest Windows 2019 Hosting, ASP.NET 5 Hosting, ASP.NET MVC 6 Hosting and SQL 2019 Hosting.


Tag cloud

Sign in