Full Trust European Hosting

BLOG about Full Trust Hosting and Its Technology - Dedicated to European Windows Hosting Customer

AngularJS Hosting Europe - HostForLIFE :: Containerize An Angular Application

clock July 30, 2021 05:44 by author Peter

In this article, we are going to build an angular application using docker and host the production-ready environment in an NGINX container.


Let’s create an angular application.

Before creating an angular application, ensure that you have installed NodeJS and Angular CLI installed into your development environment.

Once the prerequisite is installed start executing the following command for creating an angular application.
ng new sample-app

Navigate to the project directory,
cd sample-app

Run the application by using the below command.
ng serve

Now your angular application starts running,

Let’s create a docker file and dockerizing the angular application.

Creating a Docker File

Docker file consists of the following stages,

    Building the Angular application into production-ready
    Serving the application using the NGINX server.

Let's discuss both the stages in detail and the command which we are going to use while creating a docker file.

Stage 1

FROM
Initializes a build stage, and gets the latest node image from the DOCKERHUB Registry as the base image from executing the instruction related to the angular application configuration. The stage is named build, which helps to reference this stage in the Nginx configuration stage.

WORKDIR
Sets the default directory in which instructions are executed, If the path is not found the directory will be created, In the above code path of usr/local/app is the directory where angular source code move into.

COPY
It copies the project source files from the project root directory into the host environment into the specified directory path on the container subsystem.

RUN
It compiles our application.

Stage 2
FROM

Initializes a build stage, and gets the latest Nginx image from the DOCKERHUB Registry as the base image from executing the instruction related to the Nginx configuration.

COPY
It copies the build output which is generated in STAGE 1(-FROM=build used to replace the default Nginx configuration).

EXPOSE

It informs the docker that the Nginx container listens on port 80, So exposing the specific port.

Docker File
# STAGE 1: Compile and Build angular application
#Using official node image as the base image
FROM node: latest as build
# Setting up the working directory
WORKDIR / usr / local / app
# Add the Source code to app
COPY. / /usr/local / app / # Install all dependencies
RUN npm install
# Generate the Build of the angular application
RUN npm run build
# STAGE 2: Serving the application using NGINX server
# Using official nginx image as the base image
FROM nginx: latest
# Copy compiled file from build stage
COPY– from = build / usr / local / app / dist / sample - app / usr / share / nginx / html
# Expose Port 80
EXPOSE 80

Let's RUN the DOCKER CONTAINER,

In order to run the docker container, open up the terminal or command prompt and navigate to the docker file into your project directory.
docker build -t sample-app:latest

Once the build is successful, execute the following command.
Docker image ls

The above command will list all images which are installed in our docker container.
Let’s run the image,
Docker run -d -p 8080:80 sample-app:latest

Here I am using -d its helps to detach the container and have it run in the background and the -p argument is used for port mapping which is port 80 of the docker container (as mentioned in the docker file), should expose port 8080 of the host machine.
docker ps

The above command displays the details of our running container.
CONTAINER ID IMAGE COMMAND CREATED STATUS PORTS NAMES
13e5642e4s29 gurp13/sample-app:latest "/docker-entrypoint.…" 10 seconds ago Up 10 seconds 0.0.0.0:8080->80/tcp reen_khayyam

Now we can see that the container is up and running. Try to open localhost:8080, you can see your application running.

Application is running and working as expected now we can push out the image to an image repository, which helps to deploy our container to a cloud service, for that you need to create an account on the Docker hub.

Once you created an account on docker hub run the following command,
docker login -u <username> -p <password>
docker push sample-app:latest
    
Your image is successfully pushed to the Docker hub registry.


Europe SQL Hosting - HostForLIFEASP.NET :: Master Slave System Design

clock July 29, 2021 08:57 by author Peter

Master-Slave database design is usually designed to replicate to one or more database servers. In this scenario, we have a master/slave relationship between the original database and the copies of databases.

A master database only supports the write operations and the slave database only supports read operations. Basically, the master database will handle the insert, delete and update commands whereas the slave databases will handle the select command. 

The below image shows a master database with multiple slave databases.


Advantages of Master/Slave Design

    Availability
    We have replicated the master data across multiple locations. So in case, a slave database goes offline, then we have other slave databases to handle the read operations.

    Performance
    As the master/slave model has multiple slave database servers, more queries can be processed in parallel.

    Failover alleviating
    We can set up a master and a slave (or several slaves), and then write a script that monitors the master to check whether it is up. Then instruct our applications and the slaves to change master in case of failure.

Problem with Master/Slave Design


One of the major problems with this design is that if a user has changed his/her profile username. This request will go into the master database. It takes some time to replicate the change in the slave databases. In case the customer refreshes the profile, he/she will still see the old data because the changes have not yet synced from the Master to Slave.


Europe SQL Hosting - HostForLIFEASP.NET :: Add DBCC INPUTBUFFER to Your Performance Tuning Toolbox

clock July 15, 2021 08:09 by author Peter

A command I like to use when performance tuning is DBCC INPUTBUFFER. If you have ever run sp_whoisactive or sp_who2 to find out what sessions are executing when CPU is high for instance this can be a real quick lifesaver. At times, for me, those two options do not return enough information for what I’m looking for which is the associated stored procedure or object. Using this little helper along with the session id can easily get you that information.


Let’s take a look.

First, I will create a simple procedure to generate a workload.
CREATE OR ALTER PROCEDURE KeepRunning
AS
DECLARE @i INT=1
WHILE (@i <1000)
BEGIN
select @@servername
WAITFOR DELAY '00:00:30'
select @i=@i+1
END

Now I will execute the procedure and capture what it looks like using the first sp_who2 and then sp_whoisactive. Looking at the Sp_who2 screenshot all you can see is the session information including command and status that is being run but have no idea from what procedure it is being run from.

Exec KeepRunning

Now take it a step further and let’s run sp_whoisactive. Here we get more information such as the sql_text being run.

Take note of the session id, displayed with either tool, which in this case is 93. Now run DBCC INPUTBUFFER for that session.
DBCC INPUTBUFFER (93)

BINGO! We’ve now got what we needed which is the name of the store procedure that the statement is associated with.

Now let’s try one last thing. Remember I said sp_whoisactive does not give us the store procedure name, well that wasn’t 100% true. There are fantastic parameter options we can use that can get us even more information. Let’s run sp_whoisactive using the parameter @get_outer_command = 1. As shown in the screenshot you can see here is essentially the same thing as DBCC INPUTBUFFER giving you the sql_command i.e. the store procedure name.

Quickly knowing the stored procedure associated with the query that is causing issues allows us to easily follow the breadcrumbs to identify the root cause of an issue. If you cannot run third-party or community tools like sp_whoisactive, dbcc inputbuffer is an alternative for you. Therefore, I wanted to introduce DBCC INPUTBUFFER. Adding this little tidbit to your performance tuning toolbox can be a real-time saver,, you may have other useful ways to use it as well. Be sure to have a look.


AngularJS Hosting Europe - HostForLIFE.eu :: Custom Attribute Directive In Angular

clock July 6, 2021 07:14 by author Peter

In this article, we will learn about custom attribute directives in Angular. In this article, we will create some custom attributes directive and use in our components.
What is a directive?

Directives are classes that add additional behavior to elements in your Angular applications. With Angular's built-in directives, you can manage forms, lists, styles, and what users see.

The different types of Angular directives are as follows,
    Components - directives with a template. This type of directive is the most common directive type.
    Attribute directives - directives that change the appearance or behavior of an element, component, or another directive.
    Structural directives - directives that change the DOM layout by adding and removing DOM elements.

Create a new Angular project

Step 1
Open your folder where you want to save your project in Visual Studio Code or Command Prompt.

Step 2

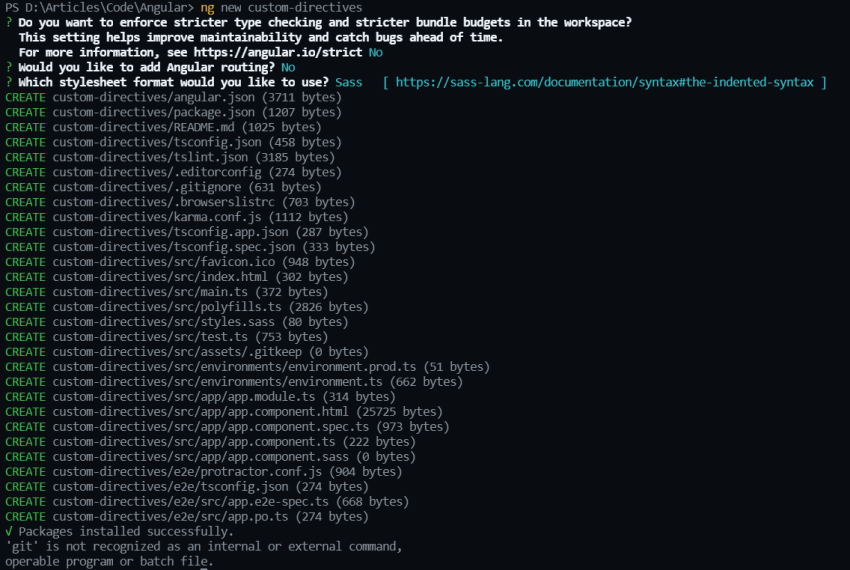
Run the below command to create a new project. In this process, you will be asked some questions like add routing in your project and style sheet format, etc. You can add as per your requirements.
ng new custom-directives

JavaScript

As you see below, our project is created.Custom Attribute Directive In Angular
In this article, we will learn about custom attribute directives in Angular. In this article, we will create some custom attributes directive and use in our components.
What is a directive?

Directives are classes that add additional behavior to elements in your Angular applications. With Angular's built-in directives, you can manage forms, lists, styles, and what users see.

The different types of Angular directives are as follows,
    Components - directives with a template. This type of directive is the most common directive type.
    Attribute directives - directives that change the appearance or behavior of an element, component, or another directive.
    Structural directives - directives that change the DOM layout by adding and removing DOM elements.

Create a new Angular project

Step 1
Open your folder where you want to save your project in Visual Studio Code or Command Prompt.

Step 2
Run the below command to create a new project. In this process, you will be asked some questions like add routing in your project and style sheet format, etc. You can add as per your requirements.

ng new custom-directives

JavaScript
As you see below, our project is created.
Step 3
As you now open your app component you see a lot of code so we remove all the code and just add a simple h1 tag as you see below code.
<h1>This is Custom Attribute Directive Project</h1>

Markup

Step 4
Now run your project by a simple move to your project directory and then run the below command,
ng serve

JavaScript
After successfully running your project, you can see the output as below.


Built in Attributes Directives
Attribute directives listen to and modify the behavior of other HTML elements, attributes, properties, and components.

The most common attribute directives are as follows,
    NgClass - adds and removes a set of CSS classes.
    NgStyle - adds and removes a set of HTML styles.
    NgModel - adds two-way data binding to an HTML form element.

Create custom attributes directive

Step 1
Create a new folder in your project’s app folder called directives to simplify project structure.

Step 2
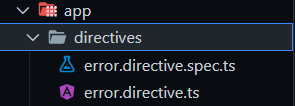
Run the below command to create a new custom attribute directive. Here error is the name of our directive and directives is a folder name that we create.
ng g directive directives/error

JavaScript
After executing the above command, it will generate the following two files.
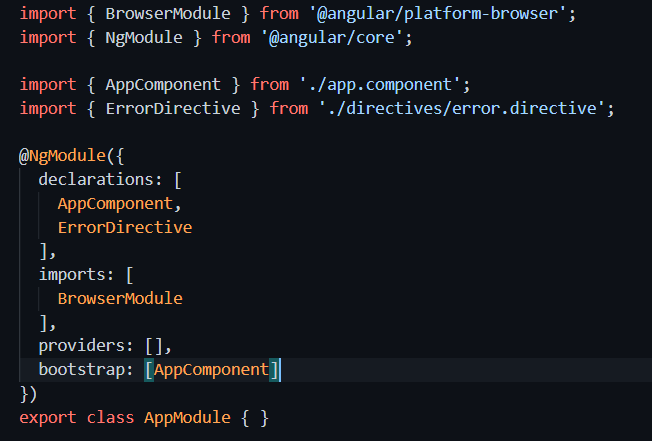
And it also adds our directive in-app module file’s declaration section.
Step 3
Now we implement logic in this directive that if the user uses this directive in any element, the element color will become red. For that add the below code in your file.
import { Directive, ElementRef } from '@angular/core';


@Directive({
  selector: '[appError]'
})

export class ErrorDirective {
  constructor(el:ElementRef) {
    el.nativeElement.style.color="red";
   }
}

Explanation
    In the above code first, we add the ElementRef type parameter in the constructor. It will get that element on which we use our custom attribute directive
    Then by using this el parameter we change color from style to red.

Implement custom attributes directive in our components

To add our custom attribute directive we need to add attributes In our element. As you see in your directive file you see a selector in our case our selector name is appError, by using appError in our element we can change the style.

Add this attribute in your element as shown below image,

Now refresh your page in the browser and you can see out like below image,

So as you see that we can create custom attribute directives easily. You can implement it as your requirement. In the future, we will create some other custom directives that will be useful in our day-to-day projects. If you like this article kindly share it with your friends and if you have any doubt let me know in the comments.


About HostForLIFE

HostForLIFE is European Windows Hosting Provider which focuses on Windows Platform only. We deliver on-demand hosting solutions including Shared hosting, Reseller Hosting, Cloud Hosting, Dedicated Servers, and IT as a Service for companies of all sizes.

We have offered the latest Windows 2019 Hosting, ASP.NET 5 Hosting, ASP.NET MVC 6 Hosting and SQL 2019 Hosting.


Tag cloud

Sign in