Full Trust European Hosting

BLOG about Full Trust Hosting and Its Technology - Dedicated to European Windows Hosting Customer

AJAX Hosting - HostForLIFE :: Consuming Web API Using jQuery(AJAX)

clock September 13, 2022 10:28 by author Peter

In this article, we are going to discuss an interesting and useful topic: Consuming Web API using jQuery(AJAX). This method is an easy and quick way to access the web API. We don’t need to write a bunch of code to get access to the API. We will also discuss those errors that are raised at the time of calling an API with jQuery like AddCos and Allow origin. It is normal to get errors like this. I had also faced those errors in early phases.

In this article, I’m going to access my previously created Asp.NET Core API, named Story.com. You can use the one that is required for your desired tasks.

Before we start the steps to consume a Web API, I want to give a brief introduction to both Web API and jQuery AJAX.

Web API
A web API is an Application Programming Interface that is used to access a database in a well-managed way. A web API is an intermediate between a Web application and a database. If we want to access the database in multiple applications, then a Web API is the best way to perform such a task. We don't need to write code again and again to get, post, or update data - we can simply pass the URL and get the response.

jQuery AJAX
In the current context, AJAX is widely used to request data asynchronously from a server. This means that we can send requests to the server without reloading the web page. This is an easy way to interact with the server.

In this article, I will use my previously created API, Story.com, that has a "Get" method.


Here is a Get method that is showing all the data from the database.


This API is attached with the resource file.

To Access a web API with jQuery, we need to follow these steps.

Step 1
In the first step, we are going to create an ASP.Net Core MVC project. I’m using Visual Studio 2022 here. You can use whatever is installed on your machine. So, start Visual Studio and click on create a new project.


Choose Asp.NET Core MVC with Model View Controller and click Next. Then, enter a project name and click create.


Next, we need to enter the Project name.


Step 2
I’m using the default HomeController View. You can add any other controller or view or HTML page to perform this task. Now you need to open the index view, located at View>>Home>>index. cshtml. Now we need to Call the javaScript, located in the wwwRoot folder.


Step 3
First, we call the javascrip.min.js file using @section and Scripts. We’ll write our jQuery within the script tag.
@section Scripts{
    <script>
    </script>
}

Before we move forward to the next step, we need a controller to hold the value of the API. Here I’ve used the table to hold the value of the API. In this table, I only defined the structure of the table. We will define its data rows at run time.
<div class="container">
    <table id="table1" class="table table-dark">
        <tr><th>ID</th><th>Content</th><th>StoryDate</th><th>Author</th><th>Title</th></tr>
    </table>
</div>

In the code above, I created a table with table ID=”table1” and defined their headers.

Note
While creating a table or other control, to bind it using jQuery it must give the ID or name of the control. This is because we will bind data on that control using its Id or its Name.

Step 4
Now, let’s go to our script tag and call a method to load the data from the API. When the document is ready, this means our page is loaded.
$(document).ready(function() {
    GetData();
})


This method calls a method GetData(); when our page is ready.

Step 5
Next, we need to define the functionality to get data from the Web API.
<script>
function GetData() {
    $.ajax({
        url: "https://localhost:7138/api/Story",
        method: "GET",
        success: function(res) {
            var tableString = "";
            $.each(res, function(index, value) {
                tableString += "<tr><td>" + value.iD + "</td><td>" + value.content + "</td><td>" + value.storyStartDate + "</td><td>" + value.auther + "</td><td>" + value.title + "</td></tr>";
            });
            $("#table1").append(tableString);
        },
        error: function(error) {
            console.log(error);
        }
    });
}


Here in this code:
    First we have used the $.ajax() method is used to send the request to the server.
    URL: is used to pass the URL of the Web API here I have the URL of my get API you can use your API URL to get the data from our API.
    method: "GET", here we have to define the method if we are getting the data or we are posting the data. By default, it's set to "GET" data. If you are getting data, then it's not necessary to define, but if we want to post data then it's necessary to define the method as "POST".
    Next,

    success: function(res) {
            var tableString = "";
            $.each(res, function(index, value) {
                tableString += "<tr><td>" + value.iD + "</td><td>" + value.content + "</td><td>" + value.storyStartDate + "</td><td>" + value.auther + "</td><td>" + value.title + "</td></tr>";
            });


In this code we are checking whether the result of the getting method is a success. This means we have gotten the proper or desired response to our request. Then, we need to store the response of the request. So, in the next step, we created a variable with the name tableString to hold the response. To store all these values, we have used $.each loop, which is similar to the for each loop. This loop works dynamically for each element stored in the collection. Here we have stored all data that is coming from the response in the format of table data. Always remember that it is case-sensitive. We have to write the variable names as they are to get the proper value.
Next, we need to append this data into table data. Here we need that controller's Id, in which we want to bind it. In my case, I created a table control to hold the data with the name "table1". This append() will append the data into the table using its id.
$("#table1").append(tableString);

Next, we can also create a method to deal with the errors.
error: function(error) {
    console.log(error);
}


Now if any error occurs when we are getting or loading data from the Web API, we can get the details related to errors in the console. It's not a necessary part; it's optional.

Now, if we run the Program and if your API is live or running, your data will be loaded in the table format.


In this article, we got the data from the ASP.NET Core API using  jQuery AJAX. We can also post or update the data using jQuery AJAX without reloading the page. We just need to pass the desired URL and pass the data with method type "POST", and we can perform the task.


AJAX Hosting - HostForLIFE :: Learn About AJAX Security

clock March 17, 2022 07:42 by author Peter

The advent of Web 2.0 brought about a new technique in building web applications, Asynchronous, JavaScript, and XML. AJAX is a faster and interactive technology that has found great favor among modern businesses today. With it comes a combination of JavaScript, HTML, CSS, and XML to build one useful technique that makes web application interactivity faster and affordable in terms of bandwidth consumption. This article is a description of AJAX and its security issues.

AJAX
Conventional web sites were known to be slower and consumed more bandwidth because of the way they connected to the server. It would take a page to reload to connect to the server using synchronous connection. This meant more bandwidth consumption and slower response from web applications. On the other hand, AJAX is a browser technology that uses asynchronous means to communicate to the server. This means that you can communicate with the server to update certain portions of a page without having to reload the whole page.
 
A good example of AJAX in use is the Google create account page which recognizes a username in use soon after a user enters their suggested username. This means that in the background the page has communicated with the Google server to check if the name exists and show results without having to reload the entire page.
 
It is considered the most feasible Rich Internet Application (RIA) to date. AJAX makes use of Open Standards that include HTML and CSS for the presentation of data, XML for data storage and transfers to and from the server, XMLHttpRequest objects in the browser to fetch data from the server, and finally JavaScript for interactivity. AJAX can also transfer data in JSON or plain-text.
 
Security Issues with AJAX
AJAX applications only use a different technique to connect to the server. However, they use the same security schemes to connect to the server. This entails that you still have to include your authentication, authorization, and data protection methods in the web.xml file or program. AJAX applications bear the same vulnerabilities as ordinary or conventional web applications. In as much as people prefer the swiftness and the advanced interactivity of AJAX applications, some are misled to believe that AJAX web applications are more secure than ordinary web applications.
 
AJAX applications are known to have session management vulnerabilities and a lot of loopholes in the hidden URLs which carry AJAX requests to the server.
 
The AJAX engine makes use of JavaScript to transfer user requests/commands and transforms them into function calls. The AJAX engine sends these function calls in plain-text to the server that may be intercepted by attackers to reveal database information, variable names, or any other confidential user data that may be used by the attacker maliciously.
 
AJAX-based applications are also vulnerable to Cross-Site Request Forgery (CRSF) and Cross-Site Scripting (XSS). Although it is not that easy to exploit CSRF on AJAX applications because the requests are hidden, attackers may be able to create a script that can steal a user’s session token and by so doing be able to steal the user’s session remotely.
 
This can be avoided by creating random complex tokens for the AJAX requests which are not identified by the attackers. The server embeds the complex token on the page and checks for it each time the users make a request to the server and if it is any different the server does not process the request.
 
To ensure AJAX security against XSS, the application has to strictly sanitize user input and output. The use of JS functions such as ‘document.write()’, ‘innerHTML()’, ‘eval()’, ‘write()’ may make it possible for XSS attacks in AJAX web applications.
 
Conclusion

AJAX is a very fast and affordable browser technology but needs to be treated just like any other web application when it comes to security. Organizations need to do thorough scanning of their AJAX applications just like on conventional web applications to ensure absolute security from common vulnerabilities.

HostForLIFE.eu AJAX Hosting
HostForLIFE.eu is European Windows Hosting Provider which focuses on Windows Platform only. We deliver on-demand hosting solutions including Shared hosting, Reseller Hosting, Cloud Hosting, Dedicated Servers, and IT as a Service for companies of all sizes. We have customers from around the globe, spread across every continent. We serve the hosting needs of the business and professional, government and nonprofit, entertainment and personal use market segments.


Ajax Hosting UK - HostForLIFE :: Render API Using AJAX Call

clock August 3, 2021 07:57 by author Peter

In this article, we will discuss how to invoke API using the AJAX call. We use the AJAX call because it allows the user to update a web page without reloading the page, request data from a server after the page has loaded, receive data from a server after the page has loaded, and send the data to a server in the background.

 
The below HTTP verb is used to call a particular Web API call. Here is the mapping sequence.
    POST - Create
    GET - Read
    PUT - Update
    DELETE - delete

    var person = new Object();    
    person.name = $('#name').val();    
    person.surname = $('#surname').val();    
    $.ajax({    
        url: 'http://localhost:3413/api/person',    
        type: 'POST',    
        dataType: 'json',    
        data: person,    
        success: function (data, textStatus, xhr) {    
            console.log(data);    
        },    
        error: function (xhr, textStatus, errorThrown) {    
            console.log('Error in Operation');    
        }    
    });  


In the above code, we pass the person data to the API using the Post method.
 
You can call the API using the above code for different uses, like Delete record, Update record, and Get records using Get, Put, and Delete type keywords.

HostForLIFE.eu AJAX Hosting
HostForLIFE.eu is European Windows Hosting Provider which focuses on Windows Platform only. We deliver on-demand hosting solutions including Shared hosting, Reseller Hosting, Cloud Hosting, Dedicated Servers, and IT as a Service for companies of all sizes. We have customers from around the globe, spread across every continent. We serve the hosting needs of the business and professional, government and nonprofit, entertainment and personal use market segments.


European Ajax Hosting UK - HostForLIFE.eu :: How to Make Custom Alert Message with Ajax?

clock September 4, 2020 07:56 by author Peter

In this article, we are going to learn how to make custom Alert Message with Ajax. Some time we needed to make clone of windows alert message, however that alert message isn't permitting to change the header text. Here using Ajax model popup extender i'll show you how to make custom message box:
Add the user control file and ajaxtoolkit reference in your project.

Write the following code in ascx file.
<style type="text/css">
.MessageBoxPopUp
{
background-color:White;
border:solid 2px #99B4D1;
}

.MessageBoxButton
{
background-color: #A0A0A0;
border: solid 2px #B4B4B4;
color: Black;
font-weight:bold;
font-family:Verdana;
font-size:9pt;
cursor:pointer;
height: 20px;
width:70px;
display:none;
}
.MessageBoxHeader
{
height:17px;
font-size:10pt;
color:White;
font-weight:bold;
font-family:Verdana;
text-align:Left;
vertical-align:middle;
padding:3px 3px 3px 3px;
background-color:#3399FF;
border-bottom:2px solid #B4B4B4;
}
.MessageBoxData
{
height:20px;
font-size:8pt;
font-family:Verdana;
color:#3A4349;
text-align:Left;
vertical-align:top;
}
</style>
<script type="text/javascript">
function closeModelPopup(btn) {
// var mpe = document.getElementById("<%= mpeMessageBox.ClientID %>");
$find('mpeFirmMessageBox').hide();
}
</script>

<cc1:ModalPopupExtender ID="mpeMessageBox" runat="server" DynamicServicePath="" Enabled="True"
TargetControlID="btnTemp" PopupControlID="pnlMessageBox" BackgroundCssClass="modal"
PopupDragHandleControlID="pnlMessageBox" CancelControlID="btnCancel" BehaviorID="mpeFirmMessageBox">
</cc1:ModalPopupExtender>

<asp:Panel ID="pnlMessageBox" runat="server" Style="display: none; width: 300px;
height: 140px;" class="MessageBoxPopUp">
<table border="0" cellpadding="0" cellspacing="0" width="100%">
<tr class="MessageBoxHeader" style="height: 17px;">

<td colspan="2">
    <asp:Label ID="lblHeader" runat="server"></asp:Label>
</td>

<td align="right" style="padding: 2px 2px 0px 0px;">
    <%--<asp:UpdatePanel ID="upnCloseMessageBox" runat="server">
        <ContentTemplate>--%>
            <asp:ImageButton ID="imgBtnClose" runat="server" ImageUrl="~/Image/close_icon.png"
                 OnClientClick="closeModelPopup(this)" />
        <%--</ContentTemplate>
    </asp:UpdatePanel>--%>
</td>
</tr>

<tr>
<td colspan="2" style="height: 5px;">
</td>
</tr>
<tr style="height: 88px;">

<td style="vertical-align: top; padding-left: 5px;">
    <asp:Image ID="imgInfo" runat="server" ImageUrl="~/Image/information-balloon.png" Width="40px" />
</td>

<td class="MessageBoxData" colspan="2" style=" padding: 10px 5px 5px 5px;">
    <asp:Label ID="lblMessage" runat="server"></asp:Label>
</td>

</tr>
<tr style="vertical-align: bottom; height: 20px; padding: 0px 5px 5px 0px;">
<td style="width: 40px;">
</td>
<td align="right" style="width: 180px">
    <asp:Button ID="btnOk" runat="server" CssClass="MessageBoxButton" />
</td>

<td align="right">
    <asp:Button ID="btnCancel" runat="server" CssClass="MessageBoxButton" />
</td>
</tr>
</table>
</asp:Panel>

Now, add the following code in .cs file
public delegate void delegate_OkClick();
public event delegate_OkClick OnOkClick;
public string Header
{
set { lblHeader.Text = value; }
//set { lblHeader.InnerHtml = value; }
}

public string Message
{
set { lblMessage.Text = value; }
}

public Button CancelButton
{
get { return btnCancel; }
}

public Button OkButton
{
get { return btnOk; }
}

public AjaxControlToolkit.ModalPopupExtender MessageBox
{
get { return mpeMessageBox; }
}

protected void Page_Load(object sender, EventArgs e)
{
}

protected void btnOk_OnClick(object sender, EventArgs e)
{
//raise the event if not null
if (OnOkClick != null)
OnOkClick();
}
public void displayMessage(string message)
{
displayMessage(message, null);
}
public void displayMessage(string message, int? type)

{

lblHeader.Text = "Alert Message";
//lblHeader.InnerHtml = title;
lblMessage.Text = message;
btnCancel.Attributes["style"] = "display:block";
btnCancel.Text = "Ok";
mpeMessageBox.Show();
}


Your message box is ready, now you need to call from the aspx page where ever you need to show the message.
You need to add below line of code in
<%@ Register Src="~/Control/Alert.ascx" TagName="MessageBox" TagPrefix="mb" %>
<asp:ScriptManager runat="server" ID="s"></asp:ScriptManager>
<mb:MessageBox ID="ucMessageBox" runat="server"></mb:MessageBox>

And from the code behind cal the display message write the following code:
protected void btnClick_OnClik(object sender, EventArgs e)
{
ucMessageBox.displayMessage("Alert from Code");
}

HostForLIFE.eu AJAX Hosting
HostForLIFE.eu is European Windows Hosting Provider which focuses on Windows Platform only. We deliver on-demand hosting solutions including Shared hosting, Reseller Hosting, Cloud Hosting, Dedicated Servers, and IT as a Service for companies of all sizes. We have customers from around the globe, spread across every continent. We serve the hosting needs of the business and professional, government and nonprofit, entertainment and personal use market segments.


Ajax Hosting UK - HostForLIFE.eu :: How to call ASP.NET Page Method using jQuery AJAX ?

clock January 21, 2020 11:25 by author Peter

jQuery may be a powerful JavaScript library that permits you to call ASP.NET page method directly without any postback. you can call page method while not involving ScriptManager at all.

Creating page method:
First we've got to make page method, it ought to be declared as static with the [WebMethod] attribute.    [WebMethod]
    public static string GetDate()
    {
        return DateTime.Now.ToString();
    }

jQuery.ajax method:
           $.ajax({
                    type: "POST",
                    contentType: "application/json; charset=utf-8",
                    url: "Default.aspx/MethodName",
                    data: "{}",
                    dataType: "json",
                    success: function (msg) {
                       //do something
                    }
                });

Type: the type of request the type ("POST" or "GET")
URL: A string containing the URL to that the request is sent.
ContentType: By default we've got to use "application/x-www-form-urlencoded; charset=UTF-8", when we sending information to server we've got to use this content type, that is okay for many cases.
Data: data send to be server, if data isn't a string it’ll be converted to query string.
DataType: the type of data that you are expecting back from the server.

Source code:
<html xmlns="http://www.w3.org/1999/xhtml">
<head runat="server">
    <title>jQuery AJAX call</title>
    <script type="text/javascript" src="http://code.jquery.com/jquery-1.7.1.js"></script>
    <script type="text/javascript">
        $(document).ready(function () {
            // Add the page method call as an onclick handler for the div.
            $('#btnGetTime').click(function () {
                $.ajax({
                    type: "POST",
                    contentType: "application/json; charset=utf-8",
                    url: "Default.aspx/GetDate",
                    data: "{}",
                    dataType: "json",
                    success: function (msg) {
                        alert('Current Time is ' + msg.d);
                    }
                });
            });
        });
    </script>
</head>
<body>
    <form id="form1" runat="server">
    <div>
        <input type="button" id="btnGetTime" value="Get Time" />
    </div>
    </form>
</body>
</html>

C# code:
using System;
using System.Collections.Generic;
using System.Linq;
using System.Web;
using System.Web.UI;
using System.Web.UI.WebControls;
using System.Web.Services;
public partial class _Default : System.Web.UI.Page
{
    protected void Page_Load(object sender, EventArgs e)
    {
    }
    [WebMethod]
    public static string GetDate()
    {
        return DateTime.Now.ToString();
    }
}

Output:

HostForLIFE.eu AJAX Hosting
HostForLIFE.eu is European Windows Hosting Provider which focuses on Windows Platform only. We deliver on-demand hosting solutions including Shared hosting, Reseller Hosting, Cloud Hosting, Dedicated Servers, and IT as a Service for companies of all sizes. We have customers from around the globe, spread across every continent. We serve the hosting needs of the business and professional, government and nonprofit, entertainment and personal use market segments.


AJAX Hosting :: HostForLIFE.eu :: How to Work With PHP and MySQL?

clock April 12, 2016 23:12 by author Anthony

Today we will discuss about Ajax. Ajax is a collection of several technologies aiming to provide a better user experience compared to traditional web applications. End to end implementation of Ajax includes HTML, CSS, DOM, JavaScript, a Server Side Language, and XMLHttpRequest which is also called as XHR.

In traditional web applications, the browser sends a request to server, server processes, send some data back to browser and then it is rendered by the browser. But meanwhile, when server is processing, user has to wait. This, needless to say, does not provide the user with a good experience. Ajax, helps to get rid of the issue. It makes the user's interaction to the application asynchronous. User interface and communicating to the server goes hand in hand and without waiting for the server to come with the processed data or without reloading the webpage, the user interface responds to user's action; greatly improving user experience.

In this tutorial we will see how to make Ajax work with PHP and MySQL. We will create a small web application. In that, as soon as you start typing an alphabet in the given input field, a request goes to the PHP file via Ajax, a query is made to the MySQL table, it returns some results and then those results are feteched by Ajax and displayed.

You need to make MySQL table. The structure of the MySQL table we use.
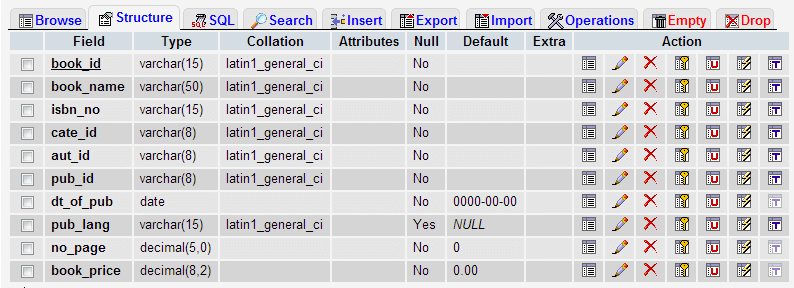
mysql table for ajax php mysql tutorial

We have a simple user inerface created with HTML and CSS where user can supply data in the input field. This is the basic HTML code. Though, we will make modifications on it and add JavaScript code later.

<!DOCTYPE html>  
<html lang="en">  
<head>  
<meta charset="utf-8">  
<title>User interface for Ajax, PHP, MySQL demo</title>  
<meta name="description" content="HTML code for user interface for Ajax, PHP and MySQL demo.">  
<link href="../includes/bootstrap.css" rel="stylesheet"> 
<style type="text/css"> 
body {padding-top: 40px; padding-left: 25%} 
li {list-style: none; margin:5px 0 5px 0; color:#FF0000} 
</style> 
</head> 
<body> 
<form class="well-home span6 form-horizontal" name="ajax-demo" id="ajax-demo"> 
<div class="control-group"> 
              <label class="control-label" for="book">Book</label> 
              <div class="controls"> 
                <input type="text" id="book"> 
              </div> 
 </div> 
 <div class="control-group"> 
              <div class="controls"> 
                <button type="submit" class="btn btn-success">Submit</button> 
              </div> 
 </div> 
</form> 
</body> 
</html> 

This is how it looks :

user interface for ajax demo

We will now create JavaScript code to send data to server. And we will call that code on onkeyup event of the of the input field given.

function book_suggestion() 

var book = document.getElementById("book").value; 
var xhr; 
 if (window.XMLHttpRequest) { // Mozilla, Safari, ... 
    xhr = new XMLHttpRequest(); 
} else if (window.ActiveXObject) { // IE 8 and older 
    xhr = new ActiveXObject("Microsoft.XMLHTTP"); 

var data = "book_name=" + book; 
     xhr.open("POST", "book-suggestion.php", true);  
     xhr.setRequestHeader("Content-Type", "application/x-www-form-urlencoded");                   
     xhr.send(data); 

Processing data on server side

<?php 
include('../includes/dbopen.php'); 
$book_name = $_POST['book_name']; 
$sql = "select book_name from book_mast where book_name LIKE '$book_name%'"; 
$result = mysql_query($sql); 
while($row=mysql_fetch_array($result)) 

echo "<p>".$row['book_name']."</p>"; 

?> 

Now we have to retreive data returned by MYSQL and display that data using Ajax. So, we will write that code in our HTML file. We will add follwing code

xhr.onreadystatechange = display_data; 
    function display_data() { 
     if (xhr.readyState == 4) { 
      if (xhr.status == 200) { 
       document.getElementById("suggestion").innerHTML = xhr.responseText; 
      } else { 
        alert('There was a problem with the request.'); 
      } 
     } 
  }

We have to add <div id="suggestion"></div> bellow the input field whose id is book.

Now we set the value of the string to be displayed within the div whose id is 'suggestion' as 'responseText' property of the XMLHttpRequest object. 'responseText' is the response to the request as text.

So, the final JavaScript code of the HTML file becomes as follows:

  function book_suggestion() 

var book = document.getElementById("book").value; 
var xhr; 
 if (window.XMLHttpRequest) { // Mozilla, Safari, ... 
    xhr = new XMLHttpRequest(); 
} else if (window.ActiveXObject) { // IE 8 and older 
    xhr = new ActiveXObject("Microsoft.XMLHTTP"); 

var data = "book_name=" + book; 
     xhr.open("POST", "book-suggestion.php", true);  
     xhr.setRequestHeader("Content-Type", "application/x-www-form-urlencoded");                   
     xhr.send(data); 
     xhr.onreadystatechange = display_data; 
    function display_data() { 
     if (xhr.readyState == 4) { 
      if (xhr.status == 200) { 
       //alert(xhr.responseText);       
      document.getElementById("suggestion").innerHTML = xhr.responseText; 
      } else { 
        alert('There was a problem with the request.'); 
      } 
     } 
    } 


HostForLIFE.eu AJAX Hosting
HostForLIFE.eu revolutionized hosting with Plesk Control Panel, a Web-based interface that provides customers with 24x7 access to their server and site configuration tools. Plesk completes requests in seconds. It is included free with each hosting account. Renowned for its comprehensive functionality - beyond other hosting control panels - and ease of use, Plesk Control Panel is available only to HostForLIFE's customers. They offer a highly redundant, carrier-class architecture, designed around the needs of shared hosting customers.



European Ajax Hosting UK - HostForLIFE.eu :: How to Make Custom Alert Message with Ajax?

clock August 6, 2015 09:53 by author Peter

In this article, we are going to learn how to make custom Alert Message with Ajax. Some time we needed to make clone of windows alert message, however that alert message isn't permitting to change the header text. Here using Ajax model popup extender i'll show you how to make custom message box:
Add the user control file and ajaxtoolkit reference in your project.

Write the following code in ascx file.
<style type="text/css">
.MessageBoxPopUp
{
background-color:White;
border:solid 2px #99B4D1;
}

.MessageBoxButton
{
background-color: #A0A0A0;
border: solid 2px #B4B4B4;
color: Black;
font-weight:bold;
font-family:Verdana;
font-size:9pt;
cursor:pointer;
height: 20px;
width:70px;
display:none;
}
.MessageBoxHeader
{
height:17px;
font-size:10pt;
color:White;
font-weight:bold;
font-family:Verdana;
text-align:Left;
vertical-align:middle;
padding:3px 3px 3px 3px;
background-color:#3399FF;
border-bottom:2px solid #B4B4B4;
}
.MessageBoxData
{
height:20px;
font-size:8pt;
font-family:Verdana;
color:#3A4349;
text-align:Left;
vertical-align:top;
}
</style>
<script type="text/javascript">
function closeModelPopup(btn) {
// var mpe = document.getElementById("<%= mpeMessageBox.ClientID %>");
$find('mpeFirmMessageBox').hide();
}
</script>

<cc1:ModalPopupExtender ID="mpeMessageBox" runat="server" DynamicServicePath="" Enabled="True"
TargetControlID="btnTemp" PopupControlID="pnlMessageBox" BackgroundCssClass="modal"
PopupDragHandleControlID="pnlMessageBox" CancelControlID="btnCancel" BehaviorID="mpeFirmMessageBox">
</cc1:ModalPopupExtender>

<asp:Panel ID="pnlMessageBox" runat="server" Style="display: none; width: 300px;
height: 140px;" class="MessageBoxPopUp">
<table border="0" cellpadding="0" cellspacing="0" width="100%">
<tr class="MessageBoxHeader" style="height: 17px;">

<td colspan="2">
    <asp:Label ID="lblHeader" runat="server"></asp:Label>
</td>

<td align="right" style="padding: 2px 2px 0px 0px;">
    <%--<asp:UpdatePanel ID="upnCloseMessageBox" runat="server">
        <ContentTemplate>--%>
            <asp:ImageButton ID="imgBtnClose" runat="server" ImageUrl="~/Image/close_icon.png"
                 OnClientClick="closeModelPopup(this)" />
        <%--</ContentTemplate>
    </asp:UpdatePanel>--%>
</td>
</tr>

<tr>
<td colspan="2" style="height: 5px;">
</td>
</tr>
<tr style="height: 88px;">

<td style="vertical-align: top; padding-left: 5px;">
    <asp:Image ID="imgInfo" runat="server" ImageUrl="~/Image/information-balloon.png" Width="40px" />
</td>

<td class="MessageBoxData" colspan="2" style=" padding: 10px 5px 5px 5px;">
    <asp:Label ID="lblMessage" runat="server"></asp:Label>
</td>

</tr>
<tr style="vertical-align: bottom; height: 20px; padding: 0px 5px 5px 0px;">
<td style="width: 40px;">
</td>
<td align="right" style="width: 180px">
    <asp:Button ID="btnOk" runat="server" CssClass="MessageBoxButton" />
</td>

<td align="right">
    <asp:Button ID="btnCancel" runat="server" CssClass="MessageBoxButton" />
</td>
</tr>
</table>
</asp:Panel>

Now, add the following code in .cs file
public delegate void delegate_OkClick();
public event delegate_OkClick OnOkClick;
public string Header
{
set { lblHeader.Text = value; }
//set { lblHeader.InnerHtml = value; }
}

public string Message
{
set { lblMessage.Text = value; }
}

public Button CancelButton
{
get { return btnCancel; }
}

public Button OkButton
{
get { return btnOk; }
}

public AjaxControlToolkit.ModalPopupExtender MessageBox
{
get { return mpeMessageBox; }
}

protected void Page_Load(object sender, EventArgs e)
{
}

protected void btnOk_OnClick(object sender, EventArgs e)
{
//raise the event if not null
if (OnOkClick != null)
OnOkClick();
}
public void displayMessage(string message)
{
displayMessage(message, null);
}
public void displayMessage(string message, int? type)

{

lblHeader.Text = "Alert Message";
//lblHeader.InnerHtml = title;
lblMessage.Text = message;
btnCancel.Attributes["style"] = "display:block";
btnCancel.Text = "Ok";
mpeMessageBox.Show();
}


Your message box is ready, now you need to call from the aspx page where ever you need to show the message.
You need to add below line of code in
<%@ Register Src="~/Control/Alert.ascx" TagName="MessageBox" TagPrefix="mb" %>
<asp:ScriptManager runat="server" ID="s"></asp:ScriptManager>
<mb:MessageBox ID="ucMessageBox" runat="server"></mb:MessageBox>

And from the code behind cal the display message write the following code:
protected void btnClick_OnClik(object sender, EventArgs e)
{
ucMessageBox.displayMessage("Alert from Code");
}

HostForLIFE.eu AJAX Hosting
HostForLIFE.eu is European Windows Hosting Provider which focuses on Windows Platform only. We deliver on-demand hosting solutions including Shared hosting, Reseller Hosting, Cloud Hosting, Dedicated Servers, and IT as a Service for companies of all sizes. We have customers from around the globe, spread across every continent. We serve the hosting needs of the business and professional, government and nonprofit, entertainment and personal use market segments.


AJAX with Free ASP.NET Hosting - HostForLIFE.eu :: How to Solve JQuery which Only Send Partial Data to AJAX Post

clock April 27, 2015 07:06 by author Rebecca

JQuery is a great JavaScript framework that makes web developer life much easier. But like all framework, you need to learn its gotchas in order to work effectively with it.

Here is one of the gotchas. Jquery POST method lets you create Ajax HTTP POST request to the server. It is actually a shorthand to the JQuery Ajax method:
$.ajax({
  type: "POST",url: "save.php",
  data: "param1="+paramValue1
  +"&param2=paramValue2",
  complete: function(){ }, //manage the complete if needed
  success: function(){}}//get some data back to the screen if needed
});

Today, I'm gonna tell you how to solve the problem when JQuery only send partial data to AJAX Post. Maybe you've found that when executing the AJAX call, only part of the data is passed to the server and the rest vanishes. You usually see that some or all of the parameters you tried to pass are missing or cut in the middle. It's because JQuery uses ‘&’ as a separator between the parameters. If you have a ‘&’ within your key or value parameters, then the JQuery AJAX request gets really messed up.

You can solve this problem by encoding the parameters, replace & with %26 which is the standard encoding for that character. There are 2 ways to encode the parameters:

Semi-Automatic

Use .replace(/&/g, “%26″) –

Here is a working example:
$.ajax({
  type: "POST",url: "save.php",
  data: "param1="+paramValue1.replace(/&/g, "%26")
  +"&param2=paramValue2.replace(/&/g, "%26")",
  complete: function(){ }, //manage the complete if needed
  success: function(){}}//get some data back to the screen if needed
});

Fully Automatic

A more elegant way is to slightly change the way we call the meethod and let JQuery do that encoding for you –

Here is a working example:
$.ajax({
 type: "POST",url: "save.php",
 data: { "param1": paramValue1,
 "param2": paramValue2 },
 complete: function(){ }, //manage the complete if needed
 success: function(){}//get some data back to the screen if needed
});

AJAX with Free ASP.NET Hosting
Try our AJAX with Free ASP.NET Hosting today and your account will be setup soon! You can also take advantage of our Windows & ASP.NET Hosting support with Unlimited Domain, Unlimited Bandwidth, Unlimited Disk Space, etc. You will not be charged a cent for trying our service for the next 3 days. Once your trial period is complete, you decide whether you'd like to continue.


AJAX Hosting Spain - HostForLIFE.eu :: How to Handle Session Timeout and Server HTTP Errors in AJAX

clock April 2, 2015 14:41 by author Rebecca

The most difficult part in writing AJAX code is to handle errors and exceptions. Session timeout is one of the most trivial error that one needs to consider while creating an AJAX enabled application. In this post, I will show you the way of handling session timeout errors server HTTP errors in AJAX.

Normally, we use AJAX to deliever HTML content that we put in a DIV or SPAN tag and display it on screen. But suppose the request that we sent using AJAX was generated an error due to session timeout then the session timeout screen will be shown in DIV tag. Any error generated by server let say http 404 error or http 505 can lead to display such error in our display DIV.

How to Handle Session Timeout Errors

One solution that you can use to handle the session timeout errors is using JSON or XML format as output for your AJAX requests. You have to check for session in your script, say for example if you are using JSP then probably you can do something like this:

if(null == session || session.getAttribute("SOME_ATTR_THAT_I_PLACED_IN_SESSION")) {
    isSessionNull = true;
}
...
{
    <%
    if(isSessionNull) {
        out.println("status: error");
    }
    else {
        out.println("status: success");
    }
    %>
}

In short, create a status field in your JSON script or a status tag in your XML which will describe the status of the request. I am looking for some more ways of checking session timeouts in AJAX. Kindly let me know if you have a good solution.

Handle Server HTTP errors in AJAX

HTTP errors like 404, 503 are sometimes tedious to handle using AJAX. There is a simple trick to solve this problem. First let's see simple AJAX handler function that you use to get response XML/text through AJAX.

xhr.open("GET", "http://someurl", true);
xhr.onreadystatechange = handleHttpResponse;
xhr.send(null);
...
...
function handleHttpResponse() {
    if (xhr.readyState == 4) {
        //handle response your way
        spanBodyContent.innerHTML = xhr.responseText;
    }
}

Normal AJAX handlers has a if to check readyState and if it is 4 (response arrived state) then you will get the response from xhr.responseText or xhr.responseXML.

AJAX’s XMLHttpRequest object has attributes to check the status of your http request. You can use two attributes: status and statusText for knowing this.

xhr.status
..
xhr.statusText

Thus by checking status attribute from your AJAX xhr object can solve your problem.

xhr.open("GET", "http://someurl", true);
xhr.onreadystatechange = handleHttpResponse;
xhr.send(null);
...
...
function handleHttpResponse() {
    if (xhr.readyState == 4) {
        try {
        if(xhr.status == 200) {
            //handle response your way
            spanBodyContent.innerHTML = xhr.responseText;
        }
        }catch(e) {//error}
    }
}

At the end, if status is not 200, you may not want to update your DOM with the ajax result and display some error message on your web page.

HostForLIFE.eu AJAX Hosting
HostForLIFE.eu is European Windows Hosting Provider which focuses on Windows Platform only. We deliver on-demand hosting solutions including Shared hosting, Reseller Hosting, Cloud Hosting, Dedicated Servers, and IT as a Service for companies of all sizes. We have customers from around the globe, spread across every continent. We serve the hosting needs of the business and professional, government and nonprofit, entertainment and personal use market segments.


Ajax Hosting UK - HostForLIFE.eu :: How to Edit the GridView Row Values in ASP.NET with Ajax ?

clock March 3, 2015 08:40 by author Peter

In this post, I explain you about how to edit the GridView Row Values in ASP.NET with Ajax. First, create a new project on Visual Studio. In ASP.NET write the following code:


<%@ Register Assembly="AjaxControlToolkit" Namespace="AjaxControlToolkit" TagPrefix="ajax" %>
<html xmlns="http://www.w3.org/1999/xhtml">
<head runat="server">
    <title> How to Edit the GridView Row Values in ASP.NET with Ajax </title> 
<style type="text/css">
    .modalBackground
    {
        background-color: black;      
        opacity: 0.7;      
    }
 #grd
 {
     margin:25px;
}
</style>
</head>
<body>
   <form id="form1" runat="server">
<asp:ScriptManager ID="ScriptManager1" runat="server">
</asp:ScriptManager>
<asp:DropDownList></asp:DropDownList>
<h4>Details</h4>
<div>
      <asp:GridView ID="grd" runat ="server"  GridLines="Both" BorderColor="#4F81BD" BorderStyle="Solid"
                            BorderWidth="1px" Style="position: static"  AutoGenerateColumns="false" >          <Columns>
              <asp:BoundField DataField="User_id" HeaderText="User ID" SortExpression="User_id" />
              <asp:BoundField DataField="Name" HeaderText="Name" SortExpression="Name" />              <asp:BoundField DataField="Email_Address" HeaderText="Email Address"                  SortExpression="Email_Address" />          
           <asp:BoundField DataField="Mobile" HeaderText="Mobile No" SortExpression="Mobile" />
                             <asp:TemplateField HeaderText="Edit">
<ItemTemplate>
    <asp:LinkButton ID="lnkBtn" runat="server" OnClick="lnkbtn_Click">Edit</asp:LinkButton>
</ItemTemplate>
</asp:TemplateField>
          </Columns>

<RowStyle BorderColor="Red" BorderWidth="2px"></RowStyle>
         </asp:GridView>
</div>
           <asp:Button ID="btnShow" Visible="true" runat="server" />
            <ajax:ModalPopupExtender ID="ModalPopup" runat="server" TargetControlID="btnShow"
                BackgroundCssClass="modalBackground" PopupControlID="PnlShow">
            </ajax:ModalPopupExtender>
                      <div ID="PnlShow" runat="server" style="display: none;background-color:white;">
             <span style="float: right; padding-right: 0px; margin: 0px;">
                         <asp:Button ID="btnClose" Text="X" runat ="server" />
             </span>
                <div style="margin:25px;">
<table >
<tr>
<td colspan="2" >User Details</td>
</tr>
<tr><td>User Id</td>
<td>Name</td>
<td>Email_Address</td>
<td>Mobile No.</td>
</tr>
<tr>
<td><asp:Label ID="lblID" runat="server" /></td>
<td><asp:TextBox ID="txtName" runat="server" /></td>
<td><asp:TextBox ID="txtEmail" runat="server" /></td>
<td><asp:TextBox ID="txtMobile" runat="server" /></td>
</tr>
<tr>
<td>
<asp:Button ID="btnUpdate" CommandName="Update" runat="server" Text="Update" onclick="btnUpdate_Click"/>
<asp:Button ID="btnCancel" runat="server" Text="Cancel" />
</td>
</tr>
</table>
                </div>                          
            </div>
</form>
</body>
</html>


In C#.NET
using System;
using System.Collections.Generic;
using System.Linq;
using System.Web;
using System.Web.UI;
using System.Web.UI.WebControls;
using System.Data;
using System.Data.SqlClient;
public partial class AjaxModalPopUp : System.Web.UI.Page
{
    SP obj = new SP();
    protected void Page_Load(object sender, EventArgs e)
    {
        BindData();
        btnShow.Visible = false;
    }
   protected void BindData()
    {    
        DataSet ds = obj.Display();
        grd.DataSource = ds;
        grd.DataBind();
    }
    protected void btnUpdate_Click(object sender, EventArgs e)
    {
        obj.id = Convert.ToInt32(lblID.Text);
        obj.name = txtName.Text;
        obj.email = txtEmail.Text;
        obj.mobile = txtMobile.Text;
        obj.Update();
        Response.Write ("<script>alert('Details Updated Successfully');</script>");    
        BindData();
    }
    protected void lnkbtn_Click(object sender, EventArgs e)
    {
        LinkButton LNK = sender as LinkButton;
        GridViewRow gvrow = (GridViewRow)LNK.NamingContainer;
        lblID.Text = gvrow.Cells[0].Text;
        txtName.Text = gvrow.Cells[1].Text;       
        txtEmail.Text = gvrow.Cells[2].Text;
        txtMobile.Text = gvrow.Cells[3].Text;
        btnShow.Visible = true;
        ModalPopup.Show();
    }
 }


In App_Code/SP.cs

using System;
using System.Collections.Generic;
using System.Linq;
using System.Web;
using System.Data;
using System.Data.SqlClient;
using Microsoft.Practices.EnterpriseLibrary.Data;
using Microsoft.Practices.EnterpriseLibrary.Data.Sql;
using System.Configuration;
using System.Data.Common ;
public class SP
{
    public int id { get; set; }
    public string name { get; set; }
    public string email { get; set; }
    public string mobile { get; set; }
    public int studentId { get; set; }
    public string item { get; set; }
    public DataSet Display()
    {
        DataSet ds;
        try
        {           
            DbCommand cmd = sqlCon.GetStoredProcCommand("Display_Users");
            ds = sqlCon.ExecuteDataSet(cmd);
            return ds;
        }
        catch (Exception ex)
        {
            throw ex;
        }
    }
    public int Update()
    {
        int checkUser;
        try
        {

            DbCommand cmd = sqlCon.GetStoredProcCommand("Update_user");
            sqlCon.AddInParameter(cmd, "@userId", DbType.String, id);
            sqlCon.AddInParameter(cmd, "@name", DbType.String, name);
            sqlCon.AddInParameter(cmd, "@email", DbType.String, email);
            sqlCon.AddInParameter(cmd, "@mobile", DbType.String, mobile);
            checkUser = sqlCon.ExecuteNonQuery(cmd);
            return checkUser;
        }
        catch (Exception ex)
        {
            throw ex;
        }
    }
}

In VB.net
Imports System.Collections.Generic
Imports System.Linq
Imports System.Web
Imports System.Web.UI
Imports System.Web.UI.WebControls
Imports System.Data
Imports System.Data.SqlClient
Partial Public Class AjaxModalPopUp
    Inherits System.Web.UI.Page
    Private obj As New SP()
    Protected Sub Page_Load(ByVal sender As Object, ByVal e As EventArgs)
        BindData()
        btnShow.Visible = False
    End Sub
    Protected Sub BindData()
        Dim ds As DataSet = obj.Display()
        grd.DataSource = ds
        grd.DataBind()
    End Sub
    Protected Sub btnUpdate_Click(ByVal sender As Object, ByVal e As EventArgs)
        obj.id = Convert.ToInt32(lblID.Text)
        obj.name = txtName.Text
        obj.email = txtEmail.Text
        obj.mobile = txtMobile.Text
        obj.Update()
        Response.Write("<script>alert('Details Updated Successfully');</script>")
        BindData()
    End Sub
    Protected Sub lnkbtn_Click(ByVal sender As Object, ByVal e As EventArgs)
        Dim LNK As LinkButton = TryCast(sender, LinkButton)
        Dim gvrow As GridViewRow = DirectCast(LNK.NamingContainer, GridViewRow)
        lblID.Text = gvrow.Cells(0).Text
        txtName.Text = gvrow.Cells(1).Text
        txtEmail.Text = gvrow.Cells(2).Text
        txtMobile.Text = gvrow.Cells(3).Text
        btnShow.Visible = True
        ModalPopup.Show()
    End Sub
End Class


In App_Code/SP.vb
Imports System.Collections.Generic
Imports System.Linq
Imports System.Web
Imports System.Data
Imports System.Data.SqlClient
Imports Microsoft.Practices.EnterpriseLibrary.Data
Imports Microsoft.Practices.EnterpriseLibrary.Data.Sql
Imports System.Configuration
Imports System.Data.Common
Public Class SP
    Public Property id() As Integer
        Get
            Return m_id
        End Get
        Set(ByVal value As Integer)
            m_id = Value
        End Set
    End Property
    Private m_id As Integer
    Public Property name() As String
        Get
            Return m_name
        End Get
        Set(ByVal value As String)
            m_name = Value
        End Set
    End Property
    Private m_name As String
    Public Property email() As String
       Get
            Return m_email
        End Get
        Set(ByVal value As String)
            m_email = Value
        End Set
    End Property
    Private m_email As String
    Public Property mobile() As String
        Get
            Return m_mobile
        End Get
        Set(ByVal value As String)
            m_mobile = Value
        End Set
    End Property
    Private m_mobile As String
    Public Property studentId() As Integer
        Get
            Return m_studentId
        End Get
        Set(ByVal value As Integer)
            m_studentId = Value
       End Set
    End Property
    Private m_studentId As Integer
    Public Property item() As String
        Get
            Return m_item
       End Get
        Set(ByVal value As String)
            m_item = Value
       End Set
    End Property
   Private m_item As String
    Public Function Display() As DataSet
        Dim ds As DataSet
       Try
            Dim cmd As DbCommand = sqlCon.GetStoredProcCommand("Display_Users")
            ds = sqlCon.ExecuteDataSet(cmd)
            Return ds
        Catch ex As Exception
            Throw ex
        End Try
    End Function
    Public Function Update() As Integer
        Dim checkUser As Integer
       Try
            Dim cmd As DbCommand = sqlCon.GetStoredProcCommand("Update_user")       sqlCon.AddInParameter(cmd, "@userId", DbType.[String], id)
            sqlCon.AddInParameter(cmd, "@name", DbType.[String], name)
            sqlCon.AddInParameter(cmd, "@email", DbType.[String], email)
            sqlCon.AddInParameter(cmd, "@mobile", DbType.[String], mobile)
           checkUser = sqlCon.ExecuteNonQuery(cmd)
            Return checkUser
        Catch ex As Exception
            Throw ex
        End Try
    End Function
End Class

HostForLIFE.eu Ajax Hosting
HostForLIFE.eu is European Windows Hosting Provider which focuses on Windows Platform only. We deliver on-demand hosting solutions including Shared hosting, Reseller Hosting, Cloud Hosting, Dedicated Servers, and IT as a Service for companies of all sizes. We have customers from around the globe, spread across every continent. We serve the hosting needs of the business and professional, government and nonprofit, entertainment and personal use market segments.


About HostForLIFE

HostForLIFE is European Windows Hosting Provider which focuses on Windows Platform only. We deliver on-demand hosting solutions including Shared hosting, Reseller Hosting, Cloud Hosting, Dedicated Servers, and IT as a Service for companies of all sizes.

We have offered the latest Windows 2019 Hosting, ASP.NET 5 Hosting, ASP.NET MVC 6 Hosting and SQL 2019 Hosting.


Tag cloud

Sign in