Full Trust European Hosting

BLOG about Full Trust Hosting and Its Technology - Dedicated to European Windows Hosting Customer

AngularJS Hosting Europe - HostForLIFE.eu :: Syntax Highlighting In Markdown For Blog made with Scully

clock April 27, 2021 07:41 by author Peter

In many technical blogs, we use code snippets to share code with readers and explain the implementation. In a previous article, we have seen how to create a blogging site with Angular and Scully. If you are creating a technical blogging site you might also need to add code snippets to your blog. So In this article, we will see how to add a code block with syntax highlighting feature. 


Adding Code Block in Markdown file
In the markdown file, we can add a code block with the following syntax,
    ```    
    --- CODE BLOCK ---    
    ```  


Optionally you can also set the language as
    ```language  
    --- CODE BLOCK ---  
    ```  


 language can be javascript, bash, etc.
 
For Example,
Add the following sample code block in  getting-started-with-scully.md file
    ```javascript  
    import { ScullyConfig } from '@scullyio/scully';  
    export const config: ScullyConfig = {  
      projectRoot: "./src",  
      projectName: "portfolio",  
      outDir: './dist/static',  
      routes: {  
        '/blog/:slug': {  
          type: 'contentFolder',  
          slug: {  
            folder: "./blog"  
          }  
        },  
      }  
    };  

    ```  
Now take a Scully build and serve the Scully static server  with npm run scully && npm run scully:serve

As you can see it generates the code block with preformatted code, but it doesn't have any syntax highlighting.
 
Adding Syntax Highlighting Feature
Scully has a markdown plugin, which transforms markdown files to HTML files at the time of Scully build. This plugin provides an option to enable syntax highlighting at the time of Scully build.

As you can see below, We will use the setPluginConfig function to configure plugins. set enableSyntaxHighlighting to true in the markdown plugin to enable syntax highlighting.

    // scully.[projectName].config.ts  
      
    import { ScullyConfig, setPluginConfig } from '@scullyio/scully';  
      
    setPluginConfig('md', { enableSyntaxHighlighting : true});  
      
    export const config: ScullyConfig = {  
      projectRoot: "./src",  
      projectName: "portfolio",  
      outDir: './dist/static',  
      routes: {  
        '/blog/:slug': {  
          type: 'contentFolder',  
          slug: {  
            folder: "./blog"  
          }  
        },  
      }  
    };  


Scully internally uses Prism.js for code block syntax highlighting. We need to import its styles in our styles.css file as below
    /* include CSS for prism toolbar */  
    @import '~prismjs/plugins/toolbar/prism-toolbar.css';  
    /* check node_modules/prismjs/themes/ for the available themes */  
    @import '~prismjs/themes/prism-tomorrow';  


Great !!! We are done with the implementation, Now take and build and test it.
 
Final Output

Take a new build of the angular app, as we have made changes in styles.css, then take a Scully build and start the static server using the following commands

    ng build --prod  
    npm run scully  
    npm run scully:serve  


Now check the blog in which you have added code snippets / code blocks :


European Visual Studio 2017 Hosting - HostForLIFE.eu :: Enabling Preview Features In Visual Studio 2019

clock April 21, 2021 08:38 by author Peter

By default, Visual Studio doesn’t enable preview feature selection in Visual Studio 2019. Say you have .Net 5.0 installed on your machine and you are creating a new Console Application. After creating the application, you will notice that, although .Net 5.0 is installed, the application still picks up the .Net Core 3.1 as a default framework. In fact, the application didn’t ask for framework selection too.

So, how can we select the framework while creating an application itself? For doing this, we need to enable Preview Features in Visual Studio by going to the Options menu as shown below,


mySQL Hosting Europe - HostForLIFEASP.NET :: Character Sets And Collations in MySQL

clock April 16, 2021 08:23 by author Peter

In this tutorial, I am going to explain about Character Sets and Collations in MySQL with examples. This article will cover the following topics. Let’s see.

CHARACTER SETS
A character set is a set of symbols and their encoding. It is a set of behavior; it is used for analyzing the characters in a character set. MySQL also includes the character set support in which it prepares for storing data by using a collection of character sets and it also performs the estimation according to a variety of collations. MySQL chooses the database character set and the collation of the database and it can become the point on character sets at the server, database, table, and at the column level. Each character set contains one or more collations that determine a set of character comparison rules within the character set.
 
Character sets have developed through history but that history is beyond the bounds of this article. During this time the Unicode standard developed and achieves identification of the older character sets which are closed throughout. It is important to be conscious of the difference between Unicode and local character sets.
MySQL supports various character sets that allow almost any character to be stored in a string. Below is the CHARACTER SET Statement, by which the user can get all available character sets in the MySQL database.
SHOW CHARACTER SET;

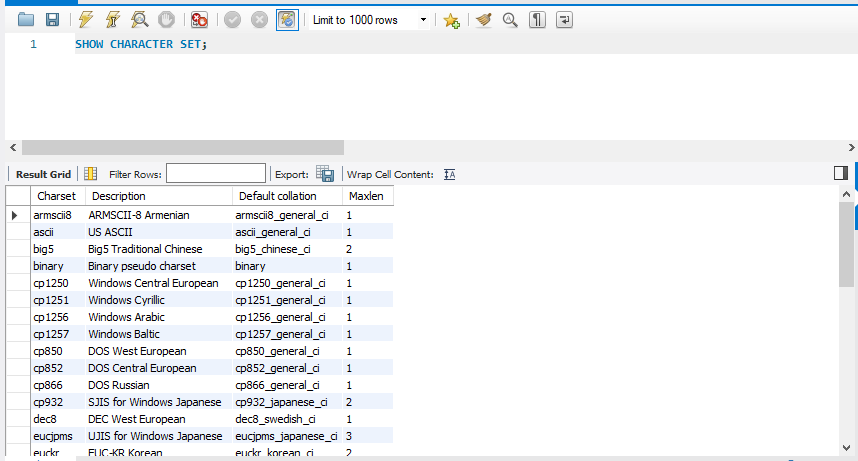
In the above-given character set, it must have one collation. And, the given character set, it has several collations. To the collations list for a given character set, it includes all variable character sets by using the following statement.
 
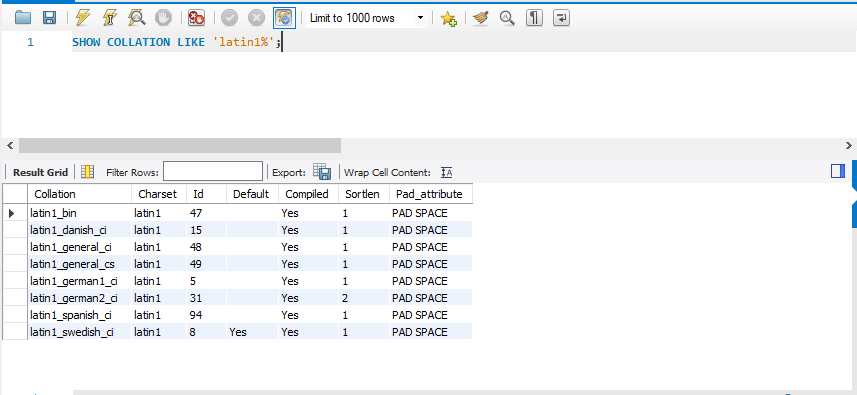
In MySQL, you can use the "SHOW COLLATION" statement to get all the collations for a given character set.
 
Syntax
SHOW COLLATION LIKE 'character_set_name%';
 
Example

    SHOW COLLATION LIKE 'latin1%';

Setting Character Sets and Collations at Database Level
 
When you create a database, you can specify the default character set and the collation for a database. But, if you don’t specify it, MySQL will use the default character sets and collation.
 
Syntax
CREATE DATABASE <database_name>
CHARACTER SET <character_set_name>
COLLATE <collation_name>

Setting Character Sets and Collations at the Table Level
 
When you create a table, you can also specify the default character set and the collation for a table. But, if you don’t specify it, MySQL will use the default character sets and collation.
 
Syntax
CREATE TABLE <table_name> (
<column_name1> datatype,
<column_name2> datatype, …
<column_nameN> datatype

)
CHARACTER SET <character_set_name>
COLLATE <collation_name>;
 

For Example
 
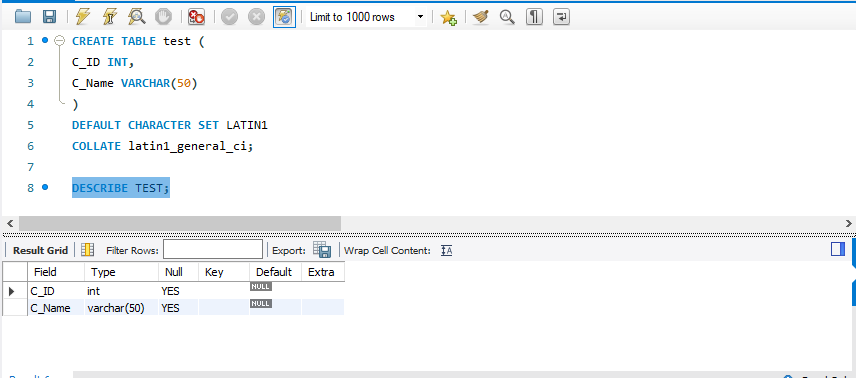
1) Define the column and table with the collate and its character
 
Example - In the following example we have to define the column and table with the collation and its character.

CREATE TABLE test(  
  C_ID INT,  
  C_Name VARCHAR(50)  
)  
DEFAULT CHARACTER SET LATIN1  
COLLATE latin1_general_ci;  
  
DESCRIBE TEST; 


2) Setting Collation and Character Set a Table Level
 
Example - Here we have to define the table has a table character set and a table collation. Create a table “RACEWINNER” with R_ID and First_name column and set the collation.

    Create table RACEWINNER(  
      R_ID INT,  
      First_name varchar(30)  
    ) CHARACTER SET latin1  
    COLLATE latin1_danish_ci;  
      
    DESCRIBE RACEWINNER;


3) Setting Collation and character set at Column Level
 
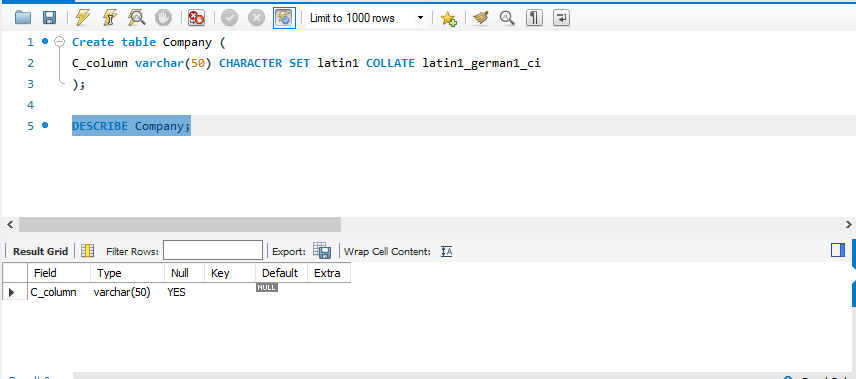
Example - In this example create a table "Company" and show the collation on the column character set.

    Create table Company(  
      C_column varchar(50) CHARACTER SET latin1 COLLATE latin1_german1_ci  
    );  
      
    DESCRIBE Company;

HostForLIFE.eu SQL Server 2019 Hosting
HostForLIFE.eu is European Windows Hosting Provider which focuses on Windows Platform only. We deliver on-demand hosting solutions including Shared hosting, Reseller Hosting, Cloud Hosting, Dedicated Servers, and IT as a Service for companies of all sizes. We have customers from around the globe, spread across every continent. We serve the hosting needs of the business and professional, government and nonprofit, entertainment and personal use market segments.


About HostForLIFE

HostForLIFE is European Windows Hosting Provider which focuses on Windows Platform only. We deliver on-demand hosting solutions including Shared hosting, Reseller Hosting, Cloud Hosting, Dedicated Servers, and IT as a Service for companies of all sizes.

We have offered the latest Windows 2019 Hosting, ASP.NET 5 Hosting, ASP.NET MVC 6 Hosting and SQL 2019 Hosting.


Tag cloud

Sign in