Full Trust European Hosting

BLOG about Full Trust Hosting and Its Technology - Dedicated to European Windows Hosting Customer

European Moodle 2.8 Hosting - UK :: How to Install Moodle in IIS on Windows Server Hosting Enviroment

clock November 24, 2014 06:28 by author Scott

In this tutorial, we will show you how to install the latest Moodle manually on Windows Server hosting environment with Plesk Control panel and will show you the error during the installation. Hope this tutorial will help you.

Moodle Installation Requirement

To install Moodle, we need to make sure that your server support the latest PHP 5.4 version or higher. Without this PHP version, we can’t install the latest Moodle version. And also you need to install MySQL on your server. With our configuration settings (Plesk), we have install MySQL previously and you can create the database via Control Panel. Please see this complete steps how to install Moodle

1. Download the latest Moodle version directly on their site https://download.moodle.org/releases/latest/. Just download it to your computer.

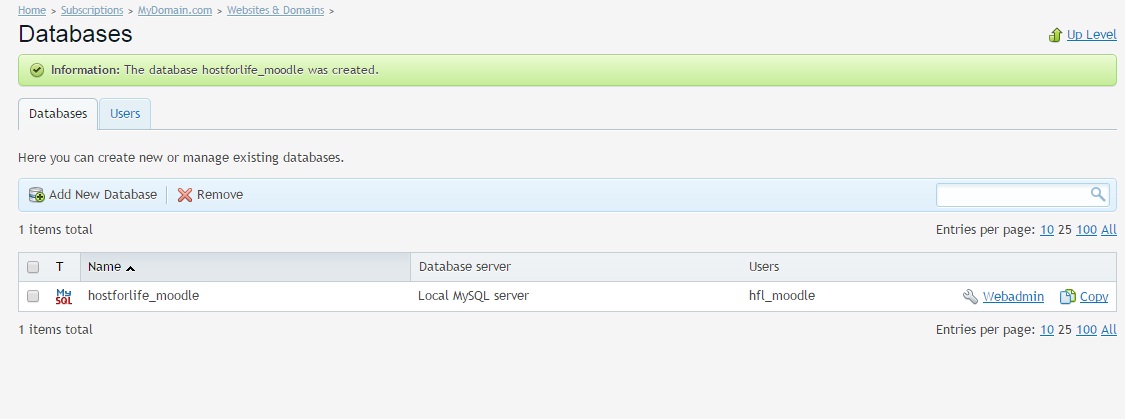
2. Login to your Plesk Control Panel and add MySQL database.

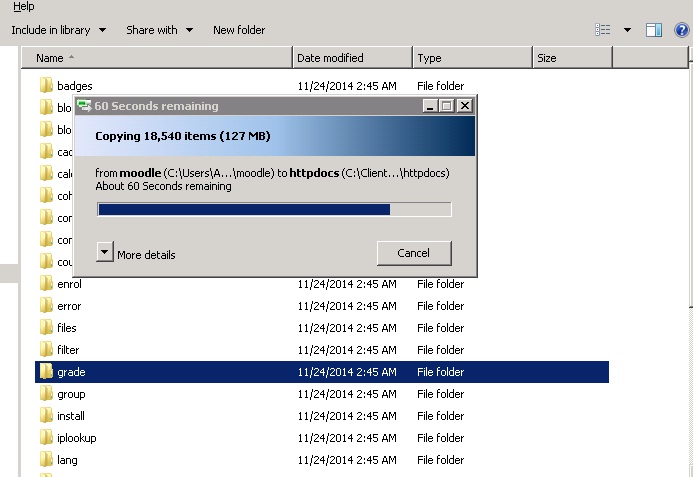
3. Extract the Moodle file to your root folder.

4. Then, you may try to browse your site and it will prompt permission error as below

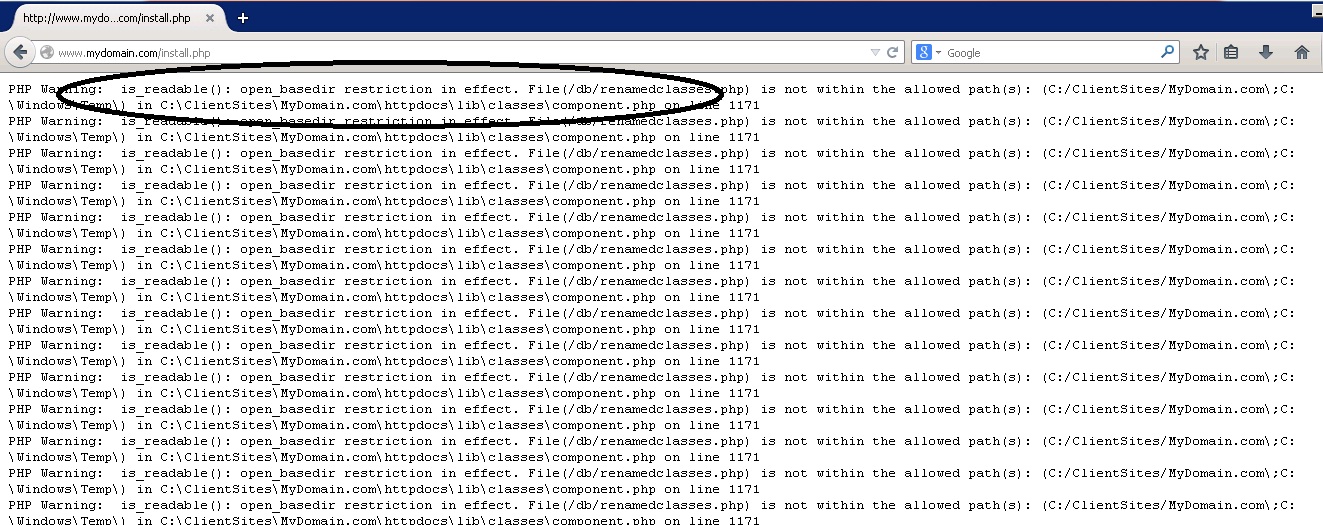
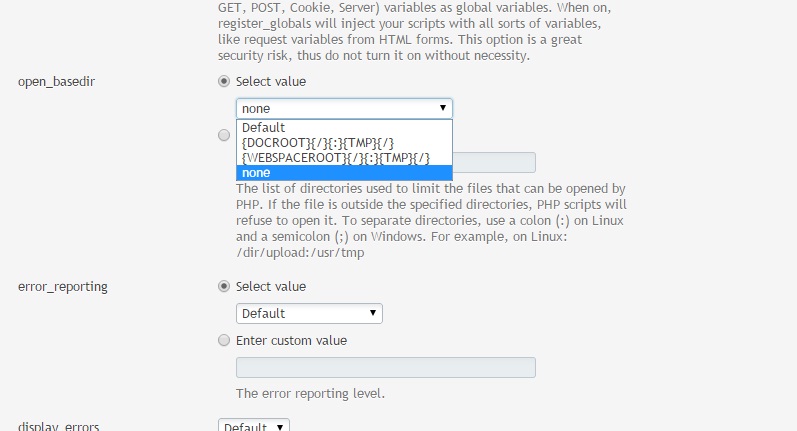
5. What we need to do is give full permission to root folder and then change the open_basedir restriction to NONE on your Plesk Control Panel. Login to your Control Panel, find PHP settings on your Plesk Control Panel and then set open_basedir to None and then click OK. Please see this image below:

6. Browse your site again. It will ask the Moodle installation.


7. It will show the error message again:


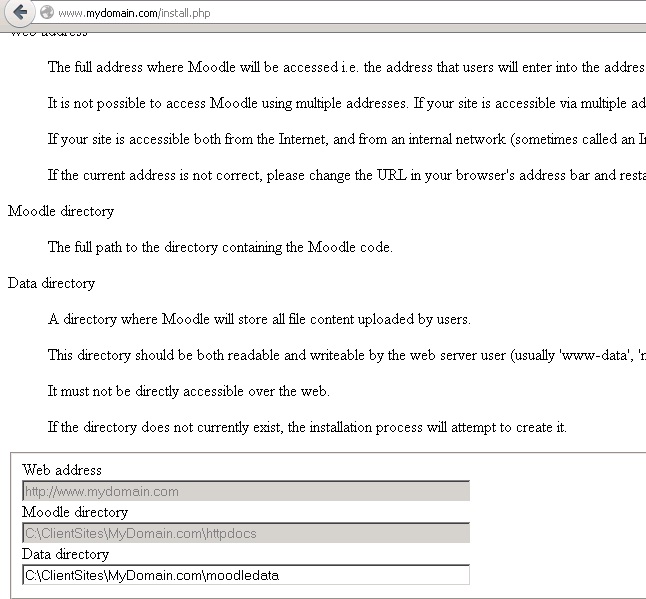
"Parent directory (C:\ClientSites\MyDomain.com) is not writeable. Data directory (C:\ClientSites\MyDomain.com\moodledata) cannot be created by the installer."


Then, please give full permission again to C:\ClientSites\MyDomain folder. Once, you have given the permission, then you can continue the installation.

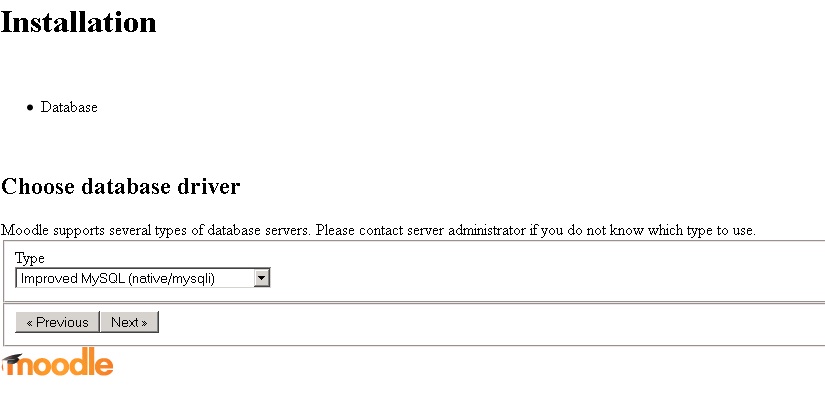
8. Once you click Next, it will ask the database server that you want to use. In this case, we use MySQL server so we select MySQL.


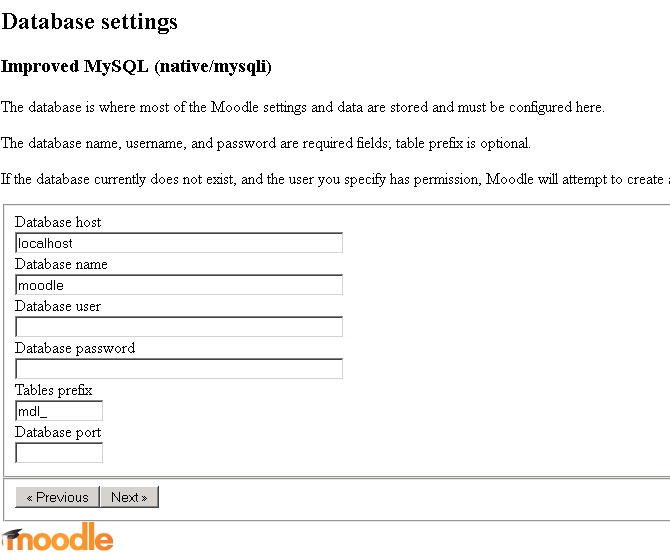
9. Once you click Next, Moodle requires your database details. Please make sure you fill the correct details so you can continue the installation.

10. Once you have filled all your database details, it will show this error message

If you receive this error message, then refresh the installation again

11. Once you have refreshed it, you won’t see this error message again. You will be asked about language that you want to use.

12. Then, some of you find this error message:

HTTP Error 500.0 - Internal Server Error
c:\php-fastcgi\php-cgi.exe - The FastCGI process exceeded configured activity timeout


This is the last error that you might find during the installation. If you can fix this issue, then the Moodle is ready. This issue is about the timeout error, so we need to increase PHP activity timeout on the server.

How to Increase Fast-CGI ActivityTimeout in IIS

When your PHP script runs longer than 10 minutes (600 seconds) you will get an 500 Internal server error.

To fix this issue you will need to increase the fastCgi activityTimeout in IIS7.

1. Start a command promt and go to this folder:

c:\Windows\System32\inetsrv

2. Execute this command to see the current settings:

C:\Windows\System32\inetsrv>appcmd list config -section:system.webServer/fastCgi

Output will be something like this:

<system.webServer>
<fastCgi>
<application fullPath="C:\Program Files (x86)\PHP\v5.4\php-cgi.exe" monitorChangesTo="php.ini" activityTimeout="600" requestTimeout="600" instanceMaxRequests="10000">
<environmentVariables>
<environmentVariable name="PHP_FCGI_MAX_REQUESTS" value="10000" />
<environmentVariable name="PHPRC" value="C:\Program Files (x86)\PHP\v5.4" />
</environmentVariables>
</application>
</fastCgi>
</system.webServer>

3. To change the timeout to 1 hour (3600 seconds) execute the following command:

C:\Windows\System32\inetsrv>appcmd set config -section:system.webServer/fastCgi "-[fullPath='C:\Program Files (x86)\PHP\v5.4\php-cgi.exe'].activityTimeout:3600"

Not the use of double and single quotes to specify the correct parameters.

4. After you run this command you will see this output:

Applied configuration changes to section "system.webServer/fastCgi" for "MACHINE/WEBROOT/APPHOST" at configuration commit path "MACHINE/WEBROOT/APPHOST"

After running the list config command again the output now looks like this:

<system.webServer>
<fastCgi>
<application fullPath="C:\Program Files (x86)\PHP\v5.4\php-cgi.exe" monitorChangesTo="php.ini" activityTimeout="3600" requestTimeout="600" instanceMaxRequests="10000">
<environmentVariables>
<environmentVariable name="PHP_FCGI_MAX_REQUESTS" value="10000" />
<environmentVariable name="PHPRC" value="C:\Program Files (x86)\PHP\v5.4" />
</environmentVariables>
</application>
</fastCgi>
</system.webServer>

As you can see the activityTimeout is now increased.

5. Restart your IIS service and your good to go.

Conclusion

I hope article above help you to install Moodle. Please feel free to share this tutorial if you find this is useful. Thank you for reading this tutorial.


European Wordpress Hosting - UK :: Tips to Improve Your Wordpress Performance

clock November 17, 2014 07:49 by author Scott

Speed is essential for your website and can determine the success of your online business. Slow loading pages are bad for business and your visitors will be reluctant and leave your site and seek another one. In fact, you can lose rankings in search results, however we are here to help you and below we share several tips to help users improve their WordPress website speed.

Choose a reliable web hosting provider

An efficient and reliable wordpress hosting is definitely essential to your fast loading speed. If you select one not so efficient you may experience problems such as frequent down (during high peak) traffic times, slow website speed and slow servers.

Select an appropriate theme

When you decide on a Theme, what you should take into consideration is not just a basic theme, but also a framework for extra benefits to your weblog site, for instance, you should look at how often the framework is modified and whether it is protected enough.

Database Optimization

WordPress uses the database to store pages, posts, settings, comments and plugin information. Whenever a page is loaded, WordPress automatically reads the. It’s important for databases to be optimized on a consistence basis; this is because the information shown or found may take a long time when your database is too busy. We recommend using the WP-DBManager plugin, which restores, optimizes and helps you back up your database.

Delete spam comments

We recommend cleaning up and deleting spam comments because they help slow your website down. Users can modify their site quicker by removing them from your WordPress dashboard. Simply just click the “Empty spam” button and this will clear all the current spam comments on your site. Furthermore, there’s hundreds of WordPress spam plugins to eliminate the spam also i.e. Spam Comments Cleaner.

Delete Post Revisions

When editing a post in WordPress, the old version will be saved. So every post will more likely end up with 10 post or more, so removing these revisions can help speed up your WordPress site to some level. If you want to delete WordPress revisions, we recommend choosing the “Better Delete Revision “plugin and after installed, simply go to your settings and click the Check Revision Posts and delete them, that’s it!


Crystal Report 2013 Hosting France - HostForLIFE.eu :: How to Create Report on Crystal Reports without a Database ?

clock November 13, 2014 10:34 by author Peter

Sometimes we would like to do tricks with the Crystal Reports 2013 engine, like taking advantage of the exporting functions to make Word, Excel, or PDF files. What if we do not scan the data from a database? this article shows the details on making a Crystal Reports sub report, and the way to fill it from code, without a database.

Using the code

  1. First thing you should do is Create the Project: File -> New -> New Project
  2. Then, creat a new Crystal Reports Visual Basic Windows Application.
  3. Next, Create the DataSet schema. Right click the Crystal Reports project -> Add -> New Folder. Name it that folder: “DataSets”.
  4. Right click the “DataSets” folder , click Add then select New Item.
  5. Now, create the new CRDataSet DataSet. Right click the CRDataSet Designer Page, click Add, then select New element. I give it a name: MainTable.
  6. Add new Field1, Field2, Field3 rows.
  7. Repeat steps three and four, then Add a new DetailTable element.

You will have the following DataSet tables schema as shown as picture below:

Now,  we are going to Create report on Crystal Report:
1. First, Right click the Crystal Reports project -> Click “Add” -> SelectNew Folder.
2. Name it that folder “Reports”.
3.Right click on the Reports folder -> Click Add -> then select New Item.
4. Open a new MainReport Crystal Reports report.
5. Now, Click the Register Later button to close the register window, if it appears.
6. Select the Subreport and then click OK button. In the Contain Subeport Expert window Data tab, expand the Project Data -> Select ADO.NET DataSet -> CrystalReport.CRDataSet.
7. Choose MainTable. Now, Click the Insert Table button.
8. Click Next.
9. Next Step: Click the Add All button ->  Next -> Next -> Next.
10. Next to the Create a Subreport choice of the Subreport window tab, then fill  DetailReport in the Report Name edit box.
11. Click the Report Expert button. Insert the DetailTable. Then Click Next to open the Subreport Generator. Add All fields. Click Next. Click Next. Click Next. Click Next.
12. Type "No DB Subreport Crystal Report Sample" as the Subreport Title.
13. Click Finish.
14. After that Click Next. Type "No DB Crystal Report Sample." as the Main Report title. And now, click Finish.

And now we will add the a CrystalReportViewer1 to the form.

  1. Open the Form1 form. Click View -> Toolbox in the menu.
  2. Drag a CrystalReportViewer into the form.
  3. Right click the CrystalReportViewer1 CrystalReportViewer in the form -> Properties.
  4. Set the Dock property to Fill.
  5. Next step, Add the code to fill & show the Crystal Reports report. Then, Right click the Form -> View Code. Add the following Form1_Activated method:

Private Sub Form1_Activated(ByVal sender As Object, _
        ByVal e As System.EventArgs) _
        Handles MyBase.Activated
    Dim dsObj As CRDataSet = New CRDataSet
    FillDataSet(dsObj)
    Dim cr As MainReport = New MainReport
    ' Set the report DataSet  
   cr.SetDataSource(dsObj)
    CrystalReportViewer1.ReportSource = cr
End Sub


Now, I’m gonna Add the following FillDataSet code:

Public Sub FillDataSet(ByRef dataSet As CRDataSet)
    ' Turn off constraint checking before the dataset is filled.
    ' This allows the adapters to fill the dataset without concern
    ' for dependencies between the tables.
    dataSet.EnforceConstraints = False
    Try
        ' Attempt to fill the dataset MainTable
        dataSet.MainTable.AddMainTableRow("Hello!", _
                         "This is", "my sample data")
        ' Attempt to fill the dataset DetailTable
        dataSet.DetailTable.AddDetailTableRow("This is", _
                           "the detail", "information")
        dataSet.DetailTable.AddDetailTableRow("added", _
                           "without the", "need of")
        dataSet.DetailTable.AddDetailTableRow("actually", _
                           "access a", "database.")
    Catch ex As Exception
       ' Add your error handling code here.
        Throw ex
    Finally
        ' Turn constraint checking back on.
        dataSet.EnforceConstraints = True
    End Try
End Sub


Build and Run this Application. Hope this tutorial works for you!


HostForLIFE.eu Windows Hosting Proudly Launches New Data Center in Paris (France)

clock November 10, 2014 10:56 by author Peter

HostForLIFE.eu, a leading Windows web hosting provider with innovative technology solutions and a dedicated professional services team proudly announces New Data Center in Paris (France) for all costumers. HostForLIFE’s new data center in Paris will address strong demand from customers for excellent data center services in Europe, as data consumption and hosting services experience continued growth in the global IT markets.

The new facility will provide customers and our end users with HostForLIFE.eu services that meet in-country data residency requirements. It will also complement the existing HostForLIFE.eu. The Paris (France) data center will offer the full range of HostForLIFE.eu web hosting infrastructure services, including bare metal servers, virtual servers, storage and networking.

HostForLIFE.eu expansion into Paris gives us a stronger European market presence as well as added proximity and access to HostForLIFE.eu growing customer base in region. HostForLIFE.eu has been a leader in the dedicated Windows & ASP.NET Hosting industry for a number of years now and we are looking forward to bringing our level of service and reliability to the Windows market at an affordable price.

The new data center will allow customers to replicate or integrate data between Paris data centers with high transfer speeds and unmetered bandwidth (at no charge) between facilities. Paris itself, is a major center of business with a third of the world’s largest companies headquartered there, but it also boasts a large community of emerging technology startups, incubators, and entrepreneurs.

Our network is built from best-in-class networking infrastructure, hardware, and software with exceptional bandwidth and connectivity for the highest speed and reliability. Every upstream network port is multiple 10G and every rack is terminated with two 10G connections to the public Internet and two 10G connections to our private network. Every location is hardened against physical intrusion, and server room access is limited to certified employees.

All of HostForLIFE.eu controls (inside and outside the data center) are vetted by third-party auditors, and we provide detailed reports for our customers own security certifications. The most sensitive financial, healthcare, and government workloads require the unparalleled protection HostForLIFE.eu provides.

Paris data centres meet the highest levels of building security, including constant security by trained security staff 24x7, electronic access management, proximity access control systems and CCTV. HostForLIFE.eu is monitored 24/7 by 441 cameras onsite. All customers are offered a 24/7 support function and access to our IT equipment at any time 24/7 by 365 days a year.

For more information about new data center in Paris, please visit http://hostforlife.eu/Paris-Hosting-Data-Center

About HostForLIFE.eu
HostForLIFE.eu is an European Windows Hosting Provider which focuses on the Windows Platform only. HostForLIFE.eu deliver on-demand hosting solutions including Shared hosting, Reseller Hosting, Cloud Hosting, Dedicated Servers, and IT as a Service for companies of all sizes.

HostForLIFE.eu is awarded Top No#1 SPOTLIGHT Recommended Hosting Partner by Microsoft (see http://www.asp.net/hosting/hostingprovider/details/953). Our service is ranked the highest top #1 spot in several European countries, such as: Germany, Italy, Netherlands, France, Belgium, United Kingdom, Sweden, Finland, Switzerland and other European countries. Besides this award, we have also won several awards from reputable organizations in the hosting industry and the detail can be found on our official website.


Europe ASP.NET Hosting - HostForLIFE.eu :: How to Use AspEncrypt as a Client-site ActiveX Control

clock November 6, 2014 07:03 by author Frank

What is AspEncrypt?

AspEncrypt is an Active Server component that brings security to your applications through encryption. With AspEncrypt, you can encrypt data, send S/MIME-based secure mail, compute one-way hash values, generate and verify digital signatures, issue and manage X.509 digital certificates, and more. This component can be used in an ASP/ASP.NET or VB environment on Windows 2000/XP/2003/2008/Vista/7.In this article we will tell you about “How to Use AspEncrypt as a Client-site ActiveX Control”.

Use AspEncrypt as a Client-side ActiveX Control

Starting with Version 2.0, the AspEncrypt.dll file contains an ActiveX control component called XEncrypt which can be used on the client side inside Internet Explorer 4.0+. All the cryptographic operations offered by AspEncrypt can now take place on the user’s machine and not just the web server. XEncrypt exposes the same properties and methods as CryptoManager with the exception of a few methods not applicable to client-side operations. Most importantly, XEncrypt allows your Web-based application to perform operations involving the user’s private key such as digital signing or data decryption without jeopardizing the security of the private key. XEncrypt does not require a registration key, so you do not need to purchase a license for every client machine XEncrypt will be downloaded to. However, XEncrypt will only work under IE and not any other environment such as VB, etc. For containers other than IE, you must continue using the CryptoManager object which requires a registration key.

Using XEncrypt under IE

The XEncrypt ActiveX control resides in the same DLL as the rest of the AspEncrypt objects, aspencrypt.dll. To use XEncrypt on the client side, your web page must reference it using the <OBJECT> tag, as follows:

<OBJECT
  CLASSID="CLSID:F9463571-87CB-4A90-A1AC-2284B7F5AF4E"
  CODEBASE="aspencrypt.dll"
  ID="XEncrypt">
</OBJECT>

The CLASSID attribute is the globally unique identifier (GUID) of the XEncrypt control. The CODEBASE attribute points to a relative path of the file aspencrypt.dll on your server. For this code to work, you must place the file aspencrypt.dll in a virtual directory on your web server where the browser can find and download it from. Note that you do not need to register aspencrypt.dll in that location. Your web server may have the file aspencrypt.dll registered in, say, the system folder c:\winnt\system32, and another copy of that file placed in the same virtual directory as the HTML or ASP files that reference it. The ID attribute is to be used by client-side VBScript to reference the XEncrypt control (see code samples below). AspEncrypt is a digitally signed DLL, so when your users run this page for the first time, they will see a dialog box similar to this: XEncrypt is an invisible control with no user interface. It can only be invoked by client-side script. The code sample http://localhost/aspencrypt/client_side/simple_client.asp demonstrates simple text encryption and decryption performed on the client side:

<HTML>
<HEAD>
<OBJECT
classid="CLSID:F9463571-87CB-4A90-A1AC-2284B7F5AF4E"
codeBase="aspencrypt.dll"
id="XEncrypt">
</OBJECT>
 
<SCRIPT LANGUAGE="VBSCRIPT">
Sub Encrypt
  Set Context = XEncrypt.OpenContext("mycontainer", False)
  Set Key = Context.GenerateKeyFromPassword("my password")
  Set Blob = Key.EncryptText( document.myForm.txtEncr.Value )
  document.myForm.txtDecr.Value = Blob.Base64
End Sub
 
Sub Decrypt
  Set Context = XEncrypt.OpenContext("mycontainer", False)
  Set Key = Context.GenerateKeyFromPassword("my password")
  Set Blob = XEncrypt.CreateBlob
  Blob.Base64 = document.myForm.txtDecr.Value
  MsgBox Key.DecryptText(Blob)
End Sub
</SCRIPT>
</HEAD>

<BODY>
<FORM NAME="myForm">
<INPUT TYPE="TEXT" NAME="txtEncr" SIZE="60" VALUE="Text to encrypt">
<INPUT TYPE="BUTTON" OnClick="Encrypt" VALUE="Encrypt">
<P>
<INPUT TYPE="TEXT" NAME="txtDecr" SIZE="60">
<INPUT TYPE="BUTTON" OnClick="Decrypt" VALUE="Decrypt">
</FORM>

</BODY>
</HTML>

Best and Cheap Classic ASP Hosting With AspEncrypt Recommendation

HostforLIFE.eu was founded in 2008. It has been topping the list of almost all the web hosting review sites so far. Still have websites running on ASP 3.0 or Classic ASP? Don’t worry; we still support legacy technology like Classic ASP Hosting. You can also mix and match Classic ASP and ASP.NET code in one single web site. We will make sure that Classic ASP runs smoothly on our servers and that your website is safer, faster and better supported than anywhere else! Our best and cheap Classic ASP hosting plan is starting at $5.00/mo. HostforLIFE.eu is now providing free domain and double SQL server space for new clients to enjoy the company’s outstanding web hosting service.


About HostForLIFE

HostForLIFE is European Windows Hosting Provider which focuses on Windows Platform only. We deliver on-demand hosting solutions including Shared hosting, Reseller Hosting, Cloud Hosting, Dedicated Servers, and IT as a Service for companies of all sizes.

We have offered the latest Windows 2019 Hosting, ASP.NET 5 Hosting, ASP.NET MVC 6 Hosting and SQL 2019 Hosting.


Tag cloud

Sign in