Full Trust European Hosting

BLOG about Full Trust Hosting and Its Technology - Dedicated to European Windows Hosting Customer

Node.js Hosting Europe - HostForLIFE :: How To Check If A File Exists In NodeJS?

clock May 30, 2022 08:55 by author Peter

Node.js comes bundled with the file system module which allows the developers to interact with the file system of the operating system. This module is commonly used to create, read, update, delete and rename a file. However, before we start performing the above-mentioned operations it is always a better idea to check if the file we're trying to access exists in the file system. And the file system module provides multiple ways to perform this check.

Using existsSync method
The easiest way to test if a file exists in the file system is by using the existsSync method. All you need to do is pass the path of the file to this method.

const fs = require('fs');
const path = './my-awesome-file.txt';

if (fs.existsSync(path)) {
  console.log('file exists');
} else {
  console.log('file not found!');
}


The existsSync method will return true if the file exists and else it'll return false.
    One thing that we need to keep in mind is this method is synchronous in nature. that means that it’s blocking.

Using exists method (Deprecated)
The exists method checks for the existence of a file asynchronously. It accepts two parameters:

    Path to the file
    Callback function to execute once path is verified passing a boolean parameter value to the function as its argument.

const fs = require('fs');
const path = './my-awesome-file.txt';

fs.exists(path, function (doesExist) {
  if (doesExist) {
    console.log('file exists');
  } else {
    console.log('file not found!');
  }
});


The parameter value will be true when the file exists otherwise it'll be false.

Using accessSync method
The accessSync method is used to verify the user’s permission for the specified path. If the path is not found, it will throw an error that we need to handle using try...catch block.

This method accepts two parameters as follows,
    Path to the file
    Mode of verification

The mode parameter is optional. It specifies the accessibility checks that need to be performed.0

Following constants can be used as the second parameter to specify the mode.
    fs.constants.R_OK to check for read permission
    fs.constants.W_OK to check for write permission
    fs.constants.X_OK to check for execute permission

If the second parameter is not provided it defaults to  fs.constants.F_OK constant.
const fs = require('fs');
const path = './my-awesome-file.txt';

try {
  fs.accessSync(path);
  console.log('file exists');
} catch (err) {
  console.log('file not found');
  console.error(err);
}


The above code verifies the existence of my-awesome-file.txt file:

If you wish to determine the write and read access, you can pass the mode parameter with a bitwise OR operator as follows:
const fs = require('fs');
const path = './my-awesome-file.txt';

try {
  fs.accessSync(path, fs.constants.R_OK | fs.constants.W_OK);
  console.log('read/write access');
} catch (err) {
  console.log('no access:');
  console.error(err);
}


Using access method
The access method is basically the asynchronous version of accessSync method.

The access method allows the developers to verify the existence or permissions of a specified path asynchronously.

The method accepts three parameters, first two parameters are the same as accessSync method parameters, and last parameter is a callback function:
    Path to the file
    Mode of verification
    The callback function to execute

const fs = require('fs')
const path = './my-awesome-file.txt'

fs.access(path, fs.F_OK, (err) => {
  if (err) {
    console.error(err)
    return;
  } else {
    console.log('file exists')
  }
})


Summary
existsSync, exists, accessSync, and access are the four methods that allow the developers to verify if the file exists in the file system. It’s recommended to use existsSync method if you only wish to check for the existence of a file. When you wish to check for specific permissions as well as the existence of the file, you can use either accessSync or access method. The exists method is deprecated from node.js and hence needs to be avoided. 


AngularJS Hosting Europe - HostForLIFE :: Using HTTP Interceptor Service In Angular App

clock May 19, 2022 09:54 by author Peter

HTTP Interceptor
HTTP Interceptors is a special type of angular service that we can implement. It's used to apply custom logic to the central point between the client-side and server-side outgoing/incoming HTTP request and response. Keep in mind that the interceptor wants only HTTP requests.

Operations of HTTP Interceptor

    Modify HTTP headers
    Modifying the request body
    Set authentication/authorization token
    Modify the HTTP response
    Error handling

Add HTTP Interceptor

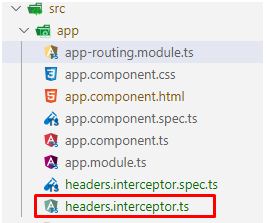
Execute this CLI command to add an interceptor service: ng generate interceptor headers

Successfully added headers interceptor

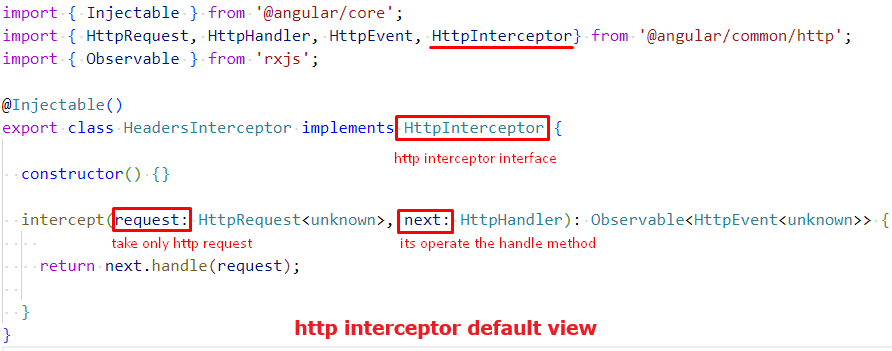
After opening the interceptor service you can see a default view like this:


Interceptor registration
We need to register the HTTP interceptor to use in the application. So, open the app.module.ts file and go to the provider section.

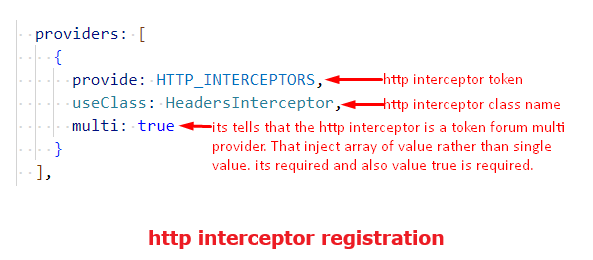
This interceptor will execute for every HTTP request of a client.

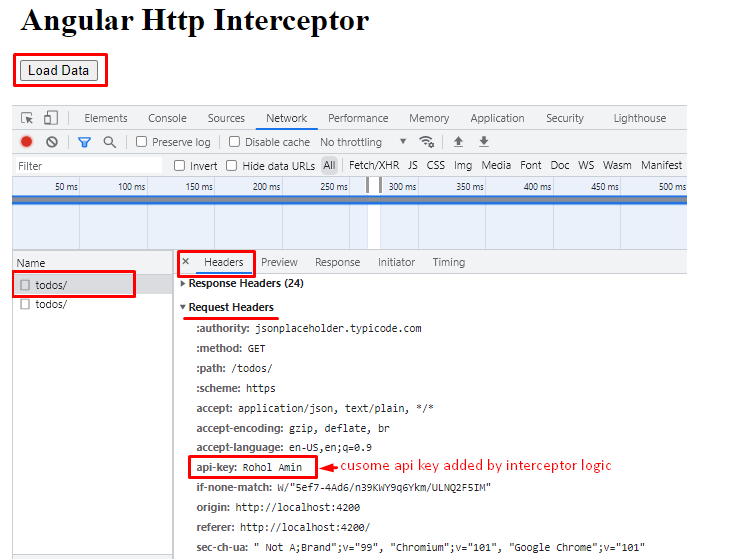
Modifying HTTP Headers By interceptor

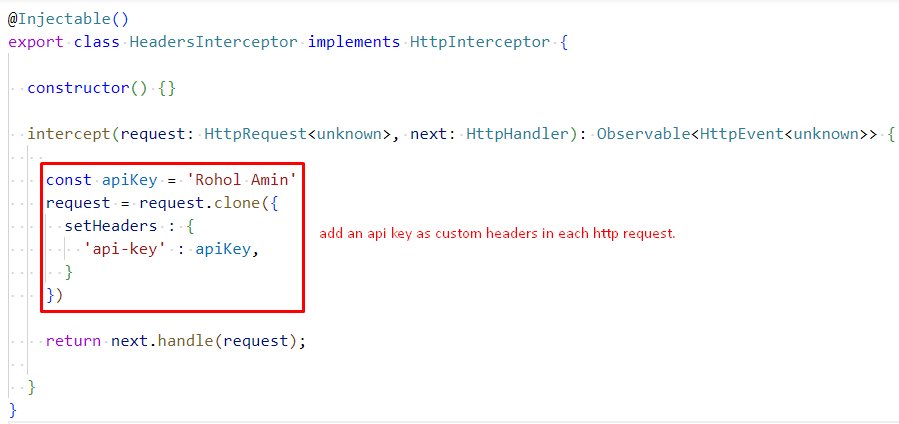
const apiKey = 'Rohol Amin'
request = request.clone({
    setHeaders: {
        'api-key': apiKey,
    }
})

Now serve the project. Open the browser inspect window then go to the Network tab and click the load data button. Then click the todos API of xhr type. Then go to the HTTP request headers,

Multiple interceptors
It is also possible to use multiple interceptors simultaneously. Just need to maintain the serial which service will be executed before and after. This serialization is defined in provider registration. Meaning the interceptor service will execute according to the provider registration serialization.
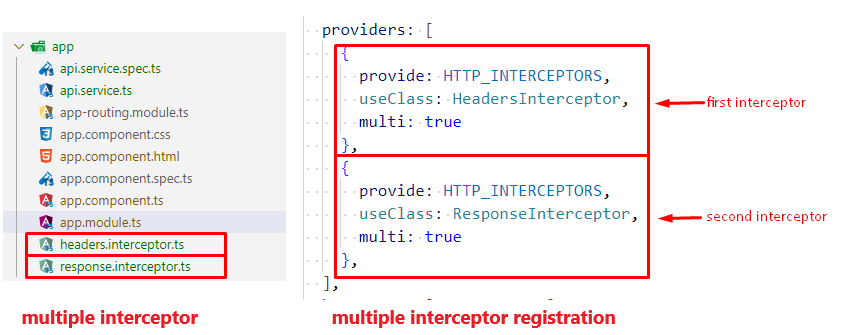

{
  provide: HTTP_INTERCEPTORS,
  useClass: ResponseInterceptor,
  multi: true
}

Response Interceptor Implementation

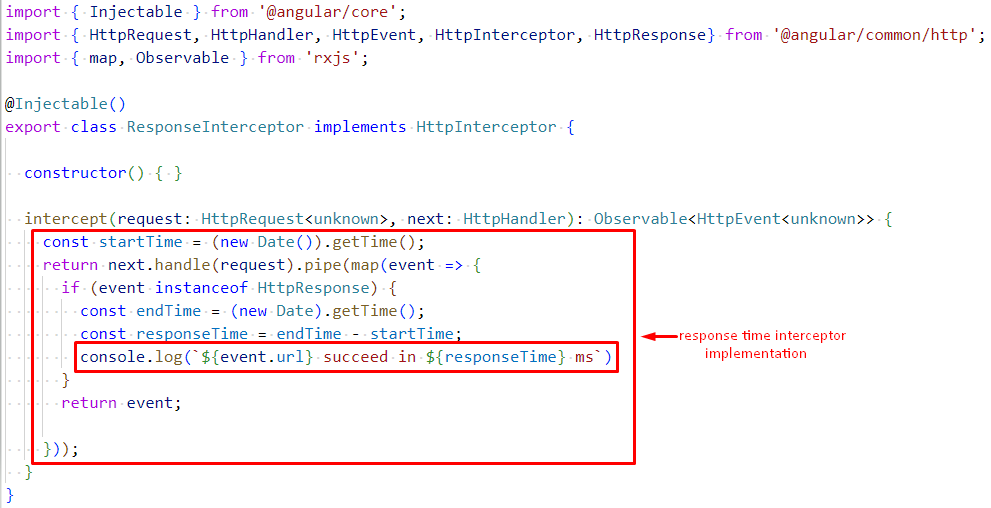
const startTime = (new Date()).getTime();
return next.handle(request).pipe(map(event => {
    if (event instanceof HttpResponse) {
        const endTime = (new Date).getTime();
        const responseTime = endTime - startTime;
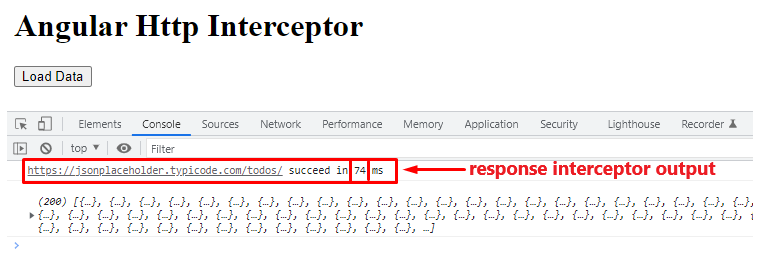
        console.log(`${event.url} succeed in ${responseTime} ms`)
    }
    return event;
}));

Note
This HTTP interceptor is most used when authentication and authorization are applied in the application.

Hope this article would have helped you to understand about Angular Interceptor. Here I have tried to explain very simply some uses of the angular interceptor. Happy coding and thanks for reading my article!!!


Node.js Hosting Europe - HostForLIFE :: Create a Redis Cache with Express Node JS

clock May 11, 2022 09:02 by author Peter

This article provides a sample application using the Redis Cache with explanation. Please see this article on how to create an Express Node JS application, so that we can quickly jump into the topic without further delay.

Why is Caching required?
When the same response needs to be served multiple times, store the data in distributed server memory as and it can be retrieved faster than the data retrieved from the storage layer for every single call. Caching is an ability of an application to duplicate the values for a specified period of time and serve the web request instantly.

These techniques will be effective when
    There is a need to call for a 3rd party API and the call counts
    Cost of data transfer between cloud and the server.
    Server response is critical based on the concurrent requests.

What is Redis Cache?
The data cache stored in a centralized distributed system such as Redis. Redis is also called a data structures server, which means a variety of processes can query and modify the data at the same time without much loading time.
Advantages of Redis

The special properties of data structures are

    Even though the data is often requested, served and modified, the data will be stored in disk rather than storing in RAM.
    Unlike high-level programming language, the implementation will highlight on memory optimal usage.
    Also offers features like replication, levels of durability, clustering and high availability (HA).
    Redis can handled complexed Memcached operations like Lists, Sets, ordered data set, etc.,

Using Redis Client in local system

To use the Redis, you need to install Node JS Redis Client in the local system. The msi file (v3.0.504 stable version as of this article published date) can be downloaded from the Github and proceed with normal installation process (for Windows OS).

The latest Redis Client can be also be installed with Windows Subsystem for Linux (WSL) and install the Redis 6.x versions. Also, for dockerizing, Mac and Linux OS’ follow the instructions on downloads

Run the Redis Client by the following command

redis-server

Create an Express Node JS application

Open the PowerShell or cmd prompt window and go to the destined folder.

Execute the following command
npx express expressRedisCaching –hbs

Install the modules using the command
npm i

and install the following additional packages
npm i redis
npm i isomorphic-fetch


Once all the packages are installed and ready to start. I have created a new route page called “getCached.js” and mapped in the “App.js” page.
app.use('/getCached', require('./routes/getCached'));

Upon calling the endpoint, the logic is to fetch the response from JSON placeholder (mock API) site, store the data in Redis Cache and respond to the request. On further request, cached data will be served.
const express = require('express')
require('isomorphic-fetch')
const redis = require('redis')
const router = express.Router()
const client = redis.createClient({
    host:'127.0.0.1',
    port:6379
})


router.get('/',async(req, res)=>{

        await client.connect();
        const value = await client.get('todos');
        if(value){

            console.log("from cached data")
            res.send(JSON.parse(value))
        }
        else{

            const resp = await fetch(sourceURL)
               .then((response) => response.json());
            await client.set('todos', JSON.stringify(resp));
            console.log("from source data")
            res.send(resp);
        }
        await client.disconnect();

})

module.exports = router

Object created using the redis is
redis.createClient({ host:’127.0.0.1’, port:6379});

With options
    host : currently the Redis is available in the local system and so the host is default 127.0.0.1
    port : by default Windows OS is allocating 6379 port to Redis, but the same can be customized.

Now it’s time to run the app by executing the command
npm start


On the first hit, the data is fetched from the source API with the response time of approximately 1156ms and the same has been stored in the in-memory data store Redis Cache. The second hit gets the data from the cached with the remarkable reduction in fetch time of just ~10 ms or even ~6ms.

Thus, the objective is met with very few easy steps.


About HostForLIFE

HostForLIFE is European Windows Hosting Provider which focuses on Windows Platform only. We deliver on-demand hosting solutions including Shared hosting, Reseller Hosting, Cloud Hosting, Dedicated Servers, and IT as a Service for companies of all sizes.

We have offered the latest Windows 2019 Hosting, ASP.NET 5 Hosting, ASP.NET MVC 6 Hosting and SQL 2019 Hosting.


Tag cloud

Sign in