Node.js is a backend framework based on Javascript. It is said to be 10x faster as compared to other backend languages as it is developed keeping in mind Javascript runtime browser compatibility.

Node.js uses non-blocking I/O, the main reason for making it lightweight and efficient.
Moreover, it is open-source, cross-platform runtime environment for developing server-side applications.
Some other backend languages,
PYTHON.
PHP LARVEL.
GOLANG.
C#.
RUBY.
JAVA.
But the fact is node.js is said to be fastest among all as it totally works on npm (node package manager) which gives developers multiple tools and modules to use thus helping in execution of code in the fastest way as possible.
Requirements
Starting with nodejs is an easy task just by downloading/installing it, if not yet downloaded, here’s the link to download.
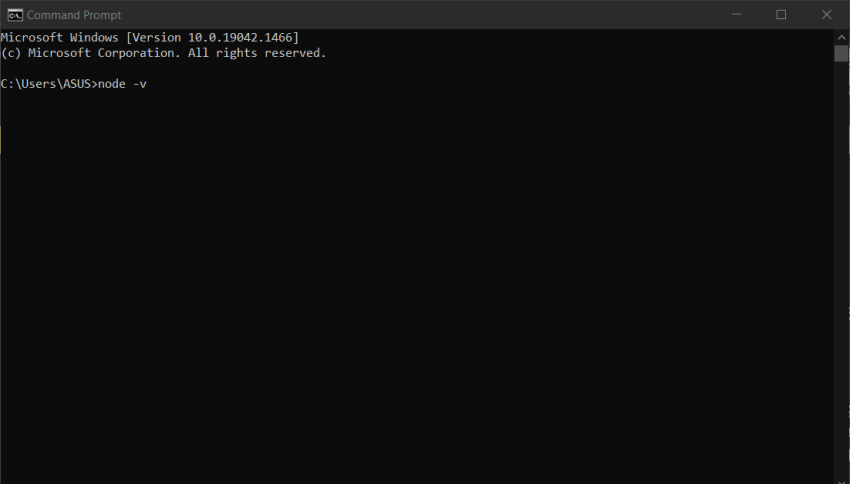
After installing node.js on your local computer or laptop, to check node gets properly installed on a particular system, open command prompt and type node -v to check.
There you go😊. Creating Middleware using Express Apps - Overview
Middleware functions are functions that have access to the request object (req), the response object (res), and the next function in the application’s request-response cycle. The next function is in the Express router which, when invoked, executes the middleware succeeding the current middleware.
The following task can be performed through middleware,
Execute any code.
Make changes to the request and the response objects.
End the request-response cycle.
Call the next middleware in the stack.
If the current middleware function does not end the request-response cycle, it must call next() to pass control to the next middleware function. Otherwise, the request will be left hanging.
The following figure shows the elements of a middleware function call,
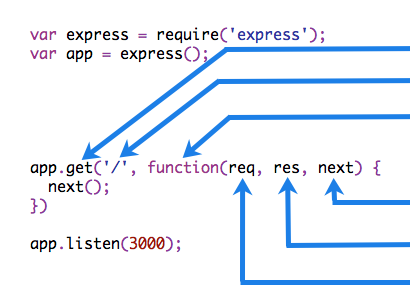
HTTP method.
Path (route) for which the middleware function applies
The middleware function.
Callback argument to the middleware function.
HTTP response argument to the middleware.
HTTP request argument to the middleware
Starting with Express 5, middleware functions that return a Promise will call next(value) when they reject or throw an error.
next will be called with either the rejected value or the thrown Error.
Example
Here is an example of a simple “Hello World” Express application. The use of this article will define and add three middleware functions to the application: one called myLogger that prints a simple log message, one called requestTime that displays the timestamp of the HTTP request, and one called validateCookies that validates incoming cookies.
const express = require('express')
const app = express()
app.get('/', (req, res) => {
res.send('Hello World!')
})
app.listen(3000)
Middleware function myLogger
Here is a simple example of a middleware function called “myLogger”. This function just prints “LOGGED” when a request to the app passes through it. The middleware function is assigned to a variable named myLogger.
const myLogger = function(req, res, next) {
console.log('LOGGED')
next()
}
Notice the call above to next(). Calling this function invokes the next middleware function in the app. The next() function is not a part of the Node.js or Express API but is the third argument that is passed to the middleware function. The next() function could be named anything, but by convention it is always named “next”. To avoid confusion, always use this convention.
To load the middleware function, call app.use(), specifying the middleware function. For example, the following code loads the myLogger middleware function before the route to the root path (/).
const express = require('express')
const app = express()
const myLogger = function(req, res, next) {
console.log('LOGGED')
next()
}
app.use(myLogger)
app.get('/', (req, res) => {
res.send('Hello World!')
})
app.listen(3000)
Every time the app receives a request, it prints the message “LOGGED” to the terminal.
The order of middleware loading is important: middleware functions that are loaded first are also executed first.
If myLogger is loaded after the route to the root path, the request never reaches it and the app doesn’t print “LOGGED”, because the route handler of the root path terminates the request-response cycle.
The middleware function myLogger simply prints a message, then passes on the request to the next middleware function in the stack by calling the next() function.
Middleware function requestTime
Next, we’ll create a middleware function called “requestTime” and add a property called requestTime to the request object.
const requestTime = function(req, res, next) {
req.requestTime = Date.now()
next()
}
The app now uses the requestTime middleware function. Also, the callback function of the root path route uses the property that the middleware function adds to req (the request object).
const express = require('express')
const app = express()
const requestTime = function(req, res, next) {
req.requestTime = Date.now()
next()
}
app.use(requestTime)
app.get('/', (req, res) => {
let responseText = 'Hello World!<br>'
responseText += `<small>Requested at: ${req.requestTime}</small>`
res.send(responseText)
})
app.listen(3000)
When you make a request to the root of the app, the app now displays the timestamp of your request in the browser.
Middleware function validateCookies
Finally, we’ll create a middleware function that validates incoming cookies and sends a 400 response if cookies are invalid.
Here’s an example function that validates cookies with an external async service.
async function cookieValidator(cookies) {
try {
await externallyValidateCookie(cookies.testCookie)
} catch {
throw new Error('Invalid cookies')
}
}
Here we use the cookie-parser middleware to parse incoming cookies off the req object and pass them to our cookieValidator function. The validateCookies middleware returns a Promise that upon rejection will automatically trigger our error handler.
const express = require('express')
const cookieParser = require('cookie-parser')
const cookieValidator = require('./cookieValidator')
const app = express()
async function validateCookies(req, res, next) {
await cookieValidator(req.cookies)
next()
}
app.use(cookieParser())
app.use(validateCookies)
// error handler
app.use((err, req, res, next) => {
res.status(400).send(err.message)
})
app.listen(3000)
Note how next() is called after await cookieValidator(req.cookies). This ensures that if cookieValidator resolves, the next middleware in the stack will get called. If you pass anything to the next() function (except the string 'route' or 'router'), Express regards the current request as being an error and will skip any remaining non-error handling routing and middleware functions.
Because you have access to the request object, the response object, the next middleware function in the stack, and the whole Node.js API, the possibilities with middleware functions are endless.
Configurable middleware
If you need your middleware to be configurable, export a function that accepts an options object or other parameters, which, then returns the middleware implementation based on the input parameters.
File: my-middleware.js
module.exports = function(options) {
return function(req, res, next) {
// Implement the middleware function based on the options object
next()
}
}
// The middleware can now be used as shown below.
const mw = require('./my-middleware.js')
app.use(mw({
option1: '1',
option2: '2'
}))
Summary
Depending on our short definition, middleware can be created for purposes such as database transactions, transactions between application servers, message controls, and authentication. Structures such as soap, rest, and JSON can be used in the communication of applications. The middleware acts according to all these purposes.