Full Trust European Hosting

BLOG about Full Trust Hosting and Its Technology - Dedicated to European Windows Hosting Customer

ASP.NET MVC 4 Hosting - HostForLIFE.eu :: How To Add MVC Model?

clock April 26, 2016 23:28 by author Anthony

Model–view–controller (MVC) is a software architectural pattern for implementing user interfaces on computers. It divides a given software application into three interconnected parts, so as to separate internal representations of information from the ways that information is presented to or accepted from the user.

Free ASP.NET Hosting - Europe

Traditionally used for desktop graphical user interfaces (GUIs), this architecture has become extremely popular for designing web applications.

MVC

The MVC(Model View Controller) separates an application into three main components.
This includes Model,View and Controller.
In this article, mainly explained about Models.


Models

Model represents an object. Model is resposible for maintaining the data
It respond to the request from view. It also respond to the instruction from controller for the updation.

Model objects retrieve and store model state in a database.
For example, a Student object might retrieve information from a StudentData Database, operate on it, and then write updated information back to a StudentData table in a SQL Server database.

In MVC, model both hold and manipulate application data. It contains all the application logic except view and controller logic

Model Folder contains the classes of application.


Model Adding

We can add models to our application with the following steps

  • A model folder will be present under the created application's Solution Explorer.

  • Right click on Model folder. A list will be appearing
  • Select 'Add' option from list.Then a new list will be coming.
  • Then select 'Class' option from list
  • A new window appearing.Here give the name for the new class or model and select 'Add'.(Say model name as SampleModel)
  • The newly added class will be appearing.That is, this will create a model class to the application.
  • Inside this class, we can add properties as per the requirements. Example is given below.
  •  


HostForLIFE.eu ASP.NET MVC 4 Hosting
HostForLIFE.eu is European Windows Hosting Provider which focuses on Windows Platform only. We deliver on-demand hosting solutions including Shared hosting, Reseller Hosting, Cloud Hosting, Dedicated Servers, and IT as a Service for companies of all sizes. We have customers from around the globe, spread across every continent. We serve the hosting needs of the business and professional, government and nonprofit, entertainment and personal use market segments.


Joomla 3.5 Hosting - HostForLIFE.eu :: Joomla 3.5 Beta Testing

clock April 14, 2016 23:15 by author Anthony

Joomla is an award-winning content management system (CMS), which enables you to build Web sites and powerful online applications. Many aspects, including its ease-of-use and extensibility, have made Joomla the most popular Web site software available. Best of all, Joomla is an open source solution that is freely available to everyone.

Free ASP.NET Hosting - Europe

Joomla is used all over the world to power Web sites of all shapes and sizes. For example:

  • Corporate Web sites or portals
  • Corporate intranets and extranets
  • Online magazines, newspapers, and publications
  • E-commerce and online reservations
  • Government applications
  • Small business Web sites
  • Non-profit and organizational Web sites
  • Community-based portals
  • School and church Web sites
  • Personal or family homepages

Joomla 3.5 was released on February 17, 2016. Here is a glimpse of what will be on Joomla 3.5. Joomla users have the opportunity to test the beta and pre-release versions given by the official Joomla development team.

If you are using Joomla and would like to contribute or you just want to test the latest features of Joomla 3.5 and its extensions, of course this is very useful. You can find some of the features that may not have been perfect and needs to be improved to be released in due course.

This time I will show you how to test the beta version of Joomla 3.5 on your website that Joomla version 3.4.x.
# Note: Do not do this test on your website is running, it helps you create a duplicate to avoid the risks that can be generated.

Step # 1. Turn Mode Update Version Joomla For Testing

Access to the menu Components -> Joomla Update -> Click on the "Option"

Update Enable Channel to "Testing"

Then click the "Save and close".
Step # 2. Fix Joomla to Beta
If there is a Joomla test version available (it will commonly use the suffix -beta # in "Latest Joomla version" row), click the "Install the update" button and wait until the process ends.

Step # 3. The trial version of Joomla Beta

Until this stage, you have managed to make updates to the Joomla 3, if you find features that have not been perfect, immediately report it to Github repository page, hopefully Joomla core team can fix it on the next regular release schedule.


HostForLIFE.eu Joomla 3.5 Hosting
HostForLIFE.eu is European Windows Hosting Provider which focuses on Windows Platform only. We deliver on-demand hosting solutions including Shared hosting, Reseller Hosting, Cloud Hosting, Dedicated Servers, and IT as a Service for companies of all sizes. We have customers from around the globe, spread across every continent. We serve the hosting needs of the business and professional, government and nonprofit, entertainment and personal use market segments.


AJAX Hosting :: HostForLIFE.eu :: How to Work With PHP and MySQL?

clock April 12, 2016 23:12 by author Anthony

Today we will discuss about Ajax. Ajax is a collection of several technologies aiming to provide a better user experience compared to traditional web applications. End to end implementation of Ajax includes HTML, CSS, DOM, JavaScript, a Server Side Language, and XMLHttpRequest which is also called as XHR.

In traditional web applications, the browser sends a request to server, server processes, send some data back to browser and then it is rendered by the browser. But meanwhile, when server is processing, user has to wait. This, needless to say, does not provide the user with a good experience. Ajax, helps to get rid of the issue. It makes the user's interaction to the application asynchronous. User interface and communicating to the server goes hand in hand and without waiting for the server to come with the processed data or without reloading the webpage, the user interface responds to user's action; greatly improving user experience.

In this tutorial we will see how to make Ajax work with PHP and MySQL. We will create a small web application. In that, as soon as you start typing an alphabet in the given input field, a request goes to the PHP file via Ajax, a query is made to the MySQL table, it returns some results and then those results are feteched by Ajax and displayed.

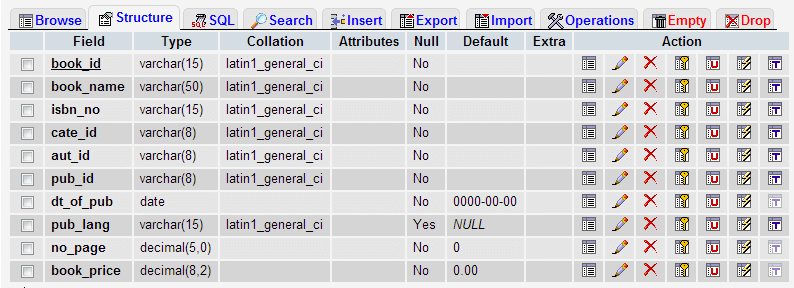
You need to make MySQL table. The structure of the MySQL table we use.

mysql table for ajax php mysql tutorial

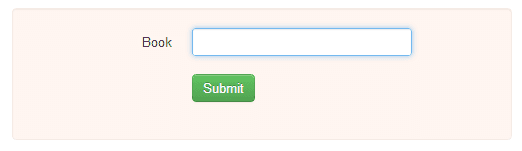
We have a simple user inerface created with HTML and CSS where user can supply data in the input field. This is the basic HTML code. Though, we will make modifications on it and add JavaScript code later.

<!DOCTYPE html>  
<html lang="en">  
<head>  
<meta charset="utf-8">  
<title>User interface for Ajax, PHP, MySQL demo</title>  
<meta name="description" content="HTML code for user interface for Ajax, PHP and MySQL demo.">  
<link href="../includes/bootstrap.css" rel="stylesheet"> 
<style type="text/css"> 
body {padding-top: 40px; padding-left: 25%} 
li {list-style: none; margin:5px 0 5px 0; color:#FF0000} 
</style> 
</head> 
<body> 
<form class="well-home span6 form-horizontal" name="ajax-demo" id="ajax-demo"> 
<div class="control-group"> 
              <label class="control-label" for="book">Book</label> 
              <div class="controls"> 
                <input type="text" id="book"> 
              </div> 
 </div> 
 <div class="control-group"> 
              <div class="controls"> 
                <button type="submit" class="btn btn-success">Submit</button> 
              </div> 
 </div> 
</form> 
</body> 
</html> 

This is how it looks :

user interface for ajax demo

We will now create JavaScript code to send data to server. And we will call that code on onkeyup event of the of the input field given.

function book_suggestion() 

var book = document.getElementById("book").value; 
var xhr; 
 if (window.XMLHttpRequest) { // Mozilla, Safari, ... 
    xhr = new XMLHttpRequest(); 
} else if (window.ActiveXObject) { // IE 8 and older 
    xhr = new ActiveXObject("Microsoft.XMLHTTP"); 

var data = "book_name=" + book; 
     xhr.open("POST", "book-suggestion.php", true);  
     xhr.setRequestHeader("Content-Type", "application/x-www-form-urlencoded");                   
     xhr.send(data); 

Processing data on server side

<?php 
include('../includes/dbopen.php'); 
$book_name = $_POST['book_name']; 
$sql = "select book_name from book_mast where book_name LIKE '$book_name%'"; 
$result = mysql_query($sql); 
while($row=mysql_fetch_array($result)) 

echo "<p>".$row['book_name']."</p>"; 

?> 

Now we have to retreive data returned by MYSQL and display that data using Ajax. So, we will write that code in our HTML file. We will add follwing code

xhr.onreadystatechange = display_data; 
    function display_data() { 
     if (xhr.readyState == 4) { 
      if (xhr.status == 200) { 
       document.getElementById("suggestion").innerHTML = xhr.responseText; 
      } else { 
        alert('There was a problem with the request.'); 
      } 
     } 
  }

We have to add <div id="suggestion"></div> bellow the input field whose id is book.

Now we set the value of the string to be displayed within the div whose id is 'suggestion' as 'responseText' property of the XMLHttpRequest object. 'responseText' is the response to the request as text.

So, the final JavaScript code of the HTML file becomes as follows:

  function book_suggestion() 

var book = document.getElementById("book").value; 
var xhr; 
 if (window.XMLHttpRequest) { // Mozilla, Safari, ... 
    xhr = new XMLHttpRequest(); 
} else if (window.ActiveXObject) { // IE 8 and older 
    xhr = new ActiveXObject("Microsoft.XMLHTTP"); 

var data = "book_name=" + book; 
     xhr.open("POST", "book-suggestion.php", true);  
     xhr.setRequestHeader("Content-Type", "application/x-www-form-urlencoded");                   
     xhr.send(data); 
     xhr.onreadystatechange = display_data; 
    function display_data() { 
     if (xhr.readyState == 4) { 
      if (xhr.status == 200) { 
       //alert(xhr.responseText);       
      document.getElementById("suggestion").innerHTML = xhr.responseText; 
      } else { 
        alert('There was a problem with the request.'); 
      } 
     } 
    } 


HostForLIFE.eu AJAX Hosting
HostForLIFE.eu revolutionized hosting with Plesk Control Panel, a Web-based interface that provides customers with 24x7 access to their server and site configuration tools. Plesk completes requests in seconds. It is included free with each hosting account. Renowned for its comprehensive functionality - beyond other hosting control panels - and ease of use, Plesk Control Panel is available only to HostForLIFE's customers. They offer a highly redundant, carrier-class architecture, designed around the needs of shared hosting customers.


Wordpress Hosting - HostForLIFE.eu :: How To Make The First Post?

clock April 8, 2016 00:01 by author Anthony

This tutorial will discuss how to create a new Page and Post on wordpress. Wherein the Post and Page this is the most will often be used when the website was built and after the website goes online, since Page and Post is the place where we put the information we want to upload on our website. If the website is used to blogging as well as for a news portal, then the Post will very often be used to post the latest posts.

WordPress was born out of a desire, wordpress initially ber personal publishing system architecture is elegantly built in PHP and MySQL and licensed under the GPL. WordPress is the official successor of b2 / cafelog. WordPress is a modern software for creating web, but wordpress developed back in 2001. It is a mature and stable. WordPress senidir wish to focus on user experience and web standards different tool with other existing web tool diluaran there. And now total 49% of websites worldwide are built with WordPress.

Here are the steps in the manufacture of a new Post and Page:

Click the sidebar menu on the dashboard pages, and then click add new as the picture below:

Membuat page baru

Bulk Action is used to remove or edit a page or post simultaneously by way of checking the page and posts would be deleted or edited. if you want to edit one by one simply by mensorot title of Page and Post will display the edit menu, trash and quick edit.

The next step to create a new Page after we click the button Add New.

Title is filled with About. Columns underneath used to fill what would we write and we publish. and if you want to insert a picture in the post-click Add Media and select the image you want to paste in your articles.

Featured Image: used to upload thumbnail images in posts

Immediately Publish: used to schedule our posts when the time to dipublis to our website.

Next make Post, essentially making the Post as well as make Page, for the menu to be clicked namely Posts and Add New, cuman difference in Post with Page that is located on the Categories and Tags, for writing Tag adjust to the discussion of the article already you write, in my example menulisakan CMS and WordPress, because my writing related to the topic, and the writing on the tag must be separated by commas. as shown below.


category&tag


HostForLIFE.eu Wordpress Hosting
HostForLIFE.eu revolutionized hosting with Plesk Control Panel, a Web-based interface that provides customers with 24x7 access to their server and site configuration tools. Plesk completes requests in seconds. It is included free with each hosting account. Renowned for its comprehensive functionality - beyond other hosting control panels - and ease of use, Plesk Control Panel is available only to HostForLIFE's customers. They
offer a highly redundant, carrier-class architecture, designed around the needs of shared hosting customers.


About HostForLIFE

HostForLIFE is European Windows Hosting Provider which focuses on Windows Platform only. We deliver on-demand hosting solutions including Shared hosting, Reseller Hosting, Cloud Hosting, Dedicated Servers, and IT as a Service for companies of all sizes.

We have offered the latest Windows 2019 Hosting, ASP.NET 5 Hosting, ASP.NET MVC 6 Hosting and SQL 2019 Hosting.


Tag cloud

Sign in