Full Trust European Hosting

BLOG about Full Trust Hosting and Its Technology - Dedicated to European Windows Hosting Customer

European Visual Studio Hosting - HostForLIFE :: Visual Studio 17.8: Improving Developer Experience

clock November 22, 2023 06:50 by author Peter

Staying ahead of the curve in the ever-changing world of software development is more than a goal—it's a requirement. Microsoft's latest Visual Studio 2022 release, version 17.8, is a big step forward in this path. As an outside observer and voice in the technology industry, I've seen Visual Studio evolve over the years, and this release is especially important.


Visual Studio 17.8 is a tribute to Microsoft's commitment to innovation and community feedback, since it is jam-packed with improvements that address developers' real-world demands. It is more than just an upgrade; it is a reinvention of what a development environment may be. This version, which is completely compatible with.NET 8, includes a mix of productivity upgrades, language advancements, and enterprise capabilities.

Let's take a look at what makes Visual Studio 17.8 such a game changer for developers of all disciplines and ability levels.

Visual Studio 17.8 will take you to new heights
Microsoft's Visual Studio 2022 has reached a new milestone with version 17.8. This upgrade is more than just a step forward; it is a leap into the future of development. It incorporates the best community feedback and ushers in complete compatibility with.NET 8, which is now widely accessible.

What Is the Latest in Productivity?

  • GitHub Copilot: With AI-powered support, this innovative addition to Visual Studio speeds coding. It's like having a co-pilot for your coding journey, speeding up and simplifying the process.
  • Create a Pull Request: You may now easily create a Pull Request directly from Visual Studio. This feature, which was strongly requested by the community, demonstrates Microsoft's dedication to user-driven innovations.
  • Improved Multi-Repo Support: Managing several repositories? The maximum has now been raised to 25, making multitasking easier than ever.
  • Summary Diff has been improved to provide a more efficient manner of reviewing changes, focusing on what is most important in your commits.
  • Remote Linux Unit Test Support: This capability enables testing to be seamlessly integrated across platforms.

Your Opinion Is Important
This release is notable not only for its features, but also for its focus on community-driven improvements. Microsoft exhibits its dedication to user feedback by incorporating top-ranked enhancements based on consumer votes.

Try it out and let us know what you think

Microsoft welcomes your comments as you explore these new features. Your feedback will be crucial in influencing future improvements and ensuring Visual Studio's position as a premier development tool.


European Visual Studio 2022 Hosting - HostForLIFE :: Create Your First Visual Studio Extension

clock April 19, 2023 08:09 by author Peter

In this article, we will look into the basics of visual studio extension. Also, create one application and understand file structure and implementation.


How to Create a New VSIX Project?
Step 1
Install Visual Studio extension development from Tools-> Get Tools and Features.

Step 2
Next, install Extensibility Essentials 2022, which helps us write different extensions.

Step 4
Configure a new project.


Step 3
Create a new VSIX Project

  • Many VSIX project templates are available, each with its purpose and usage.
  • VSIX Project w/Command (Community) template comes with a command hooked up, which helps us start a new extension easily after creating commands and configuring the same with Visual Studio.
  • VSIX Project w/Tool Window (Community) template with tool window command.
  • Empty VSIX Project (Community) and VSIX Project (Community) templates for MEF-only extensions or use in advanced customized scenarios.

But, here in this article, we will use VSIX Project w/Command (Community) template.

Step 5
Default Project Structure

As you can see, it will create different files inside the VSIX project solution, each with its purpose. So, we looked into them one by one and understood their purpose of it.

MyCommand.cs
The command handler file executes logic when the user triggers the command.
namespace VSIXProject
{
    [Command(PackageIds.MyCommand)]
    internal sealed class MyCommand : BaseCommand<MyCommand>
    {
        protected override async Task ExecuteAsync(OleMenuCmdEventArgs e)
        {
            await VS.MessageBox.ShowWarningAsync("VSIXProject", "Button clicked");
        }
    }
}

Resources/icon.png
This file is used to set icons for our extension. We can also set our custom icons for the same.

source.extension.vsixmanifest
It contains metadata of our extensions project like name, description, version, tags, author, etc.
// ------------------------------------------------------------------------------
// <auto-generated>
//     This file was generated by the extension VSIX Synchronizer
// </auto-generated>
// ------------------------------------------------------------------------------
namespace VSIXProject
{
    internal sealed partial class Vsix
    {
        public const string Id = "VSIXProject.34901e8a-0458-4252-9662-9ca734552faf";
        public const string Name = "VSIXProject";
        public const string Description = @"Empty VSIX Project.";
        public const string Language = "en-US";
        public const string Version = "1.0";
        public const string Author = "jaydeepvpatil225";
        public const string Tags = "";
    }
}

VSCommandTable.vsct
This XML file contains the binding of different commands with ids, button text for our command, parent menu, and many more.
<?xml version="1.0" encoding="utf-8"?>
<CommandTable xmlns="http://schemas.microsoft.com/VisualStudio/2005-10-18/CommandTable" xmlns:xs="http://www.w3.org/2001/XMLSchema">

  <Extern href="stdidcmd.h"/>
  <Extern href="vsshlids.h"/>
  <Include href="KnownImageIds.vsct"/>
  <Include href="VSGlobals.vsct"/>

  <Commands package="VSIXProject">
    <Groups>
      <Group guid="VSIXProject" id="MyMenuGroup" priority="0x0600">
        <Parent guid="VSMainMenu" id="Tools"/>
      </Group>
    </Groups>

    <!--This section defines the elements the user can interact with, like a menu command or a button
        or combo box in a toolbar. -->
    <Buttons>
      <Button guid="VSIXProject" id="MyCommand" priority="0x0100" type="Button">
        <Parent guid="VSIXProject" id="MyMenuGroup" />
        <Icon guid="ImageCatalogGuid" id="StatusInformation" />
        <CommandFlag>IconIsMoniker</CommandFlag>
        <Strings>
          <ButtonText>My Command</ButtonText>
          <LocCanonicalName>.VSIXProject.MyCommand</LocCanonicalName>
        </Strings>
      </Button>
    </Buttons>
  </Commands>

  <Symbols>
    <GuidSymbol name="VSIXProject" value="{bb2edf02-da6e-4673-b2a4-b3b7449b2ce7}">
      <IDSymbol name="MyMenuGroup" value="0x0001" />
      <IDSymbol name="MyCommand" value="0x0100" />
    </GuidSymbol>
  </Symbols>
</CommandTable>

VSIXProjectPackage
This file has one Initialize method that registers commands asynchronously when we run our extension project.
global using Community.VisualStudio.Toolkit;
global using Microsoft.VisualStudio.Shell;
global using System;
global using Task = System.Threading.Tasks.Task;
using System.Runtime.InteropServices;
using System.Threading;

namespace VSIXProject
{
    [PackageRegistration(UseManagedResourcesOnly = true, AllowsBackgroundLoading = true)]
    [InstalledProductRegistration(Vsix.Name, Vsix.Description, Vsix.Version)]
    [ProvideMenuResource("Menus.ctmenu", 1)]
    [Guid(PackageGuids.VSIXProjectString)]
    public sealed class VSIXProjectPackage : ToolkitPackage
    {
        protected override async Task InitializeAsync(CancellationToken cancellationToken, IProgress<ServiceProgressData> progress)
        {
            await this.RegisterCommandsAsync();
        }
    }
}


Step 6

Run Project
When we run the project, it will open one experimental visual studio and keep its own things separately related to settings.

As we can see, our command comes up under the Tool menu “MyCommand”, and when you click on it, a message popup with details that we put inside the MyCommand file. Here we just looked into the basics, but you can customize it as required and perform different operations.

This is all about VSIX Sample Project. Here we discussed the basics of VSIX Extension with a demo application implementation and its file structure details.
Happy Coding!!!


European Visual Studio 2022 Hosting - HostForLIFE :: Sharing Web Apps Using Dev Tunnels In Visual Studio 2022

clock February 22, 2023 07:00 by author Peter

Sometimes we want to share what we are doing, the changes that we are performing, or a proof of concept with others. To do this, we need to publish our app or share the screen with others and show step-by-step what we are doing and how it works. Ngrok is an application for this scenario; it's petty simple to use and free with some limitations.

In Visual Studio 2022, we have now the possibility to share quickly our web application with a https public URL.

Since this is a preview feature in Visual Studio we need to navigate to Tools -> Manage preview features

And check the option "Enable dev tunnels for web applications"

After that in our ASP.NET core web application, we need to open launchsettings.json and add 2 properties to the general profile to include now the functionality to open the application using dev tunnels, or you can also create a new profile.

Example
"profiles": {
    "WebApplication1": {
        "commandName": "Project",
        "dotnetRunMessages": true,
        "launchBrowser": true,
        "applicationUrl": "https://localhost:7211;http://localhost:5258",
        "environmentVariables": {
            "ASPNETCORE_ENVIRONMENT": "Development"
        },
        "devTunnelEnabled": true,
        "devTunnelAccess": true
    },
    "IIS Express": {
        "commandName": "IISExpress",
        "launchBrowser": true,
        "environmentVariables": {
            "ASPNETCORE_ENVIRONMENT": "Development"
        }
    }
}

Finally, you can now run the profile changed or the new profile that includes the 2 dev tunnel properties and run the application in a public URL that other people can see.

We need to confirm that we want to use the dev tunnel in the browser

This is the website running using dev tunnels:

You can now share this site with others, every time that you can execute your project Visual Studio will generate a new URL.


European Visual Studio 2022 Hosting - HostForLIFE :: Running Tasks In Parallel

clock November 4, 2022 08:12 by author Peter

Today we will see how we can run different tasks in parallel in C#. With the current hardware strength, we have machines with multiple processors. Hence, we certainly have the ability to utilize these and run our tasks in parallel to improve performance. But are we really doing this. Let us look at some sample code, which will let us do this. This can serve as a framework on which this methodology can be enhanced.
Creating the solution and adding the code

Let us create a C# console application in Visual Studio 2022 Community edition. Once created, add the below code.

// Create a generic list to hold all our tasks
var allTasks = new List < Task > ();
// Add your tasks to this generic list
// Here we simply add the same task with different input parameters
for (var i = 0; i <= 10; i++) {
    allTasks.Add(RunTaskAsync(i));
}
// Run all tasks in parallel and wait for results from all
await Task.WhenAll(allTasks);
// Collect return values from all tasks which have now executed
var returnValues = new List < int > ();
foreach(var task in allTasks) {
    var returnValue = ((Task < int > ) task).Result;
    returnValues.Add(returnValue);
}
// Display returned values on console
foreach(var returnValue in returnValues) {
    Console.WriteLine(returnValue);
}
// The task we want to run
async Task < int > RunTaskAsync(int val) {
    return await Task.FromResult(val * val);
}

Here you see that we simply create a list of tasks and run them in parallel using the Task.WhenAll method. Then, we collect the results and handle them accordingly.


In this article, we looked at how we can execute tasks in parallel in .NET 6. I created a simple framework where we define the tasks and then run them after adding to a generic list. Once completed, we extract the results, and these can be used as required.


European Visual Studio 2022 Hosting - HostForLIFE :: Three Ways To View Hidden Files In Visual Studio Solution

clock October 26, 2022 10:19 by author Peter

When I thought about this topic, I faintly remembered that I wrote a similar article sometime before.  After searching, I did find the article. But, I will not modify that article, and will write a new one to be parallel with it: .

Introduction
In Visual Studio solution, some files are not readable due to they are not included in the solution. Sometimes, we need to treat these kinds of files as the files included in the solution. This topic is what we will discuss.

The following sections will give three methods to achieve this goal.

    Method 1: Unload project
    Method 2: Switch to Folder View of Visual Studio Explorer
    Method 3: Use Open With

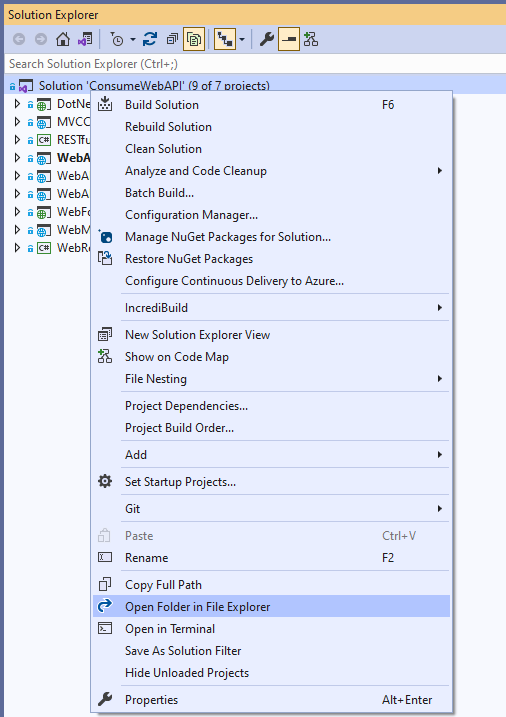
Method 1 - Open Folder in File Explorer from within Visual Studio

Right-click on Solution => Open Folder in File Explorer:

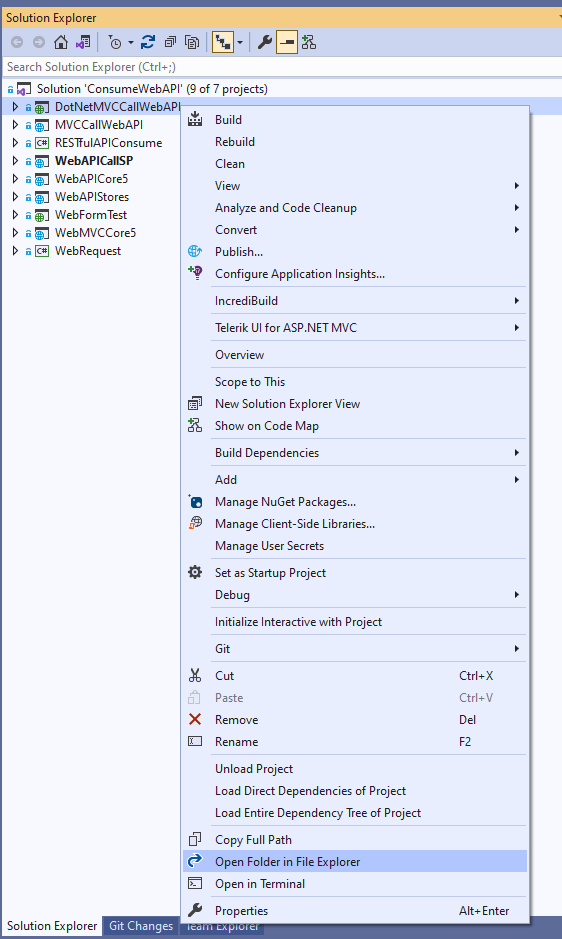
You can Right-click on Project=> Open Folder in File Explorer:

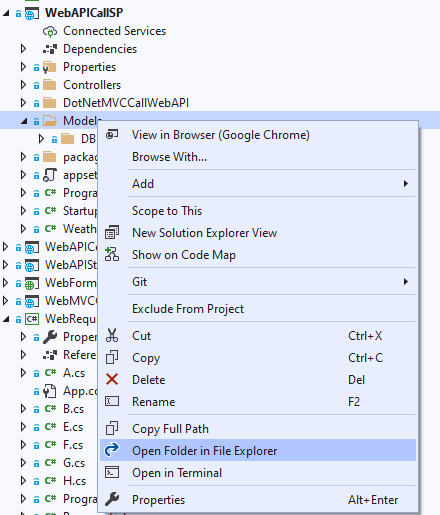
Or, Right-click on a File Folder=> Open Folder in File Explorer:

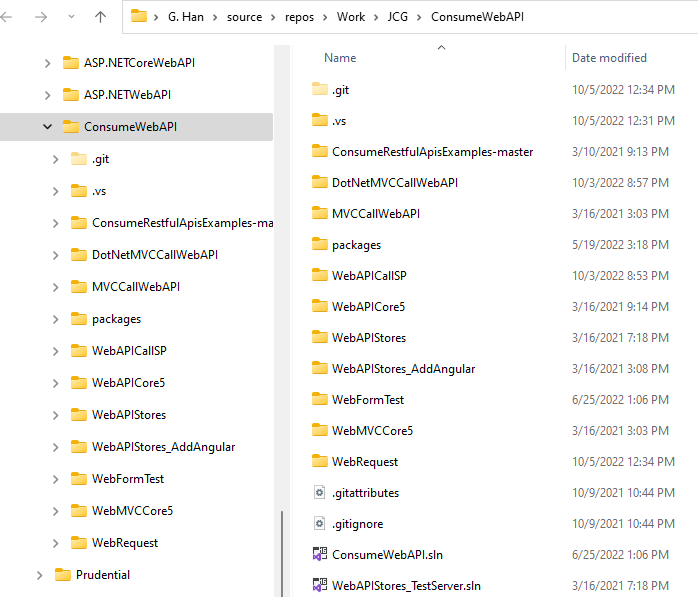
Click, then you will open the solution, or project, or specific File Folder, such like:

In this way, we can open File Explorer from within Visual Studio, instead of going outside to reopen File Explorer. The shortage is we will lose the Visual Studio environment, such as Source Control or Git from Visual Studio.  In some case, we have installed some third-party Source Control Software may reduce the shortage.

This is an example with TortoiseGit installed:

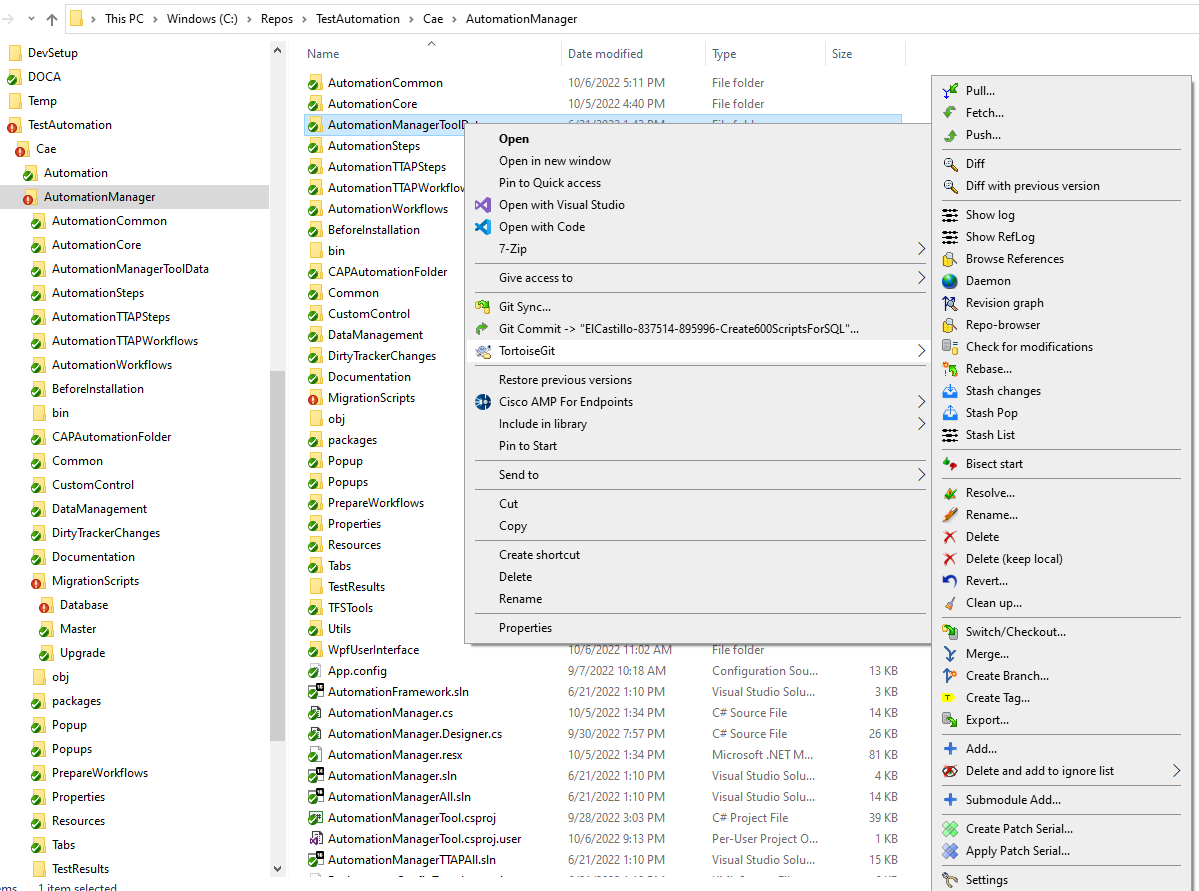
In this case, even without Visual Studio, we still have user-friendly GUI for Git control.

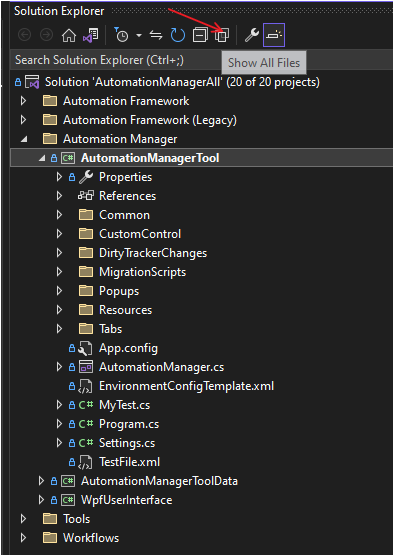
Method 2 - Show All Files
At the project level, you will have choice to have and Click the Icon Show All Files from the Solution Explorer bar, as shown below:

After Click: all hidden files, that are not included in the solution, will be shown:

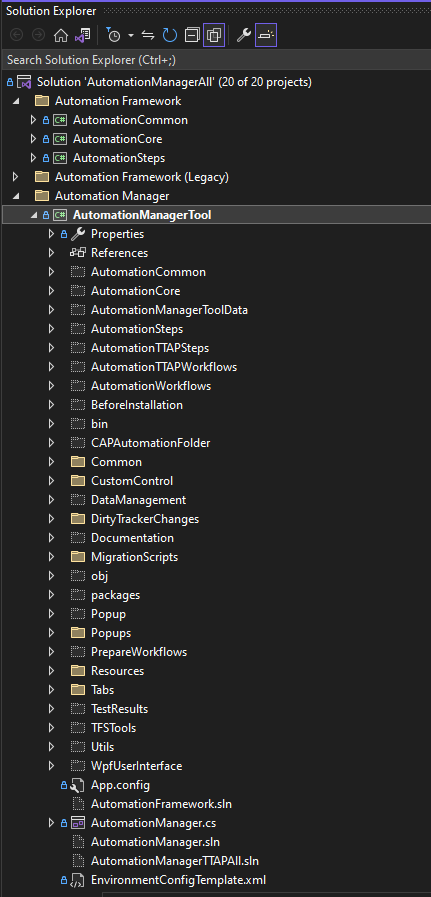
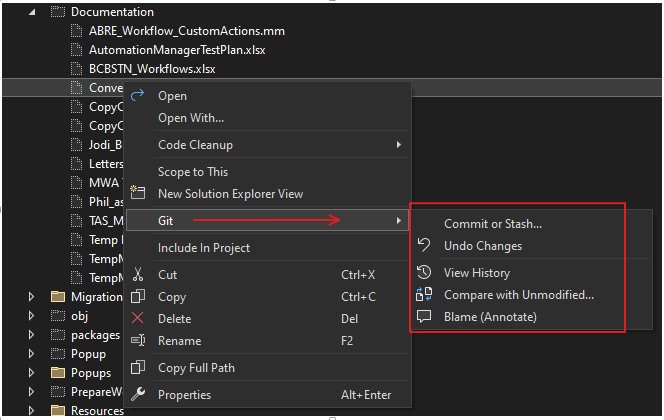
Examine one of file, you will see all Git Control feature are available for this file:


In this way, we can manager the hidden files within Visual Studio. The shortage is because they are hidden files, so even after showing, they are still in a plain color, we cannot distinguish if they are in Git Control or not, or if check out or not.

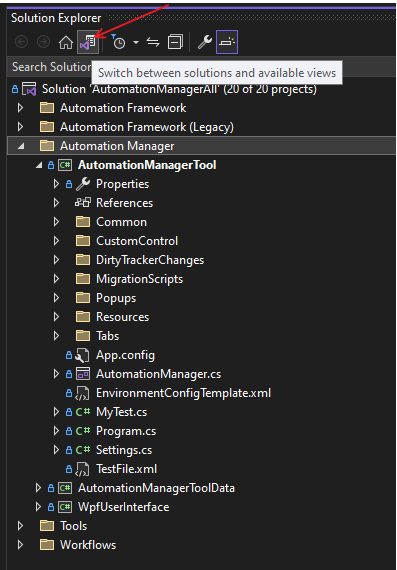
Method 3 - Switch to View Folder
Click the Icon Switch between solutions and available views as shown below


Click the Folder View:


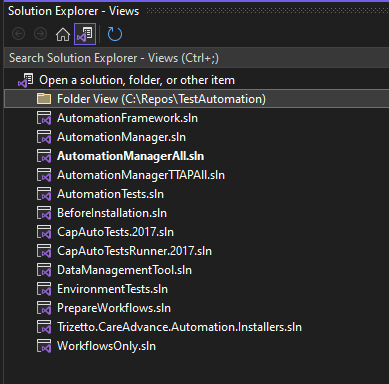
Now we are in Folder View:


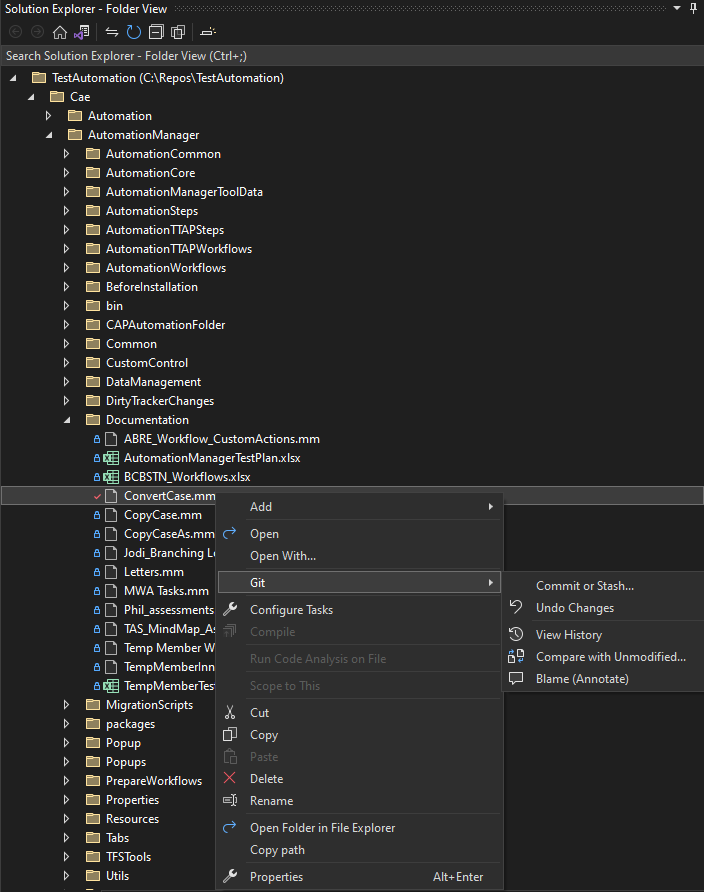
In which, we can view all files, including hidden files from the solution, and we will have all editing features, that Visual Studio has. In fact, now Visual Studio somehow is like Visual Studio Code Editor.


European Visual Studio 2022 Hosting - HostForLIFE :: Error - PerfWatson2.exe Issue While Installing SSIS Projects In Visual Studio

clock August 23, 2022 07:07 by author Peter

Got the below error while installing the SQL Server Integration Services Projects for Visual Studio 2019.

Error
Please close following processes before continuing the setup:
PerfWatson2 (17784)

Followed the below steps and resolved the issue.

Step 1
Open the Task Manager and find for PerfWatson2.exe.

Step 2
Right Click on PerfWatson2.exe and Click on End task.


Issue is resolved and continue with the installation process.
Hope you have successfully resolved this issue.
Like and share your valuable feedback on this article.


European Visual Studio 2022 Hosting - HostForLIFE :: Automating NuGet Package Uploads

clock August 9, 2022 07:44 by author Peter

The Challenge
When maintaining a larger number of NuGet packages, updating to a new version can become a tedious task. You need to upload all new packages, if there are dependencies between the different packages you also need to be fast in order to avoid breaking your packages. However, this task can also be automated - here's how.

Creating an API key
First of all, you need to create an API key that allows to push new packages to the NuGet server. Once logged in, you can choose the corresponding menu from here:

On the following page you can then choose the key name, the actions available for this key and the packages this key should apply to. In this example, I've used a global pattern to allow uploading all packages starting with combit.ListLabel:


After clicking "Create" you'll have the only chance ever to copy/view the generated key - make sure to use this opportunity wisely. Also, note that keys do have an expiration date. After this, you need to regenerate the key.


Using the Key for Automated Uploads
The next step is to use this key for an automated upload, of course. We've created a rather sophisticated batch file for this purpose which I'm sharing here. All required input is queried from the user. As the owner of this batch file may upload any packages on your behalf, make sure to store it in a very secure path only. The nuget push is repeated for each applicable package at the end.

@ECHO OFF

REM ==================================================================================================================================================
REM CONFIGURATION BEGIN
REM DO NOT EDIT BEFORE THIS LINE!
REM ==================================================================================================================================================
SET MajorVersion=27

SET NuGetExePath=.\nuget.exe

SET ApiKey=<Your API key>
SET Server=https://api.nuget.org/v3/index.json

REM ==================================================================================================================================================
REM CONFIGURATION END
REM DO NOT EDIT AFTER THIS LINE!
REM ==================================================================================================================================================

ECHO INFO: The NuGet version must match the format "Major.Minor.Patch[-Suffix]" (see examples):
ECHO    27.0.0-alpha1
ECHO    27.0.0-beta1
ECHO    27.0.0-beta2
ECHO    27.1.0
ECHO    27.2.1

SET NugetVersionString=%MajorVersion%

:UserPrompt_PrereleaseVersion
ECHO.
SET "UserChoice_PrereleaseVersion="
SET /P "UserChoice_PrereleaseVersion=Enter Pre-release version (values: "alpha" or "beta" without quotes; press 'Enter' to proceed without Pre-release version): %NugetVersionString%.0.0-"

IF /I "%UserChoice_PrereleaseVersion%" == "" (
    GOTO UserPrompt_MinorVersion
) ELSE (
    SET NugetVersionString=%NugetVersionString%.0.0-%UserChoice_PrereleaseVersion%
    GOTO UserPrompt_PrereleaseVersionSuffix
)

:UserPrompt_PrereleaseVersionSuffix
ECHO.
SET "UserChoice_PrereleaseVersionSuffix="
SET /P "UserChoice_PrereleaseVersionSuffix=Enter Pre-release version suffix (values: "2" and higher without quotes; press 'Enter' to proceed with Pre-release suffix default "1"): %NugetVersionString%"

IF /I "%UserChoice_PrereleaseVersionSuffix%" == "" (
    SET NugetVersionString=%NugetVersionString%1
) ELSE (
    SET NugetVersionString=%NugetVersionString%%UserChoice_PrereleaseVersionSuffix%
)

GOTO UserPrompt_FinalWarning

:UserPrompt_MinorVersion
ECHO.
SET "UserChoice_MinorVersion="
SET /P "UserChoice_MinorVersion=Enter Minor version (values: "1" or higher without quotes; press 'Enter' to proceed with default "0"): %NugetVersionString%."

IF /I "%UserChoice_MinorVersion%" == "" (
    SET NugetVersionString=%NugetVersionString%.0
) ELSE (
    SET NugetVersionString=%NugetVersionString%.%UserChoice_MinorVersion%
)

GOTO UserPrompt_PatchVersion

:UserPrompt_PatchVersion
ECHO.
SET "UserChoice_PatchVersion="
SET /P "UserChoice_PatchVersion=Enter Patch version (values: "1" or higher without quotes; press 'Enter' to proceed with default "0"): %NugetVersionString%."

IF /I "%UserChoice_PatchVersion%" == "" (
    SET NugetVersionString=%NugetVersionString%.0
) ELSE (
    SET NugetVersionString=%NugetVersionString%.%UserChoice_PatchVersion%
)

GOTO UserPrompt_FinalWarning

:UserPrompt_FinalWarning
ECHO.
IF /I NOT "%UserChoice_PrereleaseVersion%" == "" (
    SET PackageSourcePath=\\srvchk\prod\LL%MajorVersion%\%UserChoice_PrereleaseVersion%%UserChoice_PrereleaseVersionSuffix%\NuGet
) ELSE (
    SET PackageSourcePath=\\srvchk\prod\LL%MajorVersion%\Release\%MajorVersion%.00%UserChoice_MinorVersion%\NuGet
)

SETLOCAL EnableExtensions EnableDelayedExpansion
SET "UserChoice_FinalWarning=N"
SET /P "UserChoice_FinalWarning=WARNING: This cannot be undone. Really upload NuGet packages for version "%NugetVersionString%" ("%PackageSourcePath%") [Y/N]? "
SET "UserChoice_FinalWarning=!UserChoice_FinalWarning: =!"

IF /I "!UserChoice_FinalWarning!" == "N" ENDLOCAL & GOTO :EOF
IF /I NOT "!UserChoice_FinalWarning!" == "Y" GOTO UserPrompt_FinalWarning

ENDLOCAL
GOTO Upload

:Upload
REM Push packages to server
ECHO.
ECHO Uploading packages...
%NuGetExePath% push "%PackageSourcePath%\combit.ListLabel%MajorVersion%.%NugetVersionString%.nupkg" -ApiKey %ApiKey% -Source %Server%
%NuGetExePath% push "%PackageSourcePath%\combit.ListLabel%MajorVersion%.AdhocDesign.%NugetVersionString%.nupkg" -ApiKey %ApiKey% -Source %Server%
%NuGetExePath% push "%PackageSourcePath%\combit.ListLabel%MajorVersion%.AdhocDesign.Web.%NugetVersionString%.nupkg" -ApiKey %ApiKey% -Source %Server%
%NuGetExePath% push "%PackageSourcePath%\combit.ListLabel%MajorVersion%.CassandraDataProvider.%NugetVersionString%.nupkg" -ApiKey %ApiKey% -Source %Server%
%NuGetExePath% push "%PackageSourcePath%\combit.ListLabel%MajorVersion%.FirebirdConnectionDataProvider.%NugetVersionString%.nupkg" -ApiKey %ApiKey% -Source %Server%
%NuGetExePath% push "%PackageSourcePath%\combit.ListLabel%MajorVersion%.MongoDBDataProvider.%NugetVersionString%.nupkg" -ApiKey %ApiKey% -Source %Server%
%NuGetExePath% push "%PackageSourcePath%\combit.ListLabel%MajorVersion%.MySqlConnectionDataProvider.%NugetVersionString%.nupkg" -ApiKey %ApiKey% -Source %Server%
%NuGetExePath% push "%PackageSourcePath%\combit.ListLabel%MajorVersion%.NpgsqlConnectionDataProvider.%NugetVersionString%.nupkg" -ApiKey %ApiKey% -Source %Server%
%NuGetExePath% push "%PackageSourcePath%\combit.ListLabel%MajorVersion%.NuoDbConnectionDataProvider.%NugetVersionString%.nupkg" -ApiKey %ApiKey% -Source %Server%
%NuGetExePath% push "%PackageSourcePath%\combit.ListLabel%MajorVersion%.OdbcConnectionDataProvider.%NugetVersionString%.nupkg" -ApiKey %ApiKey% -Source %Server%
%NuGetExePath% push "%PackageSourcePath%\combit.ListLabel%MajorVersion%.OleDbConnectionDataProvider.%NugetVersionString%.nupkg" -ApiKey %ApiKey% -Source %Server%
%NuGetExePath% push "%PackageSourcePath%\combit.ListLabel%MajorVersion%.RedisDataProvider.%NugetVersionString%.nupkg" -ApiKey %ApiKey% -Source %Server%
%NuGetExePath% push "%PackageSourcePath%\combit.ListLabel%MajorVersion%.ReportServerIntegration.%NugetVersionString%.nupkg" -ApiKey %ApiKey% -Source %Server%
%NuGetExePath% push "%PackageSourcePath%\combit.ListLabel%MajorVersion%.SalesforceDataProvider.%NugetVersionString%.nupkg" -ApiKey %ApiKey% -Source %Server%
%NuGetExePath% push "%PackageSourcePath%\combit.ListLabel%MajorVersion%.SqlConnectionDataProvider.%NugetVersionString%.nupkg" -ApiKey %ApiKey% -Source %Server%
%NuGetExePath% push "%PackageSourcePath%\combit.ListLabel%MajorVersion%.Web.%NugetVersionString%.nupkg" -ApiKey %ApiKey% -Source %Server%
%NuGetExePath% push "%PackageSourcePath%\combit.ListLabel%MajorVersion%.Wpf.%NugetVersionString%.nupkg" -ApiKey %ApiKey% -Source %Server%
%NuGetExePath% push "%PackageSourcePath%\combit.ReportServer%MajorVersion%.ClientApi.%NugetVersionString%.nupkg" -ApiKey %ApiKey% -Source %Server%
%NuGetExePath% push "%PackageSourcePath%\combit.ReportServer%MajorVersion%.SharedTypes.%NugetVersionString%.nupkg" -ApiKey %ApiKey% -Source %Server%

PAUSE


The Result
Once executed, the package is uploaded and shows up with the newly created version. The result looks just like a "normal" upload, but the process is much less error prone and executed in a matter of seconds:


Wrapping Up
The presented batch file allows to automate the management of larger NuGet package zoos. We're using it successfully to maintain our roundabout 50 packages with 87k downloads on nuget.org. It will be a great help for others facing the same challenges.


European Visual Studio 2022 Hosting - HostForLIFE :: How To Enable Preview Version In Visual Studio 2022?

clock March 24, 2022 09:08 by author Peter

As we know Microsoft has released Visual Studio 2022 17.2 Preview1 (VS2022 17.2 Preview 1) recently. Just a few months before I had installed Visual Studio 2022 17.1-Current version of visual studio. I was exploring how can I get started and learn .NET 7 preview in my working machine. So, in this article, we will learn how to switch from the current Visual Studio version to the Preview version with a demonstration of switching from Visual Studio 2022 17.1-Current version to the VS2022 17.2 Preview1 (VS2022 17.2 Preview 1).

To move from Visual Studio 2022 17.1 current version to the VS2022 17.2 Preview1 (VS2022 17.2 Preview 1), you need to install the following prerequisites in your machine. Download it and install those.

  • .NET 7 Preview
  • Visual Studio 2022 17.2 Preview1

Then, follow the below steps for switching from the current to the preview version. This article is written with the device which has already been installed Visual Studio 2022 in it. However, the switching process is the same for another version as well.

So, let’s begin.

Step 1 – Check for Update
Open Visual Studio and then go to Help–>Check for Updates as shown below.

Step 2 – Change Update Setting
Then, you will get the below screen. Here you can see my Visual Studio is up to date. So, to change the setting to Preview, click on change the update setting as highlighted below.

Alternatively, you can directly go to the update setting from Visual Studio Installer. Go to More and then Update Setting as illustrated below.

Step 3 – Update Channel
Select the update channel from Current to Preview and click on OK.

It will check for the update.

Step 4 – Click on Update
If there is an update required then click on Update.

As you can see on the above image, VS 2022 17.2.0 Preview contains a cumulative update with new features, updated components, and servicing fixes.

Step 5 – Updating
The update will take some time. Wait for it until the update is done.

Step 6 – Close and Restart
Once it is updated then restart the Visual studio.

Step 7 – Version checking
When you search for VS then you can see the preview is available in the search as shown below.

Alternatively, you can check the release version at any time. For this open the Visual Studio and go to Help–> Release Note.

Or go to Help–>check for the update then you will see the status of your Visual Studio.

Hence, once you set up VS2022 17.2 Preview1 (VS2022 17.2 Preview 1) then you are ready to learn and explore the .NET 7. To learn and get started with .NET 7 you can find the article here.

In this article, we have learned to switch from Visual Studio 2022 17.1 current version to Visual Studio 2022 17.2 Preview version and set up the Visual Studio development environment for .NET 7 and C# 11. Once your environment is ready then you can start your .NET 7.0 journey from here.


European Visual Studio 2022 Hosting - HostForLIFE :: Hidden Features Of Visual Studio That Developer Should Know

clock February 8, 2022 06:46 by author Peter

Most of the .NET developers are using Visual Studio IDE for their development. The Visual Studio IDE has a lot of cool hidden features. Most of the developers are not aware of these features. In this article, we are going to explore hidden features available in Visual Studio.

1) Track active document in the solution
While working on the large solution (which has several numbers of projects), tracking of current opening file in the solution is difficult. If we want to track, then we have to scroll the entire solution explorer to find out the working files or search for a specific file inside solution explorer. It is too difficult and also time-consuming process. But Visual Studio has tracking feature which helps us to understand where we are in the solution/projects.

Visual Studio can automatically highlight the active/working files in the solution by clicking on the "Sync with Active Document" option in the top bar of the solution explorer.

Disadvantage of the above approach is every time we have to manually click this option to track files. Then how to do it automatically without manual action? Yes!!!! Visual Studio has that feature also. Cool.

Follow the below steps to enable the auto tracking feature.

Step 1
Go Tools -> Options

Step 2
Select Projects and Solutions -> General on the left pane

Step 3
Select the option "Track Active Item in Solution Explorer"

This will track your current working files automatically in the solution explorer.

2) Copy multiple items to the clipboard
Mostly if we want to copy multiple lines of code from different places and paste them in a single place or when we needed, then mostly we would copy and paste one by one. It is always affecting our productivity. Then, how to copy multiple code block, and paste them as and when needed? This is another hidden feature of Visual Studio. This built-in feature is known as “Clipboard Ring”. Just cut/copy the code blocks which are stored in a memory and you can use them later by pasting.

How it works?
    Copy (ctrl + c) / Cut (ctrl + x) the number of code blocks.
    Press ctrl+shit+v Option. A small pop-up window is displayed with all copied items. You can choose which one wants to paste.
    Use the same key set to paste the copied items. The clipboard store only the last 15 copied items in the memory.

3) Separate and Maintaining the pinned tabs in Visual Studio
Most of the times we have pinned the frequently used files. Even if pinned the files, those files are aligned with other opened files in a single row. So, it is difficult to maintain/track the pinned files with other files. Pinned Tabs are very useful features in Visual Studio where we can maintain the pinned files in a separate row and refer them quickly.

Go to Tools -> Options -> Environment -> Tabs and Windows and checked the  "Show pinned tabs in separate row" option.

4) Use "Run To Cursor" and save time while debugging
It is another cool hidden feature which can improve productivity while debugging. If we want to stop the debugger in a particular line then most of us add the breakpoint and run the application. So, the debugger will stop on the targeting line. Is it possible to reduce the work? Yes. We can.

"Run to Cursor" is just like another breakpoint, but in this case, we don’t need to start the Visual Studio debugger manually and the breakpoints are cleared when it’s hit. When you select the "Run to Cursor" option, visual studio starts the debugger automatically and stopped on the selected line.

Right click on the line where you want to stop the debugger, select the "Run to Cursor" option from the context menu. The Visual Studio starts the application and it will stop on the line you had selected. From here we can continue the debugging. Shortcut for this option is "ctrl + F10".

5) Open the application in the multiple Browsers
While working on the web application (mostly front-end), we want to test the application in different browsers. When we run the application, it will open in the default browser. Most of the time we manually copied the URL and opened it in another browser. Do you think, is this improve our productivity? No Definitely Not. Visual Studio has the option to run the application in different browsers with just a single click.

Follow the below steps to open the application in multiple browsers.

Step 1

Click on run dropdown -> Web Browser -> Click "Select Web Browsers... " option.

Step 2
The Browser option window will be displayed. Select the browser which you want to test and click OK.

Step 3
Hit the ctrl+ F5 or select "Start Without Debugging" option under the Debug menu. The application will be opened with all selected browsers.


6) Convert JSON And XML Object Into Class
Visual Studio has a super cool feature which is to generate the classes from a JSON/XML object using just copy-paste. Please refer to my other article about the details of this feature.

In this article, we have learned about various Visual Studio hidden features which help us to improve our productivity.


European Visual Studio 2022 Hosting - HostForLIFE.eu :: What Is New In Visual Studio 2022

clock November 10, 2021 07:00 by author Peter

Microsoft’s Visual Studio is one of the most popular developer IDEs in the world. Not only is Visual Studio modern, feature-rich, and advanced, but it also gets more frequent updates than any other IDE out there. The next version of Visual Studio is going to be Visual Studio 2022. The Visual Studio team just released the first public preview of Visual Studio 2022.

I am sure one of the first questions you probably have is, "What is new in Visual Studio 2022?" In this article, we will learn about the key new features in Visual Studio 2022.
Visual Studio 2022 is modern, faster, intelligent and lightweight

Visual Studio 2022 is much faster and more lightweight compared to the current version. The Visual Studio team has focused on making IDE more user-friendly by enhancing the overall user experience. It looks cleaner.

Visual Studio 2022 also has intelligent features that include recommendations around code cleanness, quality, standards, and best practices.

Let’s look at some of the key updates in Visual Studio by installing the Visual Studio 2022 Community Edition.
Installing Visual Studio 2022

The current version of Visual Studio 2022 is Preview 1 that you can download it from Visual Studio 2022 preview page here.

I selected ASP.NET, Azure, Windows, and UWP workloads and the space required for the installation is close to 20GB.

The good news is, VS 2022 keeps your current login from VS 2019.

Create a new project and the initial screens look similar.

The next screen is a little cleaner.

The current version supports .NET 6.0 (Preview only). I am sure the next upgrades will have more options here.


Key changes and updates in Visual Studio 2022
The first thing I noticed right after the installation was a little cleaner UI and minor color changes of icons. It makes them stand out a little and it's easier to find them in the UI.


Here is a list of some of the key changes in Visual Studio 2022.

Visual Studio 2022 (devenv.exe) is now 64-bit only.

IntelliCode now can complete the whole line auto-complete.

As we saw earlier, Visual Studio 2022 supports .NET 6 SDK (preview for now). .NET 6 also supports .NET MAUI project but you will have to download .NET MAUI workload template direct from Github.

The XAML Designer for .NET Framework has been upgraded in this release.
Git Tooling

Removed the ability to revert back to the Team Explorer Git UI, making the new Git experience the only available built-in tooling.

Removed the option to install the GitHub extension from the Visual Studio Installer.

New versions of the test platform will not be able to run Generic tests and Ordered tests.
Web Tools

The Publish summary page now has actions to start/stop remote debugging and profiling under the '...' menu on the top right corner of the 'Hosting' section

The Connected Services page now has an action to launch Storage Explorer

The "ASP.NET Core Empty" template that comes with .NET 6 is using the new 'minimal APIs' paradigm for which we have started to add support.

Some of the feature that has not implemented yet but is coming in the next releases.

  • Web Live Preview
  • Instrumentation profiler
  • Azure Cloud Service project support
  • T-SQL debugger
  • Web Load Test and TestController/TestAgent
  • Azure DataLake
  • Coded UI Test
  • DotFuscator
  • Incredibuild IDE integration
  • IntelliCode find and replace by example


About HostForLIFE

HostForLIFE is European Windows Hosting Provider which focuses on Windows Platform only. We deliver on-demand hosting solutions including Shared hosting, Reseller Hosting, Cloud Hosting, Dedicated Servers, and IT as a Service for companies of all sizes.

We have offered the latest Windows 2019 Hosting, ASP.NET 5 Hosting, ASP.NET MVC 6 Hosting and SQL 2019 Hosting.


Tag cloud

Sign in