Full Trust European Hosting

BLOG about Full Trust Hosting and Its Technology - Dedicated to European Windows Hosting Customer

AngularJS Hosting Europe - HostForLIFE :: How To Implement Lazy Loading In Angular?

clock January 31, 2023 07:38 by author Peter

This article explains one of the key concepts in Angular - Lazy Loading. By going through this article, we will understand:
    What is Lazy Loading in Angular?
    When Lazy Loading is useful?
    How to Lazy Load a Component in Angular?


What is Lazy Loading in Angular?
Lazy loading in Angular refers to the ability to load components as needed, rather than loading all components at once during the initial application load.

Lazy loading modules helps us decrease the start-up time as Application does not need to load everything at start-up and modules that are lazily loaded will only be loaded when the user navigates to their routes.

The following image represents the resulting build artifacts between default loading vs Lazy loading of some of the features:

Using Lazy loading, some of the feature modules (feature-n) are separated into different chunks, and these are only loaded if the user navigates to that specific route.

When Lazy Loading is useful?
When NgModule launches the angular application, it loads all the components and modules which are declared within, due to this application start up time will be increased and this will impact on the performance of our application.
Lazy loading is useful in Angular when an application has many components, and not all of them are needed for the initial load of the application.

By only loading the necessary components as they are needed, lazy loading can help improve the performance of an Angular application in several ways:
    Reducing the initial load time of the application by loading only the necessary components.
    Reducing the overall size of the main.js file by splitting the application bundle into smaller chunks.
    Increase the modularity of the applications.
    Improving the user experience by loading the components which are needed for the initial views only.
    It’s allowing developers to break up the application into smaller, more manageable chunks, making the development, and maintenance easier.

How to Lazy Load a Component in Angular?

To implement lazy loading in an Angular application, we can use the Angular Router module, which allows us to specify a component to load lazily by using the "loadChildren" property in the route configuration.

Here's an example demonstration of how we can implement lazy loading for a component.

Step 1 - Create a new module and a component
Create a new module you want to load lazily, in this case, "AdminModule" and created component called "Home" inside admin module.

Step 2 - Define and Import Router module in Lazy Load module
In the "AdminModule" module, import the component you want to load lazily and add it to the "declarations" and "imports" arrays of the module. When registering routes in sub-modules and lazy loaded submodules then we need to use forChild(routes) as follows.

In the declarations, add the component that you want to load lazily.

Step 3 - Import the Angular Router module and configure the route
In the routing module of your application, import the Angular Router module and configure the route for the " AdminModule" component to be loaded lazily.

Step 4 - Verify lazy loading in Browser
Angular will load the module and component on demand when a specific route is activated in the browser. We can verify from the Network tab that a module is indeed being lazy loaded.

Lazy loading is a technique that allows angular components to load asynchronously when a specific route is activated and useful for angular applications with a large number of components, where not all of them are needed for the initial load of the application, to improve the overall performance, load time and user experience.

Happy Learning!


AngularJS Hosting Europe - HostForLIFE :: Understanding @Input(), @Ouput() And @ViewChild() In Angular

clock January 26, 2023 06:32 by author Peter

This article demonstrates how to share data between components using @Input(), @Output(), and @ViewChild().


In Angular, @Input() and @Output() are decorators that allow a component to share data with its parent or child components, respectively. @ViewChild() is a decorator that allows a component to access a child component, directive, or DOM element.

Understanding the use of @Input()
@Input() allows a component to receive data from its parent component. For example, a child component might use @Input() to receive data from its parent component like this:

Here, whenever I added a new entry as "Add Customer", the updated information is passed to the child component (e.g. Customer Table) and the child is acting as a term component. And the parent is acting like smart component.


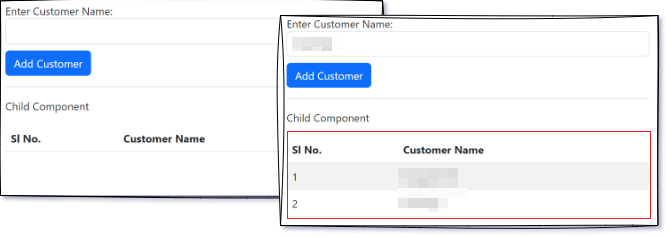
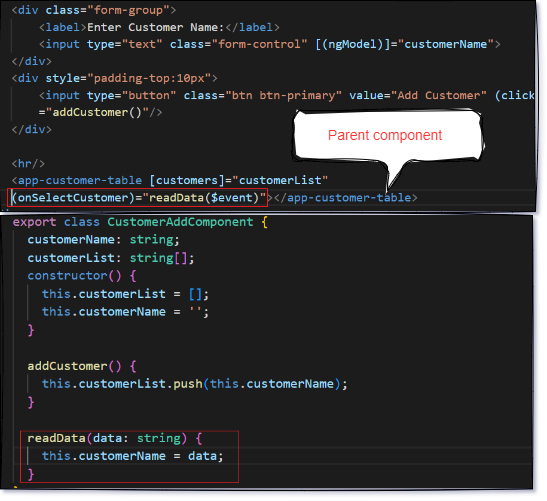
customer-add.component acts as a Parent Component
In this example, the parent component contains Add customer sections and a sub-component like a customer table. When we click on Add Customer that information being passed to the child component (customers table) and displayed on the table.


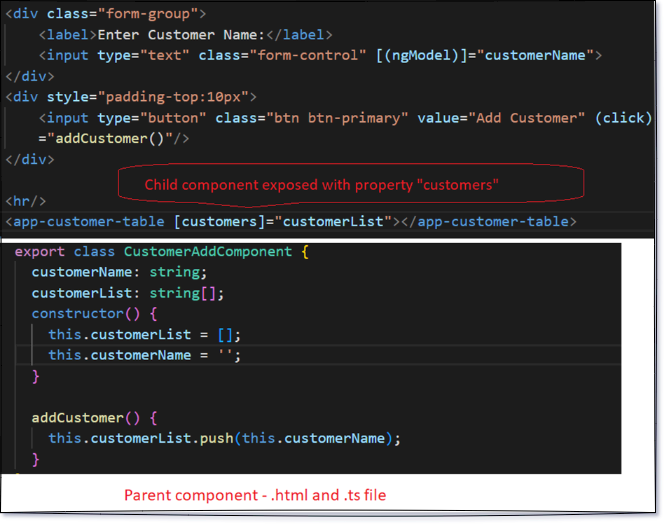
customer-table.component acts as a Child Component,

In the above example, the parent component uses the @Input() decorator to bind the "customers" property to a value passed from the parent component.

And the child component uses the @Input() decorator to receive the value passed from the parent component.

So, @Input() decorator is used to pass the data from the parent to the child component with help of property.
Understanding the use of @Output()

@Output() allows a component to emit events to its parent component. For example, a child component might use @Output() to emit an event when a button is clicked like this:

In the above example, whenever we select data from the customer table which acts as a child, that data should pass to the customer’s name textbox which acts as the parent. It’s basically sending data from child to parent. To do that, we need to expose an event with an output decorator.


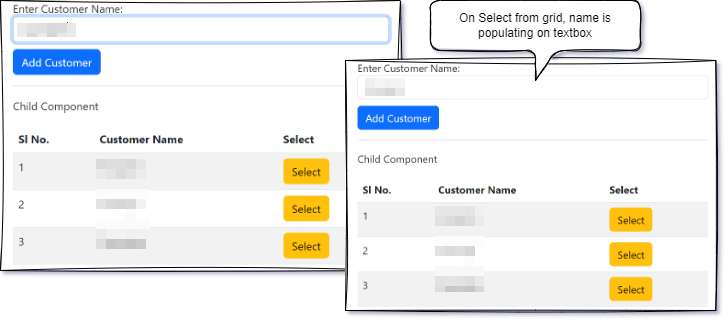
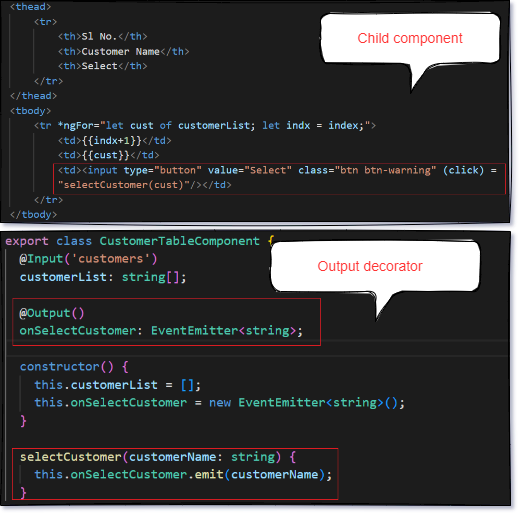
@Output() decorator to listen for an event emitted by the child component, which is then handled in the parent component.


So, @Ouput() decorator is used to pass the data from child to parent with the help of the event.
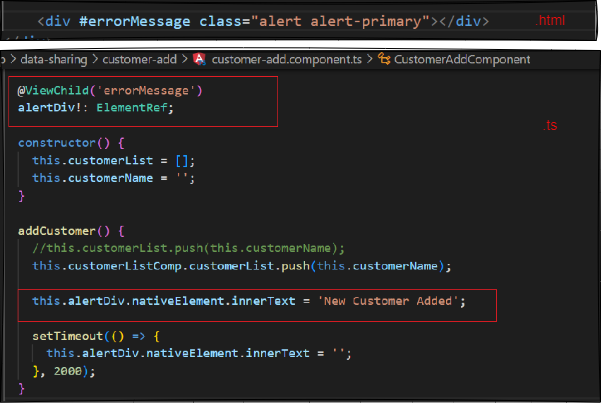
Understanding the use of @ViewChild()

@ViewChild() allows a component to access a child component or DOM element. For example, a parent component might use @ViewChild() to access a child component like this:

In order to use the @ViewChild() decorator, we need to reference the child component in the parent component's class, and then we can use to query the child component's properties and methods or manipulate the DOM directly.

Another example where @ViewChild() can be used to access the DOM element as like below:

In summary, ViewChild is used to access child components or elements in the template, while @Input and @Output are used to pass data between components. If you need to access a specific child component or element in the template, ViewChild will be more useful, while if you need to pass data between components, @Input and @Output will be more useful.


AngularJS Hosting Europe - HostForLIFE :: How to use Virtual Scrolling using Angular CDK?

clock January 17, 2023 07:09 by author Peter

Sometimes while working with web-based Angular applications you might find yourself in a situation where you need to render thousands of records inside a list. However, rendering that many records directly in the DOM can be a memory-expensive operation and can lead to performance issues or even can cause lag while scrolling through the list.


However, the Angular CDK library, fortunately, comes bundled with a feature called Virtual Scrolling that can be used to fix this issue. This component only the number of records that can fit in the viewport i.e. is visible to the user. And keeps changing the records as the user starts scrolling through the list. This feature was introduced with Angular CDK version 7.

Let's understand this technique in detail with an example.

First, create a dead simple Angular application using Angular CLI.
ng new sample

next, install the Angular CDK package either with Angular CLI or npm.
ng add @angular/cdk

or,

npm install @angular/cdk

Now first inside the app.component.ts file let's generate 500,000 rows and try to render it without the virtual scroll feature.

To generate an array we'll simply use the Array.from method.
import { Component } from '@angular/core';

@Component({
  selector: 'app-root',
  templateUrl: './app.component.html',
  styleUrls: ['./app.component.css'],
})
export class AppComponent {
  rows: string[] = Array.from(Array(500000)).map((_, i) => `Row #${i}`);
}

Next, we'll try to render the rows in the template.
<div class="box">
  <div class="row" *ngFor="let row of rows">{{ row }}</div>
</div>


We'll also add some styling to the CSS file of this template.
.box {
  height: 250px;
  width: 250px;
  border: 1px solid #e3e3e3;
  overflow: scroll;
}
.row {
  height: 50px;
}


Immediately you'll notice that it is taking a while to render that many rows. And if you try to inspect the element you'll notice that the browser is literally rendering 500,000 rows in the DOM.

Now, let's do the same thing using the Virtual Scrolling technique.

First, we need to import the ScrollingModule inside the AppModule and add it to the imports array.
import { NgModule } from '@angular/core';
import { BrowserModule } from '@angular/platform-browser';

import { AppComponent } from './app.component';
import { BrowserAnimationsModule } from '@angular/platform-browser/animations';
import { ScrollingModule } from '@angular/cdk/scrolling';

@NgModule({
  declarations: [
    AppComponent
  ],
  imports: [
    BrowserModule,
    BrowserAnimationsModule,
    ScrollingModule
  ],
  providers: [],
  bootstrap: [AppComponent]
})
export class AppModule { }

Importing this module gives us access to cdk-virtual-scroll-viewport components and the cdkVirtualFor directive which we'll be using to implement the virtual scroll strategy.
<cdk-virtual-scroll-viewport itemSize="50" class="box">
  <div class="row" *cdkVirtualFor="let row of rows">
    {{ row }}
  </div>
</cdk-virtual-scroll-viewport>


we're using cdkVirtualFor instead of the ngFor loop to iterate over the rows and itemSize is simply the height of individual elements which in our case is 50px (see the styling for .row class).

As soon as you complete the above implementation you'll notice the rendering time is reduced next to none, and if you inspect the DOM element you'll notice that component has rendered a very limited number of elements and it simply replaces existing rows with new rows as the user scrolls through the list.


AngularJS Hosting Europe - HostForLIFE :: Convert Byte Array Into PDF And Open It Inside Custom Dialog box In Angular

clock January 13, 2023 06:41 by author Peter

Mostly on the internet, you can find how to open PDF via window.open(“”) Javascript way.

So what is here?
Well, opening PDF in a separate window is available but is not in our custom control, especially in Angular.

So here we will open this PDF inside our custom dialog (in our control) and can do event firing on the closing of POP up for further business requirements.

Prerequisite(not mandatory)
I am using a ready-made dialog box from prime-ng <p-dialog> control.
But that is not required you can use any material bootstrap or custom div even. This is just to showcase because behind the scene the logic is the same.

Opening PDF In Angular
Opening PDF inside a dialog can be done in a few ways. The Idea/concept behind this is we need to get elementID from DOM and attach our PDF to its inner body. Using below ways
    Using <a href =”url”>.
    Using the same anchor tag by dynamic code and click it.
    Using <iframe/> and appending to DOM body.
    Using .getElementById(“”) and binding to its innerHTML.


Problem
Many times you use “ElementRef, Renderer2” packages which we generally use but you get errors like this:

a. Use @Viewchild()

Alternate Solution
b. Use @inject(document)

Steps
Step 1. Inject the document in the constructor and import it from the library like this.
@Inject(DOCUMENT) private document: Document

Import Library
import { DOCUMENT } from '@angular/common';

Step 2. Use it like this, here I am creating DOM <Frame> element and binding it to Element ID where I want it to display behind the HTML side

Ts Code

Html code

Step 3. It should open like this when you open it inside HTML similar can be done in dialog or popup container:

In Main Body

In POP up

Attachment
Full project will not help as Angular has many packages, so I am giving this simple JavaScript version POC used for angular application. Kindly refer to angular code screenshots (typescript version for reference)

Client-Side coding with a new framework is always fun, Let me know if you have any queries.


Node.js Hosting - HostForLIFE.eu :: How To Setup A Express.js Project?

clock January 6, 2023 06:36 by author Peter

Express.js is one of the most popular frameworks for building web applications using Node.js. It provides features that make creating a robust and scalable web application easy. This step-by-step guide will go over all the steps for setting up an Express.js project from scratch.

Installation is pretty straightforward. Before we get started, you will need to have Node.js installed on your system. You can download the latest version of Node.js from the official website. Once installation is complete, you can run the following commands to verify if Node.js and npm are working correctly on your computer.
npm -v

node -v

You're good to go if you see the versions of Node.js and npm in the command line.

Initializing the project
Let's start by creating a new directory for your project and navigate to it:
mkdir my-express-project
cd my-express-project

Next, initialize the Node.js project by running the following command:
npm init -y

This will create a package.json file in your project directory. The package.json file stores metadata about your project, including the dependencies it needs to run. the -y parameter is used to skip the questionnaire altogether. It'll implicitly set yes to all the questions during the npm init command.

Installing Express.js
To install Express.js, run the following command:
npm install express

This will install Express.js and add it as a dependency in your package.json file.

Creating an entry point for the application
Next, we'll create an entry point for your application. This file will be run when you start the application. First, let's create an src directory in the root of our application and then create a file called index.js inside the src folder and add the following code inside that file:
const express = require('express');
const app = express();
const port = 3000;
app.get('/', (req, res) => {
    res.send('Hello Express!');
});
app.listen(port, () => {
    console.log(`App is running on port ${port}`);
});

The above code creates an instance of an Express.js app and sets up a route that listens for GET requests to the app's root path (/). When a request is received, it sends a response with the message "Hello Express!". The application is also set to listen on port 3000.

Adding start script
Next, open your package.json file and add look for scripts section. In this section, add the following script.
"scripts": {
  "start": "node src/index.js"
},

Starting the app

Now from the root of your application, run the following command
npm start

This will start the app, and you should see the message "App is running on port 3000" in the console.
To test the app, open your web browser and navigate to http://localhost:3000. You should see the message "Hello Express!" displayed in the browser.

And That's it! I hope you found this article enjoyable. If you've any queries or feedback, feel free to comment.


About HostForLIFE

HostForLIFE is European Windows Hosting Provider which focuses on Windows Platform only. We deliver on-demand hosting solutions including Shared hosting, Reseller Hosting, Cloud Hosting, Dedicated Servers, and IT as a Service for companies of all sizes.

We have offered the latest Windows 2019 Hosting, ASP.NET 5 Hosting, ASP.NET MVC 6 Hosting and SQL 2019 Hosting.


Tag cloud

Sign in