In this tutorial, I am going to explain CASE expressions in MySQL with examples. This article will cover the following topics. Let’s see.
Introduction
Simple CASE Expression
Searched CASE Expression
Difference between SIMPLE and SEARCHED CASE Expressions
Conclusion
In MySQL, the case expression shows multiple conditions. An expression is the compatible aggregated type of all return values, but also depends on the context. If we have to use it in a numeric context, the result is returned as a decimal, real, or integer value. You can use CASE expression anywhere in a query like SELECT, WHERE, or ORDER BY clause.

Note:
Note that, MySQL CASE Expressions are different from MySQL CASE Statements. MySQL CASE Statements are only used in Stored Procedures, Functions, Events, and Triggers whereas MySQL CASE Expressions are used in SELECT Queries.
The CASE expression has two forms
Simple CASE Statement
Searched CASE Statement
First, let's create a database with a few tables containing some dummy data. Here, I am providing the database with the tables containing the records, on which I am showing you the various examples. Let's see.
CREATE DATABASE MySQL_CASEExpressions;
USE MySQL_CASEExpressions;
CREATE TABLE Bookorder(
BookNumber INT NOT NULL,
orderDate datetime NOT NULL,
shippedDate DATE DEFAULT NULL,
Status VARCHAR(50),
OrderAcknowledgeDate datetime,
PRIMARY KEY(BookNumber)
);
SIMPLE CASE Expressions
In the Simple Case Expressions, when “case_value” matches with its respective “value”, then it returns the corresponding “result” value. But, if the “case_value” does not match with any “value” then, it returns the “result_value”.
Syntax
CASE <case_value>
WHEN <value1> THEN <result1>
WHEN <value2> THEN <result2>...
ELSE <result_value> END;
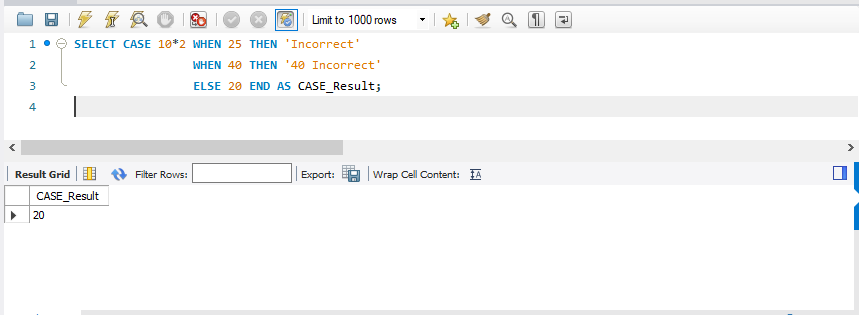
Example 1
SELECT CASE 10 * 2 WHEN 25 THEN 'Incorrect'
WHEN 40 THEN '40 Incorrect'
ELSE 20 END AS CASE_Result;
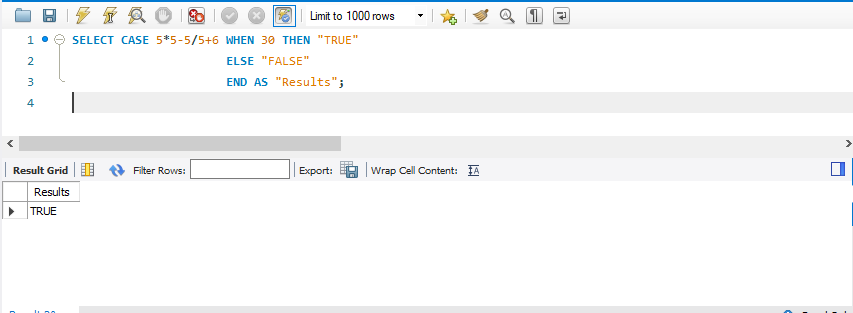
Example 2
SELECT CASE 5 * 5 - 5 / 5 + 6 WHEN 30 THEN "TRUE"
ELSE "FALSE"
END AS "Results";
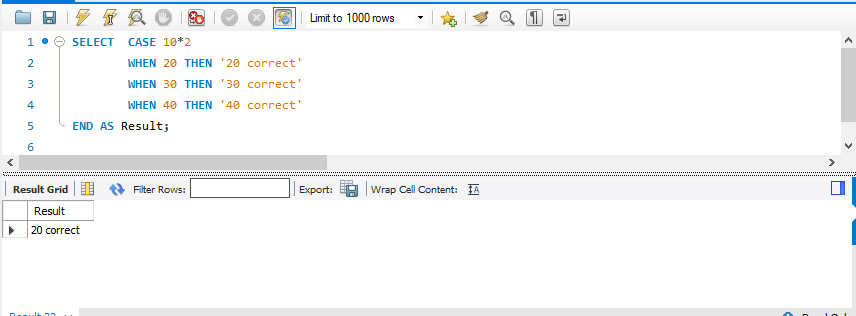
Example 3
SELECT CASE 10 * 2
WHEN 20 THEN '20 correct'
WHEN 30 THEN '30 correct'
WHEN 40 THEN '40 correct'
END AS Result;
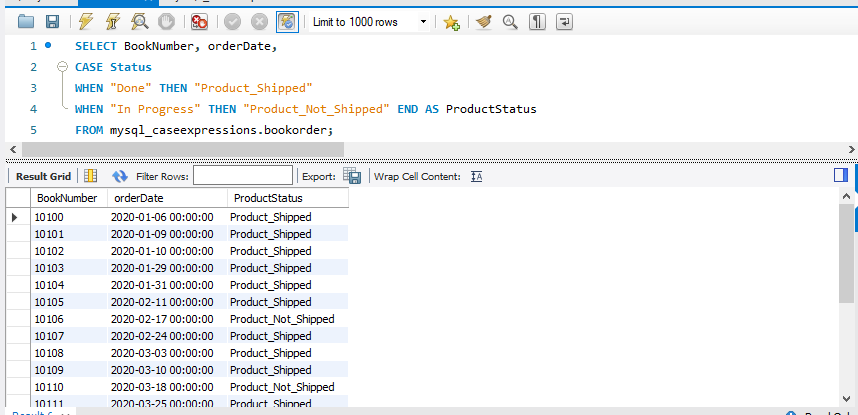
Example 4
SELECT BookNumber, orderDate,
CASE Status
WHEN "Done"
THEN "Product_Shipped"
WHEN "In Progress"
THEN "Product_Not_Shipped"
END AS ProductStatus
FROM mysql_caseexpressions.bookorder;
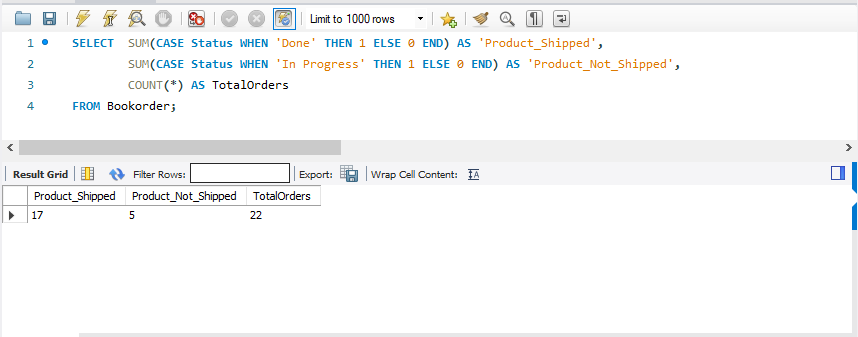
Example 5 – With Aggregate Function
SELECT SUM(CASE Status WHEN 'Done'
THEN 1 ELSE 0 END) AS 'Product_Shipped',
SUM(CASE Status WHEN 'In Progress'
THEN 1 ELSE 0 END) AS 'Product_Not_Shipped',
COUNT( * ) AS TotalOrders
FROM Bookorder;
SEARCHED CASE Expressions
In the Searched Case Expressions, CASE evaluates the “expressions” values that are specified in the WHEN clause and returns the corresponding “result_set” value. But, if any value is not satisfied by the corresponding conditions then, it returns the “result_value” that is specified in the ELSE clause.
Syntax
CASE
WHEN <expression1> THEN <result_set1>
WHEN <expression2> THEN <result_set2> …
ELSE <result_value>
END
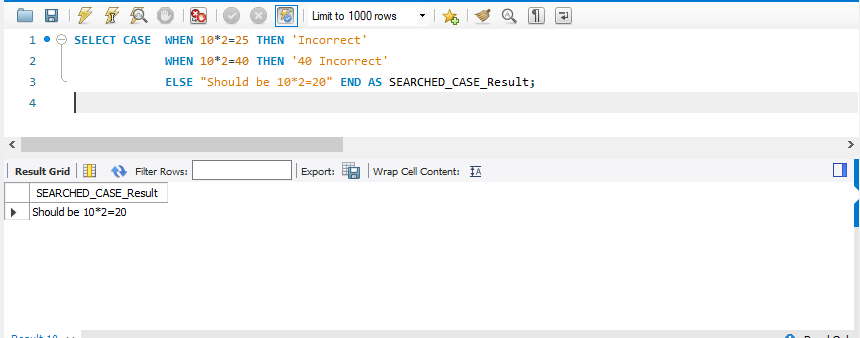
Example 1
SELECT CASE WHEN 10 * 2 = 25 THEN 'Incorrect'
WHEN 10 * 2 = 40 THEN '40 Incorrect'
ELSE "Should be 10*2=20"
END AS SEARCHED_CASE_Result;
Example 2
SELECT CASE WHEN 5 * 5 - 5 / 5 + 6 = 30 THEN "TRUE"
ELSE "FALSE"
END AS SEARCHED_CASE_Result;

Example 3
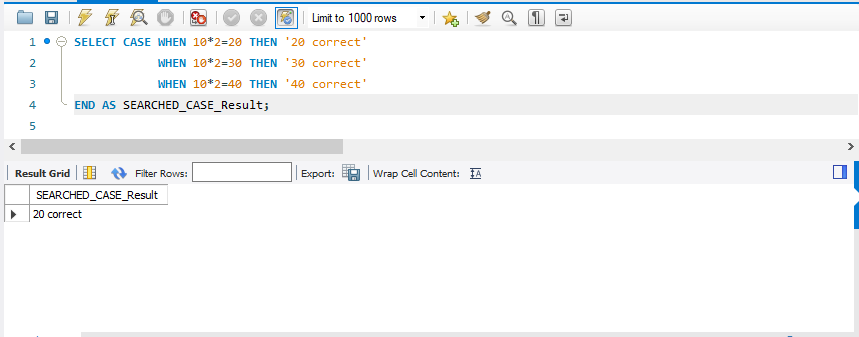
SELECT CASE WHEN 10 * 2 = 20 THEN '20 correct'
WHEN 10 * 2 = 30 THEN '30 correct'
WHEN 10 * 2 = 40 THEN '40 correct'
END AS SEARCHED_CASE_Result;
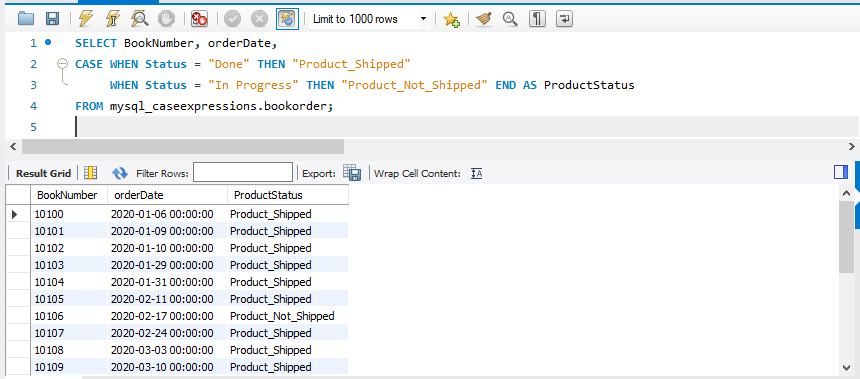
Example 4
SELECT BookNumber, orderDate,
CASE WHEN Status = "Done"
THEN "Product_Shipped"
WHEN Status = "In Progress"
THEN "Product_Not_Shipped"
END AS ProductStatus
FROM mysql_caseexpressions.bookorder;
Example 5 – With Aggregate Function
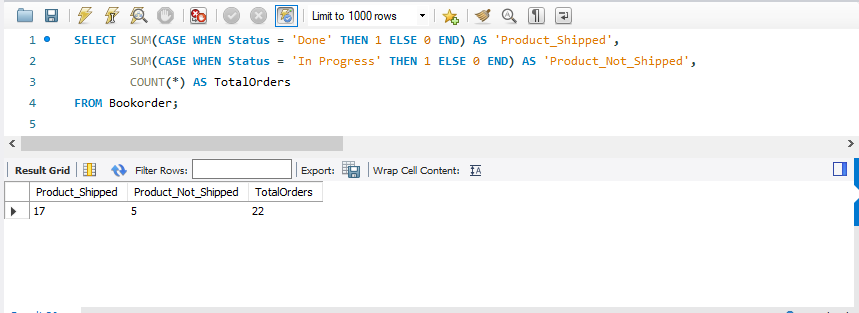
SELECT SUM(CASE WHEN Status = 'Done'
THEN 1 ELSE 0 END) AS 'Product_Shipped',
SUM(CASE WHEN Status = 'In Progress'
THEN 1 ELSE 0 END) AS 'Product_Not_Shipped',
COUNT( * ) AS TotalOrders
FROM Bookorder;
Difference between SIMPLE and SEARCHED CASE Expressions
Example 1
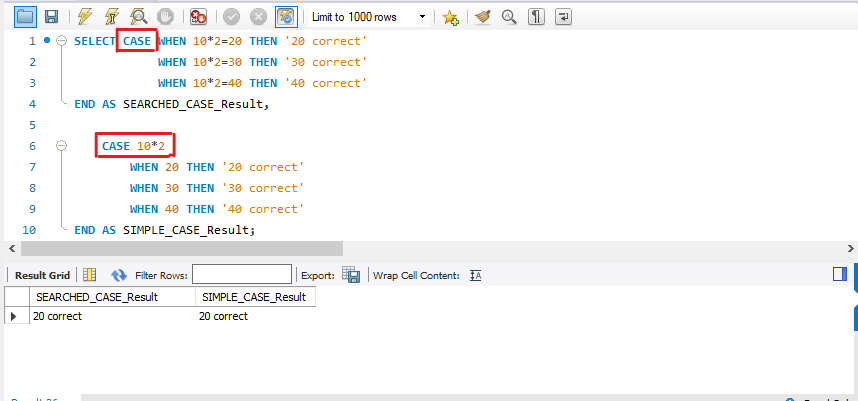
SELECT CASE WHEN 10 * 2 = 20 THEN '20 correct'
WHEN 10 * 2 = 30 THEN '30 correct'
WHEN 10 * 2 = 40 THEN '40 correct'
END AS SEARCHED_CASE_Result,
CASE 10 * 2
WHEN 20 THEN '20 correct'
WHEN 30 THEN '30 correct'
WHEN 40 THEN '40 correct'
END AS SIMPLE_CASE_Result;
Example 2
SELECT BookNumber, orderDate,
CASE Status
WHEN "Done"
THEN "Product_Shipped"
WHEN "In Progress"
THEN "Product_Not_Shipped"
END AS ProductStatus
FROM mysql_caseexpressions.bookorder;
SELECT BookNumber, orderDate,
CASE WHEN Status = "Done"
THEN "Product_Shipped"
WHEN Status = "In Progress"
THEN "Product_Not_Shipped"
END AS ProductStatus
FROM mysql_caseexpressions.bookorder;
