Full Trust European Hosting

BLOG about Full Trust Hosting and Its Technology - Dedicated to European Windows Hosting Customer

AngularJS Hosting Europe - HostForLIFE :: Knowing Angular vs. React

clock August 19, 2024 10:08 by author Peter

React and Angular are two of the most widely used front-end frameworks for creating contemporary online apps. Both are supported by sizable groups and have distinct advantages, yet they serve varying needs and tastes. We'll go over the main distinctions between Angular and React in this post to assist you in choosing the right framework for your project.


Overview

  1. React
    • Developed by: Facebook
    • Initial Release: 2013
    • Type: JavaScript library for building user interfaces, primarily focused on rendering UI components.
    • Learning Curve: Moderate
    • Main Concept: React is centered around components and follows a unidirectional data flow.
  2. Angular
    • Developed by: Google
    • Initial Release: 2016 (as Angular 2, the complete rewrite of AngularJS)
    • Type: Full-fledged framework for building web applications.
    • Learning Curve: Steep
    • Main Concept: Angular is an opinionated framework that provides a comprehensive solution for building large-scale applications, including built-in features like routing, state management, and HTTP services.

Architecture

  1. React
    • Component-Based: React is all about components. Each piece of UI is a component that can manage its state and be reused throughout the application.
    • Virtual DOM: React uses a virtual DOM to optimize rendering performance. When the state of a component changes, React updates the virtual DOM and then efficiently updates the real DOM.
    • Flexibility: React offers flexibility by allowing developers to choose their own libraries for routing, state management, and other needs. This makes React a "view library" rather than a full-fledged framework.
  2. Angular
    • MVC Architecture: Angular follows the Model-View-Controller (MVC) pattern, which helps in separating the concerns of data (Model), UI (View), and logic (Controller).
    • Real DOM: Unlike React, Angular directly interacts with the real DOM, which can impact performance in complex applications. However, Angular mitigates this with its change detection mechanism.
    • Built-In Features: Angular comes with a range of built-in features like form validation, HTTP client, routing, and RxJS for reactive programming. This makes Angular a complete solution for building applications without relying on external libraries.

Performance

  1. React
    • Virtual DOM: React’s virtual DOM significantly improves performance by minimizing the number of direct manipulations to the real DOM.
    • Component Reusability: React’s component-based architecture promotes reusability, which can lead to better performance in large applications.
    • Bundle Size: React itself is relatively lightweight, but depending on the additional libraries you use, the bundle size can grow.
  2. Angular
    • Change Detection: Angular’s change detection mechanism can sometimes lead to performance bottlenecks in large applications, but it also provides tools like OnPush strategy and NgZone to optimize performance.
    • Ahead-of-Time (AOT) Compilation: Angular’s AOT compilation improves performance by compiling the application during the build process, reducing the load time.
    • Built-In Features: While Angular’s rich feature set can impact performance, the framework’s ability to optimize these features mitigates the impact.

Learning Curve

  1. React
    • JSX: React uses JSX, a syntax extension that allows you to write HTML within JavaScript. While some developers find JSX intuitive, others might find it challenging initially.
    • Flexibility: React’s flexibility means you need to learn how to integrate and use various libraries for routing, state management, etc., which can be both an advantage and a challenge.
    • Documentation and Community: React has extensive documentation and a large community, making it easier to find resources, tutorials, and third-party libraries.
  2. Angular
    • Steep Learning Curve: Angular has a steeper learning curve due to its complexity and the number of built-in features you need to understand.
    • TypeScript: Angular is built with TypeScript, a statically typed superset of JavaScript. While this adds benefits like better tooling and error checking, it also requires learning TypeScript if you’re not already familiar with it.
    • Comprehensive Framework: Angular’s opinionated nature means that once you learn the Angular way of doing things, you have a powerful set of tools at your disposal.

Ecosystem and Community

  1. React
    • Ecosystem: React has a rich ecosystem with numerous libraries for state management (Redux, MobX), routing (React Router), and more. The flexibility to choose different tools gives developers more control over their stack.
    • Community: React has a large and active community, contributing to a vast array of plugins, tools, and resources.
  2. Angular
    • Ecosystem: Angular has a more integrated ecosystem. Many features that require third-party libraries in React are built into Angular, such as routing, HTTP services, and form handling.
    • Community: Angular also has a large community, but it is more centralized around the official Angular resources, documentation, and Google-backed initiatives.

Use Cases
 

React

  1. When to Use React
    • You need flexibility in choosing libraries and tools.
    • You prefer a simple, component-based architecture.
    • You are building a project where performance and simplicity are key.
  2. Popular Use Cases
    • Single-page applications (SPAs)
    • Static sites with dynamic components
    • Dashboards and data visualization tools

Angular

  1. When to Use Angular
    • You are building a large-scale, enterprise-level application.
    • You need a framework with a comprehensive set of tools and built-in features.
    • You prefer an opinionated framework that guides architectural decisions.
  2. Popular Use Cases
    • Complex, enterprise-level applications
    • Applications requiring robust form handling and validation
    • Real-time applications with complex state management

Conclusion
The skills of your team and the needs of your project will determine which of React and Angular is best. React is an excellent option for projects where you want more control over the architecture because of its simplicity and versatility. In contrast, Angular offers a feature-rich, opinionated framework right out of the box, making it perfect for enterprise-level apps. Both Angular and React are effective front-end development tools, and knowing the advantages and disadvantages of each will help you choose wisely for your upcoming project.


AngularJS Hosting Europe - HostForLIFE :: Angular Routing Mastery Navigate Between Components Easily

clock August 16, 2024 09:34 by author Peter

Routing in Angular enables you to move between several parts (or views) in a single-page application (SPA). To do this, routes that associate URL pathways with particular components are built up. The relevant component loads and displays in a preset area of your application (typically designated by a <router-outlet>) when a user navigates to a URL.


to use the robust routing system of Angular to move between components in an efficient manner. This article covers everything from configuring routes to using Angular's Router service programmatically and utilizing RouterLink for template-based navigation. You will learn how to map URLs to components and render them dynamically using <router-outlet>, providing smooth navigation inside your Angular applications, with concise explanations and functional code examples.

Key Concepts

  1. Router Module: This is Angular's mechanism for handling routing. You define the routes in a routing module (often AppRoutingModule), where each route maps a URL path to a component.
  2. RouterLink Directive: This directive is used in HTML templates to bind a URL to an anchor tag or button. When clicked, Angular will navigate to the route specified by the RouterLink.
  3. Router Service: This service provides methods to navigate to a route programmatically from within a component’s TypeScript file.
  4. Router Outlet: This is a directive that acts as a placeholder where the routed component will be rendered.

Step-by-Step Implementation with Code Example
1. Setting Up Routes

First, create your components if you haven't already.
ng generate component component-a
ng generate component component-b


Then, define the routes in the AppRoutingModule.
import { NgModule } from '@angular/core';
import { RouterModule, Routes } from '@angular/router';
import { ComponentA } from './component-a/component-a.component';
import { ComponentB } from './component-b/component-b.component';

const routes: Routes = [
  { path: 'component-a', component: ComponentA },
  { path: 'component-b', component: ComponentB },
  { path: '', redirectTo: '/component-a', pathMatch: 'full' }  // Default route
];

@NgModule({
  imports: [RouterModule.forRoot(routes)],
  exports: [RouterModule]
})
export class AppRoutingModule { }

2. Navigating Using RouterLink

In ComponentA, you can create a link that navigates to ComponentB.
<!-- component-a.component.html -->
<h2>This is Component A</h2>
<a [routerLink]="['/component-b']">Go to Component B</a>


When the user clicks on this link, Angular will navigate to /component-b and load ComponentB into the router outlet.

3. Navigating Programmatically Using the Router Service

You can also navigate programmatically from within a component’s TypeScript file.

// component-a.component.ts
import { Component } from '@angular/core';
import { Router } from '@angular/router';

@Component({
  selector: 'app-component-a',
  templateUrl: './component-a.component.html',
  styleUrls: ['./component-a.component.css']
})
export class ComponentA {

  constructor(private router: Router) { }

  goToComponentB() {
    this.router.navigate(['/component-b']);
  }
}


In the corresponding HTML.
<!-- component-a.component.html -->
<h2>This is Component A</h2>
<button (click)="goToComponentB()">Go to Component B</button>


4. Using Router Outlet
Ensure you have a <router-outlet> in your main HTML template (usually app.component.html).
<!-- app.component.html -->
<router-outlet></router-outlet>

This directive is where the routed components will be displayed based on the URL.

5. Putting It All Together

Here’s how everything ties together.

  • AppRoutingModule: Defines the routes.
  • ComponentA: Has a link and a button to navigate to ComponentB.
  • ComponentB: Displays content when navigated to.

Example Code Structure// app-routing.module.ts
import { NgModule } from '@angular/core';
import { RouterModule, Routes } from '@angular/router';
import { ComponentA } from './component-a/component-a.component';
import { ComponentB } from './component-b/component-b.component';

const routes: Routes = [
  { path: 'component-a', component: ComponentA },
  { path: 'component-b', component: ComponentB },
  { path: '', redirectTo: '/component-a', pathMatch: 'full' }  // Default route
];

@NgModule({
  imports: [RouterModule.forRoot(routes)],
  exports: [RouterModule]
})
export class AppRoutingModule { }

// component-a.component.ts
import { Component } from '@angular/core';
import { Router } from '@angular/router';

@Component({
  selector: 'app-component-a',
  templateUrl: './component-a.component.html',
  styleUrls: ['./component-a.component.css']
})
export class ComponentA {

  constructor(private router: Router) { }

  goToComponentB() {
    this.router.navigate(['/component-b']);
  }
}

// component-a.component.html
<h2>This is Component A</h2>
<a [routerLink]="['/component-b']">Go to Component B</a>
<button (click)="goToComponentB()">Go to Component B</button>

// component-b.component.html
<h2>This is Component B</h2>

// app.component.html
<router-outlet></router-outlet>

Summary

  • Routes: Define in AppRoutingModule to map URLs to components.
  • RouterLink: Use templates for simple navigation.
  • Router Service: Use for programmatic navigation in TypeScript.
  • Router Outlet: The placeholder for rendering routed components.

This setup allows you to navigate between components effectively, using both template-based and programmatic methods in Angular.


AngularJS Hosting Europe - HostForLIFE :: Angular SSR (server-side rendering)

clock August 12, 2024 10:21 by author Peter

Angular Universal provides server-side rendering (SSR) capabilities for Angular applications. SSR improves performance and SEO by rendering the initial HTML on the server before sending it to the client. This documentation outlines the steps to implement Angular SSR using Angular Universal.

What is client-side rendering (CSR)?
Client-side rendering (CSR) is the process of rendering web pages in the browser using JavaScript. The server sends a minimal HTML file along with JavaScript, which then dynamically generates and updates the content. This approach enables more interactive and responsive web pages by allowing specific parts of the page to be updated without a full page reload.


Server-side rendering (SSR): what is it?
The process of rendering web pages on the server and delivering the completely rendered HTML to the client is known as server-side rendering, or SSR. With this method, the client receives the HTML page in its entirety, generated by the server together with any dynamic data. After that, the client shows the page without doing any additional processing.


Steps to implement Angular SSR using Angular Universal.

Step 1. Set Up Angular Application

Create a new Angular application if you don't have one already.
ng new project-name

Step 2. Add Angular Universal
Add Angular Universal to your application.
ng add @nguniversal/express-engine

Step 3. Add non-destructive hydration

To enable non-destructive hydration, we need to import the provideClientHydration function as the provider of AppModule.
import { provideClientHydration } from '@angular/platform-browser';
// ...

@NgModule({
  // ...
  providers: [provideClientHydration()],  // add this line
  bootstrap: [AppComponent]
})
export class AppModule {
  // ...
}

Step 4. Update the Angular Configuration

Ensure your angular.json includes SSR configurations. This should be done automatically when you add Angular Universal.

Step 5. Update Server Files
const ssrRoutes = ['/test'];

// All regular routes use the Universal engine
server.get('*', (req, res) => {
  if (ssrRoutes.some((route) => req.url.startsWith(route))) {
    res.render(indexHtml, {
      req,
      providers: [{ provide: APP_BASE_HREF, useValue: req.baseUrl }]
    });
  } else {
    res.sendFile(join(distFolder, 'index.html'));
  }
});

Step 6. Serve the Application

npm run dev:ssr

Conclusion

By following these steps, you can implement server-side rendering in your Angular application using Angular Universal. SSR enhances performance and improves SEO by serving pre-rendered HTML content to the client.


AngularJS Hosting Europe - HostForLIFE :: Harnessing the Power of Environments using Angular

clock August 5, 2024 08:40 by author Peter

Ever pondered how to call multiple APIs, colors, or headlines for the same application from several environments? Production APIs and test APIs are undoubtedly distinct and need to be utilized extremely carefully. When launching a project, we won't manually alter every API call and sentence structure. This is dangerous and should not be done. With Angular, it's simple to have distinct setups for various environments. Because of this, we can use and deploy to as many environments and stages as necessary without ever having to alter the code. Environment files is the name of it.


To put it briefly, we can have two environment files: environment.development.ts for the development stage and environment.ts for the production stage. The appropriate environment file will then be used, based on where we are distributing our program.

There are very few configurations needed, and there is a significant gain. I'll walk you through the process in this post and give an example of using various texts and APIs.

Getting started
Create a new app: ng new angular-environment-demo --standalone false.
Generate environment files: ng generate environments.

Note. As from the Angular 15.1 environment files are not generated automatically.

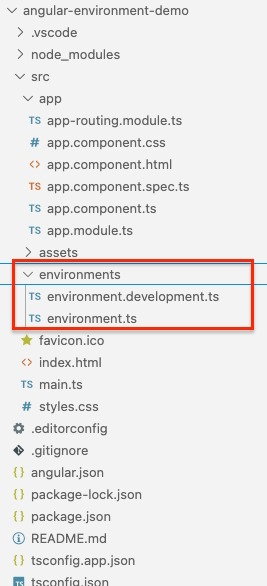
Environment file hierarchy
The identical item will initially be present in both the environments.ts and the environments.development.ts. Both objects should have the same key and all settings should be done with them.

For example, you have the following in that file if the environment.development.ts has a key-value pair like: "weather_status": "Good" and the environment.ts will not utilize it. The weather status is ''. This is due to the fact that you are using it in the code, and your code will utilize [this will be explained later] when it looks for it in the environment file. Compilation errors result from your code still searching for this even if it is pointing to another environment file.

Let's create two distinct page titles.

You can utilize the environment file's values in the app.component.ts file or any other ts file by accessing them as follows: environment.\<value you wish to access.>>. Here's an illustration of how to use the pageTitle in the app.component.ts ngOnInit.

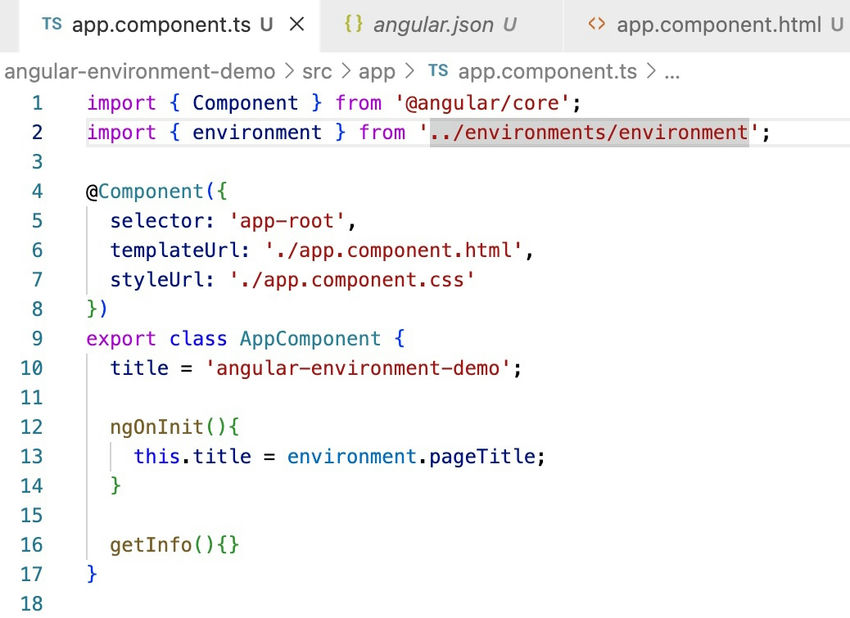
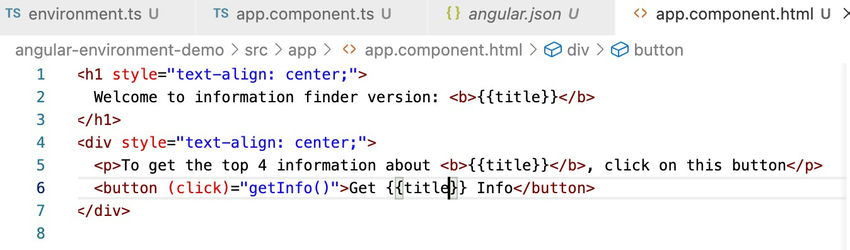
Notice the import on line 2. For now, you can import any of the environment files. On line 13, we are assigning the value of ‘pageTitle’ from the environment to ‘this. title’. In the HTML file, we are using the ‘title’ as below.

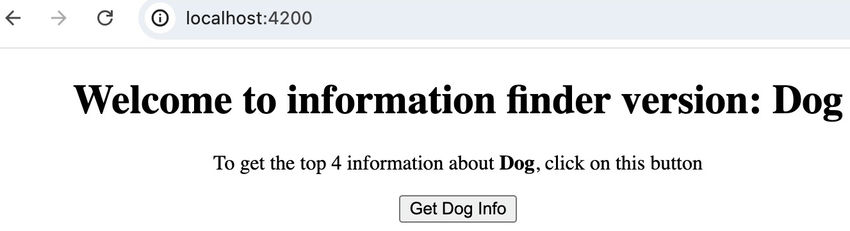
When you serve the application using: ng serve, you will be given the following screen.

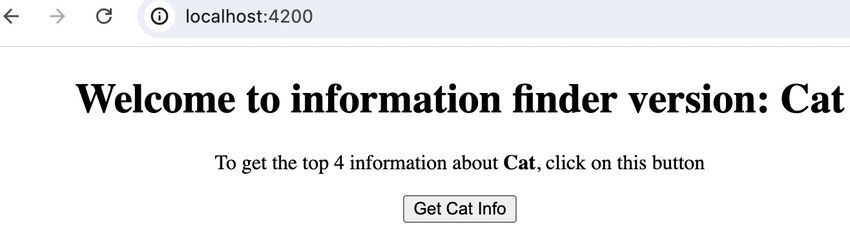
When we do only: “ng serve”, the values from the ‘environment.development.ts’ file are used. If you want to use the configurations from the environment.ts file, you should add the following in the angular.json file.

"fileReplacements": [
  {
    "replace": "src/environments/environment.development.ts",
    "with": "src/environments/environment.ts"
  }
],


These codes should be added under "projects" -> "architect" -> "build" -> "configurations" -> "production" in the angular.json file. Below is a full example of the angular.json file:

{
  "$schema": "./node_modules/@angular/cli/lib/config/schema.json",
  "version": 1,
  "newProjectRoot": "projects",
  "projects": {
    "angular-environment-demo": {
      "projectType": "application",
      "schematics": {
        "@schematics/angular:component": {
          "standalone": false
        },
        "@schematics/angular:directive": {
          "standalone": false
        },
        "@schematics/angular:pipe": {
          "standalone": false
        }
      },
      "root": "",
      "sourceRoot": "src",
      "prefix": "app",
      "architect": {
        "build": {
          "builder": "@angular-devkit/build-angular:application",
          "options": {
            "outputPath": "dist/angular-environment-demo",
            "index": "src/index.html",
            "browser": "src/main.ts",
            "polyfills": [
              "zone.js"
            ],
            "tsConfig": "tsconfig.app.json",
            "assets": [
              "src/favicon.ico",
              "src/assets"
            ],
            "styles": [
              "src/styles.css"
            ],
            "scripts": []
          },
          "configurations": {
            "stagging": {
              "fileReplacements": [
                {
                  "replace": "src/environments/environment.ts",
                  "with": "src/environments/environment.stagging.ts"
                }
              ]
            },
            "production": {
              "budgets": [
                {
                  "type": "initial",
                  "maximumWarning": "500kb",
                  "maximumError": "1mb"
                },
                {
                  "type": "anyComponentStyle",
                  "maximumWarning": "2kb",
                  "maximumError": "4kb"
                }
              ],
              "fileReplacements": [
                {
                  "replace": "src/environments/environment.development.ts",
                  "with": "src/environments/environment.ts"
                }
              ],
              "outputHashing": "all"
            },
            "development": {
              "optimization": false,
              "extractLicenses": false,
              "sourceMap": true,
              "fileReplacements": [
                {
                  "replace": "src/environments/environment.ts",
                  "with": "src/environments/environment.development.ts"
                }
              ]
            }
          },
          "defaultConfiguration": "production"
        },
        "serve": {
          "builder": "@angular-devkit/build-angular:dev-server",
          "configurations": {
            "stagging": {
              "buildTarget": "angular-environment-demo:build:stagging"
            },
            "production": {
              "buildTarget": "angular-environment-demo:build:production"
            },
            "development": {
              "buildTarget": "angular-environment-demo:build:development"
            }
          },
          "defaultConfiguration": "development"
        },
        "extract-i18n": {
          "builder": "@angular-devkit/build-angular:extract-i18n",
          "options": {
            "buildTarget": "angular-environment-demo:build"
          }
        },
        "test": {
          "builder": "@angular-devkit/build-angular:karma",
          "options": {
            "polyfills": [
              "zone.js",
              "zone.js/testing"
            ],
            "tsConfig": "tsconfig.spec.json",
            "assets": [
              "src/favicon.ico",
              "src/assets"
            ],
            "styles": [
              "src/styles.css"
            ],
            "scripts": []
          }
        }
      }
    }
  }
}

This file is the most important one when we want to make the best use of an environment file. To use the configuration from the environment.ts file, we need to serve the application with the following command: “ng serve --configuration=production”.

Note that you did not make any changes in the code, you have added only a new configuration and served the app using the new command. For example, if you are serving in production, you can use this command to serve in that environment. No changes in the code are required. It is common to have multiple environments used mostly for testing. When you need to accommodate a new environment, there are some steps to follow.

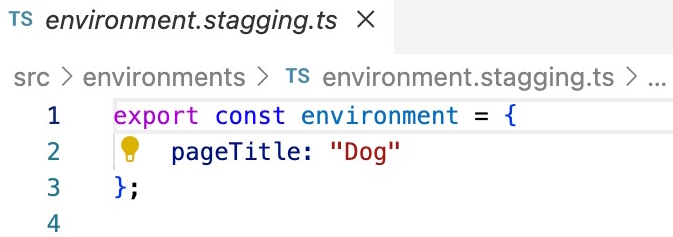
create a new environment file in the environment folder. For example, we can add environment.staging.ts.
Once this is created, do not forget to add values present in other environment files.

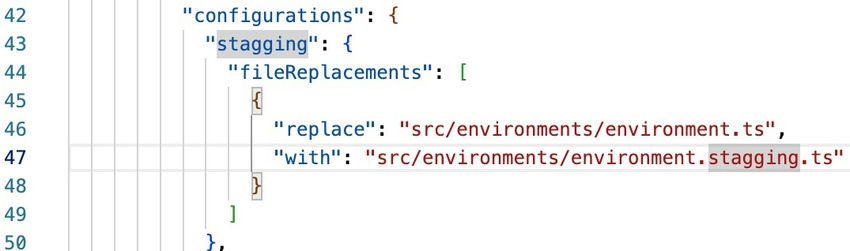
In the angular.json file, we need to add a new configuration under configuration.

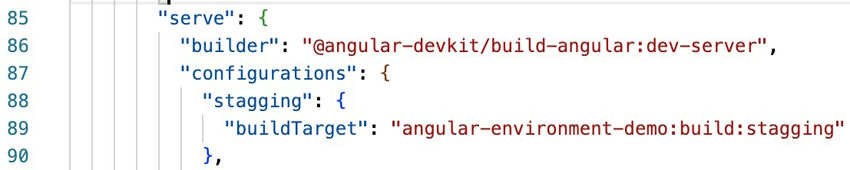
The last part is still in the angular.json file. Now we need to add the configuration to serve the application using the respective environment file. These changes are done under "projects" -> "architect" -> "serve" -> "configurations"

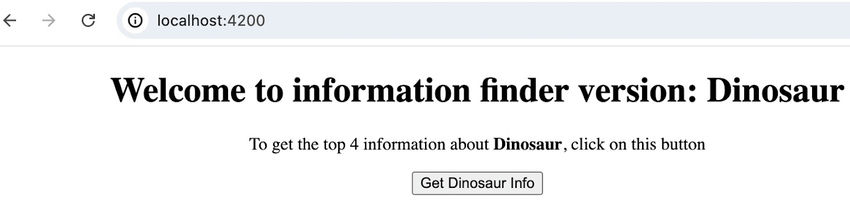
We use the following command to serve the application using the settings found in the environment.stagging.ts file: ng serve --configuration=stagging. The screen that loads after serving is as follows.


Using environment files to use different APIs. Another powerful application of environment files is how easily, almost seamlessly it can be used to call different APIs for different environments.

Below are the steps.
Add the corresponding key-value pair in the environment object in all the environment files in your project, like below.
export const environment = {
    pageTitle: "Dinosaur",
    apiUrl: "https://dinosaur-facts-api.shultzlab.com/dinosaurs"
};

In your component.ts file, wherever required, you can call the web service in any method that you want.
For this example, we will be using the fetch method in a promise.
getInfo(){
  const myPromise = new Promise((resolve, reject) => {
    fetch(environment.apiUrl)
    .then((response) => response.json())
    .then((data) => {
      resolve(data)
    })
    .catch((error) => reject(error))
  });

  myPromise
  .then((result: any) => {
    const element = document.getElementById('txtResult');
    if (element) {
      element.innerHTML = JSON.stringify(result.slice(0, 5));
    }
    console.log(result.slice(0, 5));
  })
  .catch((error) => console.log(error))
  .finally(() => console.log('promise done'));
}

Notice that in the call, we are not passing any api. Instead, we are using the variable from the environment file.
At this point, the function is done and can be called when a button is clicked.
When we serve the application using: ng serve and click on the button, we get the following.

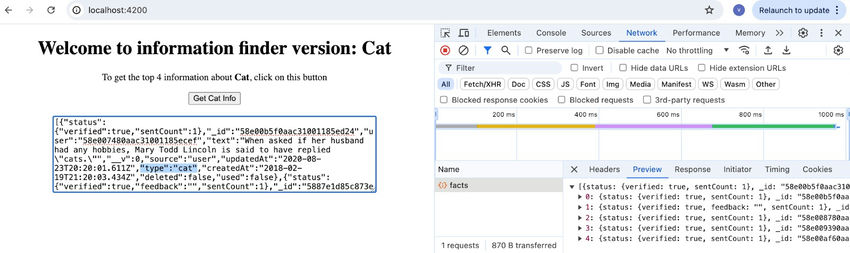
When we serve the application using ng serve --configuration=production, below is the output:

  • Note that there has been NO code change. We have only served the application using different serving configurations.
  • The same applies when you are deploying to an environment. Whether you are deploying your Angular app using Azure or something else, you are asked at some point the command to run the Angular application. Providing the correct serving configuration will use the required environment file and will display the corresponding information or call the desired API. No changes in code are required.

Conclusion
Environment files are very important and powerful. Maximizing their use will prevent you from doing manual changes when deploying in different stages.


AngularJS Hosting Europe - HostForLIFE :: How to Copying Text to Clipboard in AngularJS?

clock August 1, 2024 08:52 by author Peter

Web applications frequently need users to copy text to the clipboard in order to share links, copy codes, or accomplish other tasks. We will look at how to add a copy-to-clipboard feature to an AngularJS application in this article.

Required conditions
You need know the fundamentals of JavaScript and AngularJS in order to follow along with this lesson.

Step 1: Configuring the AngularJS Program

Let's start by configuring a basic AngularJS application. Ensure that your HTML file has the AngularJS library.

<!DOCTYPE html>
<html lang="en">
<head>
    <meta charset="UTF-8">
    <meta name="viewport" content="width=device-width, initial-scale=1.0">
    <title>Copy to Clipboard in AngularJS</title>
    <script src="https://ajax.googleapis.com/ajax/libs/angularjs/1.8.2/angular.min.js"></script>
</head>
<body ng-app="clipboardApp" ng-controller="clipboardController">
    <!-- Your AngularJS app content will go here -->
</body>
</html>

Step 2. Creating the AngularJS Module and Controller
Next, let's create an AngularJS module and a controller.
<script>
    var app = angular.module('clipboardApp', []);

    app.controller('clipboardController', ['$scope', function($scope) {
        $scope.textToCopy = "Hello, this is the text to be copied!";

        $scope.copyToClipboard = function() {
            var textArea = document.createElement("textarea");
            textArea.value = $scope.textToCopy;
            document.body.appendChild(textArea);
            textArea.select();

            try {
                document.execCommand('copy');
                alert('Text copied to clipboard');
            } catch (err) {
                console.error('Unable to copy', err);
            }

            document.body.removeChild(textArea);
        };
    }]);
</script>

Step 3. Adding the HTML Elements
Now, let's add the HTML elements to allow users to copy the text.
<div class="container">
    <h1>Copy to Clipboard Example</h1>
    <div class="form-group">
        <label for="textToCopy">Text to Copy:</label>
        <input
            type="text"
            id="textToCopy"
            ng-model="textToCopy"
            class="form-control"
            readonly
        >
    </div>
    <button
        ng-click="copyToClipboard()"
        class="btn btn-primary"
    >
        Copy to Clipboard
    </button>
</div>


Explanation

  • Creating a Textarea Element: In the copy to clipboard function, we create a textarea element dynamically and set its value to the text we want to copy.
  • Appending Textarea to Body: The textarea is appended to the body of the document to ensure it is part of the DOM.
  • Selecting the Text: We then select the text inside the text area.
  • Copying the Text: Using document.execCommand('copy'), we copy the selected text to the clipboard.
  • Removing the Textarea: Finally, we remove the textarea element from the document.


Step 4. Styling the Application
You can add some CSS to style the application.
<style>
    .container {
        margin: 50px;
    }

    .form-group {
        margin-bottom: 20px;
    }

    .btn-primary {
        background-color: #007bff;
        border-color: #007bff;
    }
</style>


Example 1

Conclusions

You can incorporate copy-to-clipboard capabilities into your AngularJS application with ease by following these steps. This feature makes it easier for users to copy text without having to pick and paste it by hand, which improves user experience. Play around with this implementation and adjust it to suit the requirements of your application.


About HostForLIFE

HostForLIFE is European Windows Hosting Provider which focuses on Windows Platform only. We deliver on-demand hosting solutions including Shared hosting, Reseller Hosting, Cloud Hosting, Dedicated Servers, and IT as a Service for companies of all sizes.

We have offered the latest Windows 2019 Hosting, ASP.NET 5 Hosting, ASP.NET MVC 6 Hosting and SQL 2019 Hosting.


Tag cloud

Sign in