December 17, 2024 06:08 by
 Peter
PeterWhen we run a typescript version checking command,
tsc -v

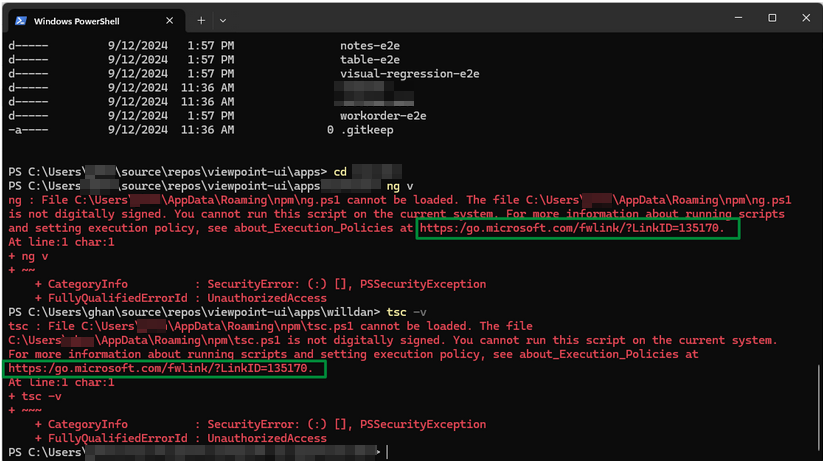
We may get error in either PowerShell prompt or Visual Studio or VS Code terminal, such as

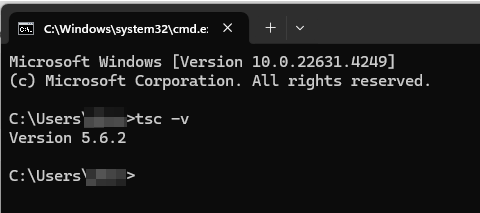
However, if we run this same command from a command line prompt, such as Windows Colose, we can get the result:

We can see something like this

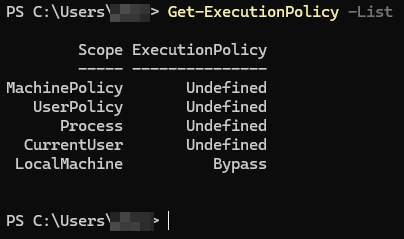
There are some articles to discuss this issue, but most of them went to a wrong answer. Actually, it is not true. From the PowerShell window, we can see:

The execution policy isn't a security system that restricts user actions. For example, users can easily bypass a policy by typing the script contents at the command line when they cannot run a script. Instead, the execution policy helps users to set basic rules and prevents them from violating them unintentionally.
Such as

The default for local Machine is Restricted

That is the reason that we cannot run the 'tsc' command from PowerShell or Visual studio and VS code terminal.
How to Fix?
Set it to ByPass:

You must be an admin role when opening the prompt:

Or


December 9, 2024 06:32 by
 Peter
PeterMongoDB With Angular Sample
Connecting MongoDB with an Express backend and an Angular frontend involves several steps. Here's a detailed guide, including a code sample, input/output, and steps.

Step 1. Set Up MongoDB
Install MongoDB
- Install MongoDB locally or use a cloud solution like MongoDB Atlas.
- Start the MongoDB server.
Create a Database
- Use the MongoDB shell or a GUI tool like MongoDB Compass to create a database, e.g., my_database.
- Add a collection, e.g., users.
Step 2. Create an Express Backend
Initialize the Project
mkdir express-mongodb-app
cd express-mongodb-app
npm init -y
npm install express mongoose body-parser cors
Create the Server File: Create a file named server.js.
const express = require('express');
const mongoose = require('mongoose');
const bodyParser = require('body-parser');
const cors = require('cors');
const app = express();
// Middleware
app.use(cors());
app.use(bodyParser.json());
// MongoDB Connection
mongoose.connect('mongodb://localhost:27017/my_database', {
useNewUrlParser: true,
useUnifiedTopology: true,
}).then(() => console.log("MongoDB connected"))
.catch(err => console.error(err));
// Define Schema and Model
const userSchema = new mongoose.Schema({
name: String,
email: String,
});
const User = mongoose.model('User', userSchema);
// Routes
app.get('/api/users', async (req, res) => {
const users = await User.find();
res.json(users);
});
app.post('/api/users', async (req, res) => {
const newUser = new User(req.body);
await newUser.save();
res.status(201).json(newUser);
});
// Start Server
const PORT = 3000;
app.listen(PORT, () => {
console.log(`Server running on http://localhost:${PORT}`);
});
Run the Server
node server.js
Step 3. Create the Angular Frontend
Set Up Angular Project
ng new angular-mongodb-app
cd angular-mongodb-app
ng add @angular/material
npm install axios
Service for API Communication: Create a file src/app/services/user.service.ts.
import { Injectable } from '@angular/core';
import axios from 'axios';
@Injectable({
providedIn: 'root'
})
export class UserService {
private baseUrl = 'http://localhost:3000/api/users';
getUsers() {
return axios.get(this.baseUrl);
}
addUser(user: { name: string; email: string }) {
return axios.post(this.baseUrl, user);
}
}
Component for User Interaction: Update src/app/app.component.ts.
typescript
import { Component, OnInit } from '@angular/core';
import { UserService } from './services/user.service';
@Component({
selector: 'app-root',
template: `
<div style="text-align: center;">
<h1>Angular with Express & MongoDB</h1>
<form (submit)="addUser($event)">
<input type="text" [(ngModel)]="name" placeholder="Name" name="name" required>
<input type="email" [(ngModel)]="email" placeholder="Email" name="email" required>
<button type="submit">Add User</button>
</form>
<ul>
<li *ngFor="let user of users">{{ user.name }} ({{ user.email }})</li>
</ul>
</div>
`,
styles: []
})
export class AppComponent implements OnInit {
users: any[] = [];
name = '';
email = '';
constructor(private userService: UserService) {}
ngOnInit() {
this.loadUsers();
}
async loadUsers() {
const response = await this.userService.getUsers();
this.users = response.data;
}
async addUser(event: Event) {
event.preventDefault();
await this.userService.addUser({ name: this.name, email: this.email });
this.loadUsers();
this.name = '';
this.email = '';
}
}
Install Angular Forms Module: Add FormsModule to AppModule.
typescript
import { NgModule } from '@angular/core';
import { BrowserModule } from '@angular/platform-browser';
import { FormsModule } from '@angular/forms';
import { AppComponent } from './app.component';
@NgModule({
declarations: [AppComponent],
imports: [BrowserModule, FormsModule],
providers: [],
bootstrap: [AppComponent]
})
export class AppModule {}
Run the Angular Application
ng serve
Step 4. Input and Output
Input
Fill the form with a name and email, e.g.
Name: "Peter Scott"
Email: "[email protected]"
Output: The list below the form will update to include the newly added user.
less
Peter Scott ([email protected])
Step 5. Visual Workflow (Images)
Backend (server.js)
- Database schema for storing user data.
- APIs (/api/users) for CRUD operations.
Frontend (Angular App)
- The user fills out the form.
- Data is sent to the Express backend.
- Data is saved in MongoDB.
- Users are displayed dynamically.

December 5, 2024 08:53 by
 Peter
PeterTo convert a DOC file to PDF using Node.js and PowerShell, you can use the following steps:
Install the ‘child_process’ package in your Node.js project by running the following command in your project’s terminal:

npm i child_process
Create a PowerShell script that converts the DOC file to PDF using Microsoft Word. You can use the following script:
$documents_path = 'C:\Users\Peter\Downloads\DoctoPdf\doc\Web_Service_Uing_Ajax_in_net.docx'
$output_path = 'C:\Users\Peter\Downloads\DoctoPdf\doc\Web_Service_Uing_Ajax_in_net12.pdf'
$word_app = New-Object -ComObject Word.Application
# This filter will find .doc as well as .docx documents
Get-ChildItem -Path $documents_path -Filter *.doc? | ForEach-Object {
$document = $word_app.Documents.Open($_.FullName)
$pdf_filename = "$output_path"
$document.SaveAs($pdf_filename)
$document.Close()
}
$word_app.Quit()
return $output_path
Make sure to replace the input and output file paths with the actual paths to your files.
Use the ‘child_process’ package in your Node.js code to execute the PowerShell script. You can use the following code:
const express = require('express');
const app = express();
const port = 5000;
const { exec } = require('child_process');
const { v4: uuidv4 } = require('uuid');
const fileUpload = require('express-fileupload');
const fs = require('fs');
app.use(express.json({
limit: "200mb"
}));
app.use(
express.urlencoded({
extended: true,
limit: "200mb",
})
);
app.use(fileUpload());
app.post('/', function(req, res,next){
console.log('req', req.files.inputfile)
let uploaded_path = __dirname+'/doc/' + req.files.inputfile.name;
fs.writeFile(uploaded_path, req.files.inputfile.data, function(err) {
if(err) {
return console.log(err);
}
///console.log("The file was saved!");
const cmd = `$documents_path = "${uploaded_path}"
$output_path = '${__dirname}/doc/${uuidv4()}.pdf'
$word_app = New-Object -ComObject Word.Application
# This filter will find .doc as well as .docx documents
Get-ChildItem -Path $documents_path -Filter *.doc? | ForEach-Object {
$document = $word_app.Documents.Open($_.FullName)
$pdf_filename = "$output_path"
$document.SaveAs([ref] $pdf_filename, [ref] 17)
$document.Close()
}
$word_app.Quit()
return $output_path`;
exec(cmd, {'shell':'powershell.exe'}, (error, stdout, stderr)=> {
console.log('Error', stderr)
console.log('OUTPUT', stdout);
res.status(200).json({status:200, msg:"success", stdout: stdout})
})
});
})
app.listen(port, function(){
console.log('Server is running on port', port);
})
Make sure to replace the script path and input file path with the actual paths to your files.
Run your Node.js code and the DOC file will be converted to PDF using PowerShell. The output PDF file will be saved to the path specified in the PowerShell script.