
May 28, 2025 08:43 by
 Peter
PeterWhat is a Signature Pad?
A JavaScript package called Signature Pad might be used to create elegant signatures. It employs variable-width Bezier curve interpolation based on drum sander signatures as supplied by Square and supports HTML5 canvas. It does not take into account external libraries and functions in all of the main desktop and mobile browsers.

Let's begin with a real-world illustration. There are a number of npm packages that can be used for angular signatures, but in this case, I've picked "signature_pad" because I think it's quite simple to use and intuitive. Create the Angular Project app first, then adhere to the instructions below.
Step 1: Use the signature_pad JavaScript package to implement the associate degree example of Angular signature pad misuse. Installing the signature_pad library into our code should come first.
npm i signature_pad --save
Once install successfully then go ahead.
In the app.component.html template, we want to feature a canvas to draw our signature. it's 2 buttons. One to clear the signature space and another to urge the signature knowledge in Base64 string format.
We got to outline a canvas component to put in writing the signature. Once you have got the base64 signature, you'll show it as a picture exploitation of the template's IMG element.
Step 2: Let's add HTML code to our app.component.html, Please put the code as same as mine.
<div style="text-align: center;margin-top:30px;">
<h3 style="font-family: monospace;">Signature Pad example by Peter</h3>
<div style="margin-left: 39%;">
<canvas #signPadCanvas (touchstart)="startSignPadDrawing($event)" (touchmove)="movedFinger($event)"></canvas>
</div>
<button class="btn btn-success" color="secondary" (click)="saveSignPad()">Save</button>
<button class="btn btn-danger" (click)="clearSignPad()">Clear</button>
<button class="btn btn-warning" (click)="undoSign()">Undo</button>
<div>
<span style="font-family: monospace;">Write the signature and click on Save</span>
<div>
<img src='{{ signImage }}' />
</div>
</div>
</div>
Okay so now we need to add code to the app.component.ts file
Step 3: Edit the app.component.ts typescript file code to draw the signature on the canvas and save it in base64 format.
First import SignaturePad from 'signature_pad' and ViewChild from '@angular/core' as shown as below
import { Component, ViewChild } from '@angular/core';
import SignaturePad from 'signature_pad';
Here I am putting whole the code of the component file, So please make sure it is exactly the same as below.
app.component.ts
import { Component, ViewChild } from '@angular/core';
import SignaturePad from 'signature_pad';
@Component({
selector: 'app-root',
templateUrl: './app.component.html',
styleUrls: ['./app.component.scss']
})
export class AppComponent {
title = 'Signature Pad by Peter';
signPad: any;
@ViewChild('signPadCanvas', {static: false}) signaturePadElement:any;
signImage:any;
constructor() { }
ngAfterViewInit() {
this.signPad = new SignaturePad(this.signaturePadElement.nativeElement);
}
/*It's work in devices*/
startSignPadDrawing(event: Event) {
console.log(event);
}
/*It's work in devices*/
movedFinger(event: Event) {
}
/*Undo last step from the signature*/
undoSign() {
const data = this.signPad.toData();
if (data) {
data.pop(); // remove the last step
this.signPad.fromData(data);
}
}
/*Clean whole the signature*/
clearSignPad() {
this.signPad.clear();
}
/*Here you can save the signature as a Image*/
saveSignPad() {
const base64ImageData = this.signPad.toDataURL();
this.signImage = base64ImageData;
//Here you can save your signature image using your API call.
}
}
Step 4: After making the canvas element, add designs resembling borders, backgrounds, and so on to the canvas element. Let's put css into the app.component.scss file.
canvas {
display: block;
border: 1px solid rgb(105, 105, 105);
background-color: var(--ion-color-success);
}
button {
margin: 10px;
margin-left: 10px;
}
All the code is done now let's run the application and see.
Note*: You can add bootstrap CSS and js for better UI, See the below code and put into the index.html
index.html
<!doctype html>
<html lang="en">
<head>
<meta charset="utf-8">
<title>Signature Pad by Peter</title>
<base href="/">
<meta name="viewport" content="width=device-width, initial-scale=1">
<link rel="icon" type="image/x-icon" href="favicon.ico">
<link rel="stylesheet" href="https://maxcdn.bootstrapcdn.com/bootstrap/4.5.2/css/bootstrap.min.css">
<link rel="stylesheet" href="https://unpkg.com/[email protected]/style.css">
<link rel="stylesheet" href="https://cdnjs.cloudflare.com/ajax/libs/font-awesome/4.7.0/css/font-awesome.min.css">
<script src="https://ajax.googleapis.com/ajax/libs/jquery/3.5.1/jquery.min.js"></script>
<script src="https://cdnjs.cloudflare.com/ajax/libs/popper.js/1.16.0/umd/popper.min.js"></script>
<script src="https://maxcdn.bootstrapcdn.com/bootstrap/4.5.2/js/bootstrap.min.js"></script>
</head>
<body>
<app-root></app-root>
</body>
</html>
You can write the signature under signature and click on the Save button and see.
Let's click on Save and see your signature as an Image, And If you want to clear the sign then click on the Clear button, and for undo click on Undo button. Here you can see the image of the written signature, You can save your signature into the database by using API.
May 9, 2025 10:52 by
PeterIn this walk, you will learn the following things.
- Create an angular project.
- Install NPM Package XLSX
- Restrict the user from uploading only the XLSX file to the input tag.
- Restrict the user to select only one file at a time to upload.
- Read Excel file (XLSX)
- Get XLSX data in JSON format.
How is it implemented and how is it working in the description?
- Create Angular project - AnguDemo.
- Run the application and check project was created successfully.
- Install NPM package called read-excel-file by command
npm install xlsx --save
- Verify package is installed or not.
- First, implement UI/Frontend side (HTML file) coding.
- Component (TS file) coding.
- Execute the Project
- Output
Create an Angular Project called “AnguDemo” using the following CLI command.
Command
ng new AnguDemo
Example

CD AnguDemo
[Go inside project folder with the complete path]
Open Visual Studio code by using the following command.
Command
code
Example

Note. Visual Studio code will get started only if your system is configured with path and settings.
Before starting coding related WebCam first have to install a WebCam library called “ngx-webcam”.
Command
npm install xlsx --save
Example
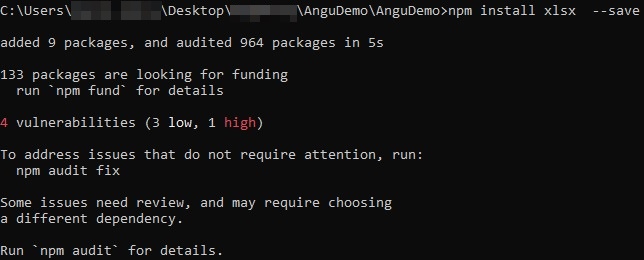
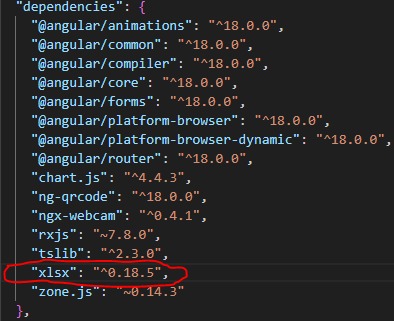
How to cross-check whether check read-excel-file package is installed or not?
Open the Package.json file which is located in the root of the project folder. Inside the dependencies section, you can check the ‘read-excel-file’ entry with the version number marked in red color.
XLSX is a package from the SheetJS community. XLSX is an open-source and freeware solution for extracting useful data and generating new spreadsheets.
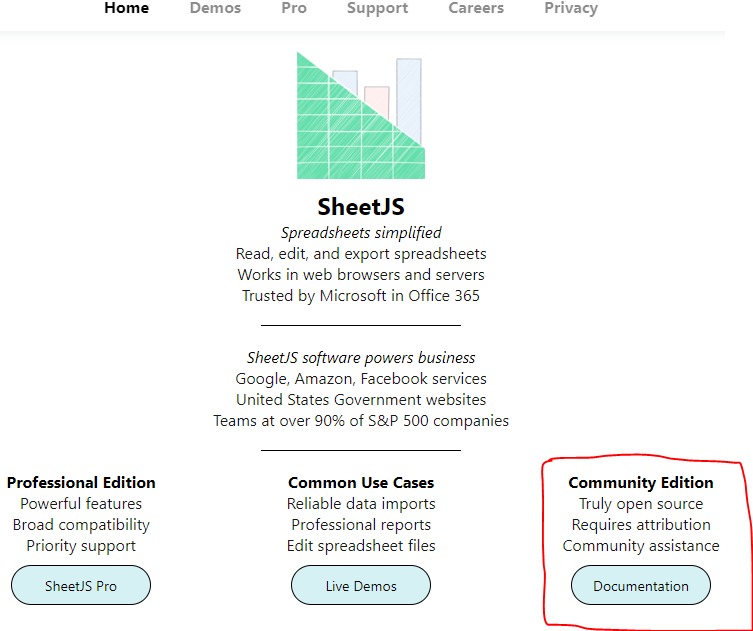
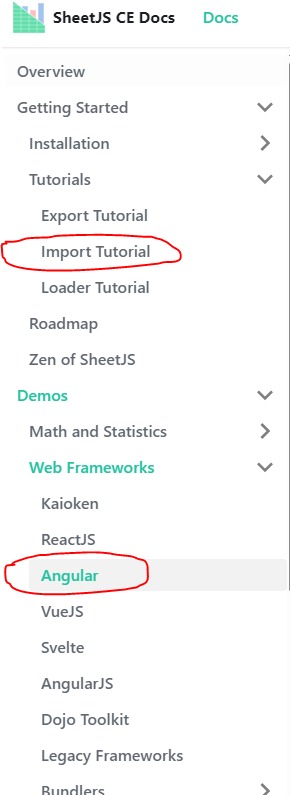
Click on Community Edition’s section Documentation button.
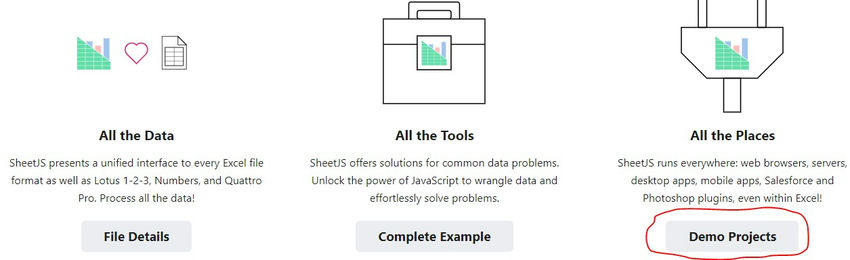
Now click on Demo Projects you will get so many tools and readymade code for XLSX files and other important topics.
Now we going to implement import Excel data.
Open the app.Component.html file and update the following code.
<p>Select XLSX File</p>
<input
type="file"
id="input"
accept="application/vnd.openxmlformats-officedocument.spreadsheetml.sheet,application/vnd.ms-excel"
(change)="onFileSubmit($event)"
multiple="false"
/>
Let's Understand the above Input type=file command.
For Excel Files 97-2003 (.xls).
application/vnd.ms-excel
For Excel Files 2007+ (.xlsx).
application/vnd.openxmlformats-officedocument.spreadsheetml.sheet
multiple="false"
Only one will be allowed at a time not multiple.
Open the app.component.ts file and update the following code.
import { Component } from '@angular/core';
import { RouterLink, RouterOutlet } from '@angular/router';
import * as XLSX from "xlsx";
@Component({
selector: 'app-root',
standalone: true,
imports: [RouterOutlet, RouterLink],
templateUrl: './app.component.html',
styleUrls: ['./app.component.css']
})
export class AppComponent {
title = 'Angular Demo';
onFileSubmit(evt: any) {
// File received
const fileReced: DataTransfer = <DataTransfer>(evt.target);
// Check how many files are received
if (fileReced.files.length > 1) {
alert('Only Single File allowed');
return;
} else {
const reader: FileReader = new FileReader();
reader.onload = (e: any) => {
const binarystring: string = e.target.result;
console.log(binarystring);
const workbook: XLSX.WorkBook = XLSX.read(binarystring, { type: 'binary' });
const worksheetname = workbook.SheetNames[0];
const worksheet: XLSX.WorkSheet = workbook.Sheets[worksheetname];
// Converting to JSON
let excelsheetdata = (XLSX.utils.sheet_to_json(worksheet, { header: 1 }));
// Print the Excel Data
console.log(excelsheetdata);
// You can use a loop to display the data on screen or process it as needed
};
reader.readAsArrayBuffer(fileReced.files[0]);
}
}
}
Now run the application by following the command.
Command
ng serve --open
Excel Data import was completed successfully.
Happy Coding!