Node.js web application development enables the development of scalable and effective platforms. You will learn how to put up a basic application with a dashboard interface and user authentication in this tutorial. The database will be MongoDB, the web framework will be Express, and the templating will be done with EJS. For simpler deployment, we will also use Docker to containerize our application.

Before you begin, ensure you have the following installed on your system:
- Node.js and npm
- Docker
- Docker Compose
- A text editor or IDE of your choice
Step 1. Setting Up Your Project
Initialize a New Node.js Project
- Open your terminal.
- Create a new directory for your project and navigate into it:
mkdir nodejs-app
cd nodejs-app
Initialize a new Node.js project:
npm init -y
Install Dependencies
Install Express, EJS, Mongoose, and other necessary packages:
npm install express ejs mongoose bcryptjs express-session passport passport-local
Step 2. Create the Application Structure
Create the necessary directories and files for your application:
nodejs-app/
│
├── app.js
├── Dockerfile
├── docker-compose.yml
├── package.json
├── routes/
│ ├── index.js
│ ├── user.js
├── config/
│ ├── passportConfig.js
├── views/
│ ├── login.ejs
│ ├── register.ejs
│ ├── dashboard.ejs
│ ├── layout.ejs
│ └── partials/
│ └── messages.ejs
├── models/
│ ├── User.js
└── public/
├── css/
├── style.css
Here is a shell script (create-nodejs-app.sh) to automatically create the directory structure for your Node.js application:
#!/bin/bash
# Define the folder structure
mkdir -p nodejs-app/{routes,config,views,models,public/css}
# Create the necessary files
touch nodejs-app/app.js
touch nodejs-app/Dockerfile
touch nodejs-app/docker-compose.yml
touch nodejs-app/package.json
touch nodejs-app/routes/index.js
touch nodejs-app/routes/user.js
touch nodejs-app/config/passportConfig.js
touch nodejs-app/views/login.ejs
touch nodejs-app/views/register.ejs
touch nodejs-app/views/dashboard.ejs
touch nodejs-app/views/layout.ejs
touch nodejs-app/views/partials/messages.ejs
touch nodejs-app/models/User.js
touch nodejs-app/public/css/style.css
# Confirmation message
echo "Node.js app folder structure created successfully!"
Step 3. Developing the Backend
Set Up Express and Middleware
In app.js, Set up your Express application and middleware to handle requests.
const express = require('express');
const mongoose = require('mongoose');
const session = require('express-session');
const flash = require('connect-flash');
const passport = require('passport');
const app = express();
const port = 3000;
// Passport Config
require('./config/passportConfig')(passport);
// DB Config
mongoose.connect('mongodb://mongo:27017/nodejs-app', { useNewUrlParser: true, useUnifiedTopology: true })
.then(() => console.log('MongoDB Connected'))
.catch(err => console.log(err));
// Middleware
app.use(express.urlencoded({ extended: false }));
app.use(express.static('public'));
// EJS
app.set('view engine', 'ejs');
// Express Session
app.use(session({
secret: 'secret',
resave: true,
saveUninitialized: true
}));
// Passport middleware
app.use(passport.initialize());
app.use(passport.session());
// Connect Flash
app.use(flash());
// Global Variables
app.use((req, res, next) => {
res.locals.success_msg = req.flash('success_msg');
res.locals.error_msg = req.flash('error_msg');
res.locals.error = req.flash('error');
next();
});
// Routes
app.use('/', require('./routes/index'));
app.use('/users', require('./routes/user'));
// Start Server
app.listen(port, () => {
console.log(`Server started on port ${port}`);
});
Configure Passport for user authentication
Database Models
Use Mongoose to define models in models/User.js.
const mongoose = require('mongoose');
const UserSchema = new mongoose.Schema({
name: {
type: String,
required: true
},
email: {
type: String,
required: true,
unique: true
},
password: {
type: String,
required: true
},
date: {
type: Date,
default: Date.now
}
});
const User = mongoose.model('User', UserSchema);
module.exports = User;
User Authentication
Implement registration and login functionality in routes/user.js.
const express = require('express');
const router = express.Router();
const bcrypt = require('bcryptjs');
const passport = require('passport');
const User = require('../models/User');
// Register Page
router.get('/register', (req, res) => res.render('register'));
// Register Handle
router.post('/register', (req, res) => {
const { name, email, password, password2 } = req.body;
let errors = [];
// Validation
if (!name || !email || !password || !password2) {
errors.push({ msg: 'Please fill in all fields' });
}
if (password !== password2) {
errors.push({ msg: 'Passwords do not match' });
}
if (errors.length > 0) {
res.render('register', { errors, name, email, password, password2 });
} else {
User.findOne({ email: email })
.then(user => {
if (user) {
errors.push({ msg: 'Email already exists' });
res.render('register', { errors, name, email, password, password2 });
} else {
const newUser = new User({ name, email, password });
bcrypt.genSalt(10, (err, salt) => {
bcrypt.hash(newUser.password, salt, (err, hash) => {
if (err) throw err;
newUser.password = hash;
newUser.save()
.then(user => {
req.flash('success_msg', 'You are now registered and can log in');
res.redirect('/users/login');
})
.catch(err => console.log(err));
});
});
}
});
}
});
// Login Page
router.get('/login', (req, res) => res.render('login'));
// Login Handle
router.post('/login', (req, res, next) => {
passport.authenticate('local', {
successRedirect: '/dashboard',
failureRedirect: '/users/login',
failureFlash: true
})(req, res, next);
});
// Logout Handle
router.get('/logout', (req, res) => {
req.logout(() => {
req.flash('success_msg', 'You are logged out');
res.redirect('/users/login');
});
});
module.exports = router;
Utilize Passport for handling authentication. config/passportConfig.js
const LocalStrategy = require('passport-local').Strategy;
const mongoose = require('mongoose');
const bcrypt = require('bcryptjs');
// Load User model
const User = require('../models/User');
module.exports = function (passport) {
passport.use(new LocalStrategy({ usernameField: 'email' }, (email, password, done) => {
User.findOne({ email: email })
.then(user => {
if (!user) {
return done(null, false, { message: 'That email is not registered' });
}
bcrypt.compare(password, user.password, (err, isMatch) => {
if (err) throw err;
if (isMatch) {
return done(null, user);
} else {
return done(null, false, { message: 'Password incorrect' });
}
});
})
.catch(err => console.log(err));
}));
passport.serializeUser((user, done) => {
done(null, user.id);
});
passport.deserializeUser((id, done) => {
User.findById(id, (err, user) => {
done(err, user);
});
});
};
routes/user.js
const express = require('express');
const router = express.Router();
const { ensureAuthenticated } = require('../config/auth');
// Welcome Page
router.get('/', (req, res) => res.render('welcome'));
// Dashboard Page
router.get('/dashboard', ensureAuthenticated, (req, res) =>
res.render('dashboard', {
user: req.user
})
);
module.exports = router;
config/auth.js
module.exports = {
ensureAuthenticated: function (req, res, next) {
if (req.isAuthenticated()) {
return next();
}
req.flash('error_msg', 'Please log in to view this resource');
res.redirect('/users/login');
}
};
Step 4. Creating the Frontend
EJS Templates
Create views for registration, login, and the dashboard in the views/ directory.
views/register.ejs
<%- include('layout') %>
<form action="/users/register" method="POST">
<div class="form-group">
<input type="text" name="name" class="form-control" placeholder="Name">
</div>
<div class="form-group">
<input type="email" name="email" class="form-control" placeholder="Email">
</div>
<div class="form-group">
<input type="password" name="password" class="form-control" placeholder="Password">
</div>
<div class="form-group">
<input type="password" name="password2" class="form-control" placeholder="Confirm Password">
</div>
<button type="submit" class="btn btn-primary">Register</button>
</form>
views/login.ejs
<%- include('layout') %>
<form action="/users/login" method="POST">
<div class="form-group">
<input type="email" name="email" class="form-control" placeholder="Email">
</div>
<div class="form-group">
<input type="password" name="password" class="form-control" placeholder="Password">
</div>
<button type="submit" class="btn btn-primary">Login</button>
</form>
views/dashboard.ejs
<%- include('layout') %>
<h1>Welcome, <%= user.name %>!</h1>
<a href="/users/logout" class="btn btn-danger">Logout</a>
JavaScript
views/layout.ejs
<!DOCTYPE html>
<html lang="en">
<head>
<meta charset="UTF-8">
<meta name="viewport" content="width=device-width, initial-scale=1.0">
<title>Node.js App</title>
<link rel="stylesheet" href="/css/style.css">
</head>
<body>
<nav>
<a href="/">Home</a>
<a href="/users/login">Login</a>
<a href="/users/register">Register</a>
</nav>
<div class="container">
<%- include('partials/messages') %>
</div>
</body>
</html>
Create the partials Directory and messages.ejs
Inside your views directory, create a new folder called partials.
Inside this partials folder, create a file called messages.ejs.
Here is an example of the content for messages.ejs:
<% if (typeof success_msg != 'undefined') { %>
<div class="alert alert-success">
<%= success_msg %>
</div>
<% } %>
<% if (typeof error_msg != 'undefined') { %>
<div class="alert alert-danger">
<%= error_msg %>
</div>
<% } %>
<% if (typeof errors != 'undefined' && errors.length > 0) { %>
<div class="alert alert-danger">
<ul>
<% errors.forEach(function(error) { %>
<li><%= error.msg %></li>
<% }) %>
</ul>
</div>
<% } %>
Static Files
Style your application using CSS in the public/css/style.css file.
/* Reset some default browser styles */
* {
margin: 0;
padding: 0;
box-sizing: border-box;
}
body {
font-family: Arial, sans-serif;
background-color: #f4f4f4;
color: #333;
line-height: 1.6;
margin: 0;
padding: 0;
}
/* Container */
.container {
max-width: 1170px;
margin: 0 auto;
padding: 20px;
}
/* Navigation */
nav {
background: #333;
color: #fff;
padding: 15px;
text-align: center;
}
nav a {
color: #fff;
text-decoration: none;
margin: 0 10px;
}
nav a:hover {
text-decoration: underline;
}
/* Form Styling */
form {
background: #fff;
padding: 20px;
margin-top: 20px;
border-radius: 5px;
box-shadow: 0 0 10px rgba(0, 0, 0, 0.1);
}
.form-group {
margin-bottom: 15px;
}
.form-group input {
width: 100%;
padding: 10px;
border: 1px solid #ccc;
border-radius: 5px;
}
button {
background: #333;
color: #fff;
border: 0;
padding: 10px 15px;
cursor: pointer;
border-radius: 5px;
}
button:hover {
background: #555;
}
/* Messages */
.alert {
padding: 10px;
background-color: #f4f4f4;
color: #333;
margin-bottom: 20px;
border: 1px solid #ccc;
}
.alert-success {
background-color: #dff0d8;
color: #3c763d;
}
.alert-error {
background-color: #f2dede;
color: #a94442;
}
/* Dashboard */
h1 {
font-size: 24px;
margin-bottom: 20px;
}
.btn-danger {
background-color: #e74c3c;
}
.btn-danger:hover {
background-color: #c0392b;
}
Step 5. Dockerizing the Application
Dockerfile
Create a Dockerfile to specify the build process for your application.
FROM node:16
WORKDIR /app
COPY package*.json ./
RUN npm install
COPY . .
EXPOSE 3000
CMD ["node", "app.js"]
Docker Compose
Define services, including your Node.js app and MongoDB, in docker-compose.yml.
version: '3'
services:
app:
build: .
ports:
- "3000:3000"
depends_on:
- mongo
mongo:
image: mongo
ports:
- "27017:27017"
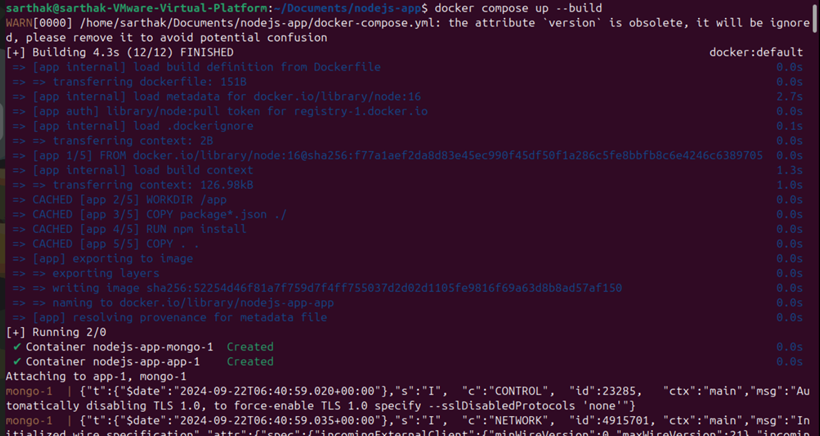
Step 6. Running Your Application
Build and Run with Docker Compose
docker-compose up --build
Access the App: Go to http://localhost:3000 in your browser.
Access the App: Go to http://localhost:3000 in your browser.
HostForLIFE.eu Node.js Hosting
HostForLIFE.eu is European Windows Hosting Provider which focuses on Windows Platform only. We deliver on-demand hosting solutions including Shared hosting, Reseller Hosting, Cloud Hosting, Dedicated Servers, and IT as a Service for companies of all sizes. We have customers from around the globe, spread across every continent. We serve the hosting needs of the business and professional, government and nonprofit, entertainment and personal use market segments.
