Full Trust European Hosting

BLOG about Full Trust Hosting and Its Technology - Dedicated to European Windows Hosting Customer

AngularJS Hosting Europe - HostForLIFE :: Apply Dynamically Changing Filters to Kendo Grid in Angular

clock June 26, 2024 07:59 by author Peter

You may use the built-in features of the Kendo Grid in conjunction with Angular's component lifecycle hooks to apply dynamic filters in a Kendo Grid based on the data type of each column. Here's how you can make this happen.


Install the required packages
Make sure the Angular Grid package's Kendo UI is installed.

npm install @progress/kendo-angular-grid \
            @progress/kendo-angular-inputs \
            @progress/kendo-angular-l10n \
            @progress/kendo-angular-dateinputs \
            @progress/kendo-angular-dropdowns --save


Import Kendo Modules
Import the necessary Kendo UI modules into your Angular module.
import { GridModule } from '@progress/kendo-angular-grid';
import { DateInputsModule } from '@progress/kendo-angular-dateinputs';
import { InputsModule } from '@progress/kendo-angular-inputs';
import { DropDownsModule } from '@progress/kendo-angular-dropdowns';
@NgModule({
  imports: [
    GridModule,
    DateInputsModule,
    InputsModule,
    DropDownsModule
    // other imports
  ],
  // other configurations
})
export class AppModule {}


Define the grid in your component template
Create the Kendo Grid in your component template and bind it to a data source.
<kendo-grid [data]="gridData" [filterable]="true">
  <kendo-grid-column *ngFor="let column of columns"
                     [field]="column.field"
                     [title]="column.title"
                     [filter]="getFilterType(column)">
  </kendo-grid-column>
</kendo-grid>


Determine the filter type dynamically
In your component, write a method to return the filter type based on the column's data type.
import { Component, OnInit } from '@angular/core';
@Component({
  selector: 'app-dynamic-filter-grid',
  templateUrl: './dynamic-filter-grid.component.html',
  styleUrls: ['./dynamic-filter-grid.component.css']
})
export class DynamicFilterGridComponent implements OnInit {
  public gridData: any[] = [
    { name: 'John', age: 30, birthday: new Date(1990, 1, 1) },
    { name: 'Jane', age: 25, birthday: new Date(1995, 2, 1) },
    // more data
  ];

  public columns: any[] = [
    { field: 'name', title: 'Name', type: 'string' },
    { field: 'age', title: 'Age', type: 'number' },
    { field: 'birthday', title: 'Birthday', type: 'date' }
  ];
  constructor() { }
  ngOnInit(): void { }
  getFilterType(column: any): string {
    switch (column.type) {
      case 'date':
        return 'date';
      case 'number':
        return 'numeric';
      default:
        return 'text';
    }
  }
}


Add the component template

In your component HTML file, use the Kendo Grid and call the dynamic filter method.
<kendo-grid [data]="gridData" [filterable]="true">
  <kendo-grid-column *ngFor="let column of columns"
                     [field]="column.field"
                     [title]="column.title"
                     [filter]="getFilterType(column)">
  </kendo-grid-column>
</kendo-grid>


Conclusion
With these steps, your Kendo Grid will apply filters dynamically based on the data type of each column.


European Node.js Hosting - HostForLIFE :: How to Automate MySQL Database Updates with Cron Jobs in Node.js?

clock June 14, 2024 09:17 by author Peter

Automating repetitive operations is essential for streamlining workflows and increasing productivity in the digital age. An in-depth tutorial on using Node.js and cron jobs to automate MySQL database updates can be found in "How to Automate MySQL Database Updates with Cron Jobs in Node.js: A Step-by-Step Guide".

This article offers developers a workable method for putting scheduled activities into practice, guaranteeing accurate and timely data changes without the need for manual intervention. This book gives you the tools to efficiently use automation, regardless of your level of experience. Whether you're a newbie hoping to improve your backend programming skills or an experienced developer wishing to streamline database administration operations, this guide will help you. Together, let's set out on this path to effective database automation.

Steps for creating a project
Step 1. Setting Up the Project

Use my previous article for setting up Node.js, "How to upload file in Node.js" In this article, we mentioned important commands for uploading files in Node.js.

Step 2. Install the necessary dependencies (mysql2 and node-cron)
npm install mysql2 node-cron

Step 3. Setting Up the Server
Create the Server File. Create a file named app.js.
const cron = require('node-cron');
const mysql = require('mysql2');

// Create a connection to the MySQL database
const connection = mysql.createConnection({
   host: 'localhost',
  user: 'your_mysql_username',
  password: 'your_mysql_password',
  database: 'your_database_name'
});

// Function to update the MySQL database
const updateDatabase = () => {
  const sql = 'UPDATE users SET last_notification = CURRENT_TIMESTAMP';

  connection.query(sql, (err, result) => {
    if (err) {
      console.error('Error updating database:', err);
      return;
    }
    console.log('Database updated:', result.affectedRows, 'row(s) affected');
  });
};

// Schedule a cron job to update the database every minute
cron.schedule('* * * * *', () => {
  console.log('Scheduling database update...');
  updateDatabase();
}, {
  scheduled: true,
  timezone: 'America/New_York'
});

Step 4. Create a table in the database
CREATE TABLE users (
    id INT AUTO_INCREMENT PRIMARY KEY,
    name VARCHAR(255) NOT NULL,
    last_notification TIMESTAMP DEFAULT CURRENT_TIMESTAMP ON UPDATE CURRENT_TIMESTAMP
);

Step 5. Insert some value manually in the Database

INSERT INTO users (name, last_notification) VALUES
('John Doe', NOW()),
('Jane Smith', NOW());

Step 6. Running the Application
Run the command in CMD.
node app.js

Output

illustrates seamless database management automation. Post-execution, the tutorial ensures continuous updates to the "last_notification" column every minute, facilitating efficient data maintenance and enhancing productivity. Experience streamlined database automation with this comprehensive guide.

Conclusion

The automation of MySQL database updates using Node.js and cron jobs offers significant advantages in streamlining workflows. By implementing the techniques outlined in this guide, developers can ensure continuous and timely updates to their databases, minimizing manual intervention and maximizing efficiency. Embrace the power of automation to unlock greater productivity and reliability in database management.

HostForLIFE.eu Node.js Hosting
HostForLIFE.eu is European Windows Hosting Provider which focuses on Windows Platform only. We deliver on-demand hosting solutions including Shared hosting, Reseller Hosting, Cloud Hosting, Dedicated Servers, and IT as a Service for companies of all sizes. We have customers from around the globe, spread across every continent. We serve the hosting needs of the business and professional, government and nonprofit, entertainment and personal use market segments.


AngularJS Hosting Europe - HostForLIFE :: Using Entity Framework to Begin With HTTP Client Get Request in Angular 8

clock June 6, 2024 08:53 by author Peter

In this post, I'll explain how to use the HttpClient module in Angular 8 to consume RESfFul API and how to use the entity framework to get requests. Requests for GET, POST, PUT, PATCH, and DELETE are handled by the HttpClient module. HTTP can be used by an Angular application to communicate with backend services.

RxJs observable-based API is available with Angular HTTP. When an HTTP request is unsuccessful, Observable generates an error.

Note: I won't go over the CRUD process in this post. This article aims to clarify things for newcomers.

Step 1. Create tables in the database
Consider the simple example of employees in a hotel. We will show the name & email ID of the employee in a hotel on the view in the last step of this article.

I am going to create one database & will add the table with some values. Use the below script for more information. Note that you can create a database structure as per your requirements.

GO
SET ANSI_NULLS ON
GO
SET QUOTED_IDENTIFIER ON
GO
SET ANSI_PADDING ON
GO
CREATE TABLE [dbo].[Employee](
    [Id] [int] IDENTITY(1,1) NOT NULL,
      NULL,
      NULL,
      NULL,
    CONSTRAINT [PK_Employee] PRIMARY KEY CLUSTERED
    (
        [Id] ASC
    ) WITH (PAD_INDEX = OFF, STATISTICS_NORECOMPUTE = OFF, IGNORE_DUP_KEY = OFF, ALLOW_ROW_LOCKS = ON, ALLOW_PAGE_LOCKS = ON) ON [PRIMARY]
) ON [PRIMARY]
GO
SET ANSI_PADDING OFF
GO
SET IDENTITY_INSERT [dbo].[Employee] ON
INSERT [dbo].[Employee] ([Id], [Name], [Email], [Password]) VALUES (1, N'Rupesh', N'[email protected]', N'123')
INSERT [dbo].[Employee] ([Id], [Name], [Email], [Password]) VALUES (2, N'Ashish', N'[email protected]', N'123')
INSERT [dbo].[Employee] ([Id], [Name], [Email], [Password]) VALUES (3, N'Sam', N'[email protected]', N'123')
INSERT [dbo].[Employee] ([Id], [Name], [Email], [Password]) VALUES (4, N'Ajit', N'[email protected]', N'123')
SET IDENTITY_INSERT [dbo].[Employee] OFF

Step 2: Establish a Web Application
First, we'll use Visual Studio to construct a WebAPI application. Navigate to File => New => Project after opening Visual Studio. Open a new project, choose an empty ASP.NET + WebAPI project from the template, and give it a name.

In our project, create the entity data model (.edmx) file by right-clicking on the solution, selecting Add, then New Item, and then choosing ADO.NET Entity Data Model from the Visual C# installed template in Data. Give it a name.

Create a web API controller by using the Entity framework. Use the Web API controller with REST actions to perform a CRUD operation from the entity framework context.

Give our controller a name. From the drop-down, choose the name of the context class.

We need to enable the CORS attribute on the above controller level as per the below syntax. CORS stands for Cross-Origin Resource Sharing. For more information refer to this article.
[EnableCors(origins: "*", headers: "*", methods: "*")]
public class EmployeesController : ApiController
{
    // Our CRUD operation code here
}

The whole controller code is as shown below.
[EnableCors(origins: "*", headers: "*", methods: "*")]
public class EmployeesController : ApiController
{
    private HotelEntities db = new HotelEntities();
    // GET: api/Employees
    public List<Employee> GetAllEmployees()
    {
        return db.Employees.ToList();
    }
    // GET: api/Employees/5
    [ResponseType(typeof(Employee))]
    public IHttpActionResult GetEmployee(int id)
    {
        Employee employee = db.Employees.Find(id);
        if (employee == null)
        {
            return NotFound();
        }
        return Ok(employee);
    }
    // PUT: api/Employees/5
    [ResponseType(typeof(void))]
    public IHttpActionResult PutEmployee(int id, Employee employee)
    {
        if (!ModelState.IsValid)
        {
            return BadRequest(ModelState);
        }
        if (id != employee.Id)
        {
            return BadRequest();
        }
        db.Entry(employee).State = EntityState.Modified;
        try
        {
            db.SaveChanges();
        }
        catch (DbUpdateConcurrencyException)
        {
            if (!EmployeeExists(id))
            {
                return NotFound();
            }
            else
            {
                throw;
            }
        }
        return StatusCode(HttpStatusCode.NoContent);
    }
    // POST: api/Employees
    [ResponseType(typeof(Employee))]
    public IHttpActionResult PostEmployee(Employee employee)
    {
        if (!ModelState.IsValid)
        {
            return BadRequest(ModelState);
        }
        db.Employees.Add(employee);
        db.SaveChanges();
        return CreatedAtRoute("DefaultApi", new { id = employee.Id }, employee);
    }
    // DELETE: api/Employees/5
    [ResponseType(typeof(Employee))]
    public IHttpActionResult DeleteEmployee(int id)
    {
        Employee employee = db.Employees.Find(id);
        if (employee == null)
        {
            return NotFound();
        }
        db.Employees.Remove(employee);
        db.SaveChanges();

        return Ok(employee);
    }
    protected override void Dispose(bool disposing)
    {
        if (disposing)
        {
            db.Dispose();
        }
        base.Dispose(disposing);
    }
    private bool EmployeeExists(int id)
    {
        return db.Employees.Count(e => e.Id == id) > 0;
    }
}

Step 3. To create an Angular Project

Create a new service in our Angular application using syntax & create a company service.
ng g service our_service_name

Now we will write code to get the data from our API in the service i.e. company.service.ts file contains the below code.
Note. Do not use a direct URL link in the typescript file anyone can easily hack it. For demo purposes, I have used it.

The below code contains the file company.service.ts.
import { Injectable } from '@angular/core';
import { HttpClient } from '@angular/common/http';
import { Company } from '../Model/company';

@Injectable({
  providedIn: 'root'
})
export class CompanyService {

  constructor(private http: HttpClient) { }

  getData() {
    return this.http.get("http://localhost:8012/api/Employees");
  }
}

In the above code, CompanyService is a class that contains our getData method that returns a result from API from where we are getting a record using a GET request, API/Employees (which is written in the API project). We can also host our API project & add that URL as well.

Step 4. Create a new component in our angular project
Now create a new component in our angular project using syntax & create the my-company component.
ng g c componentName


The below code contains the file my-company.component.html.
<p>Angular 8 using Web API !!!</p>

<div>
  <table class="gridList">
    <tr>
      <th>User Names</th>
      <th>Email</th>
    </tr>
    <tr *ngFor="let item of companyList">
      <td>{{ item.Name }}</td>
      <td>{{ item.Email }}</td>
    </tr>
  </table>
</div>


In the above code, we have used ngFor to iterate the loop. companyList is a variable in which we will get the data from our services refer to the below steps.

The below code contains the file my-company.component .ts
import { BrowserModule, Title } from '@angular/platform-browser';
import { Component, OnInit, ViewChild } from '@angular/core';
import { CompanyService } from '../../service/company.service';
@Component({
  selector: 'app-my-company',
  templateUrl: './my-company.component.html',
  styleUrls: ['./my-company.component.css']
})
export class MyCompanyComponent implements OnInit {
  companyList: any;
  constructor(private companyService: CompanyService) { }
  ngOnInit() {
    this.getData();
  }
  getData() {
    this.companyService.getData().subscribe(
      data => {
        this.companyList = data;
      }
    );
  }
}


In the above code, we have imported the company service. In the OnInit method, we will declare one variable company list & will assign the data that is returned by our method getData() from service.

Here, subscribe is used to send the list.

Step 5. Loading the company component in app.component.html

Now, to load our company component, we will add a selector in the app.component.html file.
<app-my-company></app-my-company>


Step 6. To run the Angular application

To run the Angular application, use the below syntax.
ng serve -o


AngularJS Hosting Europe - HostForLIFE :: Using Entity Framework to Begin With HTTP Client Get Request in Angular 8

clock June 6, 2024 08:53 by author Peter

In this post, I'll explain how to use the HttpClient module in Angular 8 to consume RESfFul API and how to use the entity framework to get requests. Requests for GET, POST, PUT, PATCH, and DELETE are handled by the HttpClient module. HTTP can be used by an Angular application to communicate with backend services.


RxJs observable-based API is available with Angular HTTP. When an HTTP request is unsuccessful, Observable generates an error.

Note: I won't go over the CRUD process in this post. This article aims to clarify things for newcomers.

Step 1. Create tables in the database
Consider the simple example of employees in a hotel. We will show the name & email ID of the employee in a hotel on the view in the last step of this article.

I am going to create one database & will add the table with some values. Use the below script for more information. Note that you can create a database structure as per your requirements.

GO
SET ANSI_NULLS ON
GO
SET QUOTED_IDENTIFIER ON
GO
SET ANSI_PADDING ON
GO
CREATE TABLE [dbo].[Employee](
    [Id] [int] IDENTITY(1,1) NOT NULL,
      NULL,
      NULL,
      NULL,
    CONSTRAINT [PK_Employee] PRIMARY KEY CLUSTERED
    (
        [Id] ASC
    ) WITH (PAD_INDEX = OFF, STATISTICS_NORECOMPUTE = OFF, IGNORE_DUP_KEY = OFF, ALLOW_ROW_LOCKS = ON, ALLOW_PAGE_LOCKS = ON) ON [PRIMARY]
) ON [PRIMARY]
GO
SET ANSI_PADDING OFF
GO
SET IDENTITY_INSERT [dbo].[Employee] ON
INSERT [dbo].[Employee] ([Id], [Name], [Email], [Password]) VALUES (1, N'Rupesh', N'[email protected]', N'123')
INSERT [dbo].[Employee] ([Id], [Name], [Email], [Password]) VALUES (2, N'Ashish', N'[email protected]', N'123')
INSERT [dbo].[Employee] ([Id], [Name], [Email], [Password]) VALUES (3, N'Sam', N'[email protected]', N'123')
INSERT [dbo].[Employee] ([Id], [Name], [Email], [Password]) VALUES (4, N'Ajit', N'[email protected]', N'123')
SET IDENTITY_INSERT [dbo].[Employee] OFF

Step 2: Establish a Web Application
First, we'll use Visual Studio to construct a WebAPI application. Navigate to File => New => Project after opening Visual Studio. Open a new project, choose an empty ASP.NET + WebAPI project from the template, and give it a name.

In our project, create the entity data model (.edmx) file by right-clicking on the solution, selecting Add, then New Item, and then choosing ADO.NET Entity Data Model from the Visual C# installed template in Data. Give it a name.

Create a web API controller by using the Entity framework. Use the Web API controller with REST actions to perform a CRUD operation from the entity framework context.

Give our controller a name. From the drop-down, choose the name of the context class.

We need to enable the CORS attribute on the above controller level as per the below syntax. CORS stands for Cross-Origin Resource Sharing. For more information refer to this article.
[EnableCors(origins: "*", headers: "*", methods: "*")]
public class EmployeesController : ApiController
{
    // Our CRUD operation code here
}

The whole controller code is as shown below.
[EnableCors(origins: "*", headers: "*", methods: "*")]
public class EmployeesController : ApiController
{
    private HotelEntities db = new HotelEntities();
    // GET: api/Employees
    public List<Employee> GetAllEmployees()
    {
        return db.Employees.ToList();
    }
    // GET: api/Employees/5
    [ResponseType(typeof(Employee))]
    public IHttpActionResult GetEmployee(int id)
    {
        Employee employee = db.Employees.Find(id);
        if (employee == null)
        {
            return NotFound();
        }
        return Ok(employee);
    }
    // PUT: api/Employees/5
    [ResponseType(typeof(void))]
    public IHttpActionResult PutEmployee(int id, Employee employee)
    {
        if (!ModelState.IsValid)
        {
            return BadRequest(ModelState);
        }
        if (id != employee.Id)
        {
            return BadRequest();
        }
        db.Entry(employee).State = EntityState.Modified;
        try
        {
            db.SaveChanges();
        }
        catch (DbUpdateConcurrencyException)
        {
            if (!EmployeeExists(id))
            {
                return NotFound();
            }
            else
            {
                throw;
            }
        }
        return StatusCode(HttpStatusCode.NoContent);
    }
    // POST: api/Employees
    [ResponseType(typeof(Employee))]
    public IHttpActionResult PostEmployee(Employee employee)
    {
        if (!ModelState.IsValid)
        {
            return BadRequest(ModelState);
        }
        db.Employees.Add(employee);
        db.SaveChanges();
        return CreatedAtRoute("DefaultApi", new { id = employee.Id }, employee);
    }
    // DELETE: api/Employees/5
    [ResponseType(typeof(Employee))]
    public IHttpActionResult DeleteEmployee(int id)
    {
        Employee employee = db.Employees.Find(id);
        if (employee == null)
        {
            return NotFound();
        }
        db.Employees.Remove(employee);
        db.SaveChanges();

        return Ok(employee);
    }
    protected override void Dispose(bool disposing)
    {
        if (disposing)
        {
            db.Dispose();
        }
        base.Dispose(disposing);
    }
    private bool EmployeeExists(int id)
    {
        return db.Employees.Count(e => e.Id == id) > 0;
    }
}

Step 3. To create an Angular Project

Create a new service in our Angular application using syntax & create a company service.
ng g service our_service_name

Now we will write code to get the data from our API in the service i.e. company.service.ts file contains the below code.
Note. Do not use a direct URL link in the typescript file anyone can easily hack it. For demo purposes, I have used it.

The below code contains the file company.service.ts.
import { Injectable } from '@angular/core';
import { HttpClient } from '@angular/common/http';
import { Company } from '../Model/company';

@Injectable({
  providedIn: 'root'
})
export class CompanyService {

  constructor(private http: HttpClient) { }

  getData() {
    return this.http.get("http://localhost:8012/api/Employees");
  }
}

In the above code, CompanyService is a class that contains our getData method that returns a result from API from where we are getting a record using a GET request, API/Employees (which is written in the API project). We can also host our API project & add that URL as well.

Step 4. Create a new component in our angular project
Now create a new component in our angular project using syntax & create the my-company component.
ng g c componentName


The below code contains the file my-company.component.html.
<p>Angular 8 using Web API !!!</p>

<div>
  <table class="gridList">
    <tr>
      <th>User Names</th>
      <th>Email</th>
    </tr>
    <tr *ngFor="let item of companyList">
      <td>{{ item.Name }}</td>
      <td>{{ item.Email }}</td>
    </tr>
  </table>
</div>


In the above code, we have used ngFor to iterate the loop. companyList is a variable in which we will get the data from our services refer to the below steps.

The below code contains the file my-company.component .ts
import { BrowserModule, Title } from '@angular/platform-browser';
import { Component, OnInit, ViewChild } from '@angular/core';
import { CompanyService } from '../../service/company.service';
@Component({
  selector: 'app-my-company',
  templateUrl: './my-company.component.html',
  styleUrls: ['./my-company.component.css']
})
export class MyCompanyComponent implements OnInit {
  companyList: any;
  constructor(private companyService: CompanyService) { }
  ngOnInit() {
    this.getData();
  }
  getData() {
    this.companyService.getData().subscribe(
      data => {
        this.companyList = data;
      }
    );
  }
}


In the above code, we have imported the company service. In the OnInit method, we will declare one variable company list & will assign the data that is returned by our method getData() from service.

Here, subscribe is used to send the list.

Step 5. Loading the company component in app.component.html

Now, to load our company component, we will add a selector in the app.component.html file.
<app-my-company></app-my-company>


Step 6. To run the Angular application

To run the Angular application, use the below syntax.
ng serve -o


Node.js Hosting - HostForLIFE :: How Can I Use MySQL To Create JWT Token Authentication In Node.js?

clock June 5, 2024 08:12 by author Peter

The JSON Web Token (JWT) authentication method is a popular security measure for Node.js applications. A token is created upon login and is used for subsequent request authentication. This tutorial shows you how to implement JWT authentication in a Node.js application using MySQL and Express. You'll learn how to set up the database, create authentication routes, and oversee token generation and validation. By securing your API endpoints and restricting access to protected resources to only authorized users, you may increase the security and scalability of your service.

Steps for Creating a project
Step 1. Initialize a new Node.js project ;(CMD Command)

mkdir Node_JWT_Project
cd Node_JWT_Project
npm init -y

Step 2. Install the required packages ;(CMD Command)
npm install express mysql2 jsonwebtoken bcryptjs body-parser

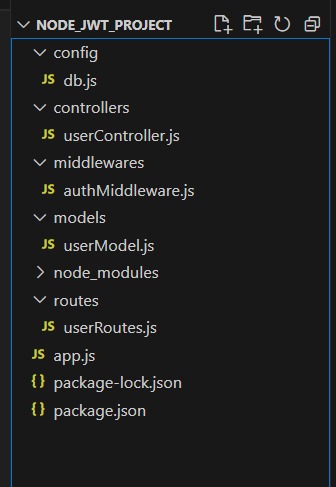
Step 3. Create the project structure

Step 4. Database Configuration (config/db.js)
const mysql = require('mysql2');
const connection = mysql.createConnection({
    host: 'localhost',
    user: 'root',
    password: 'password',
    database: 'my_database'
});
connection.connect((err) => {
    if (err) {
        console.error('Error connecting to the database:', err.stack);
        return;
    }
    console.log('Connected to the database.');
});
module.exports = connection;


Step 5. Create a Model folder (models/userModel.js)
const db = require('../config/db');
const User = {};
User.create = (user, callback) => {
    const query = 'INSERT INTO users (username, email, password) VALUES (?, ?, ?)';
    db.query(query, [user.username, user.email, user.password], callback);
};
User.findById = (id, callback) => {
    const query = 'SELECT * FROM users WHERE id = ?';
    db.query(query, [id], callback);
};
User.findByEmail = (email, callback) => {
    const query = 'SELECT * FROM users WHERE email = ?';
    db.query(query, [email], callback);
};
User.update = (id, user, callback) => {
    const query = 'UPDATE users SET username = ?, email = ? WHERE id = ?';
    db.query(query, [user.username, user.email, id], callback);
};
User.delete = (id, callback) => {
    const query = 'DELETE FROM users WHERE id = ?';
    db.query(query, [id], callback);
};
module.exports = User;

Step 6. Controller (controllers/userController.js)
const User = require('../models/userModel');
const bcrypt = require('bcryptjs');
const jwt = require('jsonwebtoken');
const userController = {};
userController.register = async (req, res) => {
    const { username, email, password } = req.body;
    const hashedPassword = await bcrypt.hash(password, 10);
    User.create({ username, email, password: hashedPassword }, (err, result) => {
        if (err) {
            return res.status(500).json({ error: err.message });
        }
        res.status(201).json({ message: 'User registered successfully!' });
    });
};
userController.login = (req, res) => {
    const { email, password } = req.body;
    User.findByEmail(email, async (err, results) => {
        if (err || results.length === 0) {
            return res.status(400).json({ error: 'Invalid email or password' });
        }
        const user = results[0];
        const isMatch = await bcrypt.compare(password, user.password);
        if (!isMatch) {
            return res.status(400).json({ error: 'Invalid email or password' });
        }
        const token = jwt.sign({ id: user.id }, 'your_jwt_secret', { expiresIn: '1h' });
        res.json({ token });
    });
};
userController.getUser = (req, res) => {
    const userId = req.user.id;
    User.findById(userId, (err, results) => {
        if (err) {
            return res.status(500).json({ error: err.message });
        }
        if (results.length === 0) {
            return res.status(404).json({ message: 'User not found' });
        }
        res.json(results[0]);
    });
};
userController.updateUser = (req, res) => {
    const userId = req.user.id;
    const { username, email } = req.body;
    User.update(userId, { username, email }, (err, results) => {
        if (err) {
            return res.status(500).json({ error: err.message });
        }
        res.json({ message: 'User updated successfully!' });
    });
};
userController.deleteUser = (req, res) => {
    const userId = req.user.id;
    User.delete(userId, (err, results) => {
        if (err) {
            return res.status(500).json({ error: err.message });
        }
        res.json({ message: 'User deleted successfully!' });
    });
};
module.exports = userController;


Step 7. Routes (routes/userRoutes.js)
const express = require('express');
const router = express.Router();
const userController = require('../controllers/userController');
const authMiddleware = require('../middlewares/authMiddleware');
router.post('/register', userController.register);
router.post('/login', userController.login);
router.get('/profile', authMiddleware, userController.getUser);
router.put('/profile', authMiddleware, userController.updateUser);
router.delete('/profile', authMiddleware, userController.deleteUser);
module.exports = router;

Step 8. Middleware (middlewares/authMiddleware.js)
const jwt = require('jsonwebtoken');
const authMiddleware = (req, res, next) => {
    const token = req.header('Authorization').replace('Bearer ', '');
    if (!token) {
        return res.status(401).json({ message: 'Access denied. No token provided.' });
    }
    try {
        const decoded = jwt.verify(token, 'your_jwt_secret');
        req.user = decoded;
        next();
    } catch (error) {
        res.status(400).json({ message: 'Invalid token.' });
    }
};
module.exports = authMiddleware;


Step 9. Main Application (app.js)
const express = require('express');
const bodyParser = require('body-parser');
const userRoutes = require('./routes/userRoutes');
const app = express();
app.use(bodyParser.json());
app.use('/api/users', userRoutes);
const PORT = process.env.PORT || 3000;
app.listen(PORT, () => {
    console.log(`Server is running on port ${PORT}`);
});


Step 10. Create a Database and Table
CREATE DATABASE my_database;
USE my_database;
CREATE TABLE users (
    id INT AUTO_INCREMENT PRIMARY KEY,
    username VARCHAR(255) NOT NULL,
    email VARCHAR(255) NOT NULL,
    password VARCHAR(255) NOT NULL
);


Step 11. Running the project (CMD Command)
node app.js

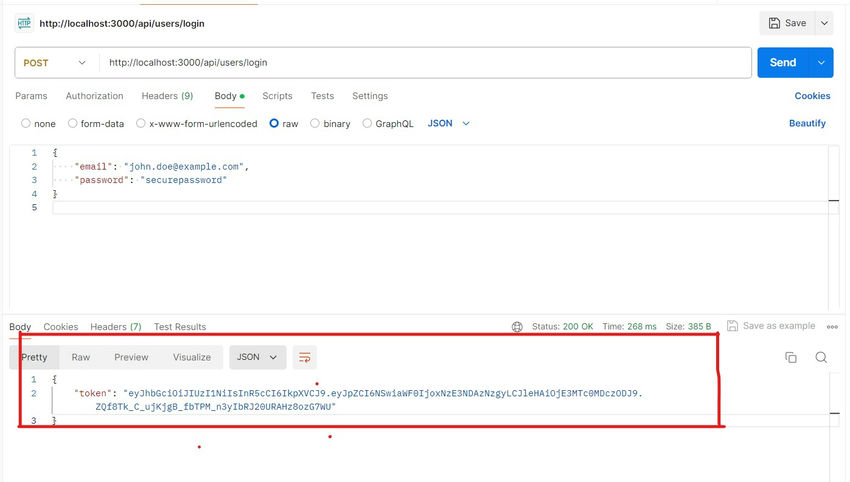
Step 12. Check-in Postman

Similarly, we can use Endpoint Update, Insert, and Delete.

Conclusion

Only authenticated users can access protected resources, which improves security and scalability when JWT authentication is implemented in a Node.js application using MySQL. You may create a strong authentication system by following the procedures listed, which include setting up the database, making authentication routes, and creating and validating tokens. This method offers a scalable solution for user management in your application in addition to securing your API endpoints. You can make your application more dependable and user-friendly by maintaining a seamless and secure user experience with JWT authentication.

HostForLIFE.eu Node.js Hosting
HostForLIFE.eu is European Windows Hosting Provider which focuses on Windows Platform only. We deliver on-demand hosting solutions including Shared hosting, Reseller Hosting, Cloud Hosting, Dedicated Servers, and IT as a Service for companies of all sizes. We have customers from around the globe, spread across every continent. We serve the hosting needs of the business and professional, government and nonprofit, entertainment and personal use market segments.


About HostForLIFE

HostForLIFE is European Windows Hosting Provider which focuses on Windows Platform only. We deliver on-demand hosting solutions including Shared hosting, Reseller Hosting, Cloud Hosting, Dedicated Servers, and IT as a Service for companies of all sizes.

We have offered the latest Windows 2019 Hosting, ASP.NET 5 Hosting, ASP.NET MVC 6 Hosting and SQL 2019 Hosting.


Tag cloud

Sign in