
July 25, 2024 07:31 by
 Peter
PeterWorking with APIs is a standard chore in modern web development. Angular's HttpClient module offers a reliable method for managing HTTP requests. You will learn how to create an Angular service that will call an API and manage the responses in this tutorial.

Configuring Angular Project
Make sure you have Angular CLI installed before we begin. If not, you can use the following command to install it.
npm install -g @angular/cli
Create a new Angular project.
ng new api-service-demo
cd api-service-demo
Add HttpClientModule to your project.
ng add @angular/common/http
Creating the Service
Generate a new service using Angular CLI.
ng generate service api
This command will create a file named api.service.ts in the src/app directory.
Importing HttpClient
First, import HttpClient and HttpClientModule in your app.module.ts.
import { HttpClientModule } from '@angular/common/http';
@NgModule({
declarations: [
// Your components
],
imports: [
BrowserModule,
HttpClientModule,
// Other modules
],
providers: [],
bootstrap: [AppComponent]
})
export class AppModule { }
Implementing the API Call in the Service
Next, implement the API call in your service (api.service.ts).
import { Injectable } from '@angular/core';
import { HttpClient } from '@angular/common/http';
import { Observable } from 'rxjs';
@Injectable({
providedIn: 'root'
})
export class ApiService {
private apiUrl = 'https://jsonplaceholder.typicode.com/posts'; // Replace with your API URL
constructor(private http: HttpClient) { }
getPosts(): Observable<any> {
return this.http.get<any>(this.apiUrl);
}
}
In this example, getPosts is a method that sends a GET request to the specified API URL and returns an Observable of the response.
Using the Service in a Component
Now, let's use this service in a component to fetch data and display it. Generate a new component.ng generate component post-list
Injecting the Service
Inject the ApiService in your post-list.component.ts.import { Component, OnInit } from '@angular/core';
import { ApiService } from '../api.service';
@Component({
selector: 'app-post-list',
templateUrl: './post-list.component.html',
styleUrls: ['./post-list.component.css']
})
export class PostListComponent implements OnInit {
posts: any[] = [];
constructor(private apiService: ApiService) { }
ngOnInit(): void {
this.apiService.getPosts().subscribe(data => {
this.posts = data;
});
}
}
Displaying Data in the TemplateUpdate the template (post-list.component.html) to display the fetched data.<div *ngIf="posts.length > 0">
<h2>Posts</h2>
<ul>
<li *ngFor="let post of posts">
<h3>{{ post.title }}</h3>
<p>{{ post.body }}</p>
</li>
</ul>
</div>
<div *ngIf="posts.length === 0">
<p>No posts available.</p>
</div>
Running the Application
Serve the Angular application using the following command.
ng serve
Navigate to http://localhost:4200 in your browser to see the list of posts fetched from the API.
Conclusion
In this article, we've covered how to make API calls in Angular using a service. We created a service to handle HTTP requests and used this service in a component to fetch and display data. This approach ensures that your API logic is centralized and reusable across different components.
July 19, 2024 07:38 by
PeterAngular's built-in Router module can be used to dynamically highlight the active menu item in an Angular application based on the current path. You can now apply a class to the active link as a result.
Here's how to accomplish it.
Step 1. Import the RouterModule
Ensure that your Angular module—typically app.module.ts—has the RouterModule set.
import { RouterModule } from '@angular/router';
@NgModule({
imports: [RouterModule.forRoot(routes)],
exports: [RouterModule]
})
export class AppRoutingModule { }
Step 2. Update your HTML
Use the routerLinkActive directive to dynamically apply a class to the active menu item. Here’s how you can update your navigation HTML.
<!DOCTYPE html>
<html lang="en">
<head>
<meta charset="UTF-8">
<meta name="viewport" content="width=device-width, initial-scale=1.0">
<title>Navbar Example</title>
<link rel="stylesheet" href="https://stackpath.bootstrapcdn.com/bootstrap/4.3.1/css/bootstrap.min.css">
<style>
.navbar-nav .nav-item a {
color: black;
text-decoration: none;
}
.navbar-nav .nav-item a:hover {
color: #0056b3; /* Optional: Change color on hover */
}
.navbar-nav .home-link i {
color: blue;
}
.active-link {
color: blue !important; /* Customize the active link color */
}
</style>
</head>
<body>
<section class="wrapper megamenu-wraper">
<div class="">
<nav class="container navbar navbar-expand-lg main-menu">
<div class="">
<button class="navbar-toggler" type="button" data-toggle="collapse" data-target="#navbarSupportedContent" aria-controls="navbarSupportedContent" aria-expanded="false" aria-label="Toggle navigation">
<span class="navbar-toggler-icon"></span>
</button>
<div class="collapse navbar-collapse" id="navbarSupportedContent">
<ul class="navbar-nav mr-auto">
<li class="nav-item">
<a routerLink="/private/po" routerLinkActive="active-link" class="home-link active">
<i class="fa fa-home"></i>
</a>
</li>
<li class="nav-item">
<a routerLink="dashboard" routerLinkActive="active-link">Dashboard</a>
</li>
<li class="nav-item">
<a routerLink="default" routerLinkActive="active-link">Student List</a>
</li>
<li class="nav-item">
<a routerLink="camps" routerLinkActive="active-link">Activities</a>
</li>
<li class="nav-item">
<a routerLink="camp-attendence" routerLinkActive="active-link">Attendance</a>
</li>
<li class="nav-item">
<a [routerLink]="['/private/po/actvity-camp', 0]" routerLinkActive="active-link">Create Activity</a>
</li>
</ul>
</div>
</div>
</nav>
</div>
</section>
<script src="https://code.jquery.com/jquery-3.3.1.slim.min.js"></script>
<script src="https://cdnjs.cloudflare.com/ajax/libs/popper.js/1.14.7/umd/popper.min.js"></script>
<script src="https://stackpath.bootstrapcdn.com/bootstrap/4.3.1/js/bootstrap.min.js"></script>
</body>
</html>
Explanation
- routerLinkActive Directive: This directive applies the specified class (active-link in this case) to the link that matches the current route.
- routerLink Directive: This binds the link to the router path.
- CSS: The active-link class is styled to indicate the active state.
Step 3. Ensure router module configuration
Make sure your Angular router is correctly configured in your application module (usually app-routing.module.ts).
import { NgModule } from '@angular/core';
import { RouterModule, Routes } from '@angular/router';
import { DashboardComponent } from './dashboard/dashboard.component';
import { StudentListComponent } from './student-list/student-list.component';
import { ActivitiesComponent } from './activities/activities.component';
import { AttendanceComponent } from './attendance/attendance.component';
import { CreateActivityComponent } from './create-activity/create-activity.component';
const routes: Routes = [
{ path: 'dashboard', component: DashboardComponent },
{ path: 'default', component: StudentListComponent },
{ path: 'camps', component: ActivitiesComponent },
{ path: 'camp-attendence', component: AttendanceComponent },
{ path: 'private/po/actvity-camp/:id', component: CreateActivityComponent },
{ path: '**', redirectTo: 'dashboard', pathMatch: 'full' }
];
@NgModule({
imports: [RouterModule.forRoot(routes)],
exports: [RouterModule]
})
export class AppRoutingModule { }
This setup ensures that when you navigate through your app, the active link will be highlighted, providing a better user experience.


July 15, 2024 07:55 by
PeterMake sure you have components and test files for them first. I've made the device.ts and device.test.ts files for this example. Please make use of the pictures below.
Add the required function methods after that. For example, pushToDevice is in charge of pushing data to devices and is also in charge of sending data to the backend.
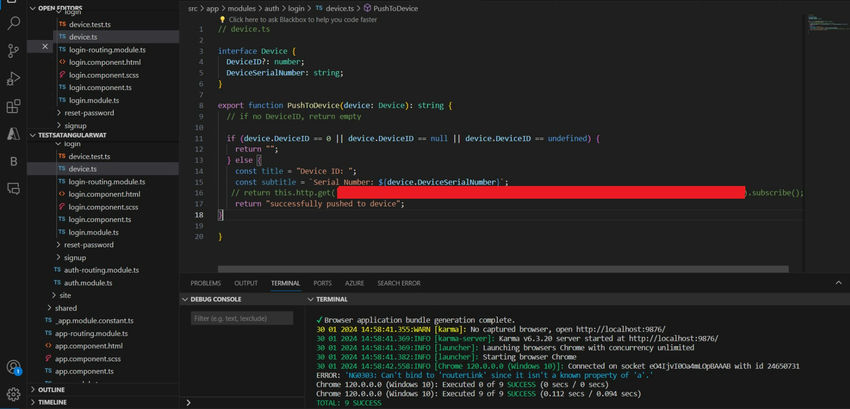
Add test cases to the device.test.ts file after generating the device.ts and device.test.ts files and including the pushToDevice and sendToBackend methods. Some sample function names that you might use are listed below. If you used the enter tab key to input the function name.
import { describe, expect, test } from '@jest/globals';
import { PushToDevice } from './device';
class Device {
DeviceID?: number;
DeviceSerialNumber: string;
}
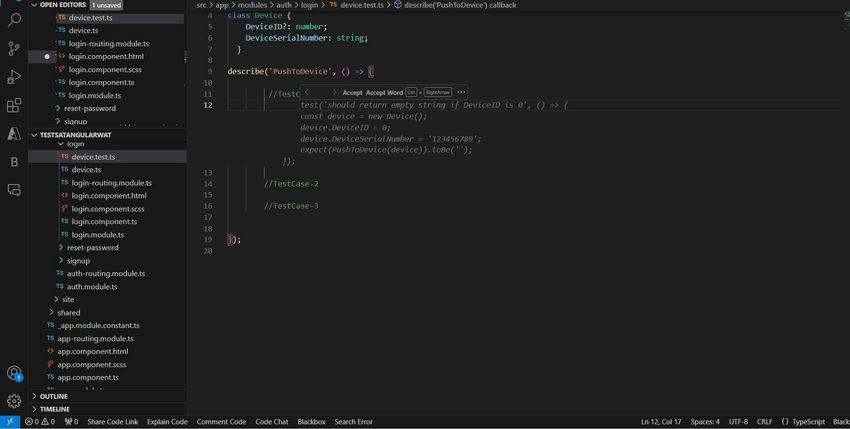
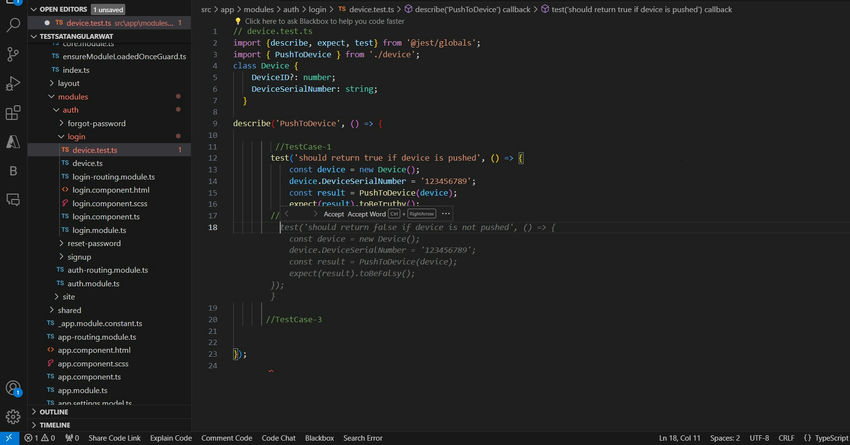
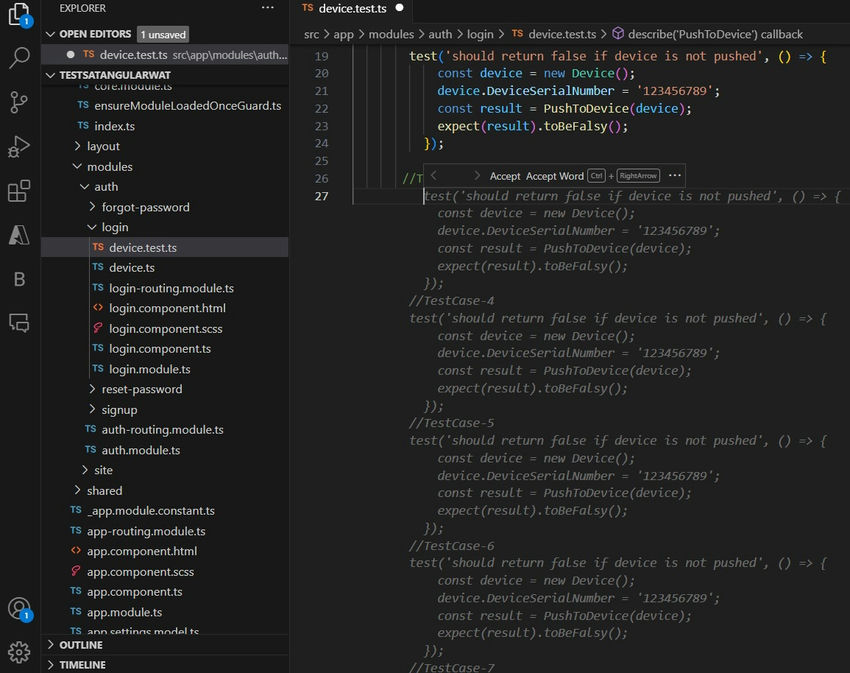
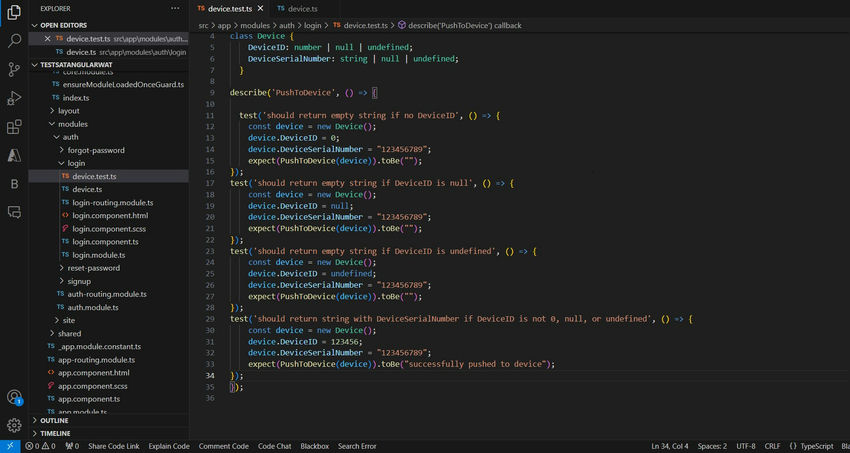
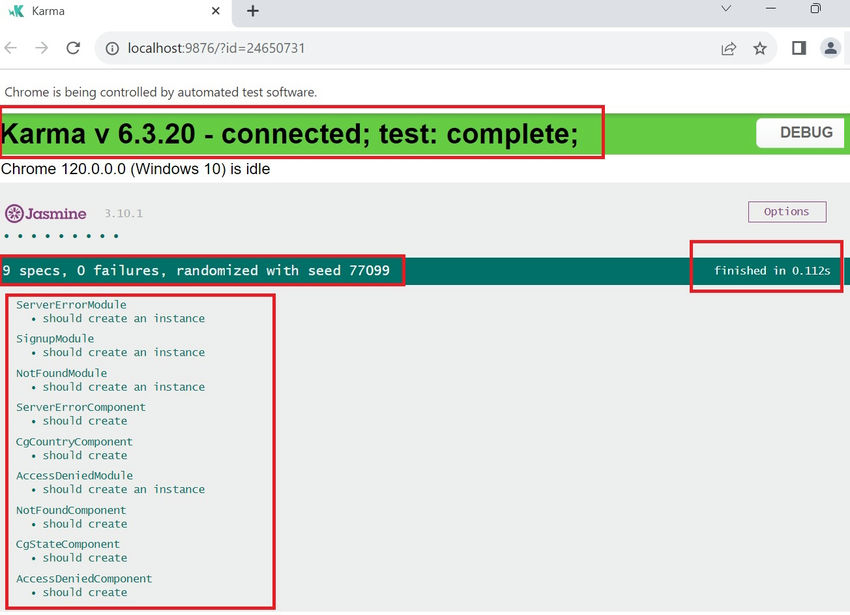
The copilot will now provide one to five test examples for these techniques. Please see the screenshot up above. The test cases will be executed by Angular. To run and execute the cases, simply type the command "npm run test" into the console. In accordance with the context you supply, it might help by offering several test case samples. This is how these test cases could be organized and run in an Angular project.
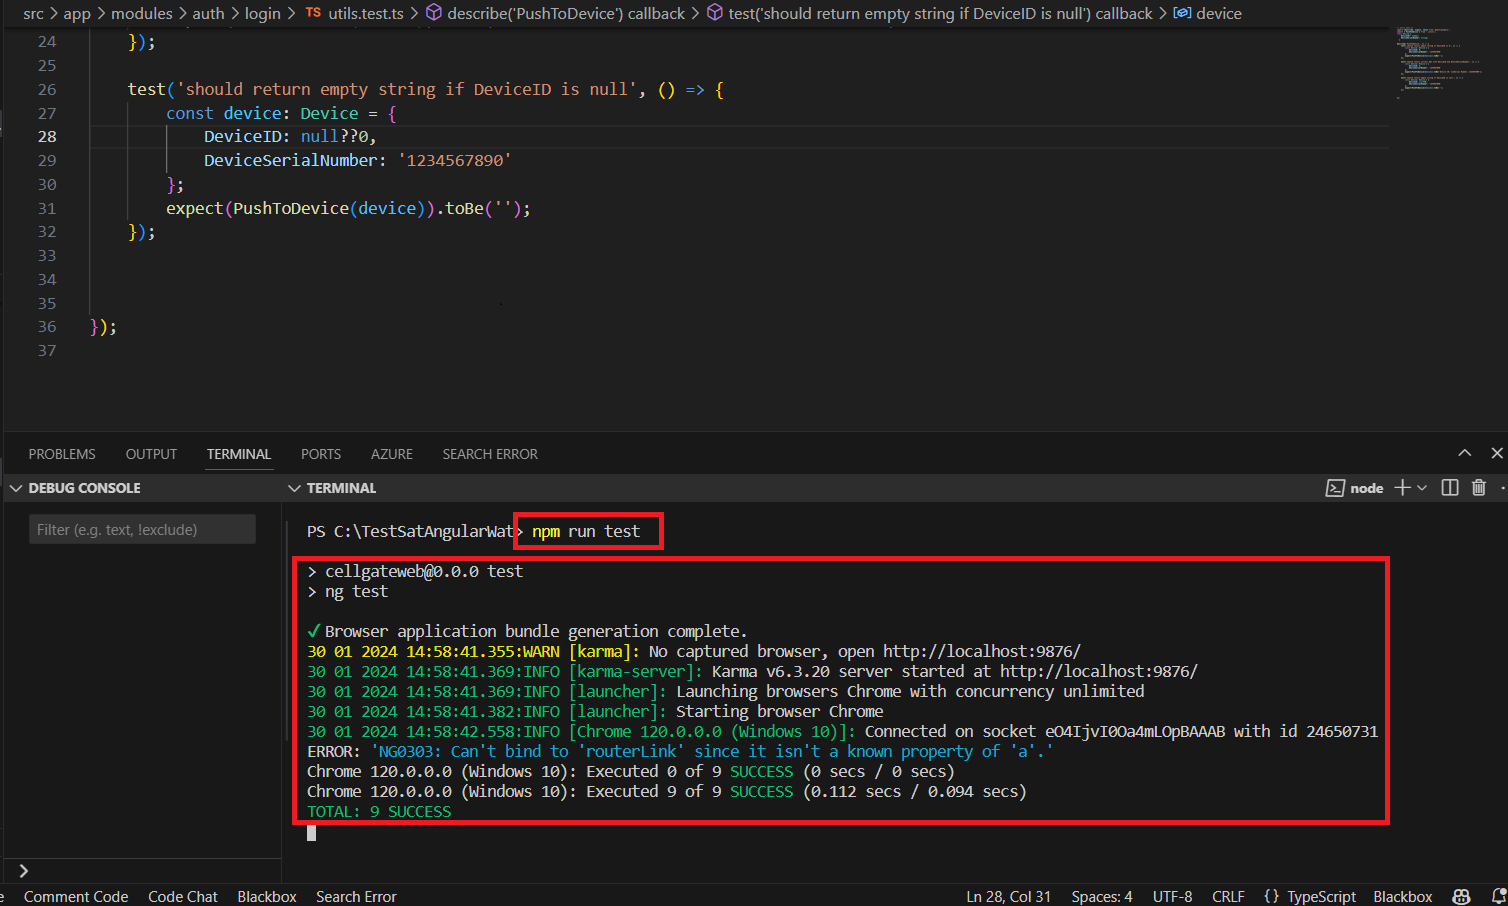
The application running time will display if there is a problem. In the event that not, cases ran in the Chrome window opened. Here's what usually occurs when you use Karma (which runs tests in actual browsers like Chrome) and Jasmine to execute tests in an Angular application: When you execute the npm run test in your terminal or command prompt, Karma will record and show this error.
July 8, 2024 10:08 by
PeterAngular's built-in Router module can be used to dynamically highlight the active menu item in an Angular application based on the current path. You can now apply a class to the active link as a result.
Here's how to accomplish it.
First, import the RouterModule
Ensure that your Angular module—typically app.module.ts—has the RouterModule set.
import { RouterModule } from '@angular/router';
@NgModule({
imports: [RouterModule.forRoot(routes)],
exports: [RouterModule]
})
export class AppRoutingModule { }
Step 2. Update your HTML
Use the routerLinkActive directive to dynamically apply a class to the active menu item. Here’s how you can update your navigation HTML.
<!DOCTYPE html>
<html lang="en">
<head>
<meta charset="UTF-8">
<meta name="viewport" content="width=device-width, initial-scale=1.0">
<title>Navbar Example</title>
<link rel="stylesheet" href="https://stackpath.bootstrapcdn.com/bootstrap/4.3.1/css/bootstrap.min.css">
<style>
.navbar-nav .nav-item a {
color: black;
text-decoration: none;
}
.navbar-nav .nav-item a:hover {
color: #0056b3; /* Optional: Change color on hover */
}
.navbar-nav .home-link i {
color: blue;
}
.active-link {
color: blue !important; /* Customize the active link color */
}
</style>
</head>
<body>
<section class="wrapper megamenu-wraper">
<div class="">
<nav class="container navbar navbar-expand-lg main-menu">
<div class="">
<button class="navbar-toggler" type="button" data-toggle="collapse" data-target="#navbarSupportedContent" aria-controls="navbarSupportedContent" aria-expanded="false" aria-label="Toggle navigation">
<span class="navbar-toggler-icon"></span>
</button>
<div class="collapse navbar-collapse" id="navbarSupportedContent">
<ul class="navbar-nav mr-auto">
<li class="nav-item">
<a routerLink="/private/po" routerLinkActive="active-link" class="home-link active">
<i class="fa fa-home"></i>
</a>
</li>
<li class="nav-item">
<a routerLink="dashboard" routerLinkActive="active-link">Dashboard</a>
</li>
<li class="nav-item">
<a routerLink="default" routerLinkActive="active-link">Student List</a>
</li>
<li class="nav-item">
<a routerLink="camps" routerLinkActive="active-link">Activities</a>
</li>
<li class="nav-item">
<a routerLink="camp-attendence" routerLinkActive="active-link">Attendance</a>
</li>
<li class="nav-item">
<a [routerLink]="['/private/po/actvity-camp', 0]" routerLinkActive="active-link">Create Activity</a>
</li>
</ul>
</div>
</div>
</nav>
</div>
</section>
<script src="https://code.jquery.com/jquery-3.3.1.slim.min.js"></script>
<script src="https://cdnjs.cloudflare.com/ajax/libs/popper.js/1.14.7/umd/popper.min.js"></script>
<script src="https://stackpath.bootstrapcdn.com/bootstrap/4.3.1/js/bootstrap.min.js"></script>
</body>
</html>
Explanation
routerLinkActive Directive: This directive applies the specified class (active-link in this case) to the link that matches the current route.
routerLink Directive: This binds the link to the router path.
CSS: The active-link class is styled to indicate the active state.
Step 3. Ensure router module configuration
Make sure your Angular router is correctly configured in your application module (usually app-routing.module.ts).
import { NgModule } from '@angular/core';
import { RouterModule, Routes } from '@angular/router';
import { DashboardComponent } from './dashboard/dashboard.component';
import { StudentListComponent } from './student-list/student-list.component';
import { ActivitiesComponent } from './activities/activities.component';
import { AttendanceComponent } from './attendance/attendance.component';
import { CreateActivityComponent } from './create-activity/create-activity.component';
const routes: Routes = [
{ path: 'dashboard', component: DashboardComponent },
{ path: 'default', component: StudentListComponent },
{ path: 'camps', component: ActivitiesComponent },
{ path: 'camp-attendence', component: AttendanceComponent },
{ path: 'private/po/actvity-camp/:id', component: CreateActivityComponent },
{ path: '**', redirectTo: 'dashboard', pathMatch: 'full' }
];
@NgModule({
imports: [RouterModule.forRoot(routes)],
exports: [RouterModule]
})
export class AppRoutingModule { }
This setup ensures that when you navigate through your app, the active link will be highlighted, providing a better user experience.
July 4, 2024 07:59 by
PeterThere are many of fascinating new features and enhancements in Angular 18. A notable improvement is the revamped Dependency Injection (DI) framework. Managing the dependencies of components and services is essential to creating scalable and maintainable applications using Angular's DI paradigm. To experience the new DI features in Angular 18, let's explore them in detail and work through an example.
What's New in the DI System of Angular 18?
- Enhanced Tree-Shakability: Angular 18 makes sure that the final bundle contains only the code that is required. Smaller, more effective applications result from this.
- Injection Contexts: With the introduction of new injection contexts, developers now have greater power and flexibility in defining and managing various dependency injection contexts.
- Provider Scopes: Enhancing resource management and efficiency, this new feature gives you more precise control over the lifecycle of dependencies.
- Simplified Provider Syntax: In Angular 18, a more understandable and maintainable syntax for declaring providers is introduced.
Using the New Dependency Injection Features in Angular 18 as an Example
Let's create a basic Angular 18 application to showcase these latest features in DI. We'll build a service, integrate it with a component, and investigate the recently added DI features.
First Step: Configuring the Angular 18 Project
First, use the Angular CLI to create a new Angular 18 project.
Step 1. Setting Up the Angular 18 Project
First, set up a new Angular 18 project using the Angular CLI
ng new angular18-di-demo
cd angular18-di-demo
Step 2. Creating a Service
We'll create a new service to provide some data to our component. Run the following command to generate the service:
ng generate service data
Open data.service.ts and implement the service like this:
import { Injectable } from '@angular/core';
@Injectable({
providedIn: 'root',
})
export class DataService {
private data = ['Angular 18', 'Dependency Injection', 'New Features'];
constructor() {}
getData(): string[] {
return this.data;
}
}
Here, the @Injectable decorator with providedIn: 'root' makes this service available throughout the application.
Step 3. Creating a Component
Next, we'll create a component to display the data provided by DataService. Run the following command.
ng generate component data-display
Open data-display.component.ts and inject DataService.
import { Component, OnInit } from '@angular/core';
import { DataService } from '../data.service';
@Component({
selector: 'app-data-display',
templateUrl: './data-display.component.html',
styleUrls: ['./data-display.component.css']
})
export class DataDisplayComponent implements OnInit {
data: string[] = [];
constructor(private dataService: DataService) {}
ngOnInit(): void {
this.data = this.dataService.getData();
}
}
In this component, we inject DataService in the constructor and use it to fetch data in the ngOnInit lifecycle hook.
Step 4. Displaying the Data
Open data-display.component.html and update the template to display the data:
<div>
<h2>Data from DataService</h2>
<ul>
<li *ngFor="let item of data">{{ item }}</li>
</ul>
</div>
Step 5. Using the Component
Include the DataDisplayComponent in your main application component. Open app.component.html and add the following.
<app-data-display></app-data-display>
Step 6. Running the Application
Run the application using the Angular CLI.
ng serve
Navigate to http://localhost:4200 in your browser. You should see the data displayed from DataService.
Summary
In this article, we've explored the new Dependency Injection features in Angular 18. By creating a simple service and component, we've seen how to use DI in Angular 18. The enhancements in the DI system, such as improved tree-shakability, injection contexts, provider scopes, and simplified syntax, make managing dependencies in Angular applications easier and more efficient. These features will help you maintain a clean and scalable codebase as you build more complex applications.