Full Trust European Hosting

BLOG about Full Trust Hosting and Its Technology - Dedicated to European Windows Hosting Customer

AngularJS Hosting Europe - HostForLIFE :: Using Entity Framework to Begin With HTTP Client Get Request in Angular 8

clock June 6, 2024 08:53 by author Peter

In this post, I'll explain how to use the HttpClient module in Angular 8 to consume RESfFul API and how to use the entity framework to get requests. Requests for GET, POST, PUT, PATCH, and DELETE are handled by the HttpClient module. HTTP can be used by an Angular application to communicate with backend services.


RxJs observable-based API is available with Angular HTTP. When an HTTP request is unsuccessful, Observable generates an error.

Note: I won't go over the CRUD process in this post. This article aims to clarify things for newcomers.

Step 1. Create tables in the database
Consider the simple example of employees in a hotel. We will show the name & email ID of the employee in a hotel on the view in the last step of this article.

I am going to create one database & will add the table with some values. Use the below script for more information. Note that you can create a database structure as per your requirements.

GO
SET ANSI_NULLS ON
GO
SET QUOTED_IDENTIFIER ON
GO
SET ANSI_PADDING ON
GO
CREATE TABLE [dbo].[Employee](
    [Id] [int] IDENTITY(1,1) NOT NULL,
      NULL,
      NULL,
      NULL,
    CONSTRAINT [PK_Employee] PRIMARY KEY CLUSTERED
    (
        [Id] ASC
    ) WITH (PAD_INDEX = OFF, STATISTICS_NORECOMPUTE = OFF, IGNORE_DUP_KEY = OFF, ALLOW_ROW_LOCKS = ON, ALLOW_PAGE_LOCKS = ON) ON [PRIMARY]
) ON [PRIMARY]
GO
SET ANSI_PADDING OFF
GO
SET IDENTITY_INSERT [dbo].[Employee] ON
INSERT [dbo].[Employee] ([Id], [Name], [Email], [Password]) VALUES (1, N'Rupesh', N'[email protected]', N'123')
INSERT [dbo].[Employee] ([Id], [Name], [Email], [Password]) VALUES (2, N'Ashish', N'[email protected]', N'123')
INSERT [dbo].[Employee] ([Id], [Name], [Email], [Password]) VALUES (3, N'Sam', N'[email protected]', N'123')
INSERT [dbo].[Employee] ([Id], [Name], [Email], [Password]) VALUES (4, N'Ajit', N'[email protected]', N'123')
SET IDENTITY_INSERT [dbo].[Employee] OFF

Step 2: Establish a Web Application
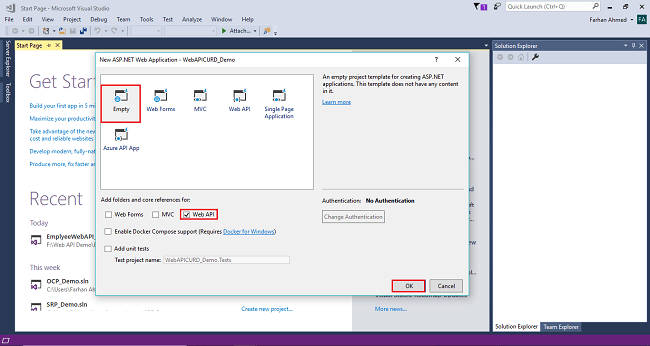
First, we'll use Visual Studio to construct a WebAPI application. Navigate to File => New => Project after opening Visual Studio. Open a new project, choose an empty ASP.NET + WebAPI project from the template, and give it a name.

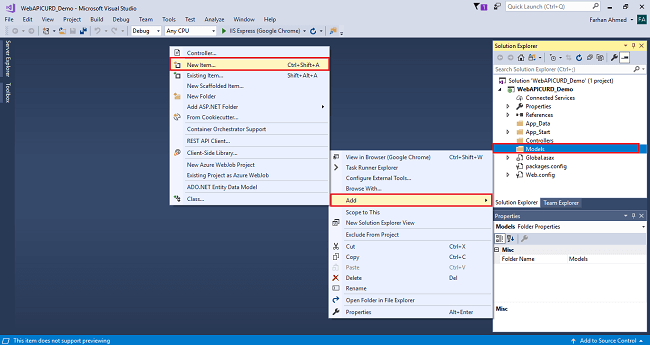
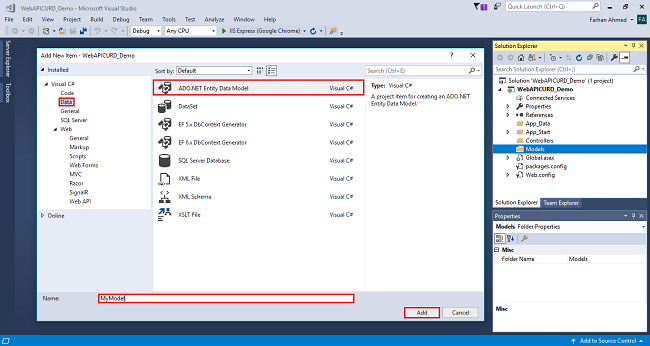
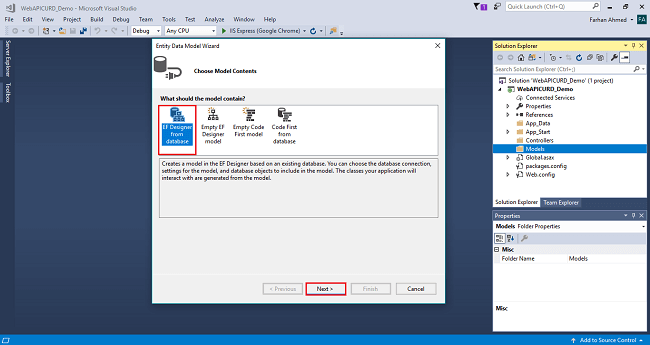
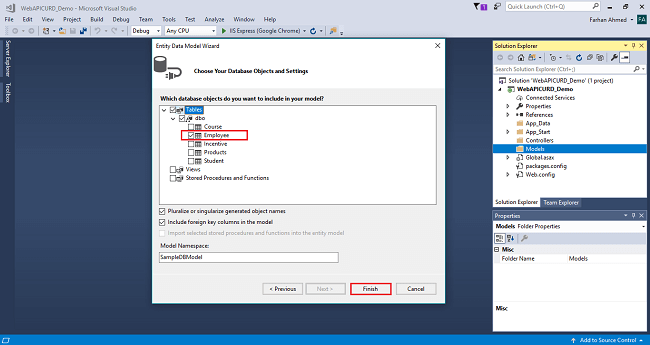
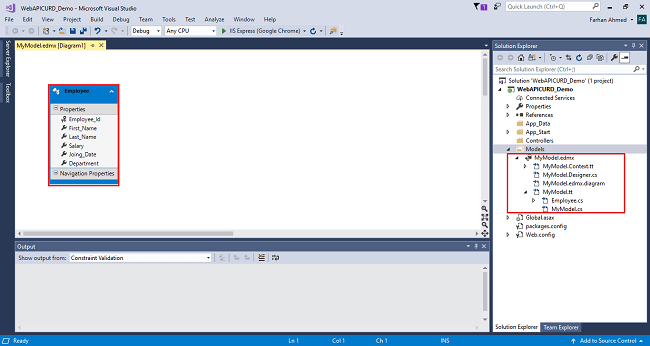
In our project, create the entity data model (.edmx) file by right-clicking on the solution, selecting Add, then New Item, and then choosing ADO.NET Entity Data Model from the Visual C# installed template in Data. Give it a name.

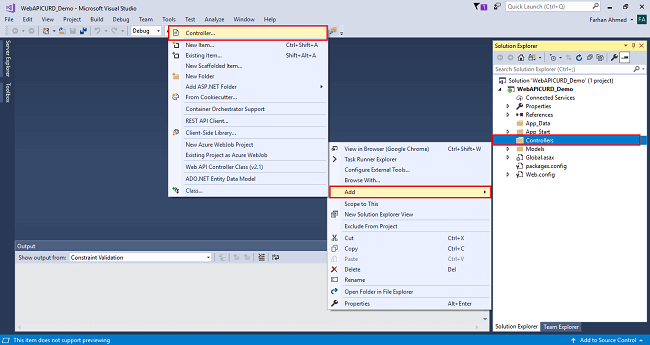
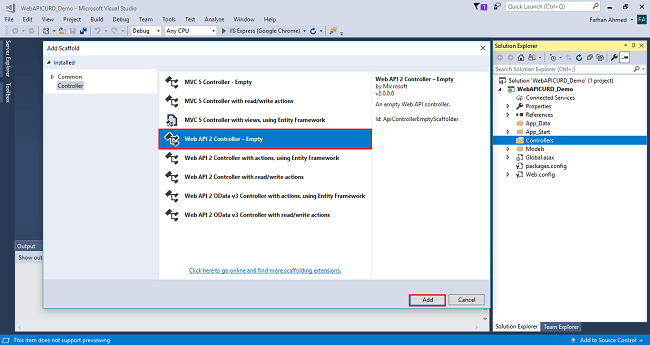
Create a web API controller by using the Entity framework. Use the Web API controller with REST actions to perform a CRUD operation from the entity framework context.

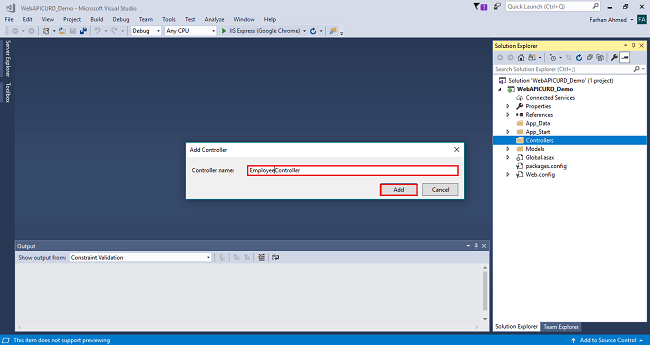
Give our controller a name. From the drop-down, choose the name of the context class.

We need to enable the CORS attribute on the above controller level as per the below syntax. CORS stands for Cross-Origin Resource Sharing. For more information refer to this article.
[EnableCors(origins: "*", headers: "*", methods: "*")]
public class EmployeesController : ApiController
{
    // Our CRUD operation code here
}

The whole controller code is as shown below.
[EnableCors(origins: "*", headers: "*", methods: "*")]
public class EmployeesController : ApiController
{
    private HotelEntities db = new HotelEntities();
    // GET: api/Employees
    public List<Employee> GetAllEmployees()
    {
        return db.Employees.ToList();
    }
    // GET: api/Employees/5
    [ResponseType(typeof(Employee))]
    public IHttpActionResult GetEmployee(int id)
    {
        Employee employee = db.Employees.Find(id);
        if (employee == null)
        {
            return NotFound();
        }
        return Ok(employee);
    }
    // PUT: api/Employees/5
    [ResponseType(typeof(void))]
    public IHttpActionResult PutEmployee(int id, Employee employee)
    {
        if (!ModelState.IsValid)
        {
            return BadRequest(ModelState);
        }
        if (id != employee.Id)
        {
            return BadRequest();
        }
        db.Entry(employee).State = EntityState.Modified;
        try
        {
            db.SaveChanges();
        }
        catch (DbUpdateConcurrencyException)
        {
            if (!EmployeeExists(id))
            {
                return NotFound();
            }
            else
            {
                throw;
            }
        }
        return StatusCode(HttpStatusCode.NoContent);
    }
    // POST: api/Employees
    [ResponseType(typeof(Employee))]
    public IHttpActionResult PostEmployee(Employee employee)
    {
        if (!ModelState.IsValid)
        {
            return BadRequest(ModelState);
        }
        db.Employees.Add(employee);
        db.SaveChanges();
        return CreatedAtRoute("DefaultApi", new { id = employee.Id }, employee);
    }
    // DELETE: api/Employees/5
    [ResponseType(typeof(Employee))]
    public IHttpActionResult DeleteEmployee(int id)
    {
        Employee employee = db.Employees.Find(id);
        if (employee == null)
        {
            return NotFound();
        }
        db.Employees.Remove(employee);
        db.SaveChanges();

        return Ok(employee);
    }
    protected override void Dispose(bool disposing)
    {
        if (disposing)
        {
            db.Dispose();
        }
        base.Dispose(disposing);
    }
    private bool EmployeeExists(int id)
    {
        return db.Employees.Count(e => e.Id == id) > 0;
    }
}

Step 3. To create an Angular Project

Create a new service in our Angular application using syntax & create a company service.
ng g service our_service_name

Now we will write code to get the data from our API in the service i.e. company.service.ts file contains the below code.
Note. Do not use a direct URL link in the typescript file anyone can easily hack it. For demo purposes, I have used it.

The below code contains the file company.service.ts.
import { Injectable } from '@angular/core';
import { HttpClient } from '@angular/common/http';
import { Company } from '../Model/company';

@Injectable({
  providedIn: 'root'
})
export class CompanyService {

  constructor(private http: HttpClient) { }

  getData() {
    return this.http.get("http://localhost:8012/api/Employees");
  }
}

In the above code, CompanyService is a class that contains our getData method that returns a result from API from where we are getting a record using a GET request, API/Employees (which is written in the API project). We can also host our API project & add that URL as well.

Step 4. Create a new component in our angular project
Now create a new component in our angular project using syntax & create the my-company component.
ng g c componentName


The below code contains the file my-company.component.html.
<p>Angular 8 using Web API !!!</p>

<div>
  <table class="gridList">
    <tr>
      <th>User Names</th>
      <th>Email</th>
    </tr>
    <tr *ngFor="let item of companyList">
      <td>{{ item.Name }}</td>
      <td>{{ item.Email }}</td>
    </tr>
  </table>
</div>


In the above code, we have used ngFor to iterate the loop. companyList is a variable in which we will get the data from our services refer to the below steps.

The below code contains the file my-company.component .ts
import { BrowserModule, Title } from '@angular/platform-browser';
import { Component, OnInit, ViewChild } from '@angular/core';
import { CompanyService } from '../../service/company.service';
@Component({
  selector: 'app-my-company',
  templateUrl: './my-company.component.html',
  styleUrls: ['./my-company.component.css']
})
export class MyCompanyComponent implements OnInit {
  companyList: any;
  constructor(private companyService: CompanyService) { }
  ngOnInit() {
    this.getData();
  }
  getData() {
    this.companyService.getData().subscribe(
      data => {
        this.companyList = data;
      }
    );
  }
}


In the above code, we have imported the company service. In the OnInit method, we will declare one variable company list & will assign the data that is returned by our method getData() from service.

Here, subscribe is used to send the list.

Step 5. Loading the company component in app.component.html

Now, to load our company component, we will add a selector in the app.component.html file.
<app-my-company></app-my-company>


Step 6. To run the Angular application

To run the Angular application, use the below syntax.
ng serve -o


Node.js Hosting - HostForLIFE :: How Can I Use MySQL To Create JWT Token Authentication In Node.js?

clock June 5, 2024 08:12 by author Peter

The JSON Web Token (JWT) authentication method is a popular security measure for Node.js applications. A token is created upon login and is used for subsequent request authentication. This tutorial shows you how to implement JWT authentication in a Node.js application using MySQL and Express. You'll learn how to set up the database, create authentication routes, and oversee token generation and validation. By securing your API endpoints and restricting access to protected resources to only authorized users, you may increase the security and scalability of your service.

Steps for Creating a project
Step 1. Initialize a new Node.js project ;(CMD Command)

mkdir Node_JWT_Project
cd Node_JWT_Project
npm init -y

Step 2. Install the required packages ;(CMD Command)
npm install express mysql2 jsonwebtoken bcryptjs body-parser

Step 3. Create the project structure

Step 4. Database Configuration (config/db.js)
const mysql = require('mysql2');
const connection = mysql.createConnection({
    host: 'localhost',
    user: 'root',
    password: 'password',
    database: 'my_database'
});
connection.connect((err) => {
    if (err) {
        console.error('Error connecting to the database:', err.stack);
        return;
    }
    console.log('Connected to the database.');
});
module.exports = connection;


Step 5. Create a Model folder (models/userModel.js)
const db = require('../config/db');
const User = {};
User.create = (user, callback) => {
    const query = 'INSERT INTO users (username, email, password) VALUES (?, ?, ?)';
    db.query(query, [user.username, user.email, user.password], callback);
};
User.findById = (id, callback) => {
    const query = 'SELECT * FROM users WHERE id = ?';
    db.query(query, [id], callback);
};
User.findByEmail = (email, callback) => {
    const query = 'SELECT * FROM users WHERE email = ?';
    db.query(query, [email], callback);
};
User.update = (id, user, callback) => {
    const query = 'UPDATE users SET username = ?, email = ? WHERE id = ?';
    db.query(query, [user.username, user.email, id], callback);
};
User.delete = (id, callback) => {
    const query = 'DELETE FROM users WHERE id = ?';
    db.query(query, [id], callback);
};
module.exports = User;

Step 6. Controller (controllers/userController.js)
const User = require('../models/userModel');
const bcrypt = require('bcryptjs');
const jwt = require('jsonwebtoken');
const userController = {};
userController.register = async (req, res) => {
    const { username, email, password } = req.body;
    const hashedPassword = await bcrypt.hash(password, 10);
    User.create({ username, email, password: hashedPassword }, (err, result) => {
        if (err) {
            return res.status(500).json({ error: err.message });
        }
        res.status(201).json({ message: 'User registered successfully!' });
    });
};
userController.login = (req, res) => {
    const { email, password } = req.body;
    User.findByEmail(email, async (err, results) => {
        if (err || results.length === 0) {
            return res.status(400).json({ error: 'Invalid email or password' });
        }
        const user = results[0];
        const isMatch = await bcrypt.compare(password, user.password);
        if (!isMatch) {
            return res.status(400).json({ error: 'Invalid email or password' });
        }
        const token = jwt.sign({ id: user.id }, 'your_jwt_secret', { expiresIn: '1h' });
        res.json({ token });
    });
};
userController.getUser = (req, res) => {
    const userId = req.user.id;
    User.findById(userId, (err, results) => {
        if (err) {
            return res.status(500).json({ error: err.message });
        }
        if (results.length === 0) {
            return res.status(404).json({ message: 'User not found' });
        }
        res.json(results[0]);
    });
};
userController.updateUser = (req, res) => {
    const userId = req.user.id;
    const { username, email } = req.body;
    User.update(userId, { username, email }, (err, results) => {
        if (err) {
            return res.status(500).json({ error: err.message });
        }
        res.json({ message: 'User updated successfully!' });
    });
};
userController.deleteUser = (req, res) => {
    const userId = req.user.id;
    User.delete(userId, (err, results) => {
        if (err) {
            return res.status(500).json({ error: err.message });
        }
        res.json({ message: 'User deleted successfully!' });
    });
};
module.exports = userController;


Step 7. Routes (routes/userRoutes.js)
const express = require('express');
const router = express.Router();
const userController = require('../controllers/userController');
const authMiddleware = require('../middlewares/authMiddleware');
router.post('/register', userController.register);
router.post('/login', userController.login);
router.get('/profile', authMiddleware, userController.getUser);
router.put('/profile', authMiddleware, userController.updateUser);
router.delete('/profile', authMiddleware, userController.deleteUser);
module.exports = router;

Step 8. Middleware (middlewares/authMiddleware.js)
const jwt = require('jsonwebtoken');
const authMiddleware = (req, res, next) => {
    const token = req.header('Authorization').replace('Bearer ', '');
    if (!token) {
        return res.status(401).json({ message: 'Access denied. No token provided.' });
    }
    try {
        const decoded = jwt.verify(token, 'your_jwt_secret');
        req.user = decoded;
        next();
    } catch (error) {
        res.status(400).json({ message: 'Invalid token.' });
    }
};
module.exports = authMiddleware;


Step 9. Main Application (app.js)
const express = require('express');
const bodyParser = require('body-parser');
const userRoutes = require('./routes/userRoutes');
const app = express();
app.use(bodyParser.json());
app.use('/api/users', userRoutes);
const PORT = process.env.PORT || 3000;
app.listen(PORT, () => {
    console.log(`Server is running on port ${PORT}`);
});


Step 10. Create a Database and Table
CREATE DATABASE my_database;
USE my_database;
CREATE TABLE users (
    id INT AUTO_INCREMENT PRIMARY KEY,
    username VARCHAR(255) NOT NULL,
    email VARCHAR(255) NOT NULL,
    password VARCHAR(255) NOT NULL
);


Step 11. Running the project (CMD Command)
node app.js

Step 12. Check-in Postman

Similarly, we can use Endpoint Update, Insert, and Delete.

Conclusion

Only authenticated users can access protected resources, which improves security and scalability when JWT authentication is implemented in a Node.js application using MySQL. You may create a strong authentication system by following the procedures listed, which include setting up the database, making authentication routes, and creating and validating tokens. This method offers a scalable solution for user management in your application in addition to securing your API endpoints. You can make your application more dependable and user-friendly by maintaining a seamless and secure user experience with JWT authentication.

HostForLIFE.eu Node.js Hosting
HostForLIFE.eu is European Windows Hosting Provider which focuses on Windows Platform only. We deliver on-demand hosting solutions including Shared hosting, Reseller Hosting, Cloud Hosting, Dedicated Servers, and IT as a Service for companies of all sizes. We have customers from around the globe, spread across every continent. We serve the hosting needs of the business and professional, government and nonprofit, entertainment and personal use market segments.


AngularJS Hosting Europe - HostForLIFE :: Opening Angular: Enhanced Functionalities, Safety, and ERP Integration

clock May 14, 2024 07:56 by author Peter

Enterprise resource planning (ERP) technologies are essential for optimizing business operations in the quickly changing digital landscape of today. Robust ERP solutions are becoming more and more necessary as businesses expand. With its cutting-edge functionality, improved security features, and speed gains, Angular is a formidable framework for creating cutting-edge ERP apps. This article will explore how Angular may boost ERP projects, emphasizing how it integrates with.NET Core online apps effortlessly and offers enhanced features, security advancements, and speed gains.

Advanced Functionalities
The extensive feature set of Angular enables developers to design complex ERP solutions that are suited to certain business requirements. Let's look at an actual instance of Angular integration in an inventory management ERP project.

// Angular component for inventory management
import { Component, OnInit } from '@angular/core';
import { InventoryService } from './inventory.service';
import { InventoryItem } from './inventory-item.model';

@Component({
  selector: 'app-inventory',
  templateUrl: './inventory.component.html',
  styleUrls: ['./inventory.component.css']
})
export class InventoryComponent implements OnInit {
  inventoryItems: InventoryItem[];

  constructor(private inventoryService: InventoryService) { }

  ngOnInit(): void {
    this.loadInventory();
  }

  loadInventory(): void {
    this.inventoryService.getInventoryItems()
      .subscribe(items => this.inventoryItems = items);
  }
}

Security Enhancements
Security is paramount in ERP systems handling sensitive business data. Angular provides robust security features such as built-in cross-site scripting (XSS) protection, strict contextual auto-escaping for templates, and a powerful HTTP client module for secure communication with backend services. Let's integrate authentication and authorization using Angular's router guards in our ERP project.

// Angular router guard for authentication
import { Injectable } from '@angular/core';
import { CanActivate, ActivatedRouteSnapshot, RouterStateSnapshot, Router } from '@angular/router';
import { AuthService } from './auth.service';

@Injectable({
  providedIn: 'root'
})
export class AuthGuard implements CanActivate {
  constructor(private authService: AuthService, private router: Router) { }

  canActivate(next: ActivatedRouteSnapshot, state: RouterStateSnapshot): boolean {
    if (this.authService.isAuthenticated()) {
      return true;
    } else {
      this.router.navigate(['/login']);
      return false;
    }
  }
}

Performance Improvements
Angular's latest versions come with performance optimizations such as Ahead-of-Time (AOT) compilation, lazy loading modules, and tree-shaking for efficient bundle sizes. These optimizations ensure smooth user experiences, especially in large-scale ERP applications. Let's leverage Angular's performance improvements by lazy loading modules in our ERP project.

// Angular lazy loading module for improved performance
import { NgModule } from '@angular/core';
import { Routes, RouterModule } from '@angular/router';

const routes: Routes = [
  {
    path: 'dashboard',
    loadChildren: () => import('./dashboard/dashboard.module').then(m => m.DashboardModule)
  },
  {
    path: 'inventory',
    loadChildren: () => import('./inventory/inventory.module').then(m => m.InventoryModule)
  },
  // Other lazy-loaded modules
];

@NgModule({
  imports: [RouterModule.forRoot(routes)],
  exports: [RouterModule]
})
export class AppRoutingModule { }

Integration with .NET Core Web Application
Integrating Angular with a .NET Core web application is seamless, thanks to Angular's flexible architecture and .NET Core's robust backend capabilities. You can use ASP.NET Core Web API to provide data services to your Angular frontend. Here's a basic example of how you can set up a .NET Core Web API to serve data to our Angular ERP application.

// .NET Core Web API controller for inventory management
using Microsoft.AspNetCore.Mvc;
using System.Collections.Generic;
using System.Linq;

namespace ERP.Controllers
{
    [Route("api/[controller]")]
    [ApiController]
    public class InventoryController : ControllerBase
    {
        private readonly InventoryContext _context;

        public InventoryController(InventoryContext context)
        {
            _context = context;
        }

        [HttpGet]
        public ActionResult<IEnumerable<InventoryItem>> Get()
        {
            return _context.InventoryItems.ToList();
        }

        // Other CRUD operations
    }
}

Conclusion

Because of its sophisticated ERP application development features, security upgrades, and speed advantages, Angular is a great option. Through the integration of Angular with.NET Core web apps, developers can fully utilize the capabilities of both platforms to provide safe and efficient ERP systems that are customized to fit the specific requirements of contemporary enterprises.


Node.js Hosting - HostForLIFE :: Combining Python and Node.js to Shorten URLs with PyShorteners

clock May 2, 2024 08:45 by author Peter

This blog post will explain how to use the pyshorteners module to integrate Node.js and Python to build a basic URL shortening application. We can take advantage of Node.js's robust features for controlling the entire application and Python's URL-shortening functionality by leveraging the strengths of both languages.

Node.js Script (nodeScript.js)
Let's begin by examining nodeScript.js, a Node.js script. This script is in charge of starting a Python process and sending a command-line argument with a URL to be abbreviated.

const { spawn } = require('child_process');
let urlToShorten = 'dynamitetechnology.in';
const pyProg = spawn('python', ['shortUrl.py', urlToShorten]);

pyProg.stdout.on('data', (data) => {
  console.log('Python script output:', data.toString());
});

pyProg.stderr.on('data', (data) => {
  console.error('Error from Python script:', data.toString());
});

pyProg.on('close', (code) => {
  console.log(`Python script exited with code ${code}`);
});


Explanation
The spawn function from the child_process module is used to execute the Python script (shortUrl.py).
The URL to be shortened ('dynamitetechnology.in' in this case) is passed as a command-line argument when spawning the Python process.
Event listeners are set up to capture the standard output and standard error streams from the Python process.

Python Script (shortUrl.py)
Now, let’s take a look at the Python script, shortUrl.py. This script utilizes the pyshorteners library to perform URL shortening.
import sys
import pyshorteners

# Check if a URL is provided as a command-line argument
if len(sys.argv) != 2:
    print("Usage: python shortUrl.py <url>")
    sys.exit(1)

url_to_shorten = sys.argv[1]

s = pyshorteners.Shortener()
print(s.tinyurl.short(url_to_shorten))


Explanation

The Python script checks whether a URL is provided as a command-line argument. If not, it prints a usage message and exits.
The provided URL is then passed to the pyshorteners library, and the shortened URL is printed to the console using the TinyURL service.

Conclusion
Python and Node.js were used to develop a straightforward but powerful URL-shortening tool. Python performs the URL shortening functionality, and Node.js provides the orchestration and communication with the Python script. This integration demonstrates the adaptability and compatibility of many programming languages, enabling programmers to take advantage of each language's advantages for particular tasks inside a single application.


Europe mySQL Hosting - HostForLIFEASP.NET :: MySQL Queries Cheat Sheet

clock April 19, 2024 08:28 by author Peter

One of the most widely used and adaptable database management system platforms is MySQL. Regardless of your position in the database industry or amount of development experience, it is imperative that you are familiar with MySQL and its querying features. The fundamentals of MySQL querying will be covered in this tutorial, along with easy to use techniques for connecting to your databases.

A few simple SQL queries
CHOOSE Information from one or more columns of a table can be obtained using this technique. You enter the desired columns, separated by commas, after the SELECT keyword.

SELECT column1, column2 FROM tablename;
SELECT * FROM tablename;


WHERE Records can be filtered using this clause depending on specific requirements. You can only obtain the rows that match the given criteria.
SELECT *FROM tablename
WHERE columnname = value;


INSERT To add new records (rows) to a table, use this statement. The values you wish to add to each column and the name of the table are also specified.

INSERT INTO tablename (column1, column2)
VALUES (value1, value2);


UPDATE A table's existing records can be changed using this statement. The table name, the columns you wish to change, and the new values are all specified.
UPDATE tablename
SET column1 = newvalue
WHERE condition;


DELETE  Depending on specific requirements, this statement is used to remove records from a table. You can use it to remove particular rows that fit the requirements.
DELETE FROM tablename
WHERE condition;


JOIN This joins rows from one or more tables together according to a shared column. With just one query, you can obtain data from several tables.
SELECT *
FROM table1
JOIN table2 ON table1.columnname = table2.columnname;


GROUP BY Rows with the same values are grouped together into summary rows using this clause. It is frequently used to calculate values on grouped data together with aggregate functions such as COUNT, SUM, AVG, etc.
SELECT columnname, COUNT(*)
FROM tablename
GROUP BY columnname;

ORDER BY Depending on one or more columns, this clause can be used to sort the result set either ascending (ASC) or descending (DESC).
SELECT *
FROM tablename
ORDER BY columnname ASC;


LIMIT This has the function of limiting how many rows are returned in a result set. It is frequently used to increase query efficiency by obtaining only a subset of rows, or for pagination.
SELECT *
FROM tablename
LIMIT 10;


DISTINCT This term pulls distinct rows out of a column. Duplicate rows are removed from the result set.
SELECT DISTINCT columnname
FROM tablename;


Data Manipulation Functions

COUNT This function counts the number of rows that satisfy a certain criteria or the total number of rows in a table.
SELECT COUNT(*)
FROM tablename;


MAX/MIN The maximum and minimum values from a column can be obtained, respectively, using these functions.
SELECT MAX(columnname), MIN(columnname)
FROM tablename;


AVG The average value of a numeric column can be determined with this function.
SELECT AVG(columnname)
FROM tablename;


SUM The total of the values in a numeric column can be determined using this function.
SELECT SUM(columnname)
FROM tablename;

Constraints
PRIMARY KEY The primary key constraint is responsible for uniquely identifying every record within a table. It guarantees that every table row has a distinct identity.
CREATE TABLE tablename (
    columnname INT PRIMARY KEY,
    ...
);


FOREIGN KEY  By referencing the primary key or unique key of another table, this constraint creates a relationship between tables.
CREATE TABLE tablename1 (
    columnname INT,
    FOREIGN KEY (columnname) REFERENCES table_name2(columnname)
);

INDEX  By based an index on one or more columns, this technique helps to speed up data retrieval operations on a table. Based on the indexed columns, it enables the database engine to find rows rapidly.
CREATE INDEX indexname
ON tablename (columnname);

Conclusion
The SQL cheat sheet offers a quick reference for effectively carrying out crucial database practices. It includes a wide range of operations, from simple commands like SELECT, INSERT, UPDATE, and DELETE for data retrieval, addition, and modification to more complex techniques like JOIN for merging data from various tables and GROUP BY for data summary. The cheat sheet also contains constraints like PRIMARY KEY, FOREIGN KEY, and INDEX, as well as data manipulation methods like COUNT, MAX, MIN, AVG, and SUM, which are essential for maintaining the accuracy of data and maximising database performance.


AngularJS Hosting Europe - HostForLIFE :: How to Getting Started With Angular 18 And Create A Small Application?

clock April 1, 2024 07:27 by author Peter

Angular team will release the latest version of Angular on May 20, 2024.

Now, we can create a new Angular 18 application.
ng new Angular18Galaxy

Compared to the older version project creation is very fast in Angular 18.

As you can see, Angular 18 has relatively small bundle sizes. The performance of the application will be enhanced.

Currently I am getting one issue while running the application.

Vite Error, /@fs/D:/Work/Community/C# Corner/C# Corner Article 134 Getting started with Angular 18 and create
a basic application/Angular18Galaxy/.angular/cache/18.0.0-next.1/vite/deps/@angular_platform-browser.js?v=0a089e0f optimized info should be defined
Vite Error, /@fs/D:/Work/Community/C# Corner/C# Corner Article 134 Getting started with Angular 18 and create
a basic application/Angular18Galaxy/.angular/cache/18.0.0-next.1/vite/deps/@angular_router.js?v=0a089e0f optimized info should be defined
Vite Error, /@fs/D:/Work/Community/C# Corner/C# Corner Article 134 Getting started with Angular 18 and create
a basic application/Angular18Galaxy/.angular/cache/18.0.0-next.1/vite/deps/@angular_platform-browser.js?v=0a089e0f optimized info should be defined
Vite Error, /@fs/D:/Work/Community/C# Corner/C# Corner Article 134 Getting started with Angular 18 and create
a basic application/Angular18Galaxy/.angular/cache/18.0.0-next.1/vite/deps/@angular_core.js?v=0a089e0f optimized info should be defined
Vite Error, /@fs/D:/Work/Community/C# Corner/C# Corner Article 134 Getting started with Angular 18 and create
a basic application/Angular18Galaxy/.angular/cache/18.0.0-next.1/vite/deps/@angular_router.js?v=0a089e0f optimized info should be defined
Vite Error, /@fs/D:/Work/Community/C# Corner/C# Corner Article 134 Getting started with Angular 18 and create
a basic application/Angular18Galaxy/.angular/cache/18.0.0-next.1/vite/deps/@angular_core.js?v=0a089e0f optimized info should be defined
3:35:24 pm [vite] Pre-transform error: The file does not exist at "D:/Work/Community/C# Corner/C# Corner Article 134 Getting started with Angular 18 and create a basic application/Angular18Galaxy/.angular/cache/18.0.0-next.1/vite/deps/@angular_platform-browser.js?v=0a089e0f" which is in the optimize deps directory. The dependency might be incompatible with the dep optimizer. Try adding it to `optimizeDeps.exclude`.
3:35:24 pm [vite] Pre-transform error: The file does not exist at "D:/Work/Community/C# Corner/C# Corner Article 134 Getting started with Angular 18 and create a basic application/Angular18Galaxy/.angular/cache/18.0.0-next.1/vite/deps/@angular_platform-browser.js?v=0a089e0f" which is in the optimize deps directory. The dependency might be incompatible with the dep optimizer. Try adding it to `optimizeDeps.exclude`. (x2)
3:35:24 pm [vite] Pre-transform error: The file does not exist at "D:/Work/Community/C# Corner/C# Corner Article 134 Getting started with Angular 18 and create a basic application/Angular18Galaxy/.angular/cache/18.0.0-next.1/vite/deps/@angular_router.js?v=0a089e0f" which is in the optimize deps directory. The dependency might be incompatible with the dep optimizer. Try adding it to `optimizeDeps.exclude`.
3:35:24 pm [vite] Pre-transform error: The file does not exist at "D:/Work/Community/C# Corner/C# Corner Article 134 Getting started with Angular 18 and create a basic application/Angular18Galaxy/.angular/cache/18.0.0-next.1/vite/deps/@angular_router.js?v=0a089e0f" which is in the optimize deps directory. The dependency might be incompatible with the dep optimizer. Try adding it to `optimizeDeps.exclude`. (x2)
3:35:24 pm [vite] Pre-transform error: The file does not exist at "D:/Work/Community/C# Corner/C# Corner Article 134 Getting started with Angular 18 and create a basic application/Angular18Galaxy/.angular/cache/18.0.0-next.1/vite/deps/@angular_core.js?v=0a089e0f" which is in the optimize deps directory. The dependency might be incompatible with the dep optimizer. Try adding it to `optimizeDeps.exclude`.
3:35:24 pm [vite] Pre-transform error: The file does not exist at "D:/Work/Community/C# Corner/C# Corner Article 134 Getting started with Angular 18 and create a basic application/Angular18Galaxy/.angular/cache/18.0.0-next.1/vite/deps/@angular_core.js?v=0a089e0f" which is in the optimize deps directory. The dependency might be incompatible with the dep optimizer. Try adding it to `optimizeDeps.exclude`. (x2)
3:35:25 pm [vite] Pre-transform error: Failed to load url D:/Work/Community/C# Corner/C# Corner Article 134 Getting started with Angular 18 and create a basic application/Angular18Galaxy/node_modules/vite/dist/client/env.mjs (resolved id: D:/Work/Community/C# Corner/C# Corner Article 134 Getting started with Angular 18 and create a basic application/Angular18Galaxy/node_modules/vite/dist/client/env.mjs) in D:/Work/Community/C. Does the
file exist?
ERROR RuntimeError: NG04002: Cannot match any routes. URL Segment: '@fs/D:/Work/Community/C'
    at Recognizer.noMatchError (eval at instantiateModule (file:///D:/Work/Community/C%23%20Corner/C%23%20Corner%20Article%20134%20Getting%20started%20with%20Angular%2018%20and%20create%20a%20basic%20application/Angular18Galaxy/node_modules/vite/dist/node/chunks/dep-BBHrJRja.js:55003:28), <anonymous>:2702:12)
    at eval (eval at instantiateModule (file:///D:/Work/Community/C%23%20Corner/C%23%20Corner%20Article%20134%20Getting%20started%20with%20Angular%2018%20and%20create%20a%20basic%20application/Angular18Galaxy/node_modules/vite/dist/node/chunks/dep-BBHrJRja.js:55003:28), <anonymous>:2734:20)
    at eval (eval at instantiateModule (file:///D:/Work/Community/C%23%20Corner/C%23%20Corner%20Article%20134%20Getting%20started%20with%20Angular%2018%20and%20create%20a%20basic%20application/Angular18Galaxy/node_modules/vite/dist/node/chunks/dep-BBHrJRja.js:55003:28), <anonymous>:1729:33)
    at OperatorSubscriber._error (eval at instantiateModule (file:///D:/Work/Community/C%23%20Corner/C%23%20Corner%20Article%20134%20Getting%20started%20with%20Angular%2018%20and%20create%20a%20basic%20application/Angular18Galaxy/node_modules/vite/dist/node/chunks/dep-BBHrJRja.js:55003:28), <anonymous>:822:9)
    at OperatorSubscriber.error (eval at instantiateModule (file:///D:/Work/Community/C%23%20Corner/C%23%20Corner%20Article%20134%20Getting%20started%20with%20Angular%2018%20and%20create%20a%20basic%20application/Angular18Galaxy/node_modules/vite/dist/node/chunks/dep-BBHrJRja.js:55003:28), <anonymous>:558:12)
    at OperatorSubscriber._error (eval at instantiateModule (file:///D:/Work/Community/C%23%20Corner/C%23%20Corner%20Article%20134%20Getting%20started%20with%20Angular%2018%20and%20create%20a%20basic%20application/Angular18Galaxy/node_modules/vite/dist/node/chunks/dep-BBHrJRja.js:55003:28), <anonymous>:581:24)
    at OperatorSubscriber.error (eval at instantiateModule (file:///D:/Work/Community/C%23%20Corner/C%23%20Corner%20Article%20134%20Getting%20started%20with%20Angular%2018%20and%20create%20a%20basic%20application/Angular18Galaxy/node_modules/vite/dist/node/chunks/dep-BBHrJRja.js:55003:28), <anonymous>:558:12)
    at OperatorSubscriber._error (eval at instantiateModule (file:///D:/Work/Community/C%23%20Corner/C%23%20Corner%20Article%20134%20Getting%20started%20with%20Angular%2018%20and%20create%20a%20basic%20application/Angular18Galaxy/node_modules/vite/dist/node/chunks/dep-BBHrJRja.js:55003:28), <anonymous>:581:24) {
  code: 4002
}
ERROR RuntimeError: NG04002: Cannot match any routes. URL Segment: '@id/D:/Work/Community/C'
    at Recognizer.noMatchError (eval at instantiateModule (file:///D:/Work/Community/C%23%20Corner/C%23%20Corner%20Article%20134%20Getting%20started%20with%20Angular%2018%20and%20create%20a%20basic%20application/Angular18Galaxy/node_modules/vite/dist/node/chunks/dep-BBHrJRja.js:55003:28), <anonymous>:2702:12)
    at eval (eval at instantiateModule (file:///D:/Work/Community/C%23%20Corner/C%23%20Corner%20Article%20134%20Getting%20started%20with%20Angular%2018%20and%20create%20a%20basic%20application/Angular18Galaxy/node_modules/vite/dist/node/chunks/dep-BBHrJRja.js:55003:28), <anonymous>:2734:20)
    at eval (eval at instantiateModule (file:///D:/Work/Community/C%23%20Corner/C%23%20Corner%20Article%20134%20Getting%20started%20with%20Angular%2018%20and%20create%20a%20basic%20application/Angular18Galaxy/node_modules/vite/dist/node/chunks/dep-BBHrJRja.js:55003:28), <anonymous>:1729:33)
    at OperatorSubscriber._error (eval at instantiateModule (file:///D:/Work/Community/C%23%20Corner/C%23%20Corner%20Article%20134%20Getting%20started%20with%20Angular%2018%20and%20create%20a%20basic%20application/Angular18Galaxy/node_modules/vite/dist/node/chunks/dep-BBHrJRja.js:55003:28), <anonymous>:822:9)
    at OperatorSubscriber.error (eval at instantiateModule (file:///D:/Work/Community/C%23%20Corner/C%23%20Corner%20Article%20134%20Getting%20started%20with%20Angular%2018%20and%20create%20a%20basic%20application/Angular18Galaxy/node_modules/vite/dist/node/chunks/dep-BBHrJRja.js:55003:28), <anonymous>:558:12)
    at OperatorSubscriber._error (eval at instantiateModule (file:///D:/Work/Community/C%23%20Corner/C%23%20Corner%20Article%20134%20Getting%20started%20with%20Angular%2018%20and%20create%20a%20basic%20application/Angular18Galaxy/node_modules/vite/dist/node/chunks/dep-BBHrJRja.js:55003:28), <anonymous>:581:24)
    at OperatorSubscriber.error (eval at instantiateModule (file:///D:/Work/Community/C%23%20Corner/C%23%20Corner%20Article%20134%20Getting%20started%20with%20Angular%2018%20and%20create%20a%20basic%20application/Angular18Galaxy/node_modules/vite/dist/node/chunks/dep-BBHrJRja.js:55003:28), <anonymous>:558:12)
    at OperatorSubscriber._error (eval at instantiateModule (file:///D:/Work/Community/C%23%20Corner/C%23%20Corner%20Article%20134%20Getting%20started%20with%20Angular%2018%20and%20create%20a%20basic%20application/Angular18Galaxy/node_modules/vite/dist/node/chunks/dep-BBHrJRja.js:55003:28), <anonymous>:581:24)
    at OperatorSubscriber.error (eval at instantiateModule (file:///D:/Work/Community/C%23%20Corner/C%23%20Corner%20Article%20134%20Getting%20started%20with%20Angular%2018%20and%20create%20a%20basic%20application/Angular18Galaxy/node_modules/vite/dist/node/chunks/dep-BBHrJRja.js:55003:28), <anonymous>:558:12)
    at OperatorSubscriber._error (eval at instantiateModule (file:///D:/Work/Community/C%23%20Corner/C%23%20Corner%20Article%20134%20Getting%20started%20with%20Angular%2018%20and%20create%20a%20basic%20application/Angular18Galaxy/node_modules/vite/dist/node/chunks/dep-BBHrJRja.js:55003:28), <anonymous>:581:24) {
  code: 4002
}


Hope Angular team will resolve this issue sooner.


AngularJS Hosting Europe - HostForLIFE :: Angular HTTP Interceptors: Sending Tokens with Every Request

clock March 25, 2024 08:40 by author Peter

In modern online applications, authentication is critical for safeguarding resources and guaranteeing that only authorized users have access to specified areas of the program. Tokens, such as JSON Web Tokens, are a typical method for handling authentication. Angular's HTTP interceptors allow you to send a token with each HTTP request in your application.

What is an HTTP interceptor?
In Angular, an HTTP interceptor is a middleware component that intercepts HTTP requests and answers. It allows you to alter requests or responses before they are delivered or received by the program. This functionality is useful for a variety of activities, including header addition, logging, error handling, and more.

Let's walk over the stages of implementing token-based authentication in an Angular application with an HTTP Interceptor.

Step 1: Create an HTTP Interceptor Service
First, establish a new Angular service to manage the HTTP Interceptor. To generate the service, open a terminal or command prompt and run the Angular CLI.

ng generate interceptor auth-interceptor

Step 2. Implement the Interceptor Logic
Open the auth-interceptor.service.ts file and implement the interceptor logic. Here's an example implementation.
import { Injectable } from '@angular/core';
import {
  HttpInterceptor,
  HttpHandler,
  HttpRequest,
  HttpEvent,
} from '@angular/common/http';
import { Observable } from 'rxjs';

@Injectable()
export class AuthInterceptor implements HttpInterceptor {
  constructor() {}

  intercept(
    req: HttpRequest<any>,
    next: HttpHandler
  ): Observable<HttpEvent<any>> {
    // Get the token from localStorage
    const token = localStorage.getItem('token');

    // Clone the request and add the token to the headers if it exists
    if (token) {
      const authReq = req.clone({
        setHeaders: { Authorization: `Bearer ${token}` },
      });
      return next.handle(authReq);
    }

    // If there's no token, just pass the original request
    return next.handle(req);
  }
}


In this code, we retrieve the token from the browser's local storage and add it to the authorization header of the HTTP request if it exists.

Step 3. Provide the Interceptor

Next, provide the interceptor in your Angular module (usually app.module.ts) as a provider. Here's an example of how to do it.
import { NgModule } from '@angular/core';
import { BrowserModule } from '@angular/platform-browser';
import { HttpClientModule, HTTP_INTERCEPTORS } from '@angular/common/http';

import { AppComponent } from './app.component';
import { AuthInterceptor } from './auth-interceptor.service';

@NgModule({
  declarations: [AppComponent],
  imports: [BrowserModule, HttpClientModule],
  providers: [
    { provide: HTTP_INTERCEPTORS, useClass: AuthInterceptor, multi: true },
  ],
  bootstrap: [AppComponent],
})
export class AppModule {}


By providing the interceptor using the HTTP_INTERCEPTORS token, Angular will use our AuthInterceptor to intercept outgoing HTTP requests.

Step 4. Use HttpClient to Make Requests

Now that the interceptor is set up, you can use Angular's HttpClient service to make HTTP requests throughout your application. The interceptor will automatically add the token to the headers of these requests.

Here's an example service (data.service.ts) that uses HttpClient.
import { HttpClient } from '@angular/common/http';
import { Injectable } from '@angular/core';

@Injectable({
  providedIn: 'root',
})
export class DataService {
  constructor(private http: HttpClient) {}

  getData() {
    return this.http.get('https://dummyjson.com/products');
  }

  postData(data: any) {
    return this.http.post('https://dummyjson.com/post', data);
  }
}


In this example, when you call getData() or postData(), the interceptor will automatically add the authorization header with the token before sending the request.


AngularJS Hosting Europe - HostForLIFE :: How to Add Controls in AG-Grid In Angular?

clock March 18, 2024 07:59 by author Peter

AG-Grid is a popular module for building data grids and tables in Angular apps. To add controls or features to an AG-Grid in an Angular application, follow the steps below:
Install AG-Grid. If you haven't already, you should install AG-Grid and its Angular wrapper. You can accomplish this with npm:

npm install --save ag-grid-angular ag-grid-community

Import AG-Grid Module
Import the AG-Grid module in your Angular application. In your Angular module (e.g., app.module.ts), add the following imports:
import { AgGridModule } from 'ag-grid-angular';

@NgModule({
  imports: [
    AgGridModule.withComponents([]), // You can specify custom components here if needed
    // other modules
  ],
  // ...
})

Create an AG-Grid Component
Create a component where you want to add your AG-Grid. You can use the Angular CLI to generate a component:
ng generate component grid

Set up the Grid in Your Component
In your newly created component (e.g., grid.component.ts), define your AG-Grid configuration. You can customize your grid by specifying column definitions, data, and other settings. Here's a basic example:
import { Component } from '@angular/core';

@Component({
  selector: 'app-grid',
  templateUrl: './grid.component.html',
  styleUrls: ['./grid.component.css']
})
export class GridComponent {
  gridOptions: any;

  constructor() {
    this.gridOptions = {
      columnDefs: [
        { headerName: 'ID', field: 'id' },
        { headerName: 'Name', field: 'name' },
        // Add more column definitions as needed
      ],
      rowData: [
        { id: 1, name: 'Gajendra' },
        { id: 2, name: 'Sachin' },
        // Add more data as needed
      ]
    };
  }
}


Render the Grid in Your Component's Template

In your component's HTML file (e.g., grid.component.html), add the AG-Grid component using the <ag-grid-angular> tag and bind it to your gridOptions:
<ag-grid-angular
  style="width: 100%; height: 500px;"
  class="ag-theme-alpine"
  [gridOptions]="gridOptions"
></ag-grid-angular>

Add Controls and Features
To add controls or features, you can manipulate the gridOptions object in your component. For example, you can add custom buttons or other UI elements outside the grid to trigger actions or manipulate data within the grid.

Style Your Grid

You can style your grid by using CSS classes and themes. In the example above, the class "ag-theme-alpine" is applied to style the grid. You can use different themes or customize the styles as needed.

Build and Run

Finally, build and run your Angular application to see the AG-Grid with controls and features.

This is a basic example of how to set up AG-Grid in an Angular application. Depending on your requirements, you can further enhance the grid by adding more features, custom components, and event handling to make it more interactive and functional.


AngularJS Hosting Europe - HostForLIFE :: How to Create Unit Test Cases with Mocking Service in Angular?

clock February 26, 2024 06:42 by author Peter

Writing unit tests with mocking services is a typical Angular approach for isolating the component under test from external dependencies like services. This allows you to test the component in isolation while focusing on its behavior. Here's a step-by-step approach for creating a unit test case using a mocked service in Angular using Jasmine and TestBed:

Assume you have a component named MyComponent that depends on a service called MyService. We'll build a dummy for MyService and use it during the test.
Create a component (my.component.ts).

// my.component.ts
import { Component, OnInit } from '@angular/core';
import { MyService } from './my.service';

@Component({
  selector: 'app-my',
  template: '<div>{{ data }}</div>',
})
export class MyComponent implements OnInit {
  data: string;

  constructor(private myService: MyService) {}

  ngOnInit(): void {
    this.data = this.myService.getData();
  }
}

Create the Service (my.service.ts)

// my.service.ts
import { Injectable } from '@angular/core';

@Injectable({
  providedIn: 'root',
})
export class MyService {
  getData(): string {
    return 'Hello from MyService!';
  }
}


Create the Unit Test (my.component.spec.ts)
import { ComponentFixture, TestBed } from '@angular/core/testing';
import { MyComponent } from './my.component';
import { MyService } from './my.service';

describe('MyComponent', () => {
  let component: MyComponent;
  let fixture: ComponentFixture<MyComponent>;
  let myServiceMock: jasmine.SpyObj<MyService>;

  beforeEach(() => {
    // Create a spy object for the service
    myServiceMock = jasmine.createSpyObj('MyService', ['getData']);

    TestBed.configureTestingModule({
      declarations: [MyComponent],
      providers: [{ provide: MyService, useValue: myServiceMock }],
    });

    fixture = TestBed.createComponent(MyComponent);
    component = fixture.componentInstance;
  });

  it('should create', () => {
    expect(component).toBeTruthy();
  });

  it('should set data from service', () => {
    // Configure the spy behavior
    myServiceMock.getData.and.returnValue('Mocked data');

    // Trigger ngOnInit
    component.ngOnInit();

    // Check if the data property has the expected value
    expect(component.data).toBe('Mocked data');
  });
});


In this example, we use the jasmine.createSpyObj function to generate a spy object for the MyService class. We then use the TestBed.configureTestingModule function to incorporate this dummy service into the testing module. The beforeEach function configures the testing module, creates a component fixture, and creates a component instance.

In the second test, we configure the spy to return a specified value when the getData function is called, and then we execute the component's ngOnInit method to verify its behavior. This is a basic example, and you may need to modify it for your own use case. Remember that Angular testing can include more advanced situations like testing asynchronous code, working with forms, and interacting with the DOM.


AngularJS Hosting Europe - HostForLIFE :: Get Browser Type and Version Using Angular and Bootstrap

clock February 20, 2024 06:04 by author Peter

This article explains how to retrieve the browser name and version from the Angular application. In certain cases, you may also need to obtain the browser name in Angular, depending on your requirements. If the Angular application is open on Internet Explorer Legacy, Edge, Firefox, Chrome, Safari, Opera, or another browser, we can quickly identify it. This article walks us through the process of adding a reusable method to an Angular application and demonstrates how to quickly identify the browser and version.


Note: Before beginning this session, please read my earlier essay (linked below) about Angular applications.

D:\EmployeeManagement\CallWebAPIAngular> ng g s services/detect-browser

Then you can service and its related files are shown below
PS D:\EmployeeManagement\CallWebAPIAngular> ng g s services/detect-browser
CREATE src/app/services/detect-browser.service.spec.ts (393 bytes)
CREATE src/app/services/detect-browser.service.ts (142 bytes)


Step 2. Configure browser name with version detection method
After creating the DetectBrowserService, add the getBrowserNameAndVersion() method to return an object with name and version keys. This method will fetch the User-Agent strings on the browser in which the Angular application is loaded.

Open the ~app\services\detect-browser.service.ts file and add as shown below.
import { Injectable } from '@angular/core';
@Injectable({
  providedIn: 'root'
})
export class DetectBrowserService {
  constructor() { }
  getBrowserNameAndVersion() {
    var ua = navigator.userAgent,
        tem,
        M = ua.match(/(opera|chrome|safari|firefox|msie|trident(?=\/))\/?\s*(\d+)/i) || [];

    if (/trident/i.test(M[1])) {
        tem = /\brv[ :]+(\d+)/g.exec(ua) || [];
        return { name: 'IE', version: (tem[1] || '') };
    }
    if (M[1] === 'Chrome') {
        tem = ua.match(/\bEdg\/(\d+)/);
        if (tem != null) {
            return { name: 'Edge(Chromium)', version: tem[1] };
        }
        tem = ua.match(/\bOPR\/(\d+)/);
        if (tem != null) {
            return { name: 'Opera', version: tem[1] };
        }
    }
    M = M[2] ? [M[1], M[2]] : [navigator.appName, navigator.appVersion, '-?'];
    if ((tem = ua.match(/version\/(\d+)/i)) != null) {
        M.splice(1, 1, tem[1]);
    }
    return {
      name: M[0],
      version: M[1]
    };
  }
}


Here, we detect the name and version of the browser by creating a new service with a common method. The getBrowserNameAndVersion method returns an object with name and version keys. This method is fetching the User-Agent string that provides the browser information.

Step 3. Detect browser name with version
Now, we will import the DetectBrowserService in the AppComponent‘s constructor function. The service instance method named getBrowserNameAndVersion() will assign the name and version object to the browserNameAndVersion variable.

Open the app.component.ts file and add as shown below

import { Component } from '@angular/core';
import { DetectBrowserService } from './services/detect-browser.service';

@Component({
  selector: 'app-root',
  templateUrl: './app.component.html',
  styleUrls: ['./app.component.css']
})
export class AppComponent {
  title = 'Display Browser Name & Version';

  public requiredVersion = 98;
  public isBrowserOutdated: boolean | undefined;
  public browserVersion = '';
  browserNameAndVersion: any;

  constructor(
    detectBrowserService: DetectBrowserService
  ) {
    this.browserNameAndVersion = detectBrowserService.getBrowserNameAndVersion();
    this.browserVersion = this.browserNameAndVersion.version;
    if (parseFloat(this.browserNameAndVersion.version) < this.requiredVersion) {
      this.isBrowserOutdated = true;
    }
  }
}

Here we configure for displaying browser name and version along with browser up-to-date or not.

this.browserNameAndVersion = detectBrowserService.getBrowserNameAndVersion();
this.browserVersion = this.browserNameAndVersion.version;
if (parseFloat(this.browserNameAndVersion.version) < this.requiredVersion) {
  this.isBrowserOutdated = true;
}


Step 4. HTML template to show browser name with version
Update the HTML template of AppComponent to display the browser name and version. Open the app.component.html file and update it as shown below:

<div class="card bg-danger text-white">
  <div class="card-body text-center">
    <h1>{{ title }}</h1>
  </div>
  <table class="table table-striped mt-5">
    <thead>
    </thead>
    <tbody>
      <tr>
        <td><h4>Browser Name: {{ browserNameAndVersion.name | titlecase }}</h4></td>
        <td><h4>Current Browser Version: {{ browserNameAndVersion.version | titlecase }}</h4></td>
        <td><h4>Required Version: {{ requiredVersion }}</h4></td>
      </tr>
    </tbody>
  </table>
</div>

<div class="toast show" style="position: fixed; top: 60%; left: 50%; width: 30em; height: 17em; margin-top: -9em; margin-left: -15em; border: 1px solid #ccc; background-color: #f3f3f3; color: red; font-weight: 900; font-size: larger;">
  <div class="toast-header">
    Angular Detect Browser Name and Version
    <button type="button" class="btn-close" data-bs-dismiss="toast"></button>
  </div>
  <div class="toast-body">
    <div class="base-block" *ngIf="isBrowserOutdated">
      <h1>Oops</h1>
      <h3>Browser is outdated</h3>
      <h5>
        Your {{ browserNameAndVersion.name }} browser is outdated ({{ browserNameAndVersion.version }}) as less than required Version
        ({{ requiredVersion }}) and no longer supported, please update your browser.
      </h5>
    </div>

    <div class="base-block" *ngIf="!isBrowserOutdated">
      <h1>Cheers!</h1>
      <h3>Browser is up to date</h3>
      <h5>
        Your {{ browserNameAndVersion.name }} browser is updated ({{ browserNameAndVersion.version }}).
      </h5>
    </div>
  </div>
</div>


Use the interpolation to display the browser name and version with the help of the interpolation. An Interpolation is defined using the double curly braces that permit the user to bind a value to a UI element. Also, we will use the angular pipe to transform the value in the title case.

<td>
  <h4>Browser Name: {{ browserNameAndVersion.name | titlecase }}</h4>
</td>
<td>
  <h4>Current Browser Version: {{ browserNameAndVersion.version | titlecase }}</h4>
</td>
<td>
  <h4>Required Version: {{ requiredVersion }}</h4>
</td>

Check browser is up-to-date or not based on some condition using the *ngIf directive.
<div class="toast-body">
  <div class="base-block" *ngIf="isBrowserOutdated">
    <h1>Oops</h1>
    <h3>Browser is outdated</h3>
    <h5>
      Your {{ browserNameAndVersion.name }} browser is outdated ({{ browserNameAndVersion.version }}) as less than required Version
      ({{ requiredVersion }}) and no longer supported, please update your browser.
    </h5>
  </div>

  <div class="base-block" *ngIf="!isBrowserOutdated">
    <h1>Cheers!</h1>
    <h3>Browser is up to date</h3>
    <h5>
      Your {{ browserNameAndVersion.name }} browser is updated ({{ browserNameAndVersion.version }}).
    </h5>
  </div>
</div>


Step 5. Add Bootstrap to make the page responsive
<!doctype html>
<html lang="en">
<head>
  <meta charset="utf-8">
  <title>Title Service Example</title>
  <base href="/">
  <meta name="viewport" content="width=device-width, initial-scale=1">
  <link rel="icon" type="image/x-icon" href="favicon.ico">
  <link href="https://cdn.jsdelivr.net/npm/[email protected]/dist/css/bootstrap.min.css" rel="stylesheet">
  <script src="https://cdn.jsdelivr.net/npm/[email protected]/dist/js/bootstrap.bundle.min.js"></script>
</head>
<body>
  <app-root></app-root>
</body>
</html>


Output

Finally, run the application by executing the ng serve command in the terminal window. It opens the application at the following URL: http://localhost:4200/
Checking Chrome Browser is up to date i.e. based required Version

Checking whether Chrome Browser is up to date or not i.e. based on the Required Version

Checking whether another Browser is up to date or not i.e. based on the Required Version

Why is it necessary to set up the browser detection procedure?
To let users know that their current browser or version isn't compatible with correctly loading the application, we need to identify the name and version of their browser. They can then use the newest browsers that are out there. Modern Javascript and CSS principles are supported by a wide range of web browsers accessible today, all of which are completely compatible with the most recent version of WebKit. In this situation, we must identify the browser's name and version in order to let users know that their current browser or a different one isn't compatible with correctly loading the program and that they can upgrade to the newest version.


About HostForLIFE

HostForLIFE is European Windows Hosting Provider which focuses on Windows Platform only. We deliver on-demand hosting solutions including Shared hosting, Reseller Hosting, Cloud Hosting, Dedicated Servers, and IT as a Service for companies of all sizes.

We have offered the latest Windows 2019 Hosting, ASP.NET 5 Hosting, ASP.NET MVC 6 Hosting and SQL 2019 Hosting.


Tag cloud

Sign in