Full Trust European Hosting

BLOG about Full Trust Hosting and Its Technology - Dedicated to European Windows Hosting Customer

AJAX Hosting :: HostForLIFE.eu :: How to Work With PHP and MySQL?

clock April 12, 2016 23:12 by author Anthony

Today we will discuss about Ajax. Ajax is a collection of several technologies aiming to provide a better user experience compared to traditional web applications. End to end implementation of Ajax includes HTML, CSS, DOM, JavaScript, a Server Side Language, and XMLHttpRequest which is also called as XHR.

In traditional web applications, the browser sends a request to server, server processes, send some data back to browser and then it is rendered by the browser. But meanwhile, when server is processing, user has to wait. This, needless to say, does not provide the user with a good experience. Ajax, helps to get rid of the issue. It makes the user's interaction to the application asynchronous. User interface and communicating to the server goes hand in hand and without waiting for the server to come with the processed data or without reloading the webpage, the user interface responds to user's action; greatly improving user experience.

In this tutorial we will see how to make Ajax work with PHP and MySQL. We will create a small web application. In that, as soon as you start typing an alphabet in the given input field, a request goes to the PHP file via Ajax, a query is made to the MySQL table, it returns some results and then those results are feteched by Ajax and displayed.

You need to make MySQL table. The structure of the MySQL table we use.
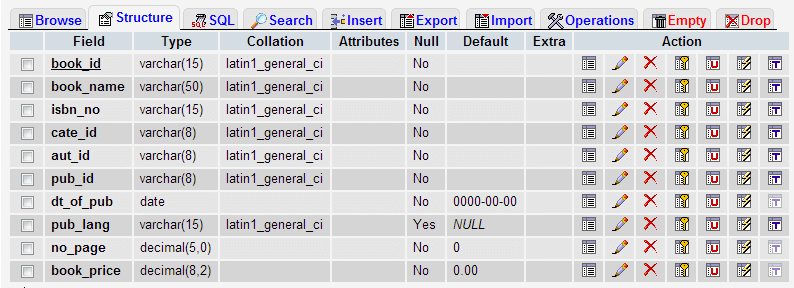
mysql table for ajax php mysql tutorial

We have a simple user inerface created with HTML and CSS where user can supply data in the input field. This is the basic HTML code. Though, we will make modifications on it and add JavaScript code later.

<!DOCTYPE html>  
<html lang="en">  
<head>  
<meta charset="utf-8">  
<title>User interface for Ajax, PHP, MySQL demo</title>  
<meta name="description" content="HTML code for user interface for Ajax, PHP and MySQL demo.">  
<link href="../includes/bootstrap.css" rel="stylesheet"> 
<style type="text/css"> 
body {padding-top: 40px; padding-left: 25%} 
li {list-style: none; margin:5px 0 5px 0; color:#FF0000} 
</style> 
</head> 
<body> 
<form class="well-home span6 form-horizontal" name="ajax-demo" id="ajax-demo"> 
<div class="control-group"> 
              <label class="control-label" for="book">Book</label> 
              <div class="controls"> 
                <input type="text" id="book"> 
              </div> 
 </div> 
 <div class="control-group"> 
              <div class="controls"> 
                <button type="submit" class="btn btn-success">Submit</button> 
              </div> 
 </div> 
</form> 
</body> 
</html> 

This is how it looks :

user interface for ajax demo

We will now create JavaScript code to send data to server. And we will call that code on onkeyup event of the of the input field given.

function book_suggestion() 

var book = document.getElementById("book").value; 
var xhr; 
 if (window.XMLHttpRequest) { // Mozilla, Safari, ... 
    xhr = new XMLHttpRequest(); 
} else if (window.ActiveXObject) { // IE 8 and older 
    xhr = new ActiveXObject("Microsoft.XMLHTTP"); 

var data = "book_name=" + book; 
     xhr.open("POST", "book-suggestion.php", true);  
     xhr.setRequestHeader("Content-Type", "application/x-www-form-urlencoded");                   
     xhr.send(data); 

Processing data on server side

<?php 
include('../includes/dbopen.php'); 
$book_name = $_POST['book_name']; 
$sql = "select book_name from book_mast where book_name LIKE '$book_name%'"; 
$result = mysql_query($sql); 
while($row=mysql_fetch_array($result)) 

echo "<p>".$row['book_name']."</p>"; 

?> 

Now we have to retreive data returned by MYSQL and display that data using Ajax. So, we will write that code in our HTML file. We will add follwing code

xhr.onreadystatechange = display_data; 
    function display_data() { 
     if (xhr.readyState == 4) { 
      if (xhr.status == 200) { 
       document.getElementById("suggestion").innerHTML = xhr.responseText; 
      } else { 
        alert('There was a problem with the request.'); 
      } 
     } 
  }

We have to add <div id="suggestion"></div> bellow the input field whose id is book.

Now we set the value of the string to be displayed within the div whose id is 'suggestion' as 'responseText' property of the XMLHttpRequest object. 'responseText' is the response to the request as text.

So, the final JavaScript code of the HTML file becomes as follows:

  function book_suggestion() 

var book = document.getElementById("book").value; 
var xhr; 
 if (window.XMLHttpRequest) { // Mozilla, Safari, ... 
    xhr = new XMLHttpRequest(); 
} else if (window.ActiveXObject) { // IE 8 and older 
    xhr = new ActiveXObject("Microsoft.XMLHTTP"); 

var data = "book_name=" + book; 
     xhr.open("POST", "book-suggestion.php", true);  
     xhr.setRequestHeader("Content-Type", "application/x-www-form-urlencoded");                   
     xhr.send(data); 
     xhr.onreadystatechange = display_data; 
    function display_data() { 
     if (xhr.readyState == 4) { 
      if (xhr.status == 200) { 
       //alert(xhr.responseText);       
      document.getElementById("suggestion").innerHTML = xhr.responseText; 
      } else { 
        alert('There was a problem with the request.'); 
      } 
     } 
    } 


HostForLIFE.eu AJAX Hosting
HostForLIFE.eu revolutionized hosting with Plesk Control Panel, a Web-based interface that provides customers with 24x7 access to their server and site configuration tools. Plesk completes requests in seconds. It is included free with each hosting account. Renowned for its comprehensive functionality - beyond other hosting control panels - and ease of use, Plesk Control Panel is available only to HostForLIFE's customers. They offer a highly redundant, carrier-class architecture, designed around the needs of shared hosting customers.


European Ajax Hosting UK - HostForLIFE.eu :: How to Make Custom Alert Message with Ajax?

clock August 6, 2015 09:53 by author Peter

In this article, we are going to learn how to make custom Alert Message with Ajax. Some time we needed to make clone of windows alert message, however that alert message isn't permitting to change the header text. Here using Ajax model popup extender i'll show you how to make custom message box:
Add the user control file and ajaxtoolkit reference in your project.

Write the following code in ascx file.
<style type="text/css">
.MessageBoxPopUp
{
background-color:White;
border:solid 2px #99B4D1;
}

.MessageBoxButton
{
background-color: #A0A0A0;
border: solid 2px #B4B4B4;
color: Black;
font-weight:bold;
font-family:Verdana;
font-size:9pt;
cursor:pointer;
height: 20px;
width:70px;
display:none;
}
.MessageBoxHeader
{
height:17px;
font-size:10pt;
color:White;
font-weight:bold;
font-family:Verdana;
text-align:Left;
vertical-align:middle;
padding:3px 3px 3px 3px;
background-color:#3399FF;
border-bottom:2px solid #B4B4B4;
}
.MessageBoxData
{
height:20px;
font-size:8pt;
font-family:Verdana;
color:#3A4349;
text-align:Left;
vertical-align:top;
}
</style>
<script type="text/javascript">
function closeModelPopup(btn) {
// var mpe = document.getElementById("<%= mpeMessageBox.ClientID %>");
$find('mpeFirmMessageBox').hide();
}
</script>

<cc1:ModalPopupExtender ID="mpeMessageBox" runat="server" DynamicServicePath="" Enabled="True"
TargetControlID="btnTemp" PopupControlID="pnlMessageBox" BackgroundCssClass="modal"
PopupDragHandleControlID="pnlMessageBox" CancelControlID="btnCancel" BehaviorID="mpeFirmMessageBox">
</cc1:ModalPopupExtender>

<asp:Panel ID="pnlMessageBox" runat="server" Style="display: none; width: 300px;
height: 140px;" class="MessageBoxPopUp">
<table border="0" cellpadding="0" cellspacing="0" width="100%">
<tr class="MessageBoxHeader" style="height: 17px;">

<td colspan="2">
    <asp:Label ID="lblHeader" runat="server"></asp:Label>
</td>

<td align="right" style="padding: 2px 2px 0px 0px;">
    <%--<asp:UpdatePanel ID="upnCloseMessageBox" runat="server">
        <ContentTemplate>--%>
            <asp:ImageButton ID="imgBtnClose" runat="server" ImageUrl="~/Image/close_icon.png"
                 OnClientClick="closeModelPopup(this)" />
        <%--</ContentTemplate>
    </asp:UpdatePanel>--%>
</td>
</tr>

<tr>
<td colspan="2" style="height: 5px;">
</td>
</tr>
<tr style="height: 88px;">

<td style="vertical-align: top; padding-left: 5px;">
    <asp:Image ID="imgInfo" runat="server" ImageUrl="~/Image/information-balloon.png" Width="40px" />
</td>

<td class="MessageBoxData" colspan="2" style=" padding: 10px 5px 5px 5px;">
    <asp:Label ID="lblMessage" runat="server"></asp:Label>
</td>

</tr>
<tr style="vertical-align: bottom; height: 20px; padding: 0px 5px 5px 0px;">
<td style="width: 40px;">
</td>
<td align="right" style="width: 180px">
    <asp:Button ID="btnOk" runat="server" CssClass="MessageBoxButton" />
</td>

<td align="right">
    <asp:Button ID="btnCancel" runat="server" CssClass="MessageBoxButton" />
</td>
</tr>
</table>
</asp:Panel>

Now, add the following code in .cs file
public delegate void delegate_OkClick();
public event delegate_OkClick OnOkClick;
public string Header
{
set { lblHeader.Text = value; }
//set { lblHeader.InnerHtml = value; }
}

public string Message
{
set { lblMessage.Text = value; }
}

public Button CancelButton
{
get { return btnCancel; }
}

public Button OkButton
{
get { return btnOk; }
}

public AjaxControlToolkit.ModalPopupExtender MessageBox
{
get { return mpeMessageBox; }
}

protected void Page_Load(object sender, EventArgs e)
{
}

protected void btnOk_OnClick(object sender, EventArgs e)
{
//raise the event if not null
if (OnOkClick != null)
OnOkClick();
}
public void displayMessage(string message)
{
displayMessage(message, null);
}
public void displayMessage(string message, int? type)

{

lblHeader.Text = "Alert Message";
//lblHeader.InnerHtml = title;
lblMessage.Text = message;
btnCancel.Attributes["style"] = "display:block";
btnCancel.Text = "Ok";
mpeMessageBox.Show();
}


Your message box is ready, now you need to call from the aspx page where ever you need to show the message.
You need to add below line of code in
<%@ Register Src="~/Control/Alert.ascx" TagName="MessageBox" TagPrefix="mb" %>
<asp:ScriptManager runat="server" ID="s"></asp:ScriptManager>
<mb:MessageBox ID="ucMessageBox" runat="server"></mb:MessageBox>

And from the code behind cal the display message write the following code:
protected void btnClick_OnClik(object sender, EventArgs e)
{
ucMessageBox.displayMessage("Alert from Code");
}

HostForLIFE.eu AJAX Hosting
HostForLIFE.eu is European Windows Hosting Provider which focuses on Windows Platform only. We deliver on-demand hosting solutions including Shared hosting, Reseller Hosting, Cloud Hosting, Dedicated Servers, and IT as a Service for companies of all sizes. We have customers from around the globe, spread across every continent. We serve the hosting needs of the business and professional, government and nonprofit, entertainment and personal use market segments.


AJAX with Free ASP.NET Hosting - HostForLIFE.eu :: How to Solve JQuery which Only Send Partial Data to AJAX Post

clock April 27, 2015 07:06 by author Rebecca

JQuery is a great JavaScript framework that makes web developer life much easier. But like all framework, you need to learn its gotchas in order to work effectively with it.

Here is one of the gotchas. Jquery POST method lets you create Ajax HTTP POST request to the server. It is actually a shorthand to the JQuery Ajax method:
$.ajax({
  type: "POST",url: "save.php",
  data: "param1="+paramValue1
  +"&param2=paramValue2",
  complete: function(){ }, //manage the complete if needed
  success: function(){}}//get some data back to the screen if needed
});

Today, I'm gonna tell you how to solve the problem when JQuery only send partial data to AJAX Post. Maybe you've found that when executing the AJAX call, only part of the data is passed to the server and the rest vanishes. You usually see that some or all of the parameters you tried to pass are missing or cut in the middle. It's because JQuery uses ‘&’ as a separator between the parameters. If you have a ‘&’ within your key or value parameters, then the JQuery AJAX request gets really messed up.

You can solve this problem by encoding the parameters, replace & with %26 which is the standard encoding for that character. There are 2 ways to encode the parameters:

Semi-Automatic

Use .replace(/&/g, “%26″) –

Here is a working example:
$.ajax({
  type: "POST",url: "save.php",
  data: "param1="+paramValue1.replace(/&/g, "%26")
  +"&param2=paramValue2.replace(/&/g, "%26")",
  complete: function(){ }, //manage the complete if needed
  success: function(){}}//get some data back to the screen if needed
});

Fully Automatic

A more elegant way is to slightly change the way we call the meethod and let JQuery do that encoding for you –

Here is a working example:
$.ajax({
 type: "POST",url: "save.php",
 data: { "param1": paramValue1,
 "param2": paramValue2 },
 complete: function(){ }, //manage the complete if needed
 success: function(){}//get some data back to the screen if needed
});

AJAX with Free ASP.NET Hosting
Try our AJAX with Free ASP.NET Hosting today and your account will be setup soon! You can also take advantage of our Windows & ASP.NET Hosting support with Unlimited Domain, Unlimited Bandwidth, Unlimited Disk Space, etc. You will not be charged a cent for trying our service for the next 3 days. Once your trial period is complete, you decide whether you'd like to continue.


AJAX Hosting Spain - HostForLIFE.eu :: How to Handle Session Timeout and Server HTTP Errors in AJAX

clock April 2, 2015 14:41 by author Rebecca

The most difficult part in writing AJAX code is to handle errors and exceptions. Session timeout is one of the most trivial error that one needs to consider while creating an AJAX enabled application. In this post, I will show you the way of handling session timeout errors server HTTP errors in AJAX.

Normally, we use AJAX to deliever HTML content that we put in a DIV or SPAN tag and display it on screen. But suppose the request that we sent using AJAX was generated an error due to session timeout then the session timeout screen will be shown in DIV tag. Any error generated by server let say http 404 error or http 505 can lead to display such error in our display DIV.

How to Handle Session Timeout Errors

One solution that you can use to handle the session timeout errors is using JSON or XML format as output for your AJAX requests. You have to check for session in your script, say for example if you are using JSP then probably you can do something like this:

if(null == session || session.getAttribute("SOME_ATTR_THAT_I_PLACED_IN_SESSION")) {
    isSessionNull = true;
}
...
{
    <%
    if(isSessionNull) {
        out.println("status: error");
    }
    else {
        out.println("status: success");
    }
    %>
}

In short, create a status field in your JSON script or a status tag in your XML which will describe the status of the request. I am looking for some more ways of checking session timeouts in AJAX. Kindly let me know if you have a good solution.

Handle Server HTTP errors in AJAX

HTTP errors like 404, 503 are sometimes tedious to handle using AJAX. There is a simple trick to solve this problem. First let's see simple AJAX handler function that you use to get response XML/text through AJAX.

xhr.open("GET", "http://someurl", true);
xhr.onreadystatechange = handleHttpResponse;
xhr.send(null);
...
...
function handleHttpResponse() {
    if (xhr.readyState == 4) {
        //handle response your way
        spanBodyContent.innerHTML = xhr.responseText;
    }
}

Normal AJAX handlers has a if to check readyState and if it is 4 (response arrived state) then you will get the response from xhr.responseText or xhr.responseXML.

AJAX’s XMLHttpRequest object has attributes to check the status of your http request. You can use two attributes: status and statusText for knowing this.

xhr.status
..
xhr.statusText

Thus by checking status attribute from your AJAX xhr object can solve your problem.

xhr.open("GET", "http://someurl", true);
xhr.onreadystatechange = handleHttpResponse;
xhr.send(null);
...
...
function handleHttpResponse() {
    if (xhr.readyState == 4) {
        try {
        if(xhr.status == 200) {
            //handle response your way
            spanBodyContent.innerHTML = xhr.responseText;
        }
        }catch(e) {//error}
    }
}

At the end, if status is not 200, you may not want to update your DOM with the ajax result and display some error message on your web page.

HostForLIFE.eu AJAX Hosting
HostForLIFE.eu is European Windows Hosting Provider which focuses on Windows Platform only. We deliver on-demand hosting solutions including Shared hosting, Reseller Hosting, Cloud Hosting, Dedicated Servers, and IT as a Service for companies of all sizes. We have customers from around the globe, spread across every continent. We serve the hosting needs of the business and professional, government and nonprofit, entertainment and personal use market segments.


About HostForLIFE

HostForLIFE is European Windows Hosting Provider which focuses on Windows Platform only. We deliver on-demand hosting solutions including Shared hosting, Reseller Hosting, Cloud Hosting, Dedicated Servers, and IT as a Service for companies of all sizes.

We have offered the latest Windows 2019 Hosting, ASP.NET 5 Hosting, ASP.NET MVC 6 Hosting and SQL 2019 Hosting.


Tag cloud

Sign in