Full Trust European Hosting

BLOG about Full Trust Hosting and Its Technology - Dedicated to European Windows Hosting Customer

AngularJS Hosting Europe - HostForLIFE :: How Components Communicate With Each Other In Angular?

clock September 14, 2021 09:33 by author Peter

For better understanding, you should have a basic knowledge about what are components and how to build an application using that.

Components are the building blocks of Angular. So we need to understand how components communicate with each other.

There are three ways:
    parent to child - sharing data via input
    child to parent - sharing data via viewChild with AfterViewInit
    child to parent - sharing data via output and EventEmitter

Parent to child - sharing data via input
To share data from parent component to child component we use@input decorator.
Let’s configure the parent component and child component,
import { Component } from '@angular/core';

@Component({
  selector: 'app-parent',
  template: ` <app-child [childMessage]="message"></app-child> `,
  styleUrls: ['./parent.component.css']
})

export class ParentComponent {
  message = “I am a parent"
  constructor() { }
}

If you see the above code, <app-child> is used as a directive in the parent component. we are using property binding to bind the properties between child and parent, Binding child’s childMessage property with message property from the parent component.
import { Component, Input } from '@angular/core';

@Component({
  selector: 'app-child',
  template: ` {{ message }}  `,
  styleUrls: ['./child.component.css']
})
export class ChildComponent {
  @Input() childMessage: string;
  constructor() { }
}

To use@input decorative, we have to first import it from @angular/core . Next will decorate childMessage with @input decorative with type string. Lastly, display the message from the parent into the child template using string interpolation.

Child to parent - sharing data via ViewChild and AfterViewInit

It allows the child component to be injected into parent competent so that the parent component gets access to its child’s attributes and functions. We must note that parents will get access only after the view is initialized.

Let’s configure the parent component and child component
import { Component, ViewChild, AfterViewInit } from '@angular/core';
import { ChildComponent } from "../child/child.component";

@Component({
  selector: 'app-parent',
  template: `
    Message: {{ message }}
    <app-child></app-child>
  `,
  styleUrls: ['./parent.component.css']
})


export class ParentComponent implements AfterViewInit {

  @ViewChild(ChildComponent) child;
  constructor() { }

  Message:string;

  ngAfterViewInit() {
    this.message = this.child.message
  }
}

import { Component} from '@angular/core';

@Component({
  selector: 'app-child',
  template: `  `,
  styleUrls: ['./child.component.css']
})

export class ChildComponent {
  message = 'Hello Angular!';
  constructor() { }
}


We have to import ViewChild,AfterViewInit from angular/core, and the child component and use AfterViewInit life cycle hook so that we get access to the attributes in the child component. In the child component, we are passing the value for the message.

Child to parent - sharing data via output and EventEmitter
You use this approach when you want to share the data on button clicks or other events. The child component uses @output to send the data to the parent by creating an event with the help of an EventEmitter which is imported from @angular/core.

Let’s configure the parent component and child component
import { Component, Output, EventEmitter } from '@angular/core';

@Component({
  selector: 'app-child',
  template: `
      <button (click)="message()">Send Message</button>
 `,
  styleUrls: ['./child.component.css']
})
export class ChildComponent {
  message: string = "Hey I am child !"
  @Output() messageEvent = new EventEmitter<string>();
 constructor() { }
  sendMessage() {
    this.messageEvent.emit(this.message)
  }
}

import { Component } from '@angular/core';

@Component({
  selector: 'app-parent',
  template: `
    Message: {{message}}
    <app-child (messageEvent)="receiveMessage($event)"></app-child>
  `,
  styleUrls: ['./parent.component.css']
})
export class ParentComponent {
    constructor() { }
    Message:string;
    receiveMessage($event) {
        this.message = $event
    }
}

First, we have to import output and EventEmitter from the @anguar/core , then we are creating an event messageEvent using EventEmitter . when the button is clicked it calls the function sendMessage and calls the emit with the message. we are using event binding property with the child selector . The parent can now subscribe to this messageEvent that’s outputted by the child component, then run the receive message function whenever this event occurs.

I hope you understand how to pass data between the parent and child components.


AngularJS Hosting Europe - HostForLIFE :: Angular - Reactive Forms

clock September 8, 2021 08:32 by author Peter

Angular provides two approaches,
    Reactive-driven forms  
    Template-driven forms

Understanding the difference between template and reactive forms
    Template driven forms are asynchronous while, reactive forms are synchronous
    In the Reactive driven approach, most of the logic is from the components whereas, in the template-driven approach most of the logic resides in the template.

When to use template-driven approach
    When no complex validations are required in the form.
    When you migrate from angular js to angular 2+, it’s easier to consider this approach

When to use reactive driven approach
When form, becomes the key part of the app we must use a reactive-driven approach as it is predictable, reusable, testable.
How to build a reactive form in 4 steps

We need to import ReactiveFormMoudle in the root folder,
import { BrowserModule } from '@angular/platform-browser';
import { NgModule } from '@angular/core';
import { ReactiveFormsModule } from '@angular/forms';
import { AppRoutingModule } from './app-routing.module';
import { AppComponent } from './app.component';
@NgModule({
  declarations: [
    AppComponent
  ],
  imports: [
    BrowserModule,
    AppRoutingModule,
    ReactiveFormsModule
  ],
  providers: [],
  bootstrap: [AppComponent]
})
export class AppModule { }


Create form module in the component using - FormGroup, FormControl, and  FormArrays

In the reactive form, we will use FormGroup, FormControl, FormArray as they are the building block of an angular form.

First, let us try to understand what does those terminology means in simple words
     FormControl - It is a class that is used to get and set the value and validate the form control.
     FormGroup and FormArray - It represents the collections of form controls.

Now we need to go to app.compotents.ts and import FormGroup, FormControl & validator from the @angular/forms
import { FormGroup, FormControl, Validators } from '@angular/forms'

The next step is to create a FormGroup and Add FormControl inside the FormGroup.
schoolForm = new FormGroup({})

As you can see, we have an instance for form group and named it as schoolForm.

Under the schoolForm, we have three formControl instances representing the properties' first name, last name, country.
schoolForm = new FormGroup({
  firstname: new FormControl(),
  lastname: new FormControl(),
  country: new FormControl()
})


Building of HTML form
You would have noticed that we have enclosed it in a <form> and included three input felids first name, last name, country.
<form [formGroup]=" schoolForm "  (ngSubmit)="onSubmit()">
  <p>
    <label for="firstname">First Name </label>
    <input type="text" id="firstname" name="firstname" formControlName="firstname" >
  </p>
  <p>
    <label for="lastname">Last Name </label>
    <input type="text" id="lastname" name="lastname" formControlName=" lastname " >
  </p>
  <p>
    <label for="country">country </label>
    <input type="text" id=" country " name=" country " formControlName=" country " >
  </p>
  <p>
    <button type="submit">Submit</button>
  </p>
</form>


To connect the model and the template, add the following,
<form [formGroup]="schoolForm">

Next, we need to bind form fields to the FormControl models and use the formControlName directive.
<input type="text" id="firstname" name="firstname" formControlName="firstname" >

Lastly, we have to submit the form
(ngSubmit)="onSubmit()"

We have already got the submit button in our form. The ngSubmit binds itself to the click event of the submit button.

Get data in the Component class

To receive the form data in the component class. We have to create the onSubmit method in the component class.
onSubmit() {
  console.log(this. schoolForm.value);
}


We are using the,
console.log(this.contactForm.value)

To send the value of our form data to the console window.

I hope you understand about forms and how to use the reactive form in angular.


AngularJS Hosting Europe - HostForLIFE :: Containerize An Angular Application

clock July 30, 2021 05:44 by author Peter

In this article, we are going to build an angular application using docker and host the production-ready environment in an NGINX container.


Let’s create an angular application.

Before creating an angular application, ensure that you have installed NodeJS and Angular CLI installed into your development environment.

Once the prerequisite is installed start executing the following command for creating an angular application.
ng new sample-app

Navigate to the project directory,
cd sample-app

Run the application by using the below command.
ng serve

Now your angular application starts running,

Let’s create a docker file and dockerizing the angular application.

Creating a Docker File

Docker file consists of the following stages,

    Building the Angular application into production-ready
    Serving the application using the NGINX server.

Let's discuss both the stages in detail and the command which we are going to use while creating a docker file.

Stage 1

FROM
Initializes a build stage, and gets the latest node image from the DOCKERHUB Registry as the base image from executing the instruction related to the angular application configuration. The stage is named build, which helps to reference this stage in the Nginx configuration stage.

WORKDIR
Sets the default directory in which instructions are executed, If the path is not found the directory will be created, In the above code path of usr/local/app is the directory where angular source code move into.

COPY
It copies the project source files from the project root directory into the host environment into the specified directory path on the container subsystem.

RUN
It compiles our application.

Stage 2
FROM

Initializes a build stage, and gets the latest Nginx image from the DOCKERHUB Registry as the base image from executing the instruction related to the Nginx configuration.

COPY
It copies the build output which is generated in STAGE 1(-FROM=build used to replace the default Nginx configuration).

EXPOSE

It informs the docker that the Nginx container listens on port 80, So exposing the specific port.

Docker File
# STAGE 1: Compile and Build angular application
#Using official node image as the base image
FROM node: latest as build
# Setting up the working directory
WORKDIR / usr / local / app
# Add the Source code to app
COPY. / /usr/local / app / # Install all dependencies
RUN npm install
# Generate the Build of the angular application
RUN npm run build
# STAGE 2: Serving the application using NGINX server
# Using official nginx image as the base image
FROM nginx: latest
# Copy compiled file from build stage
COPY– from = build / usr / local / app / dist / sample - app / usr / share / nginx / html
# Expose Port 80
EXPOSE 80

Let's RUN the DOCKER CONTAINER,

In order to run the docker container, open up the terminal or command prompt and navigate to the docker file into your project directory.
docker build -t sample-app:latest

Once the build is successful, execute the following command.
Docker image ls

The above command will list all images which are installed in our docker container.
Let’s run the image,
Docker run -d -p 8080:80 sample-app:latest

Here I am using -d its helps to detach the container and have it run in the background and the -p argument is used for port mapping which is port 80 of the docker container (as mentioned in the docker file), should expose port 8080 of the host machine.
docker ps

The above command displays the details of our running container.
CONTAINER ID IMAGE COMMAND CREATED STATUS PORTS NAMES
13e5642e4s29 gurp13/sample-app:latest "/docker-entrypoint.…" 10 seconds ago Up 10 seconds 0.0.0.0:8080->80/tcp reen_khayyam

Now we can see that the container is up and running. Try to open localhost:8080, you can see your application running.

Application is running and working as expected now we can push out the image to an image repository, which helps to deploy our container to a cloud service, for that you need to create an account on the Docker hub.

Once you created an account on docker hub run the following command,
docker login -u <username> -p <password>
docker push sample-app:latest
    
Your image is successfully pushed to the Docker hub registry.


AngularJS Hosting Europe - HostForLIFE.eu :: Custom Attribute Directive In Angular

clock July 6, 2021 07:14 by author Peter

In this article, we will learn about custom attribute directives in Angular. In this article, we will create some custom attributes directive and use in our components.
What is a directive?

Directives are classes that add additional behavior to elements in your Angular applications. With Angular's built-in directives, you can manage forms, lists, styles, and what users see.

The different types of Angular directives are as follows,
    Components - directives with a template. This type of directive is the most common directive type.
    Attribute directives - directives that change the appearance or behavior of an element, component, or another directive.
    Structural directives - directives that change the DOM layout by adding and removing DOM elements.

Create a new Angular project

Step 1
Open your folder where you want to save your project in Visual Studio Code or Command Prompt.

Step 2

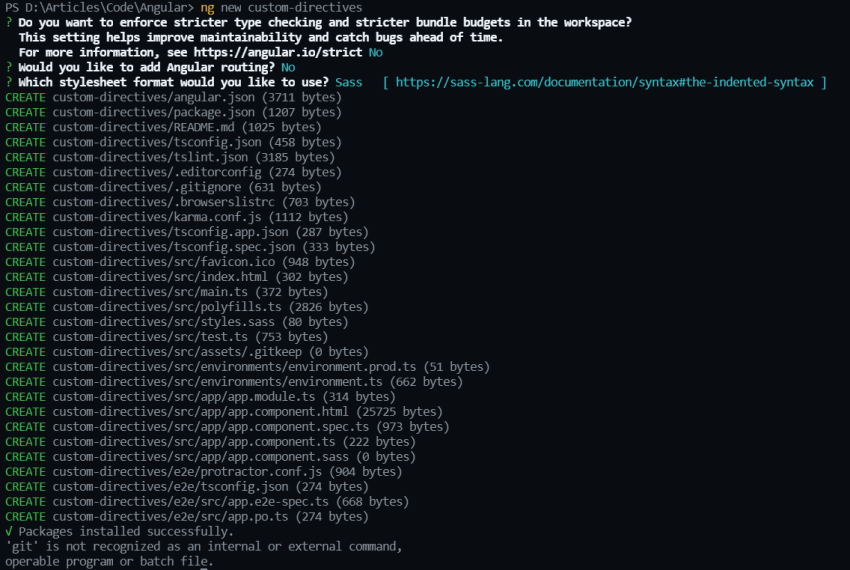
Run the below command to create a new project. In this process, you will be asked some questions like add routing in your project and style sheet format, etc. You can add as per your requirements.
ng new custom-directives

JavaScript

As you see below, our project is created.Custom Attribute Directive In Angular
In this article, we will learn about custom attribute directives in Angular. In this article, we will create some custom attributes directive and use in our components.
What is a directive?

Directives are classes that add additional behavior to elements in your Angular applications. With Angular's built-in directives, you can manage forms, lists, styles, and what users see.

The different types of Angular directives are as follows,
    Components - directives with a template. This type of directive is the most common directive type.
    Attribute directives - directives that change the appearance or behavior of an element, component, or another directive.
    Structural directives - directives that change the DOM layout by adding and removing DOM elements.

Create a new Angular project

Step 1
Open your folder where you want to save your project in Visual Studio Code or Command Prompt.

Step 2
Run the below command to create a new project. In this process, you will be asked some questions like add routing in your project and style sheet format, etc. You can add as per your requirements.

ng new custom-directives

JavaScript
As you see below, our project is created.
Step 3
As you now open your app component you see a lot of code so we remove all the code and just add a simple h1 tag as you see below code.
<h1>This is Custom Attribute Directive Project</h1>

Markup

Step 4
Now run your project by a simple move to your project directory and then run the below command,
ng serve

JavaScript
After successfully running your project, you can see the output as below.


Built in Attributes Directives
Attribute directives listen to and modify the behavior of other HTML elements, attributes, properties, and components.

The most common attribute directives are as follows,
    NgClass - adds and removes a set of CSS classes.
    NgStyle - adds and removes a set of HTML styles.
    NgModel - adds two-way data binding to an HTML form element.

Create custom attributes directive

Step 1
Create a new folder in your project’s app folder called directives to simplify project structure.

Step 2
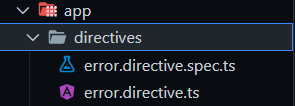
Run the below command to create a new custom attribute directive. Here error is the name of our directive and directives is a folder name that we create.
ng g directive directives/error

JavaScript
After executing the above command, it will generate the following two files.
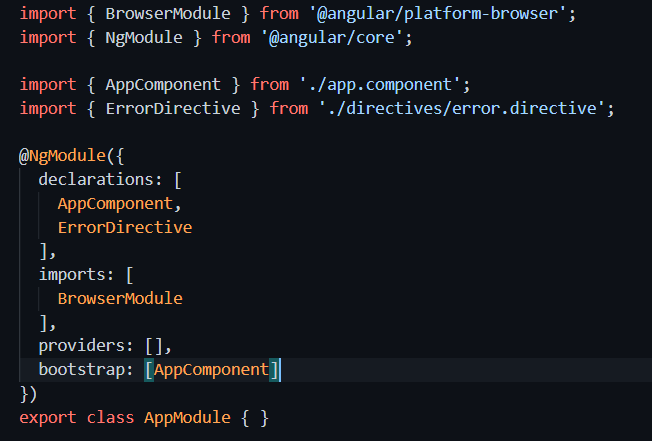
And it also adds our directive in-app module file’s declaration section.
Step 3
Now we implement logic in this directive that if the user uses this directive in any element, the element color will become red. For that add the below code in your file.
import { Directive, ElementRef } from '@angular/core';


@Directive({
  selector: '[appError]'
})

export class ErrorDirective {
  constructor(el:ElementRef) {
    el.nativeElement.style.color="red";
   }
}

Explanation
    In the above code first, we add the ElementRef type parameter in the constructor. It will get that element on which we use our custom attribute directive
    Then by using this el parameter we change color from style to red.

Implement custom attributes directive in our components

To add our custom attribute directive we need to add attributes In our element. As you see in your directive file you see a selector in our case our selector name is appError, by using appError in our element we can change the style.

Add this attribute in your element as shown below image,

Now refresh your page in the browser and you can see out like below image,

So as you see that we can create custom attribute directives easily. You can implement it as your requirement. In the future, we will create some other custom directives that will be useful in our day-to-day projects. If you like this article kindly share it with your friends and if you have any doubt let me know in the comments.


About HostForLIFE

HostForLIFE is European Windows Hosting Provider which focuses on Windows Platform only. We deliver on-demand hosting solutions including Shared hosting, Reseller Hosting, Cloud Hosting, Dedicated Servers, and IT as a Service for companies of all sizes.

We have offered the latest Windows 2019 Hosting, ASP.NET 5 Hosting, ASP.NET MVC 6 Hosting and SQL 2019 Hosting.


Tag cloud

Sign in