In this post, I'll explain how to use the HttpClient module in Angular 8 to consume RESfFul API and how to use the entity framework to get requests. Requests for GET, POST, PUT, PATCH, and DELETE are handled by the HttpClient module. HTTP can be used by an Angular application to communicate with backend services.
RxJs observable-based API is available with Angular HTTP. When an HTTP request is unsuccessful, Observable generates an error.
Note: I won't go over the CRUD process in this post. This article aims to clarify things for newcomers.
Step 1. Create tables in the database
Consider the simple example of employees in a hotel. We will show the name & email ID of the employee in a hotel on the view in the last step of this article.
I am going to create one database & will add the table with some values. Use the below script for more information. Note that you can create a database structure as per your requirements.
GO
SET ANSI_NULLS ON
GO
SET QUOTED_IDENTIFIER ON
GO
SET ANSI_PADDING ON
GO
CREATE TABLE [dbo].[Employee](
[Id] [int] IDENTITY(1,1) NOT NULL,
NULL,
NULL,
NULL,
CONSTRAINT [PK_Employee] PRIMARY KEY CLUSTERED
(
[Id] ASC
) WITH (PAD_INDEX = OFF, STATISTICS_NORECOMPUTE = OFF, IGNORE_DUP_KEY = OFF, ALLOW_ROW_LOCKS = ON, ALLOW_PAGE_LOCKS = ON) ON [PRIMARY]
) ON [PRIMARY]
GO
SET ANSI_PADDING OFF
GO
SET IDENTITY_INSERT [dbo].[Employee] ON
INSERT [dbo].[Employee] ([Id], [Name], [Email], [Password]) VALUES (1, N'Rupesh', N'[email protected]', N'123')
INSERT [dbo].[Employee] ([Id], [Name], [Email], [Password]) VALUES (2, N'Ashish', N'[email protected]', N'123')
INSERT [dbo].[Employee] ([Id], [Name], [Email], [Password]) VALUES (3, N'Sam', N'[email protected]', N'123')
INSERT [dbo].[Employee] ([Id], [Name], [Email], [Password]) VALUES (4, N'Ajit', N'[email protected]', N'123')
SET IDENTITY_INSERT [dbo].[Employee] OFF
Step 2: Establish a Web Application
First, we'll use Visual Studio to construct a WebAPI application. Navigate to File => New => Project after opening Visual Studio. Open a new project, choose an empty ASP.NET + WebAPI project from the template, and give it a name.
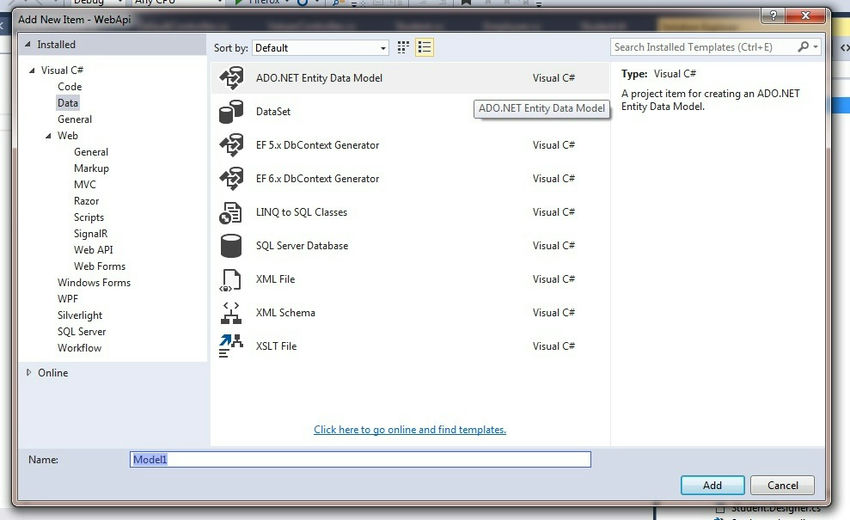
In our project, create the entity data model (.edmx) file by right-clicking on the solution, selecting Add, then New Item, and then choosing ADO.NET Entity Data Model from the Visual C# installed template in Data. Give it a name.
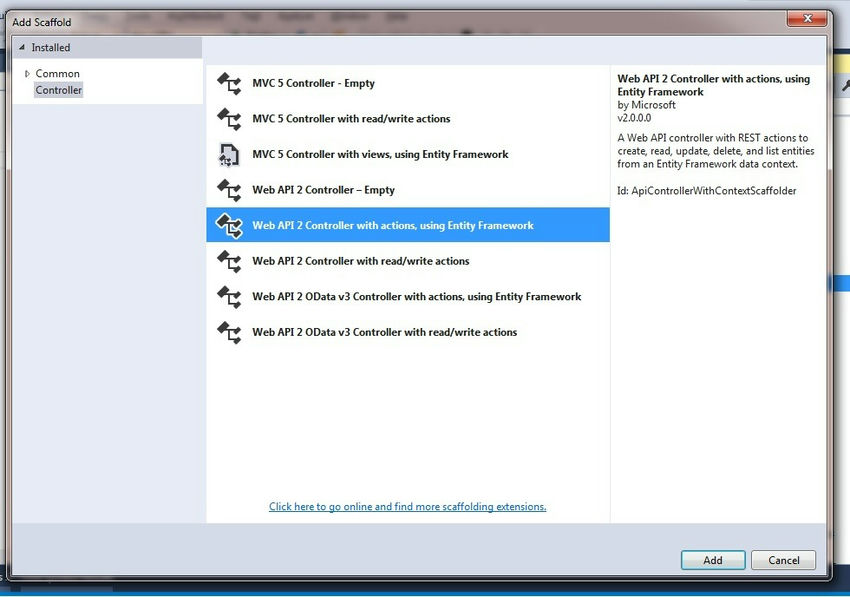
Create a web API controller by using the Entity framework. Use the Web API controller with REST actions to perform a CRUD operation from the entity framework context.
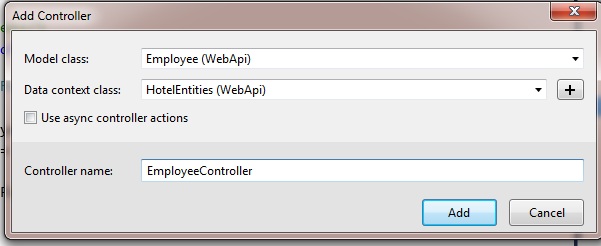
Give our controller a name. From the drop-down, choose the name of the context class.
We need to enable the CORS attribute on the above controller level as per the below syntax. CORS stands for Cross-Origin Resource Sharing. For more information refer to this article.
[EnableCors(origins: "*", headers: "*", methods: "*")]
public class EmployeesController : ApiController
{
// Our CRUD operation code here
}
The whole controller code is as shown below.
[EnableCors(origins: "*", headers: "*", methods: "*")]
public class EmployeesController : ApiController
{
private HotelEntities db = new HotelEntities();
// GET: api/Employees
public List<Employee> GetAllEmployees()
{
return db.Employees.ToList();
}
// GET: api/Employees/5
[ResponseType(typeof(Employee))]
public IHttpActionResult GetEmployee(int id)
{
Employee employee = db.Employees.Find(id);
if (employee == null)
{
return NotFound();
}
return Ok(employee);
}
// PUT: api/Employees/5
[ResponseType(typeof(void))]
public IHttpActionResult PutEmployee(int id, Employee employee)
{
if (!ModelState.IsValid)
{
return BadRequest(ModelState);
}
if (id != employee.Id)
{
return BadRequest();
}
db.Entry(employee).State = EntityState.Modified;
try
{
db.SaveChanges();
}
catch (DbUpdateConcurrencyException)
{
if (!EmployeeExists(id))
{
return NotFound();
}
else
{
throw;
}
}
return StatusCode(HttpStatusCode.NoContent);
}
// POST: api/Employees
[ResponseType(typeof(Employee))]
public IHttpActionResult PostEmployee(Employee employee)
{
if (!ModelState.IsValid)
{
return BadRequest(ModelState);
}
db.Employees.Add(employee);
db.SaveChanges();
return CreatedAtRoute("DefaultApi", new { id = employee.Id }, employee);
}
// DELETE: api/Employees/5
[ResponseType(typeof(Employee))]
public IHttpActionResult DeleteEmployee(int id)
{
Employee employee = db.Employees.Find(id);
if (employee == null)
{
return NotFound();
}
db.Employees.Remove(employee);
db.SaveChanges();
return Ok(employee);
}
protected override void Dispose(bool disposing)
{
if (disposing)
{
db.Dispose();
}
base.Dispose(disposing);
}
private bool EmployeeExists(int id)
{
return db.Employees.Count(e => e.Id == id) > 0;
}
}
Step 3. To create an Angular Project
Create a new service in our Angular application using syntax & create a company service.
ng g service our_service_name
Now we will write code to get the data from our API in the service i.e. company.service.ts file contains the below code.
Note. Do not use a direct URL link in the typescript file anyone can easily hack it. For demo purposes, I have used it.
The below code contains the file company.service.ts.
import { Injectable } from '@angular/core';
import { HttpClient } from '@angular/common/http';
import { Company } from '../Model/company';
@Injectable({
providedIn: 'root'
})
export class CompanyService {
constructor(private http: HttpClient) { }
getData() {
return this.http.get("http://localhost:8012/api/Employees");
}
}
In the above code, CompanyService is a class that contains our getData method that returns a result from API from where we are getting a record using a GET request, API/Employees (which is written in the API project). We can also host our API project & add that URL as well.
Step 4. Create a new component in our angular project
Now create a new component in our angular project using syntax & create the my-company component.
ng g c componentName
The below code contains the file my-company.component.html.
<p>Angular 8 using Web API !!!</p>
<div>
<table class="gridList">
<tr>
<th>User Names</th>
<th>Email</th>
</tr>
<tr *ngFor="let item of companyList">
<td>{{ item.Name }}</td>
<td>{{ item.Email }}</td>
</tr>
</table>
</div>
In the above code, we have used ngFor to iterate the loop. companyList is a variable in which we will get the data from our services refer to the below steps.
The below code contains the file my-company.component .ts
import { BrowserModule, Title } from '@angular/platform-browser';
import { Component, OnInit, ViewChild } from '@angular/core';
import { CompanyService } from '../../service/company.service';
@Component({
selector: 'app-my-company',
templateUrl: './my-company.component.html',
styleUrls: ['./my-company.component.css']
})
export class MyCompanyComponent implements OnInit {
companyList: any;
constructor(private companyService: CompanyService) { }
ngOnInit() {
this.getData();
}
getData() {
this.companyService.getData().subscribe(
data => {
this.companyList = data;
}
);
}
}
In the above code, we have imported the company service. In the OnInit method, we will declare one variable company list & will assign the data that is returned by our method getData() from service.
Here, subscribe is used to send the list.
Step 5. Loading the company component in app.component.html
Now, to load our company component, we will add a selector in the app.component.html file.
<app-my-company></app-my-company>
<app-my-company></app-my-company>
Step 6. To run the Angular application
To run the Angular application, use the below syntax.
ng serve -o