Introduction
In this article, we are going to discuss an important concept of Angular called Route Guard. We will create a simple angular application to get a better understanding of this concept. This article can be used by beginners, intermediates, and professionals.

I have divided this topic into 3 articles. The below topics will be coved in the first article.
What is Route Guard?
Why is it Required?
Type of Angular Route Guard?
How to Implement CanActivateGuard?
What is Route Guard?
In the traditional web application, we were checking users' access and permission using Authentication and Authorization on the server side. If the user doesn’t have sufficient access or permission, we were redirecting a user to the login page with an appropriate error message.
Now a question comes to mind; how we will achieve this in Angular? I mean how will restrict a user to access a certain area of the application without login/permission?
That’s one of the scenarios where Route Guard comes into the picture.
Route Guards help us to prevent users to access a certain area of the application that is not permitted or has access to.
Type of Route Guard?
Four types of Route guards are available in Angular. In this article, we will cover the “CanActivate” Route guard and the rest will cover in subsequent articles.
CanActivate
CanActivateChild
CanDeactivate
CanLoad
Please note that all Route guards have interfaces that need to be implemented in the component class.
eg. “CanActivate” is an interface that has a method called “canActivate”
Please see the below screen to get a better understanding,

Suppose we have multiple Route guards applied to a specific route then all route guards should return true to navigate. If any route guard returns false then the navigation will be canceled. Let's see below the screen to understand,

In the above screen, we have two route guards,
MemberAuthGaurd
DetailsAuthGuard
So both route guards should return true. In case any of the route guards return false then “member” navigation will not work.
Now we will implement “CanActivateGaurd”
How to Implement a CanActivateGuard?
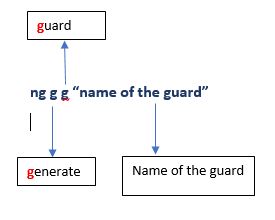
First, we will see the syntax/command used to create a route guard.
Syntax
ng g g “name of the guard”

Now we will create an angular application and implement RouteGuard to get hands-on experience.
Example
In this example, we will
Create a new angular application,
Create Two components
Implement Routing
Create a new Auth service.
Create RouteGaurd
Configure Service in the RouteGuard
Configure
Please follow the below steps to create the CanActivate Route guard in the Angular application
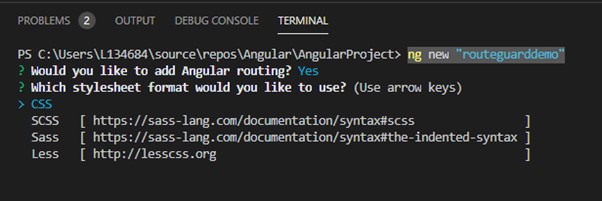
Step 1 - Create Angular Application.
ng new "routeguarddemo"

Once the application created, we will add two components,
Step 2 - Add two components
ng g c "home"
This command will create HomeComponent. Now let's add another component called “member”
ng g c “member”
Once both components are created. We will configure routing in the next step.
Step 3 - Add routing and create links
Step 3.1
Add the below code in app-routing.module.ts file
import { NgModule } from '@angular/core';
import { RouterModule, Routes } from '@angular/router';
import { HomeComponent } from './home/home.component';
import { MemberComponent } from './member/member.component';
const routes: Routes = [
{path:'home',component:HomeComponent},
{path:'member',component:MemberComponent}
];
@NgModule({
imports: [RouterModule.forRoot(routes)],
exports: [RouterModule]
})
export class AppRoutingModule { }
export const RoutingComponents =[HomeComponent,MemberComponent];
Step 3.2
Add the below code in app.moule.ts file,
import { NgModule } from '@angular/core';
import { BrowserModule } from '@angular/platform-browser';
import { AppRoutingModule, RoutingComponents } from './app-routing.module';
import { Router } from '@angular/router';
import { AppComponent } from './app.component';
@NgModule({
declarations: [
AppComponent,
RoutingComponents
],
imports: [
BrowserModule,
AppRoutingModule
],
providers: [],
bootstrap: [AppComponent]
})
export class AppModule { }
Step 3.3
Add the below code in app.comoponent.html file
<div>
<a routerLink="/home" routerLinkActive="active">Home</a>
</div>
<div>
<a routerLink="/member" routerLinkActive="active">Member</a>
</div>
<router-outlet></router-outlet>
Routing is ready now. Please note that we have not used lazy loading to keep this example simple.
Now we will add Auth service to check user credential and permission.
Step 4 - Add Auth Service and create property called “getUserPermission”
Step 4.1
Execute below command to create service,
ng g s “Auth”
Step 4.2
Add function called get MemberAuth in the service file.
This function should have actual business logic but for demo purpose, I am returning hardcoded “true” or “false” from this function.
import { Injectable } from '@angular/core';
@Injectable({
providedIn: 'root'
})
export class AuthService {
constructor() { }
get MemberAuth()
{
//Login for Member Auth
return false;
}
}
In the above code, we have created the “MemberAuth” property. In the real world, we will check member authentication and authorization here and return true and false accordingly. But for demo purposes, we are returning hard coded.
Step 5 - Create a RouteGuard
ng g g "memberAuth"
Use the above command to create RouteGuard.

We can create a route guard by selecting any interface but for this example, we will choose the “CanActivate” guard.
New “member-auth.guard.ts “ - RouteGuard file added in the project,
import { Injectable } from '@angular/core';
import { ActivatedRouteSnapshot, CanActivate, RouterStateSnapshot, UrlTree } from '@angular/router';
import { Observable } from 'rxjs';
@Injectable({
providedIn: 'root'
})
export class MemberAuthGuard implements CanActivate {
canActivate(
route: ActivatedRouteSnapshot,
state: RouterStateSnapshot): Observable<boolean | UrlTree> | Promise<boolean | UrlTree> | boolean | UrlTree {
return true;
}
}
Step 6 - Configure the route guard in the routing file.
import { NgModule } from '@angular/core';
import { RouterModule, Routes } from '@angular/router';
import { HomeComponent } from './home/home.component';
import { MemberComponent } from './member/member.component';
import { MemberAuthGuard } from './member-auth.guard';
const routes: Routes = [
{path:'home',component:HomeComponent},
{path:'member',component:MemberComponent,canActivate:[MemberAuthGuard]}
];
@NgModule({
imports: [RouterModule.forRoot(routes)],
exports: [RouterModule]
})
export class AppRoutingModule { }
export const RoutingComponents =[HomeComponent,MemberComponent];
In the above code,
We have added “canActivate:[MemberAuthGuard]” in the route object.
Imported “MemberAuthGuard” from ‘./member-auth.guard’
Step 7
Call Auth service from route guard to check member access and privileges.
import { Injectable } from '@angular/core';
import { ActivatedRouteSnapshot, CanActivate, RouterStateSnapshot, UrlTree } from '@angular/router';
import { Observable } from 'rxjs';
import { AuthService } from './auth.service';
@Injectable({
providedIn: 'root'
})
export class MemberAuthGuard implements CanActivate {
constructor(private _authservice :AuthService)
{}
canActivate(
route: ActivatedRouteSnapshot,
state: RouterStateSnapshot): Observable<boolean | UrlTree> | Promise<boolean | UrlTree> | boolean | UrlTree {
if(this._authservice.MemberAuth)
{
return true;
}
else{
window.alert("You dont have access!!! Please connect to Administrator ");
return false;
}
}
}
In the above code,
We have configured “AuthService” in the constructor of MemberAuthGuard.
Imported Auth service from’./auth.services’
Called the “MemberAuth” property to check member has access or not. This value comes from Auth Service.
Alert message in case members don't have access.
Now we will set “false” to return from Auth Service – MemberAuth properly and execute the application.
Output

Member component navigation is not working and getting an error message in the alert. That means that our Route Guard is working fine. You can change AuthSerive – MemberAuth return value to true and check.
I hope, this article has helped you to understand “route guard” and found it useful.