Full Trust European Hosting

BLOG about Full Trust Hosting and Its Technology - Dedicated to European Windows Hosting Customer

AJAX with Free ASP.NET Hosting - HostForLIFE.eu :: How to Solve JQuery which Only Send Partial Data to AJAX Post

clock April 27, 2015 07:06 by author Rebecca

JQuery is a great JavaScript framework that makes web developer life much easier. But like all framework, you need to learn its gotchas in order to work effectively with it.

Here is one of the gotchas. Jquery POST method lets you create Ajax HTTP POST request to the server. It is actually a shorthand to the JQuery Ajax method:
$.ajax({
  type: "POST",url: "save.php",
  data: "param1="+paramValue1
  +"&param2=paramValue2",
  complete: function(){ }, //manage the complete if needed
  success: function(){}}//get some data back to the screen if needed
});

Today, I'm gonna tell you how to solve the problem when JQuery only send partial data to AJAX Post. Maybe you've found that when executing the AJAX call, only part of the data is passed to the server and the rest vanishes. You usually see that some or all of the parameters you tried to pass are missing or cut in the middle. It's because JQuery uses ‘&’ as a separator between the parameters. If you have a ‘&’ within your key or value parameters, then the JQuery AJAX request gets really messed up.

You can solve this problem by encoding the parameters, replace & with %26 which is the standard encoding for that character. There are 2 ways to encode the parameters:

Semi-Automatic

Use .replace(/&/g, “%26″) –

Here is a working example:
$.ajax({
  type: "POST",url: "save.php",
  data: "param1="+paramValue1.replace(/&/g, "%26")
  +"&param2=paramValue2.replace(/&/g, "%26")",
  complete: function(){ }, //manage the complete if needed
  success: function(){}}//get some data back to the screen if needed
});

Fully Automatic

A more elegant way is to slightly change the way we call the meethod and let JQuery do that encoding for you –

Here is a working example:
$.ajax({
 type: "POST",url: "save.php",
 data: { "param1": paramValue1,
 "param2": paramValue2 },
 complete: function(){ }, //manage the complete if needed
 success: function(){}//get some data back to the screen if needed
});

AJAX with Free ASP.NET Hosting
Try our AJAX with Free ASP.NET Hosting today and your account will be setup soon! You can also take advantage of our Windows & ASP.NET Hosting support with Unlimited Domain, Unlimited Bandwidth, Unlimited Disk Space, etc. You will not be charged a cent for trying our service for the next 3 days. Once your trial period is complete, you decide whether you'd like to continue.


Drupal CMS with Free ASP.NET Hosting - HostForLIFE.eu :: Fixing Drupal Fatal Error "Allowed memory size of A bytes exhausted (tried to allocate B bytes)"

clock April 24, 2015 07:30 by author Rebecca

Sometimes when working with Drupal, you suddenly see this error: 
Allowed memory size of A bytes exhausted (tried to allocate B bytes)
or

Fatal error: Allowed memory size of 134217728 bytes exhausted (tried to allocate 3669969 bytes) in ../public_html/includes/theme.inc on line 1987

How to handle this error? That error message tells you that Drupal needed more memory than PHP was allowed to give it. In this article, I will explain to you 3 methods to increase PHP memory size, pick one that you like:

1. Fix the error in Drupal 6/7 using php.ini file

You will probably see this error message when you install new modules/themes. By default, Drupal 6/7 allocates 64M (megabytes) of memory on your website and so, to fix this issue you need to increase memory limit to higher value (128MB is fine).

Here is the solution:

1. Connect to your Drupal web hosting using SSH/FTP connection

2. Check if there’s php.ini  file in root folder of your hosting

3. If it’s existing, open the file with text editor (notepad) and add the value  php_value memory_limit = "128M"

4. If there’s no  php.ini file in root folder, then you need to create one. Use notepate, wordpad or whatever can edit and save text file as .ini  file add the value  php_value memory_limit = "128M"

5. Save the file if check the error’s gone

(Note: remember to save file with name: php.ini, not php.ini.txt)

2. Increase PHP memory using .httaccess

Edit the .htaccess file in the Drupal root directory. Look for the section:

Override PHP settings. More in sites/default/settings.php

But the following cannot be changed at runtime

Now add the following line:
php_value memory_limit 64M
This method will only work if PHP is running as an Apache module.

3. Using settings.php

If Drupal is already installed, you can edit sites/default/settings.php. This method will affect only the site using this file.
Locate the PHP settings section and add the following line at the end of that section:
ini_set('memory_limit', '64M');

That’s all for today, hope you will solve this issue immediately after reading this!

Drupal CMS with Free ASP.NET Hosting
Try our Drupal CMS with Free ASP.NET Hosting today and your account will be setup soon! You can also take advantage of our Windows & ASP.NET Hosting support with Unlimited Domain, Unlimited Bandwidth, Unlimited Disk Space, etc. You will not be charged a cent for trying our service for the next 3 days. Once your trial period is complete, you decide whether you'd like to continue.


Orchard CMS 1.8 with Free ASP.NET Hosting - HostForLIFE.eu :: Creating Custom Workflow Activity for Unpublished

clock April 20, 2015 06:28 by author Rebecca

If you needed to tap into a list of activities of orchard, unpublished activity is one of the requirements. For your information, Orchard default Workflow activity list didn’t have a unpublished activity. Maybe you had built a module that added your own custom Workflow Activities, then you had successfully creating the activities and making them work. But there's a problem that you had no idea how to bind one of these with an event. Even if you copied the publish activity which is found in the default activity folder of Workflow module, the copied activity didn’t get bind to any event. So, in this post, I will tell you the simple way to create costum workflow activity for unpublished.

First thing, you have to find that Orchard.Workflows.Activitieshas a file ContentActivity. In this file there are other classes that inherits the ContentActivity class ContentCreatedActivity,ContentUpdatedActivity and ContentPublishedActivity. All these classes are activities that subscribe to ContentActivity that is an event activity. They subscribe to the Create, Update and Publish events of the Orchard core. If you look into Orchard.ContentManagement.Handlers.ContentHandler you’d see the list of default events provided by Orchard CMS core.

I was interested in the OnUnpublished event, so in this tutorial, I created a handler that would listen to that event. Here are the codes:

using System.Collections.Generic;
using Orchard.ContentManagement;
using Orchard.ContentManagement.Handlers;
using Orchard.Workflows.Services;
namespace MyModule.Handlers {
public class WorkflowContentHandler : ContentHandler {
public WorkflowContentHandler(IWorkflowManager workflowManager) {
OnUnpublished<ContentPart>(
(context, part) =>
workflowManager.TriggerEvent("ContentUnpublished",
context.ContentItem,
() => new Dictionary<string, object> { {"Content", context.ContentItem } }));
}
}
}

After which you create your custom workflow activity for Unpublished. This class inherits from ContentActivity like its siblings, so it can start workflow and would be an event.

using System;
using System.Collections.Generic;
using System.Linq;
using Orchard.Localization;
using Orchard.Workflows.Models;
using Orchard.Workflows.Services;
using Orchard.Workflows.Activities;
namespace MyModule.WorkFlow
{
public class ContentUnpublishedActivity : ContentActivity
{
public override string Name
{
get { return "ContentUnpublished"; }
}
public override LocalizedString Description
{
get { return T("Content is Unpublished."); }
}
}
}

That’s it. Once you’ve done this the new Content Unpublished activity would show up in the Workflow activity list. You can use it in conjunction to other Activities to execute your own workflow after any content has been unpublished.


Orchard CMS 1.8 with Free ASP.NET Hosting
Try our Orchard CMS 1.8 with Free ASP.NET Hosting today and your account will be setup soon! You can also take advantage of our Windows & ASP.NET Hosting support with Unlimited Domain, Unlimited Bandwidth, Unlimited Disk Space, etc. You will not be charged a cent for trying our service for the next 3 days. Once your trial period is complete, you decide whether you'd like to continue.


Umbraco 7.2.2 with Free ASP.NET Hosting - HostForLIFE.eu :: Removing Orphaned or Missing Umbraco Nodes

clock April 15, 2015 12:28 by author Rebecca

If you try copying nodes within the back office, you may encounter the error. You'll receive an error relating to a method called 'umbraco.dialogs.moveOrCopy.CheckPermissions'. And here is a little tip on how to remove missing or orphaned nodes within Umbraco.


To find any orphaned nodes and remove them, run the following script against your Umbraco database. Make sure you backup your database first. It's a little long winded but the script finds any nodes and dependancies that do not have a version, are not trashed and is of type content. 

delete from cmsPropertyData where contentNodeId in (select id from UmbracoNode where id not in (select nodeid from cmsContentXml) and id in (select nodeId from cmsDocument where published = 1) and trashed = 0 and nodeObjectType = 'C66BA18E-EAF3-4CFF-8A22-41B16D66A972')
delete from cmsDocument where nodeId in (select id from UmbracoNode where id not in (select nodeid from cmsContentXml) and id in (select nodeId from cmsDocument where published = 1) and trashed = 0 and nodeObjectType = 'C66BA18E-EAF3-4CFF-8A22-41B16D66A972')
delete from cmsPreviewXml where nodeId in (select id from UmbracoNode where id not in (select nodeid from cmsContentXml) and id in (select nodeId from cmsDocument where published = 1) and trashed = 0 and nodeObjectType = 'C66BA18E-EAF3-4CFF-8A22-41B16D66A972')
delete from cmsContentVersion where ContentId in (select id from UmbracoNode where id not in (select nodeid from cmsContentXml) and id in (select nodeId from cmsDocument where published = 1) and trashed = 0 and nodeObjectType = 'C66BA18E-EAF3-4CFF-8A22-41B16D66A972')
delete from cmsContentXml where nodeId in (select id from UmbracoNode where id not in (select nodeid from cmsContentXml) and id in (select nodeId from cmsDocument where published = 1) and trashed = 0 and nodeObjectType = 'C66BA18E-EAF3-4CFF-8A22-41B16D66A972')
delete from cmsContent where nodeId in (select id from UmbracoNode where id not in (select nodeid from cmsContentXml) and id in (select nodeId from cmsDocument where published = 1) and trashed = 0 and nodeObjectType = 'C66BA18E-EAF3-4CFF-8A22-41B16D66A972')
delete from umbracoUser2NodePermission where nodeId in (select id from UmbracoNode where id not in (select nodeid from cmsContentXml) and id in (select nodeId from cmsDocument where published = 1) and trashed = 0 and nodeObjectType = 'C66BA18E-EAF3-4CFF-8A22-41B16D66A972')
delete from umbracoNode where id in (select id from UmbracoNode where id not in (select nodeid from cmsContentXml) and id in (select nodeId from cmsDocument where published = 1) and trashed = 0 and nodeObjectType = 'C66BA18E-EAF3-4CFF-8A22-41B16D66A972')

You may encounter a situation where some of your orphaned nodes have child nodes. You'll need to remove these as well. To identify and remove child nodes of orphaned children, use the following script before the script above. Make sure you backup your database.

delete from cmsPropertyData where contentNodeId in (select id from UmbracoNode where parentID in (select id from UmbracoNode where id not in (select nodeid from cmsContentXml) and id in (select nodeId from cmsDocument where published = 1) and trashed = 0 and nodeObjectType = 'C66BA18E-EAF3-4CFF-8A22-41B16D66A972'))
delete from cmsDocument where nodeId in (select id from UmbracoNode where parentID in (select id from UmbracoNode where id not in (select nodeid from cmsContentXml) and id in (select nodeId from cmsDocument where published = 1) and trashed = 0 and nodeObjectType = 'C66BA18E-EAF3-4CFF-8A22-41B16D66A972'))
delete from cmsPreviewXml where nodeId in (select id from UmbracoNode where parentID in (select id from UmbracoNode where id not in (select nodeid from cmsContentXml) and id in (select nodeId from cmsDocument where published = 1) and trashed = 0 and nodeObjectType = 'C66BA18E-EAF3-4CFF-8A22-41B16D66A972'))
delete from cmsContentVersion where ContentId in (select id from UmbracoNode where parentID in (select id from UmbracoNode where id not in (select nodeid from cmsContentXml) and id in (select nodeId from cmsDocument where published = 1) and trashed = 0 and nodeObjectType = 'C66BA18E-EAF3-4CFF-8A22-41B16D66A972'))
delete from cmsContentXml where nodeId in (select id from UmbracoNode where parentID in (select id from UmbracoNode where id not in (select nodeid from cmsContentXml) and id in (select nodeId from cmsDocument where published = 1) and trashed = 0 and nodeObjectType = 'C66BA18E-EAF3-4CFF-8A22-41B16D66A972'))
delete from cmsContent where nodeId in (select id from UmbracoNode where parentID in (select id from UmbracoNode where id not in (select nodeid from cmsContentXml) and id in (select nodeId from cmsDocument where published = 1) and trashed = 0 and nodeObjectType = 'C66BA18E-EAF3-4CFF-8A22-41B16D66A972'))
delete from umbracoUser2NodePermission where nodeId in (select id from UmbracoNode where parentID in (select id from UmbracoNode where id not in (select nodeid from cmsContentXml) and id in (select nodeId from cmsDocument where published = 1) and trashed = 0 and nodeObjectType = 'C66BA18E-EAF3-4CFF-8A22-41B16D66A972'))
delete from umbracoNode where parentID in (select id from UmbracoNode where id not in (select nodeid from cmsContentXml) and id in (select nodeId from cmsDocument where published = 1) and trashed = 0 and nodeObjectType = 'C66BA18E-EAF3-4CFF-8A22-41B16D66A972')

Hope it works for you!

Umbraco 7.2.2 with Free ASP.NET Hosting

Try our Umbraco 7.2.2 with Free ASP.NET Hosting today and your account will be setup soon! You can also take advantage of our Windows & ASP.NET Hosting support with Unlimited Domain, Unlimited Bandwidth, Unlimited Disk Space, etc. You will not be charged a cent for trying our service for the next 3 days. Once your trial period is complete, you decide whether you'd like to continue.


Joomla 3.4 Hosting France - HostForLIFE.eu :: Creating Lightbox for Images and Videos on Joomla Website

clock April 11, 2015 05:12 by author Rebecca

In this tutorial, I will show you how to create a 'Lightbox' effect for your Joomla website using the plugin YOOeffects. Using a Lightbox is a great way to show off your images on your website, as a slideshow or for individual pictures. Videos can also be shown using the Lightbox javascript - both from your own website or streamed from another site (such as YouTube).

What is Lightbox?

Lightbox is a simple javascript that creates an effect that when a user clicks on the image, it pops up, is magnified using a smooth animation and is set on a darkened background. Lightbox is triggered by a 'rel' attribute in the HTML which is used in the <a> tag which surrounds the target image. The Lightbox script is great because it works on all browsers and eliminates the need for Flash animation. Flash although popular is notoriously bad for SEO as Google's bots struggle to read the data within the flash animation.

Here is an example of the lightbox:

Lightbox effect for Images

If the YOOEffects plugin has been successfully installed, it's time to see how to write the code to ensure the plugin works for your chosen images. The code looks a little daunting, but it is really quite simple once you break it down, especially if you are used to using HTML.

The following is an images is the Lopes Mendes beach, on Ihla Grande, Brazil. If you click on the image you will see the lightbox effect.

The code should be entered into the article that you are wanting to display the image in. It is key not to copy and paste this code as text into your article, but click on the 'HTML' editor within your chosen editor then paste it.

<a href="/images/stories/lopes-mendes-beach.jpg"
title="Lopes Mendes Beach" rel="shadowbox;width=500;height=333"
alt="Lopes Mendes Beach" title="Ihla Grande" width="250" height="165" />

You will notice i have changed the title of the image for each part of the code. This is to show you that the 'Lopes Mendes Beach' is the description that appears when the lightbox is engaged, and Ihla Grande appears when you hover over the image in its present state. It can be a useful way of providing more information about your chosen image to your users.

The second part of the code determines the size of the thumbnail that is displayed to click on, be sure to keep the same proportions, to ensure the image is not distorted!

Lightbox Image Slideshow

Having slideshows of images is a clean, easy and convenient way to display images and this can be done using a Lightbox effect too. 

The code you would insert to create a slideshow of images is the following:

title="Lightbox Slideshow"rel="lightbox[group];width=500;height=333">
Click here to see a lightbox slideshow.

title="butterfly photo"rel="lightbox[group];width=500;height=333">

title="waterfall photo"rel="lightbox[group];width=333;height=500">


The best way to construct a slideshow is to add the "rel=lightbox" attribute to your links first so that they open in lightbox. Once you have done this, you need to remove the names of the links so they become invisible. The final step is to add in [group] in the rel attribute. You can name this anything you want, but all of the links must have to same name, so they appear in the same slideshow. witYou can see how i have done this in the code above. You can add in as many images as you like, and you can do this with videos too, not just images. The code is very simple, but it can be easy to make mistakes, so check through your work carefully if it does not work first time!

Display Videos using Lightbox

The great thing about this plugin is that you can use the same script to show videos on your website. It is far easier for users to focus on a video if the rest of the screen is darkened, so this plugin can be used to great effect. Importantly, this plugin means that people can watch videos hosted on other sites within your own - so there is no reason for visitors to leave you site.

The code is very similar and is as follows:

<a href="http://www.youtube.com/v/jtK6qITij5k&hl=en&autoplay=1"
title="Open Source Content Management Systems"
rel="shadowbox;width=425;height=355">Joomla and Google's Summer of Code</a>


You can play any type of video file as long as your browser can, so this tool is very useful. The key is to ensure you have the linked to the video directly - make sure you are not just linking to the page, otherwise lightbox will not play the video.

HostForLIFE.eu Joomla 3.4 Hosting

HostForLIFE.eu is European Windows Hosting Provider which focuses on Windows Platform only. We deliver on-demand hosting solutions including Shared hosting, Reseller Hosting, Cloud Hosting, Dedicated Servers, and IT as a Service for companies of all sizes. We have customers from around the globe, spread across every continent. We serve the hosting needs of the business and professional, government and nonprofit, entertainment and personal use market segments.


AJAX Hosting Spain - HostForLIFE.eu :: How to Handle Session Timeout and Server HTTP Errors in AJAX

clock April 2, 2015 14:41 by author Rebecca

The most difficult part in writing AJAX code is to handle errors and exceptions. Session timeout is one of the most trivial error that one needs to consider while creating an AJAX enabled application. In this post, I will show you the way of handling session timeout errors server HTTP errors in AJAX.

Normally, we use AJAX to deliever HTML content that we put in a DIV or SPAN tag and display it on screen. But suppose the request that we sent using AJAX was generated an error due to session timeout then the session timeout screen will be shown in DIV tag. Any error generated by server let say http 404 error or http 505 can lead to display such error in our display DIV.
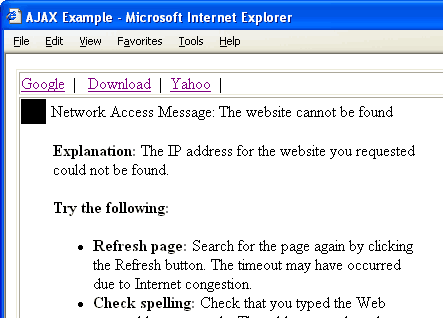
How to Handle Session Timeout Errors

One solution that you can use to handle the session timeout errors is using JSON or XML format as output for your AJAX requests. You have to check for session in your script, say for example if you are using JSP then probably you can do something like this:

if(null == session || session.getAttribute("SOME_ATTR_THAT_I_PLACED_IN_SESSION")) {
    isSessionNull = true;
}
...
{
    <%
    if(isSessionNull) {
        out.println("status: error");
    }
    else {
        out.println("status: success");
    }
    %>
}

In short, create a status field in your JSON script or a status tag in your XML which will describe the status of the request. I am looking for some more ways of checking session timeouts in AJAX. Kindly let me know if you have a good solution.

Handle Server HTTP errors in AJAX

HTTP errors like 404, 503 are sometimes tedious to handle using AJAX. There is a simple trick to solve this problem. First let's see simple AJAX handler function that you use to get response XML/text through AJAX.

xhr.open("GET", "http://someurl", true);
xhr.onreadystatechange = handleHttpResponse;
xhr.send(null);
...
...
function handleHttpResponse() {
    if (xhr.readyState == 4) {
        //handle response your way
        spanBodyContent.innerHTML = xhr.responseText;
    }
}

Normal AJAX handlers has a if to check readyState and if it is 4 (response arrived state) then you will get the response from xhr.responseText or xhr.responseXML.

AJAX’s XMLHttpRequest object has attributes to check the status of your http request. You can use two attributes: status and statusText for knowing this.

xhr.status
..
xhr.statusText

Thus by checking status attribute from your AJAX xhr object can solve your problem.

xhr.open("GET", "http://someurl", true);
xhr.onreadystatechange = handleHttpResponse;
xhr.send(null);
...
...
function handleHttpResponse() {
    if (xhr.readyState == 4) {
        try {
        if(xhr.status == 200) {
            //handle response your way
            spanBodyContent.innerHTML = xhr.responseText;
        }
        }catch(e) {//error}
    }
}

At the end, if status is not 200, you may not want to update your DOM with the ajax result and display some error message on your web page.

HostForLIFE.eu AJAX Hosting
HostForLIFE.eu is European Windows Hosting Provider which focuses on Windows Platform only. We deliver on-demand hosting solutions including Shared hosting, Reseller Hosting, Cloud Hosting, Dedicated Servers, and IT as a Service for companies of all sizes. We have customers from around the globe, spread across every continent. We serve the hosting needs of the business and professional, government and nonprofit, entertainment and personal use market segments.


About HostForLIFE

HostForLIFE is European Windows Hosting Provider which focuses on Windows Platform only. We deliver on-demand hosting solutions including Shared hosting, Reseller Hosting, Cloud Hosting, Dedicated Servers, and IT as a Service for companies of all sizes.

We have offered the latest Windows 2019 Hosting, ASP.NET 5 Hosting, ASP.NET MVC 6 Hosting and SQL 2019 Hosting.


Tag cloud

Sign in