In this article, we will look into the basics of visual studio extension. Also, create one application and understand file structure and implementation.

How to Create a New VSIX Project?
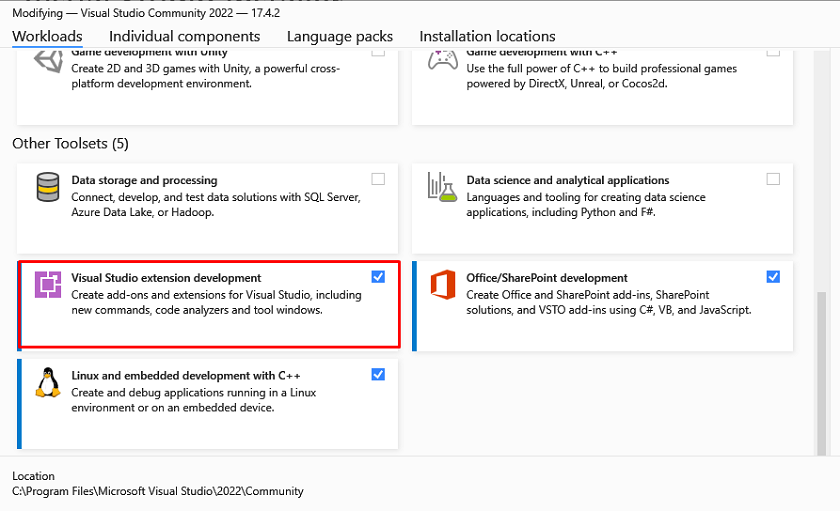
Step 1
Install Visual Studio extension development from Tools-> Get Tools and Features.
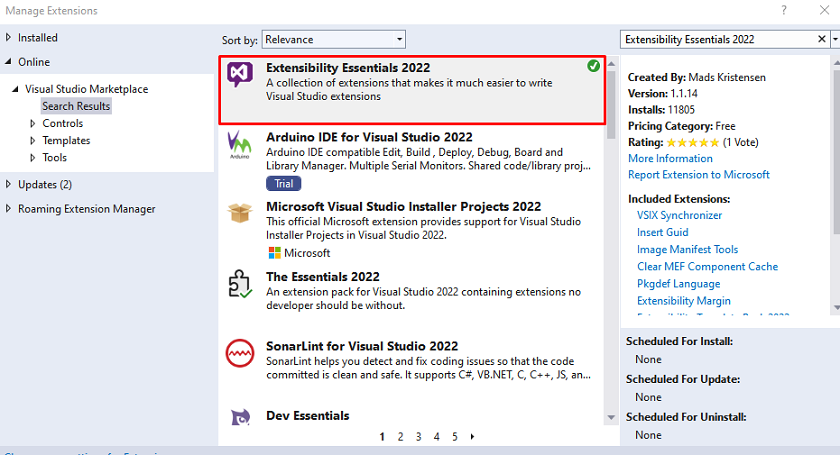
Step 2
Next, install Extensibility Essentials 2022, which helps us write different extensions.
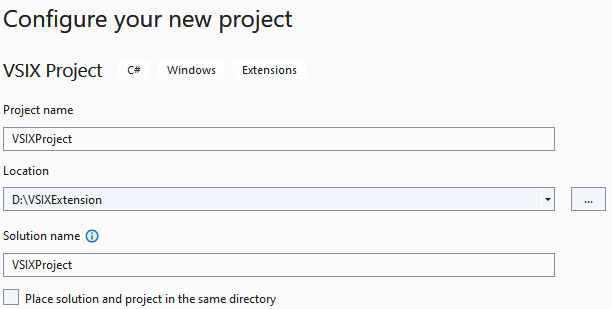
Step 4
Configure a new project.
Step 3
Create a new VSIX Project
- Many VSIX project templates are available, each with its purpose and usage.
- VSIX Project w/Command (Community) template comes with a command hooked up, which helps us start a new extension easily after creating commands and configuring the same with Visual Studio.
- VSIX Project w/Tool Window (Community) template with tool window command.
- Empty VSIX Project (Community) and VSIX Project (Community) templates for MEF-only extensions or use in advanced customized scenarios.
But, here in this article, we will use VSIX Project w/Command (Community) template.

Step 5
Default Project Structure
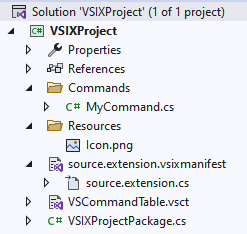
As you can see, it will create different files inside the VSIX project solution, each with its purpose. So, we looked into them one by one and understood their purpose of it.
MyCommand.cs
The command handler file executes logic when the user triggers the command.
namespace VSIXProject
{
[Command(PackageIds.MyCommand)]
internal sealed class MyCommand : BaseCommand<MyCommand>
{
protected override async Task ExecuteAsync(OleMenuCmdEventArgs e)
{
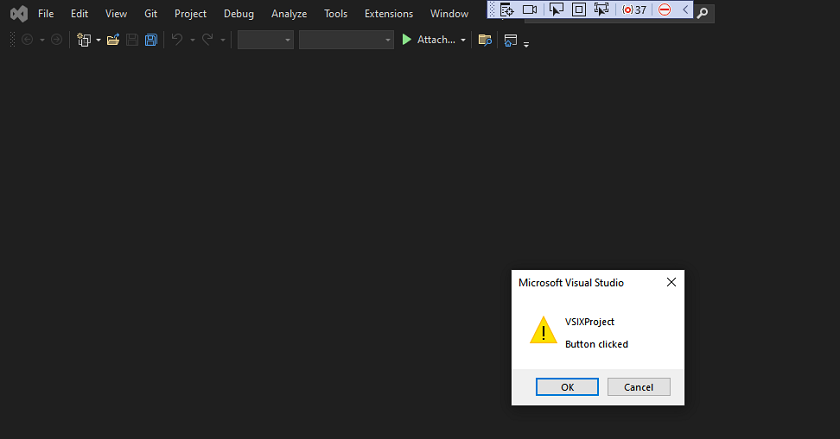
await VS.MessageBox.ShowWarningAsync("VSIXProject", "Button clicked");
}
}
}
Resources/icon.png
This file is used to set icons for our extension. We can also set our custom icons for the same.
source.extension.vsixmanifest
It contains metadata of our extensions project like name, description, version, tags, author, etc.
// ------------------------------------------------------------------------------
// <auto-generated>
// This file was generated by the extension VSIX Synchronizer
// </auto-generated>
// ------------------------------------------------------------------------------
namespace VSIXProject
{
internal sealed partial class Vsix
{
public const string Id = "VSIXProject.34901e8a-0458-4252-9662-9ca734552faf";
public const string Name = "VSIXProject";
public const string Description = @"Empty VSIX Project.";
public const string Language = "en-US";
public const string Version = "1.0";
public const string Author = "jaydeepvpatil225";
public const string Tags = "";
}
}
VSCommandTable.vsct
This XML file contains the binding of different commands with ids, button text for our command, parent menu, and many more.
<?xml version="1.0" encoding="utf-8"?>
<CommandTable xmlns="http://schemas.microsoft.com/VisualStudio/2005-10-18/CommandTable" xmlns:xs="http://www.w3.org/2001/XMLSchema">
<Extern href="stdidcmd.h"/>
<Extern href="vsshlids.h"/>
<Include href="KnownImageIds.vsct"/>
<Include href="VSGlobals.vsct"/>
<Commands package="VSIXProject">
<Groups>
<Group guid="VSIXProject" id="MyMenuGroup" priority="0x0600">
<Parent guid="VSMainMenu" id="Tools"/>
</Group>
</Groups>
<!--This section defines the elements the user can interact with, like a menu command or a button
or combo box in a toolbar. -->
<Buttons>
<Button guid="VSIXProject" id="MyCommand" priority="0x0100" type="Button">
<Parent guid="VSIXProject" id="MyMenuGroup" />
<Icon guid="ImageCatalogGuid" id="StatusInformation" />
<CommandFlag>IconIsMoniker</CommandFlag>
<Strings>
<ButtonText>My Command</ButtonText>
<LocCanonicalName>.VSIXProject.MyCommand</LocCanonicalName>
</Strings>
</Button>
</Buttons>
</Commands>
<Symbols>
<GuidSymbol name="VSIXProject" value="{bb2edf02-da6e-4673-b2a4-b3b7449b2ce7}">
<IDSymbol name="MyMenuGroup" value="0x0001" />
<IDSymbol name="MyCommand" value="0x0100" />
</GuidSymbol>
</Symbols>
</CommandTable>
VSIXProjectPackage
This file has one Initialize method that registers commands asynchronously when we run our extension project.
global using Community.VisualStudio.Toolkit;
global using Microsoft.VisualStudio.Shell;
global using System;
global using Task = System.Threading.Tasks.Task;
using System.Runtime.InteropServices;
using System.Threading;
namespace VSIXProject
{
[PackageRegistration(UseManagedResourcesOnly = true, AllowsBackgroundLoading = true)]
[InstalledProductRegistration(Vsix.Name, Vsix.Description, Vsix.Version)]
[ProvideMenuResource("Menus.ctmenu", 1)]
[Guid(PackageGuids.VSIXProjectString)]
public sealed class VSIXProjectPackage : ToolkitPackage
{
protected override async Task InitializeAsync(CancellationToken cancellationToken, IProgress<ServiceProgressData> progress)
{
await this.RegisterCommandsAsync();
}
}
}
Step 6
Run Project
When we run the project, it will open one experimental visual studio and keep its own things separately related to settings.
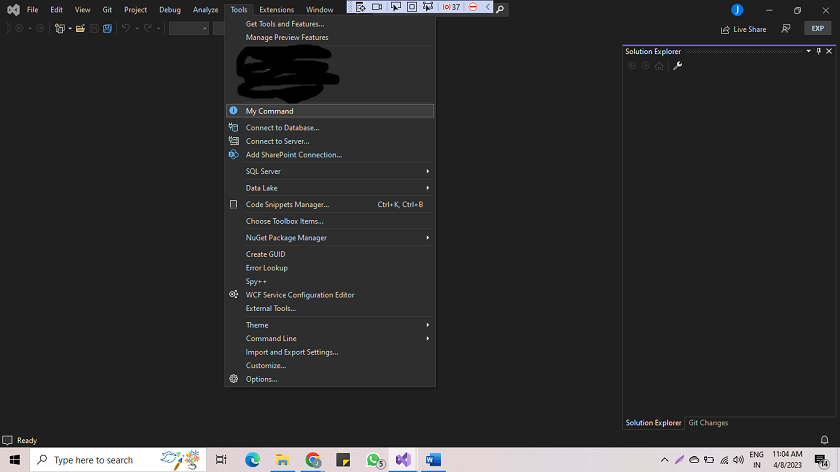
As we can see, our command comes up under the Tool menu “MyCommand”, and when you click on it, a message popup with details that we put inside the MyCommand file. Here we just looked into the basics, but you can customize it as required and perform different operations.
This is all about VSIX Sample Project. Here we discussed the basics of VSIX Extension with a demo application implementation and its file structure details.
Happy Coding!!!