In this article, we will develop APIs in Node JS for back-end operations and implement a CRUD operation in it.
Prerequisites
Visual studio code
Node version installed in the system
Postman
Create a new blank folder on your desired location. Now, open cmd and go to the newly created location and write " code . " to open folder in visual studio code.
In the cmd write below code to initiate the node app by default configurations.
npm init //press enter until you see package.json in the folder structure
At this point of time, a blank package.json will be added into the project.
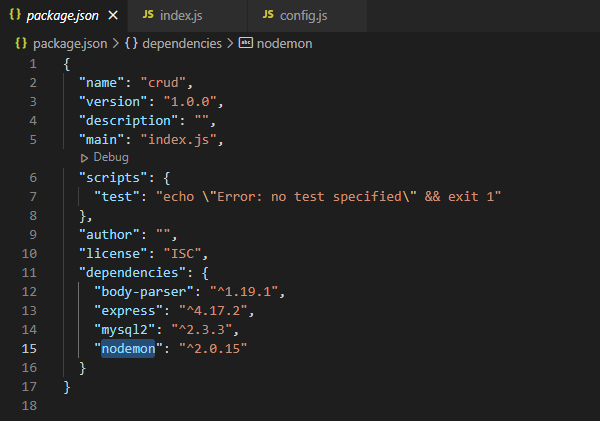
We have created basic node app now let's import our required dependencies and npm packages. We will be using express, mysql2, and,nodemon npm packages
npm i express mysql2 nodemon
Database: I have used mysql workbench (you can use any database of your choice)
I have created a simple database called employeedb through MySQL workbench and a table called employee.
Columns in the table and stored procedure for insert and update employee
- EmpId - Int
- Name - Varchar(100)
- EmpCode - Varchar(50)
- Salary - Decimal
CREATE TABLE `employee` (
`EmpId` int NOT NULL AUTO_INCREMENT,
`Name` varchar(100) NOT NULL,
`EmpCode` varchar(40) NOT NULL,
`Salary` int DEFAULT NULL,
PRIMARY KEY (`EmpId`)
) ENGINE=InnoDB AUTO_INCREMENT=49 DEFAULT CHARSET=utf8mb4 COLLATE=utf8mb4_0900_ai_ci;
Stored procedure for insert and update employee - EmployeeAddOrEdit
CREATE DEFINER=`root`@`localhost` PROCEDURE `EmployeeAddOrEdit`(
IN _EmpId INT,
IN _Name varchar(100),
IN _EmpCode varchar(40),
IN _Salary INT)
BEGIN
IF _EmpId= 0 THEN
INSERT INTO employee (Name, EmpCode,Salary)
Values (_Name,_EmpCode,_Salary);
SET _EmpId = LAST_INSERT_ID();
ELSE
Update employee
SET
Name = _Name,
EmpCode=_EmpCode,
Salary = _Salary
Where EmpId=_EmpId;
END IF;
Let's create config.js file to store database credentials. Create new file called "config.js" and write below code.
const config = {
app: {
port: 3000
},
db: {
host: 'localhost',
user: 'root',
password: 'softweb#567',
database: 'employeedb',
multipleStatements: true
}
};
Let's import config.js file in the index.js file, create a connection string and connect to the database as well as we will listen to the 3000 port through express server.
const mysql = require('mysql2');
const express = require('express');
var app = express();
app.use(express.json());
const config = require('./config');
const { db: { host, user, password, database, multipleStatements }, app: { port } } = config;
var connection = mysql.createConnection({
host: host,
user: user,
password: password,
database: database,
multipleStatements: multipleStatements
});
connection.connect((err) => {
if (!err)
console.log('Database connected successfully');
else
console.log('Database connection failed' + JSON.stringify(err, undefined, 2));
});
app.listen(port, () => console.log('Express server started at port no : ' + port));
To check whether our code is working or not run the node application and see the logs.
node index.js

Database has been connected successfully now !! :)
Let's develop node APIs now.
1. Get Employees: In order to make query call to database we will use query method of conenction object and in the callback function of the query function we log the response if there is no error.
We have to pass specific employee id in order to fetch particular employee record. Hence, we have passed it in the api by ":id".
//get all employees
app.get('/employees', (req, res) => {
connection.query('select * from employee', (err, rows, fields) => {
if (!err)
res.send(rows);
else
console.log(err);
})
});
//get employee by id
app.get('/employee/:id', (req, res) => {
connection.query('select * from employee where empid=?', [req.params.id], (err, rows, fields) => {
if (!err)
res.send(rows);
else
console.log(err);
})
});
If any error in the calling API then we have logged it in the console otherwise we could be able to see the response of the postman. (We will be using postman for the calling node APIs)

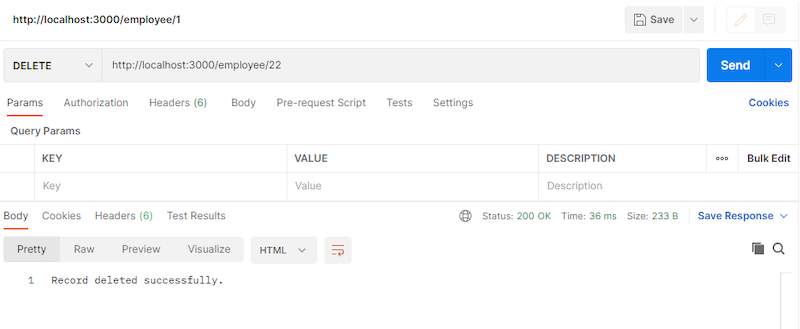
2. Delete the employee record
//delete employee
app.delete('/employee/:id', (req, res) => {
connection.query('delete from employee where empid=?', [req.params.id], (err, rows, fields) => {
if (!err)
res.send('Record deleted successfully.')
else
res.send(err);
})
});
Call delete API in postman
http://localhost:3000/employee/1 //Pass employee id with delete type of the API
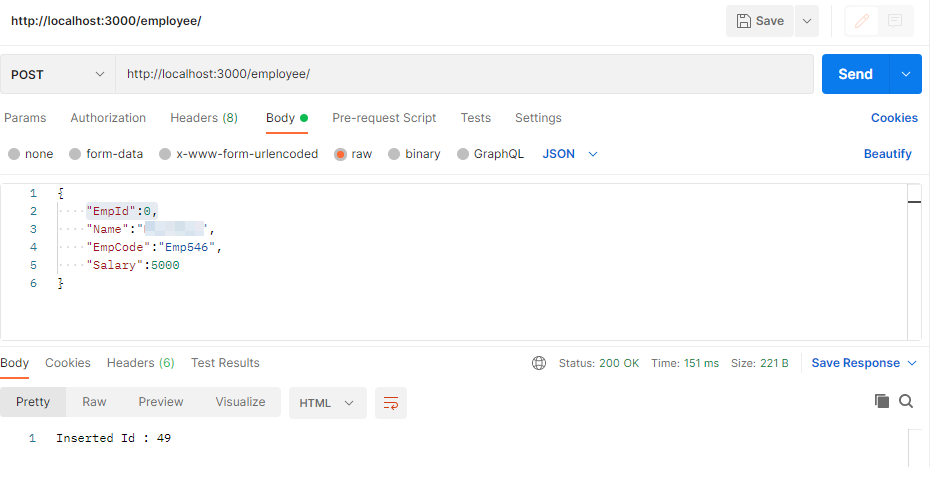
3. Insert employee record: We have to first read the employee object that we have sent via the API body. Furthermore, we will pass the required parameter in the stored procedure by SET and CALL the stored procedure.
Note: We have to pass EmpId as 0 to notify that our intention is to insert the record. (Refer to our stored procedure code above)
//post employee
app.post('/employee/', (req, res) => {
//console.log(req.body.body);
var emp = req.body;
console.log(emp);
var sql = `set @EmpId=?;set @Name=?;set @EmpCode=?;set @Salary=?;
CALL EmployeeAddOrEdit(@EmpId,@Name,@EmpCode,@Salary)`
connection.query(sql, [emp.EmpId, emp.Name, emp.EmpCode, emp.Salary], (err, rows, fields) => {
if (!err) {
const emp = rows.filter(function (elem) {
return elem.constructor == Array;
});
res.send('Inserted Id : ' + emp[0][0].EmpId);
}
else
res.send(err);
})
});
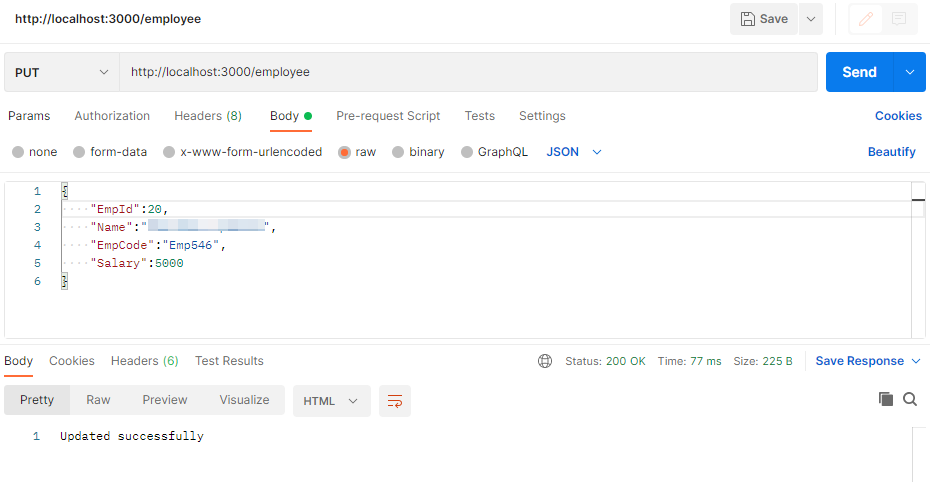
4. Update employee record
//update employee
app.put('/employee/', (req, res) => {
var emp = req.body;
var sql = `set @EmpId=?;set @Name=?;set @EmpCode=?;set @Salary=?;
CALL EmployeeAddOrEdit(@EmpId,@Name,@EmpCode,@Salary)`
connection.query(sql, [emp.EmpId, emp.Name, emp.EmpCode, emp.Salary], (err, rows, fields) => {
if (!err) {
res.send('Updated successfully');
}
else
res.send(err);
})
});
Similar to post API we will pass the mode of the employee but this time with a specific employee id so that it indicates that we are updating a record.
Therefore, our request would look like below with the EmpId
This was just a jumpstart in node js to understand database connectivity and basic crud operations. Validations, API filter, and more such features we will look into it in the future.