I'll walk you through the process of quickly creating a calculator application with Angular and Bootstrap in this post.

Note: Before beginning this session, please read my earlier essay (linked below) about Angular applications.
Step 1 of the Angular Application: Create Component
Make a component called calculator first.
ng g c calculator
Under the calculator folder, this generates calculator.component.ts & calculator.component.html.
Step 2: In calculator.component.ts, add the angular calculator logic.
The selector 'ng-calculator' is used here. in order to use the <ng-calculator></ng-calculator> calculator component anywhere in our code.
import { Component, OnInit } from '@angular/core';
@Component({
selector: 'ng-calculator',
templateUrl: './calculator.component.html',
styleUrls: ['./calculator.component.css']
})
export class CalculatorComponent implements OnInit {
I attach the operand or number that the user clicks to the input variable. For instance, I designate it as the input variable if the user inputs 31+210+40. It makes it simpler to compute the result by simply calling the built-in JavaScript function eval(input). I have some matters to attend to. The user could, for instance, repeat the operands (54++23). or a decimal value that isn't correct, like 54.23.5, etc. Also, if the number starts with 0, eval will generate an error.
The code that follows is prohibited. on multiple occasions. The integers and decimal points are captured here by pressNum. and adds it to the variable used for input. This case has two validations.
input:string = '';
result:string = '';
pressNum(num: string) {
//Do Not Allow . more than once
if (num==".") {
if (this.input !="" ) {
const lastNum=this.getLastOperand()
console.log(lastNum.lastIndexOf("."))
if (lastNum.lastIndexOf(".") >= 0) return;
}
}
The code below will fail in strict mode since it does not allow 0 at the beginning and Javascript will throw an error. There can be just one decimal place in an integer.
If the integer starts with 0, Eval will throw an error (Octal literals are not allowed in strict mode). Thus, we eliminate it.
if (num=="0") {
if (this.input=="" ) {
return;
}
const PrevKey = this.input[this.input.length - 1];
if (PrevKey === '/' || PrevKey === '*' || PrevKey === '-' || PrevKey === '+') {
return;
}
}
this.input = this.input + num
this.calcAnswer();
}
getLastOperand returns the last operand. For example, if the user input is 921+18 then the last operand is 18.
getLastOperand() {
let pos:number;
console.log(this.input)
pos=this.input.toString().lastIndexOf("+")
if (this.input.toString().lastIndexOf("-") > pos) pos=this.input.lastIndexOf("-")
if (this.input.toString().lastIndexOf("*") > pos) pos=this.input.lastIndexOf("*")
if (this.input.toString().lastIndexOf("/") > pos) pos=this.input.lastIndexOf("/")
console.log('Last '+this.input.substr(pos+1))
return this.input.substr(pos+1)
}
The pressOperator captures the operators. It again appends it to the input variable. We make sure that that operator is followed by a number and not another operator (18++).
pressOperator(op: string) {
//Do not allow operators more than once
const lastKey = this.input[this.input.length - 1];
if (lastKey === '/' || lastKey === '*' || lastKey === '-' || lastKey === '+') {
return;
}
this.input = this.input + op
this.calcAnswer();
}
Here clear removes the last input.
clear() {
if (this.input !="" ) {
this.input=this.input.substr(0, this.input.length-1)
}
}
Here allClear clears everything.
allClear() {
this.result = '';
this.input = '';
}
Here calcAnswer is where the calculation happens. We check the last character. If it is a decimal point (.) then we remove it (Example in 15+13.). We also remove the last character if it is an operator. (Example 15+13+).
calcAnswer() {
let formula = this.input;
let lastKey = formula[formula.length - 1];
if (lastKey === '.') {
formula=formula.substr(0,formula.length - 1);
}
lastKey = formula[formula.length - 1];
if (lastKey === '/' || lastKey === '*' || lastKey === '-' || lastKey === '+' || lastKey === '.') {
formula=formula.substr(0,formula.length - 1);
}
console.log("Formula " +formula);
this.result = eval(formula);
}
Here getAnswer calculates and assigns the result to the input variable.
getAnswer() {
this.calcAnswer();
this.input = this.result;
if (this.input=="0") this.input="";
}
Then use of constructor() and ngOnInit().
constructor() { }
ngOnInit(): void {
}
}
The Code as shown below,
import { Component, OnInit } from '@angular/core';
@Component({
selector: 'ng-calculator',
templateUrl: './calculator.component.html',
styleUrls: ['./calculator.component.css']
})
export class CalculatorComponent implements OnInit {
input:string = '';
result:string = '';
pressNum(num: string) {
if (num==".") {
if (this.input !="" ) {
const lastNum=this.getLastOperand()
console.log(lastNum.lastIndexOf("."))
if (lastNum.lastIndexOf(".") >= 0) return;
}
}
if (num=="0") {
if (this.input=="" ) {
return;
}
const PrevKey = this.input[this.input.length - 1];
if (PrevKey === '/' || PrevKey === '*' || PrevKey === '-' || PrevKey === '+') {
return;
}
}
this.input = this.input + num
this.calcAnswer();
}
getLastOperand() {
let pos:number;
console.log(this.input)
pos=this.input.toString().lastIndexOf("+")
if (this.input.toString().lastIndexOf("-") > pos) pos=this.input.lastIndexOf("-")
if (this.input.toString().lastIndexOf("*") > pos) pos=this.input.lastIndexOf("*")
if (this.input.toString().lastIndexOf("/") > pos) pos=this.input.lastIndexOf("/")
console.log('Last '+this.input.substr(pos+1))
return this.input.substr(pos+1)
}
pressOperator(op: string) {
const lastKey = this.input[this.input.length - 1];
if (lastKey === '/' || lastKey === '*' || lastKey === '-' || lastKey === '+') {
return;
}
this.input = this.input + op
this.calcAnswer();
}
clear() {
if (this.input !="" ) {
this.input=this.input.substr(0, this.input.length-1)
}
}
allClear() {
this.result = '';
this.input = '';
}
calcAnswer() {
let formula = this.input;
let lastKey = formula[formula.length - 1];
if (lastKey === '.') {
formula=formula.substr(0,formula.length - 1);
}
lastKey = formula[formula.length - 1];
if (lastKey === '/' || lastKey === '*' || lastKey === '-' || lastKey === '+' || lastKey === '.') {
formula=formula.substr(0,formula.length - 1);
}
console.log("Formula " +formula);
this.result = eval(formula);
}
getAnswer() {
this.calcAnswer();
this.input = this.result;
if (this.input=="0") this.input="";
}
constructor() { }
ngOnInit(): void {
}
}
Step 3. Add Angular template code in calculator.component.html using Bootstrap
<div class="container-fluid">
<div class="jumbotron col-sm-9 p-2 m-0 bg-warning">
<h2 class="text-center">Angular Calculator Application</h2>
<div class="form-group">
<label for="usr">Displays the User Input</label>
<div class="form-control" type="text">{{input}}</div>
</div>
<div class="form-group">
<label for="pwd">Displays the Results</label>
<div class="form-control" type="text">{{result}}</div>
</div>
<div class="col-sm-12 p-1 m-0">
<button class="btn btn-info col-sm-6" type="button" (click)="allClear()">C</button>
<button class="btn btn-danger col-sm-3" type="button" (click)="clear()">x</button>
<button class="btn btn-secondary col-sm-3" type="button" (click)="pressOperator('/')">/</button>
</div>
<div class="col-sm-12 p-1 m-0">
<button class="btn btn-primary col-sm-3 p-1" type="button" (click)="pressNum('7')">7</button>
<button class="btn btn-primary col-sm-3 p-1" type="button" (click)="pressNum('8')">8</button>
<button class="btn btn-primary col-sm-3 p-1" type="button" (click)="pressNum('9')">9</button>
<button class="btn btn-secondary col-sm-3 p-1" type="button" (click)="pressOperator('*')">X</button>
</div>
<div class="col-sm-12 p-1 m-0">
<button class="btn btn-primary col-sm-3 p-1" type="button" (click)="pressNum('4')">4</button>
<button class="btn btn-primary col-sm-3 p-1" type="button" (click)="pressNum('5')">5</button>
<button class="btn btn-primary col-sm-3 p-1" type="button" (click)="pressNum('6')">6</button>
<button class="btn btn-secondary col-sm-3 p-1" type="button" (click)="pressOperator('-')">-</button>
</div>
<div class="col-sm-12 p-1 m-0">
<button class="btn btn-primary col-sm-3 p-1" type="button" (click)="pressNum('1')">1</button>
<button class="btn btn-primary col-sm-3 p-1" type="button" (click)="pressNum('2')">2</button>
<button class="btn btn-primary col-sm-3 p-1" type="button" (click)="pressNum('3')">3</button>
<button class="btn btn-secondary col-sm-3 p-1" type="button" (click)="pressOperator('+')">+</button>
</div>
<div class="col-sm-12 p-1 m-0">
<button class="btn btn-primary col-sm-3 p-1" type="button" (click)="pressNum('.')">.</button>
<button class="btn btn-primary col-sm-3 p-1" type="button" (click)="pressNum('0')">0</button>
<button class="btn btn-lg btn-success col-sm-6 p-1" type="button" (click)="getAnswer()">=</button>
</div>
</div>
</div>
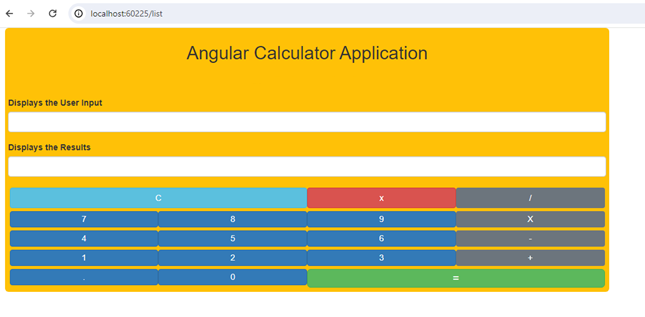
The first textbox displays the user input including the operators.
<div class="container-fluid">
<div class="jumbotron col-sm-9 p-2 m-0 bg-warning">
<h2 class="text-center">Angular Calculator Application</h2>
<h3 class="text-center">By Satyaprakash</h3>
<div class="form-group">
<label for="usr">Displays the User Input</label>
<div class="form-control" type="text">{{input}}</div>
</div>
Markup
The second textbox displays the result as the user type.
<div class="form-group">
<label for="pwd">Displays the Results</label>
<div class="form-control" type="text">{{result}}</div>
</div>
C clears every display, and x deletes, or clears, the most recent input. Our four operators for division, multiplication, subtraction, addition, and use are /, X,-, and +. to input the digits in decimal. = Computes and resets the input from the user. I'm mapping user clicks to the component class through the usage of event binding. PressNum() records the buttons for numbers and decimals. The button clicks for /, X,-, and + are recorded by the pressOperator() method. All inputs are cleared using allClear. To remove the last input, use clear(). Calculator is reset after calculation using getAnswer().
Step 4. Add the selector of calculator.component.html in app.component.html
<ng-calculator></ng-calculator>
Step 5. Add the CalculatorComponent in the declaration array of app.module.ts
import { CalculatorComponent } from './calculator/calculator.component';
@NgModule({
declarations: [
AppComponent,
CalculatorComponent
],
Step 6. Add Bootstrap CDN url in the index.html to make the application responsive design
<!doctype html>
<html lang="en">
<head>
<meta charset="utf-8">
<title>Angular Application Real-Time</title>
<base href="/">
<meta name="viewport" content="width=device-width, initial-scale=1">
<link rel="icon" type="image/x-icon" href="favicon.ico">
<link rel="stylesheet" href="https://stackpath.bootstrapcdn.com/bootstrap/4.5.0/css/bootstrap.min.css" integrity="sha384-9aIt2nRpC12Uk9gS9baDl411NQApFmC26EwAOH8WgZl5MYYxFfc+NcPb1dKGj7Sk" crossorigin="anonymous">
</head>
<body>
<app-root></app-root>
</body>
</html>
Output
Use the below command to run the Angular application.
ng serve