
September 14, 2021 09:33 by
 Peter
PeterFor better understanding, you should have a basic knowledge about what are components and how to build an application using that.

Components are the building blocks of Angular. So we need to understand how components communicate with each other.
There are three ways:
parent to child - sharing data via input
child to parent - sharing data via viewChild with AfterViewInit
child to parent - sharing data via output and EventEmitter
Parent to child - sharing data via input
To share data from parent component to child component we use@input decorator.
Let’s configure the parent component and child component,
import { Component } from '@angular/core';
@Component({
selector: 'app-parent',
template: ` <app-child [childMessage]="message"></app-child> `,
styleUrls: ['./parent.component.css']
})
export class ParentComponent {
message = “I am a parent"
constructor() { }
}
If you see the above code, <app-child> is used as a directive in the parent component. we are using property binding to bind the properties between child and parent, Binding child’s childMessage property with message property from the parent component.
import { Component, Input } from '@angular/core';
@Component({
selector: 'app-child',
template: ` {{ message }} `,
styleUrls: ['./child.component.css']
})
export class ChildComponent {
@Input() childMessage: string;
constructor() { }
}
To use@input decorative, we have to first import it from @angular/core . Next will decorate childMessage with @input decorative with type string. Lastly, display the message from the parent into the child template using string interpolation.
Child to parent - sharing data via ViewChild and AfterViewInit
It allows the child component to be injected into parent competent so that the parent component gets access to its child’s attributes and functions. We must note that parents will get access only after the view is initialized.
Let’s configure the parent component and child component
import { Component, ViewChild, AfterViewInit } from '@angular/core';
import { ChildComponent } from "../child/child.component";
@Component({
selector: 'app-parent',
template: `
Message: {{ message }}
<app-child></app-child>
`,
styleUrls: ['./parent.component.css']
})
export class ParentComponent implements AfterViewInit {
@ViewChild(ChildComponent) child;
constructor() { }
Message:string;
ngAfterViewInit() {
this.message = this.child.message
}
}
import { Component} from '@angular/core';
@Component({
selector: 'app-child',
template: ` `,
styleUrls: ['./child.component.css']
})
export class ChildComponent {
message = 'Hello Angular!';
constructor() { }
}
We have to import ViewChild,AfterViewInit from angular/core, and the child component and use AfterViewInit life cycle hook so that we get access to the attributes in the child component. In the child component, we are passing the value for the message.
Child to parent - sharing data via output and EventEmitter
You use this approach when you want to share the data on button clicks or other events. The child component uses @output to send the data to the parent by creating an event with the help of an EventEmitter which is imported from @angular/core.
Let’s configure the parent component and child component
import { Component, Output, EventEmitter } from '@angular/core';
@Component({
selector: 'app-child',
template: `
<button (click)="message()">Send Message</button>
`,
styleUrls: ['./child.component.css']
})
export class ChildComponent {
message: string = "Hey I am child !"
@Output() messageEvent = new EventEmitter<string>();
constructor() { }
sendMessage() {
this.messageEvent.emit(this.message)
}
}
import { Component } from '@angular/core';
@Component({
selector: 'app-parent',
template: `
Message: {{message}}
<app-child (messageEvent)="receiveMessage($event)"></app-child>
`,
styleUrls: ['./parent.component.css']
})
export class ParentComponent {
constructor() { }
Message:string;
receiveMessage($event) {
this.message = $event
}
}
First, we have to import output and EventEmitter from the @anguar/core , then we are creating an event messageEvent using EventEmitter . when the button is clicked it calls the function sendMessage and calls the emit with the message. we are using event binding property with the child selector . The parent can now subscribe to this messageEvent that’s outputted by the child component, then run the receive message function whenever this event occurs.
I hope you understand how to pass data between the parent and child components.
September 13, 2021 09:51 by
PeterThis article will cover the steps to set the Microsoft EDGE as Default Browser using PowerShell if the current browser is Internet Explorer.

Need for the change
In 2021, Microsoft stops support for Internet Explorer for most Azure and Office 365 applications, forcing all the windows customers to use other Browsers or Microsoft EDGE as the Default browser to get web application support.
Microsoft also provided the documentation to set Microsoft EDGE as default using GPO by configuring DefaultAssociationsConfiguration. Here is the link to change the default browser for all users.
I thought of a solution that only changes the default browser if the current default is Internet Explorer, not changing anything for the user with Chrome or Firefox. I use simple PowerShell If condition to achieve the solution.
It's a simple three-step process.
First, create the default associations configuration file as per the Microsoft document and store that to Network Share with access to all users.
Second, use the PowerShell command to capture the current default browser.
Third, use the if condition in PowerShell to match & create the registry key for DefaultAssociationsConfiguration.
I use the Microsoft document from the link to create an XML file that sets Microsoft Edge as the default application for specific protocols.
<?xml version="1.0" encoding="UTF-8"?>
<DefaultAssociations>
<Association ApplicationName="Microsoft Edge" ProgId="MSEdgeHTM" Identifier=".html"/>
<Association ApplicationName="Microsoft Edge" ProgId="MSEdgeHTM" Identifier=".htm"/>
<Association ApplicationName="Microsoft Edge" ProgId="MSEdgeHTM" Identifier="http"/>
<Association ApplicationName="Microsoft Edge" ProgId="MSEdgeHTM" Identifier="https"/>
</DefaultAssociations>
Store the XML to Network Share e.g. \\NetworkShare\EDGE\defaultapplication.XML
The next step is to capture the default browser details from the system using PowerShell.
To do that, we will check the registry value of ProgId at HKCU:\Software\Microsoft\Windows\Shell\Associations\UrlAssociations\http\UserChoice.
$Path = (Get-ItemProperty HKCU:\Software\Microsoft\Windows\Shell\Associations\UrlAssociations\http\UserChoice -Name ProgId).ProgId
$Path
The table shows the meaning of each value,
| Value Data |
Browser |
| IE.HTTP |
Internet Explorer |
| ChromeHTML |
Chrome |
| MSEdgeHTM |
EDGE |
| FirefoxHTML-308046B0AF4A39CB |
Firefox |
The next step is to create registry value DefaultAssociationsConfiguration at HKLM:\SOFTWARE\Policies\Microsoft\Windows\System and set the value data to the XML file on Network Share (\\NetworkShare\EDGE\defaultapplication.XML) using PowerShell.
$RegistryPath = 'HKLM:\SOFTWARE\Policies\Microsoft\Windows\System'
$Name = "DefaultAssociationsConfiguration"
$value = '\\NetworkShare\EDGE\defaultapplication.XML'
New-ItemProperty -Path $registryPath -Name $name -Value $value -PropertyType String -Force | Out-Null
Now merge both the PowerShell command and use the IF condition to match the value to IE.HTTP. This way, the script will only create the Registry value if the condition match else it exits the script.
$Path = (Get-ItemProperty HKCU:\Software\Microsoft\Windows\Shell\Associations\UrlAssociations\http\UserChoice -Name ProgId).ProgId
$RegistryPath = 'HKLM:\SOFTWARE\Policies\Microsoft\Windows\System'
$Name = "DefaultAssociationsConfiguration"
$value = '\\NetworkShare\EDGE\defaultapplication.XML'
$result = "IE.HTTP"
IF($Path - eq $result) {
New - ItemProperty - Path $registryPath - Name $name - Value $value - PropertyType String - Force | Out - Null
}
ELSE {
Exit
}
At the next reboot, the system will update Microsoft EDGE as a default browser.
This small PowerShell script will allow the System admins to change the default browser from Internet Explorer to Microsoft Edge without bothering Chrome and Firefox users.
Feel free to change the $result value in the command to use this script with any browser.
The administrator can use this script as a Logon script using GPO or Task Sequence in SCCM to push this configuration.
We have used the Basic PowerShell command to verify the default browser and change to Microsoft EDGE if the current default is Internet Explorer.
September 10, 2021 08:16 by
PeterYou can pass parameter values to a crystal report programmatically using ReportDocument.DataDefinition.ParameterFields member, which represents a collection of parameters associated with a report.

Before you use ParameterFields, you must import CrystalReport.Engine namespace by adding the following line to your code:
Imports CrystalDecisions.CrystalReports.Engine
In my report, I have two parameters called ParameterName1 and ParameterName2 and I want to pass values as "Parameter1Value" and "Parameter2Value" respectively. If you have more than 2 parameters, just repeat the same steps between "START" and "END" commented lines. Also, read the comments in the code carefully.
' Create a report instance. This is the class added to your project
' when you added the report to the project
Dim report As MyReport = New MyReport
' Fill data in DataSet here. Skip this step if your report is calling
' a stored procedure direct
Dim ds As DataSet = New DataSet
' ds = GetDataFromDatabase()
Dim crParameterDiscreteValue As ParameterDiscreteValue
Dim crParameterFieldDefinitions As ParameterFieldDefinitions
Dim crParameterFieldLocation As ParameterFieldDefinition
Dim crParameterValues As ParameterValues
'
' Get the report parameters collection.
'
crParameterFieldDefinitions = report.DataDefinition.ParameterFields
' Add a parameter value - START
crParameterFieldLocation = crParameterFieldDefinitions.Item("@ParameterName1")
crParameterValues = crParameterFieldLocation.CurrentValues
crParameterDiscreteValue = New CrystalDecisions.Shared.ParameterDiscreteValue
crParameterDiscreteValue.Value = "Parameter1Value"
crParameterValues.Add(crParameterDiscreteValue)
crParameterFieldLocation.ApplyCurrentValues(crParameterValues)
' Add a parameter value - END
crParameterFieldLocation = crParameterFieldDefinitions.Item("@ParameterName2")
crParameterValues = crParameterFieldLocation.CurrentValues
crParameterDiscreteValue = New CrystalDecisions.Shared.ParameterDiscreteValue
crParameterDiscreteValue.Value = "Parameter2Value"
crParameterValues.Add(crParameterDiscreteValue)
crParameterFieldLocation.ApplyCurrentValues(crParameterValues)
'
' Set report's DataSource. Skip this step if your report is calling a
' stored procedure direct in the report.
'
report.SetDataSource(ds)
'
' Set CrystalReportViewer.ReportSource
'
CrystalReportViewer1.ReportSource = report
September 8, 2021 08:32 by
PeterAngular provides two approaches,
Reactive-driven forms
Template-driven forms
Understanding the difference between template and reactive forms
Template driven forms are asynchronous while, reactive forms are synchronous
In the Reactive driven approach, most of the logic is from the components whereas, in the template-driven approach most of the logic resides in the template.
When to use template-driven approach
When no complex validations are required in the form.
When you migrate from angular js to angular 2+, it’s easier to consider this approach
When to use reactive driven approach
When form, becomes the key part of the app we must use a reactive-driven approach as it is predictable, reusable, testable.
How to build a reactive form in 4 steps
We need to import ReactiveFormMoudle in the root folder,
import { BrowserModule } from '@angular/platform-browser';
import { NgModule } from '@angular/core';
import { ReactiveFormsModule } from '@angular/forms';
import { AppRoutingModule } from './app-routing.module';
import { AppComponent } from './app.component';
@NgModule({
declarations: [
AppComponent
],
imports: [
BrowserModule,
AppRoutingModule,
ReactiveFormsModule
],
providers: [],
bootstrap: [AppComponent]
})
export class AppModule { }
Create form module in the component using - FormGroup, FormControl, and FormArrays
In the reactive form, we will use FormGroup, FormControl, FormArray as they are the building block of an angular form.
First, let us try to understand what does those terminology means in simple words
FormControl - It is a class that is used to get and set the value and validate the form control.
FormGroup and FormArray - It represents the collections of form controls.
Now we need to go to app.compotents.ts and import FormGroup, FormControl & validator from the @angular/forms
import { FormGroup, FormControl, Validators } from '@angular/forms'
The next step is to create a FormGroup and Add FormControl inside the FormGroup.
schoolForm = new FormGroup({})
As you can see, we have an instance for form group and named it as schoolForm.
Under the schoolForm, we have three formControl instances representing the properties' first name, last name, country.
schoolForm = new FormGroup({
firstname: new FormControl(),
lastname: new FormControl(),
country: new FormControl()
})
Building of HTML form
You would have noticed that we have enclosed it in a <form> and included three input felids first name, last name, country.
<form [formGroup]=" schoolForm " (ngSubmit)="onSubmit()">
<p>
<label for="firstname">First Name </label>
<input type="text" id="firstname" name="firstname" formControlName="firstname" >
</p>
<p>
<label for="lastname">Last Name </label>
<input type="text" id="lastname" name="lastname" formControlName=" lastname " >
</p>
<p>
<label for="country">country </label>
<input type="text" id=" country " name=" country " formControlName=" country " >
</p>
<p>
<button type="submit">Submit</button>
</p>
</form>
To connect the model and the template, add the following,
<form [formGroup]="schoolForm">
Next, we need to bind form fields to the FormControl models and use the formControlName directive.
<input type="text" id="firstname" name="firstname" formControlName="firstname" >
Lastly, we have to submit the form
(ngSubmit)="onSubmit()"
We have already got the submit button in our form. The ngSubmit binds itself to the click event of the submit button.
Get data in the Component class
To receive the form data in the component class. We have to create the onSubmit method in the component class.
onSubmit() {
console.log(this. schoolForm.value);
}
We are using the,
console.log(this.contactForm.value)
To send the value of our form data to the console window.
I hope you understand about forms and how to use the reactive form in angular.
August 31, 2021 08:58 by
PeterMost of the time while developing reports people wonder how to have alternating row colors in the report like below.
There is a cool trick to it.
Go to the format section of the Details. Click the Color Tab. Then click the button next to the Background Color CheckBox.
In the formula editor of background color, type the following:
if RecordNumber mod 2 = 0 then crSilver else crNoColor.
Save and close the editor.
And now when you run the report you will see alternate colors of silver and white in the details section.
August 27, 2021 07:33 by
PeterThis short article shall address the easiest way possible to get your external IP address (and local/internal IP address). There is no particular magic to getting your external IP address; the easiest way I have found is to use the automation service provided by http://whatismyip.com/automation/n09230945.asp, the good folks at whatismyip.com are nice enough to provide a free service to return the external IP address. All that the ask in return is that you do not beat them up with too many requests; they suggest about one every five minutes as being within their comfort zone; however, they also offer to provide additional services upon request so if you need something more than that, give them a call and talk to them about it.
Now, if you have a public site and are interested in getting the user's IP address that is really not an issue. You can still just request the REMOTE_ADDR or HTTP_X_FORWARDED_FOR server variable to get that.
Code
There is not much code to address in this one. There are three examples to show: the local IP address, the external IP address (for when you might need to see that locally), and the remote IP address.
The first example shows how to collect the local IP address; here we use an instance of the IPHostEntry container class to capture the host entry and then we display the first item in the host entry's address list as the local IP address.
' Local IP Address (returns your internal IP address)
Dim hostName As String = System.Net.Dns.GetHostName()
Dim myIPs As IPHostEntry = Dns.GetHostEntry(hostName)
Response.Write("<em>Your Local IP Address is: " & myIPs.AddressList(0).ToString() & "</em><br />")
The next example uses the whatismyip.com automation service to capture the external IP address locally. This value is displayed as the external IP address. If you just need to find out your external IP address, you can use a browser to navigate to the whatismyip.com website and you will see your external IP address displayed on the page; alternatively, you can use another service such as IPChicken.com to perform the same function. If you want to pro-grammatically capture the external IP address locally, this code will do the job.
' External IP Address (get your external IP locally)
Dim utf8 As New UTF8Encoding()
Dim webClient As New WebClient()
Dim externalIp As String = _ utf8.GetString(webClient.DownloadData("http://whatismyip.com/automation/n09230945.asp"))
Response.Write("<h2>Your External IP Address is: " & externalIp & _
"</h2><br />")
If you are working from a public website and you want to capture the user's IP address; the following code will do the job.
' Remote IP Address (useful for getting user's IP from public site; run locally it just returns localhost)
Dim remoteIpAddress As String = Request.ServerVariables("HTTP_X_FORWARDED_FOR")
If (String.IsNullOrEmpty(remoteIpAddress)) Then
remoteIpAddress = Request.ServerVariables("REMOTE_ADDR")
End If
Response.Write("<em>Your Remote IP Address is: " + remoteIpAddress + "</em><br />")
This article was intended to show some simple ways to capture IP address information under different circumstances. The three examples show demonstrate how to capture the local IP address, how to capture the external IP address locally, and how to capture the user's IP address from a public website.
August 6, 2021 08:42 by
PeterYou can print a Crystal Report using the print option of Crystal Report Viewer. However, there are occasions when you want your application to print a report directly to the printer without viewing the report in Crystal Report Viewer.
The ReportDocument class provides PrintToPrinter method that may be used to print a CR direct to the printer. If no printer is selected, the default printer will be used to send the printing pages to.
The PrintToPrinter method takes four parameters.
nCopies : Indicates the number of copies to print.
collated : Indicates whether to collate the pages.
startPageN : Indicates the first page to print.
endPageN : Indicates the last page to print.
The following steps will guide you to achieve the same:
Add a crystal report (.cr) file to your ASP.NET application.
Add a report instance on the page level.
Dim report As MyReport = New MyReport
Populate reports data on Page_Init
' Get data in a DataSet or DataTable
Dim ds As DataSet = GetData()
' Fill report with the data
report.SetDataSource(ds)
Print Report
report.PrintToPrinter(1, False, 0, 0)
If you wish to print a certain page range, change the last two parameters From To page number.
If you want to set page margins, you need to create a PageMargin object and set PrintOptions of the ReportDocument.
The following code sets page margins and printer name:
Dim margins As PageMargins = Report.PrintOptions.PageMargins
margins.bottomMargin = 200
margins.leftMargin = 200
margins.rightMargin = 50
margins.topMargin = 100
Report.PrintOptions.ApplyPageMargins(margins)
' Select the printer name
Report.PrintOptions.PrinterName = printerName
August 3, 2021 07:57 by
PeterIn this article, we will discuss how to invoke API using the AJAX call. We use the AJAX call because it allows the user to update a web page without reloading the page, request data from a server after the page has loaded, receive data from a server after the page has loaded, and send the data to a server in the background.

The below HTTP verb is used to call a particular Web API call. Here is the mapping sequence.
POST - Create
GET - Read
PUT - Update
DELETE - delete
var person = new Object();
person.name = $('#name').val();
person.surname = $('#surname').val();
$.ajax({
url: 'http://localhost:3413/api/person',
type: 'POST',
dataType: 'json',
data: person,
success: function (data, textStatus, xhr) {
console.log(data);
},
error: function (xhr, textStatus, errorThrown) {
console.log('Error in Operation');
}
});
In the above code, we pass the person data to the API using the Post method.
You can call the API using the above code for different uses, like Delete record, Update record, and Get records using Get, Put, and Delete type keywords.
HostForLIFE.eu AJAX Hosting
HostForLIFE.eu is European Windows Hosting Provider which focuses on Windows Platform only. We deliver on-demand hosting solutions including Shared hosting, Reseller Hosting, Cloud Hosting, Dedicated Servers, and IT as a Service for companies of all sizes. We have customers from around the globe, spread across every continent. We serve the hosting needs of the business and professional, government and nonprofit, entertainment and personal use market segments.

July 30, 2021 05:44 by
PeterIn this article, we are going to build an angular application using docker and host the production-ready environment in an NGINX container.
Let’s create an angular application.
Before creating an angular application, ensure that you have installed NodeJS and Angular CLI installed into your development environment.
Once the prerequisite is installed start executing the following command for creating an angular application.
ng new sample-app
Navigate to the project directory,
cd sample-app
Run the application by using the below command.
ng serve
Now your angular application starts running,
Let’s create a docker file and dockerizing the angular application.
Creating a Docker File
Docker file consists of the following stages,
Building the Angular application into production-ready
Serving the application using the NGINX server.
Let's discuss both the stages in detail and the command which we are going to use while creating a docker file.
Stage 1
FROM
Initializes a build stage, and gets the latest node image from the DOCKERHUB Registry as the base image from executing the instruction related to the angular application configuration. The stage is named build, which helps to reference this stage in the Nginx configuration stage.
WORKDIR
Sets the default directory in which instructions are executed, If the path is not found the directory will be created, In the above code path of usr/local/app is the directory where angular source code move into.
COPY
It copies the project source files from the project root directory into the host environment into the specified directory path on the container subsystem.
RUN
It compiles our application.
Stage 2
FROM
Initializes a build stage, and gets the latest Nginx image from the DOCKERHUB Registry as the base image from executing the instruction related to the Nginx configuration.
COPY
It copies the build output which is generated in STAGE 1(-FROM=build used to replace the default Nginx configuration).
EXPOSE
It informs the docker that the Nginx container listens on port 80, So exposing the specific port.
Docker File
# STAGE 1: Compile and Build angular application
#Using official node image as the base image
FROM node: latest as build
# Setting up the working directory
WORKDIR / usr / local / app
# Add the Source code to app
COPY. / /usr/local / app / # Install all dependencies
RUN npm install
# Generate the Build of the angular application
RUN npm run build
# STAGE 2: Serving the application using NGINX server
# Using official nginx image as the base image
FROM nginx: latest
# Copy compiled file from build stage
COPY– from = build / usr / local / app / dist / sample - app / usr / share / nginx / html
# Expose Port 80
EXPOSE 80
Let's RUN the DOCKER CONTAINER,
In order to run the docker container, open up the terminal or command prompt and navigate to the docker file into your project directory.
docker build -t sample-app:latest
Once the build is successful, execute the following command.
Docker image ls
The above command will list all images which are installed in our docker container.
Let’s run the image,
Docker run -d -p 8080:80 sample-app:latest
Here I am using -d its helps to detach the container and have it run in the background and the -p argument is used for port mapping which is port 80 of the docker container (as mentioned in the docker file), should expose port 8080 of the host machine.
docker ps
The above command displays the details of our running container.
CONTAINER ID IMAGE COMMAND CREATED STATUS PORTS NAMES
13e5642e4s29 gurp13/sample-app:latest "/docker-entrypoint.…" 10 seconds ago Up 10 seconds 0.0.0.0:8080->80/tcp reen_khayyam
Now we can see that the container is up and running. Try to open localhost:8080, you can see your application running.
Application is running and working as expected now we can push out the image to an image repository, which helps to deploy our container to a cloud service, for that you need to create an account on the Docker hub.
Once you created an account on docker hub run the following command,
docker login -u <username> -p <password>
docker push sample-app:latest
Your image is successfully pushed to the Docker hub registry.
July 29, 2021 08:57 by
Peter
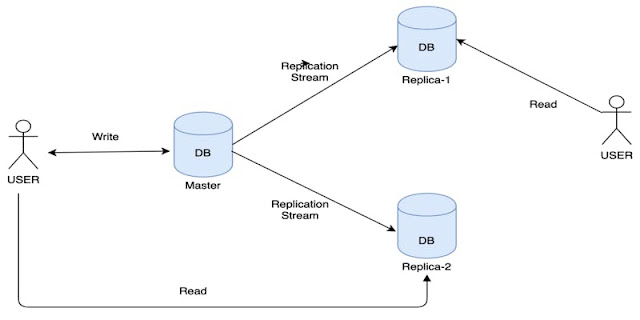
Master-Slave database design is usually designed to replicate to one or more database servers. In this scenario, we have a master/slave relationship between the original database and the copies of databases.
A master database only supports the write operations and the slave database only supports read operations. Basically, the master database will handle the insert, delete and update commands whereas the slave databases will handle the select command.
The below image shows a master database with multiple slave databases.
Advantages of Master/Slave Design
Availability
We have replicated the master data across multiple locations. So in case, a slave database goes offline, then we have other slave databases to handle the read operations.
Performance
As the master/slave model has multiple slave database servers, more queries can be processed in parallel.
Failover alleviating
We can set up a master and a slave (or several slaves), and then write a script that monitors the master to check whether it is up. Then instruct our applications and the slaves to change master in case of failure.
Problem with Master/Slave Design
One of the major problems with this design is that if a user has changed his/her profile username. This request will go into the master database. It takes some time to replicate the change in the slave databases. In case the customer refreshes the profile, he/she will still see the old data because the changes have not yet synced from the Master to Slave.