In this article, I will explain how to call ASP.NET web API in your Angular project step by step. You need to enable CORS in your web API and fetch data from web API. It is easy to call API in Angular.

Step 1
Open SQL server of your choice and create a table and insert some records.
CREATE TABLE [dbo].[Employee](
[Employee_Id] [int] IDENTITY(1,1) NOT NULL,
[First_Name] [nvarchar](50) NULL,
[Last_Name] [nvarchar](50) NULL,
[Salary] [money] NULL,
[Joing_Date] [nvarchar](50) NULL,
[Department] [nvarchar](50) NULL,
CONSTRAINT [PK_Employee] PRIMARY KEY CLUSTERED
(
[Employee_Id] ASC
)WITH (PAD_INDEX = OFF, STATISTICS_NORECOMPUTE = OFF, IGNORE_DUP_KEY = OFF, ALLOW_ROW_LOCKS = ON, ALLOW_PAGE_LOCKS = ON) ON [PRIMARY]
) ON [PRIMARY]
GO
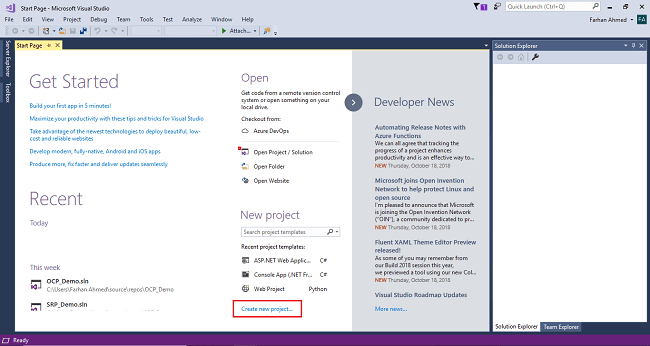
Step 2
Open Visual Studio, click on New Project and create an empty web API application project.
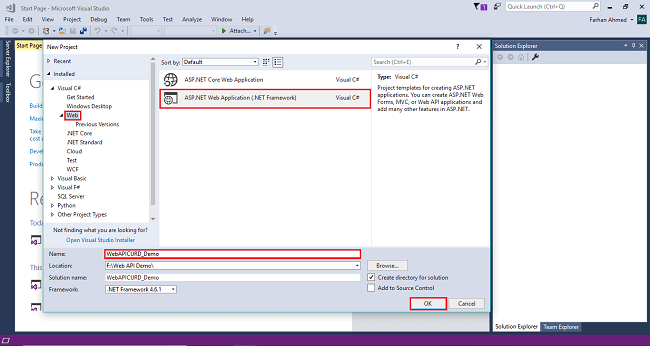
After clicking on New Project, one window will appear. Select Web from the left panel, choose ASP.NET Web Application, give a meaningful name to your project, and then click on OK as shown in the below screenshot.
After clicking on OK one more window will appear; choose empty, check on empty Web API checkbox then click on OK as shown in the below screenshot
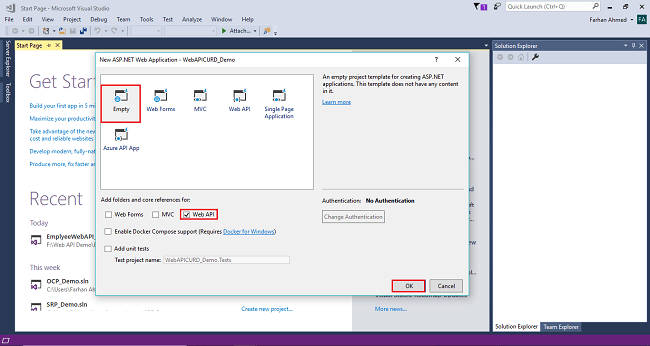
After clicking OK, the project will be created with the name of WebAPICRUD_Demo.
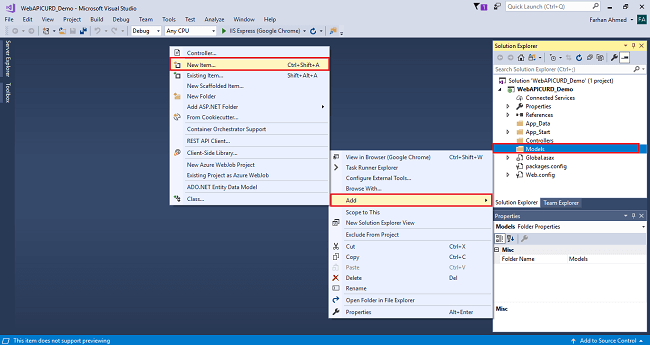
Step 3
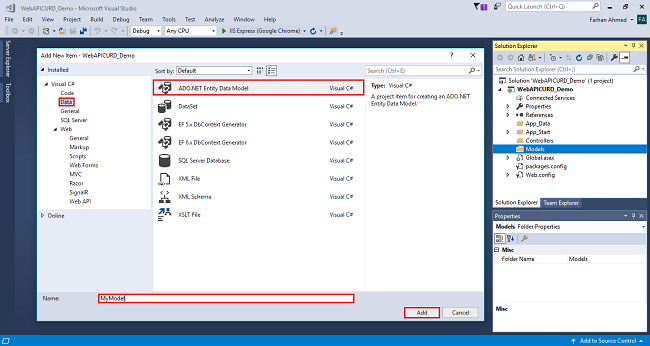
Add Entity Framework now. For that, right click on Models folder, select Add, then select New Item, then click on it.
After clicking on a New item, you will get a window; from there, select Data from the left panel and choose ADO.NET Entity Data Model, give it the name MyModel (this name is not mandatory you can give any name) and click on Add.
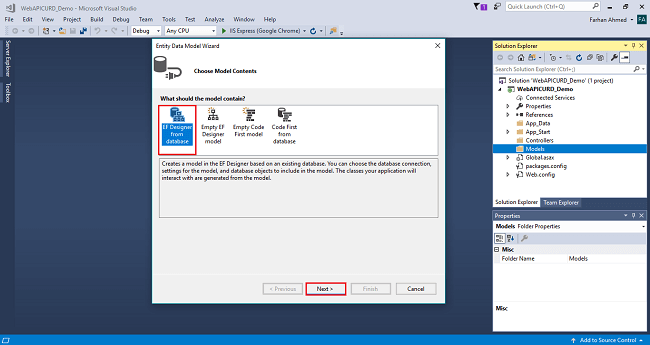
After you click on "Add a window", the wizard will open, choose EF Designer from the database and click Next.
After clicking on Next a window will appear. Choose New Connection. Another window will appear, add your server name if it is local then enter a dot (.). Choose your database and click on OK.
The connection will be added. If you wish to save connect as you want. You can change the name of your connection below. It will save connection in web config then click on Next.
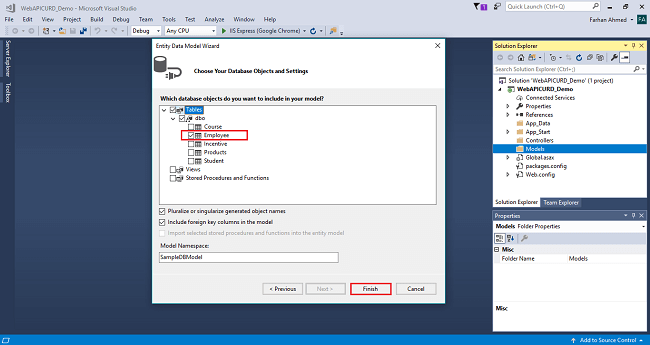
After clicking on NEXT another window will appear to choose database table name as shown in the below screenshot then click on Finish. Entity framework will be added and the respective class gets generated under the Models folder.

Following class will be added,
namespace WebAPICURD_Demo.Models
{
using System;
using System.Collections.Generic;
public partial class Employee
{
public int Employee_Id { get; set; }
public string First_Name { get; set; }
public string Last_Name { get; set; }
public Nullable<decimal> Salary { get; set; }
public string Joing_Date { get; set; }
public string Department { get; set; }
}
}
Step 4
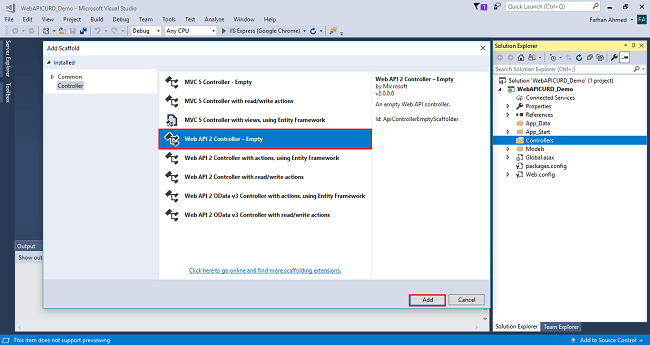
Right click on Controllers folder, select Add, then choose Controller as shown in the below screenshot.
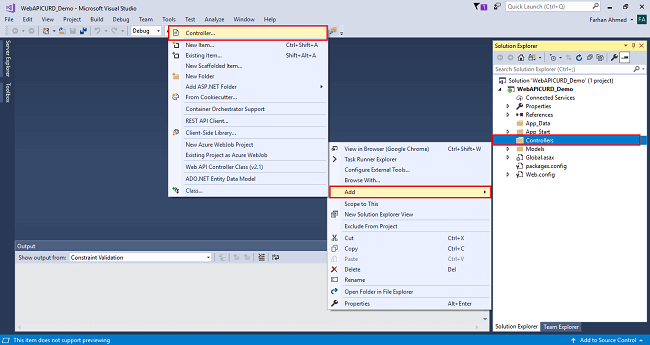
After clicking on the controller a window will appear to choose Web API 2 Controller-Empty, click on Add.
Fetch Data From Database Using ASP.NET Web API In Angular
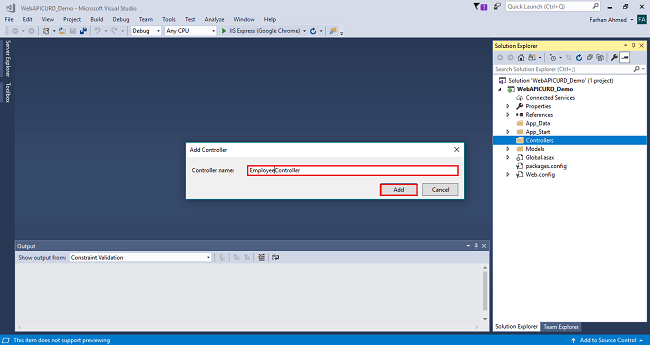
After clicking on Add, another window will appear with DefaultController. Change the name to EmployeeController then click on Add. EmployeeController will be added under Controllers folder. Remember don’t change the Controller suffix for all controllers, change only highlight, and instead of Default just change Home as shown in the below screenshot.
Complete code for controller
using System;
using System.Collections.Generic;
using System.Linq;
using System.Net;
using System.Net.Http;
using System.Web.Http;
using WebAPICURD_Demo.Models;
namespace WebAPICURD_Demo.Controllers
{
public class EmployeeController : ApiController
{
private EmployeeEntities _db;
public EmployeeController()
{
_db =new EmployeeEntities();
}
public IEnumerable<Employee> GetEmployees()
{
return _db.Employees.ToList();
}
}
}
Step 5
Now, enable CORS in the WebService app. First, add the CORS NuGet package. In Visual Studio, from the Tools menu, select NuGet Package Manager, then select Package Manager Console. In the Package Manager Console window, type the following command.
Install-Package Microsoft.AspNet.WebApi.Cors
This command installs the latest package and updates all dependencies, including the core Web API libraries.
Step 6
Open the file App_Start/WebApiConfig.cs. Add the following code to the WebApiConfig.Register method.
Add namespace
using System.Web.Http.Cors;
Add the following line of code,
EnableCorsAttribute cors = new EnableCorsAttribute("*","*","*");
config.EnableCors(cors);
Complete WebApiConfig.cs file code
using System;
using System.Collections.Generic;
using System.Linq;
using System.Web.Http;
using System.Web.Http.Cors;
namespace WebAPICURD_Demo
{
public static class WebApiConfig
{
public static void Register(HttpConfiguration config)
{
// Web API configuration and services
// Web API routes
config.MapHttpAttributeRoutes();
config.Routes.MapHttpRoute(
name: "DefaultApi",
routeTemplate: "api/{controller}/{id}",
defaults: new { id = RouteParameter.Optional }
);
EnableCorsAttribute cors = new EnableCorsAttribute("*","*","*");
config.EnableCors(cors);
}
}
}
Step 6
Open Visual Studio Code and create a new Angular project.
ng new MyDemo
Compile your project
cd MyDemo
Open your project in the browser,
ng serve --open
Step 7
Install bootstrap in your project and import in style.css file,
npm install bootstrap –save
@import 'node_modules/bootstrap/dist/css/bootstrap.min.css';
Step 8
Open terminal create component,
ng g c employee-list
Step 9
Open app.module.ts file and import httpModule
import { BrowserModule } from '@angular/platform-browser';
import { NgModule } from '@angular/core';
import {HttpClientModule, HttpClient} from '@angular/common/http';
import { AppComponent } from './app.component';
import { from } from 'rxjs';
import { EmployeeListComponent } from './employee-list/employee-list.component';
@NgModule({
declarations: [
AppComponent,
EmployeeListComponent
],
imports: [
BrowserModule,
HttpClientModule
],
providers: [],
bootstrap: [AppComponent]
})
export class AppModule { }
Step 10
Open employee-list component.ts file and add the following code,
import { HttpClientModule, HttpClient } from '@angular/common/http';
import { Component, OnInit } from '@angular/core';
@Component({
selector: 'app-employee-list',
templateUrl: './employee-list.component.html',
styleUrls: ['./employee-list.component.css']
})
export class EmployeeListComponent implements OnInit {
constructor(private httpService: HttpClient) { }
employees: string[];
ngOnInit() {
this.httpService.get('http://localhost:52202/api/employee').subscribe(
data => {
this.employees = data as string [];
}
);
}
}
Step 11
open employee-list.component.html and add the following code,
<div class="container py-5">
<h3 class="text-center text-uppercase">List of Employees</h3>
<table class="table table-bordered table-striped">
<thead>
<tr class="text-center text-uppercase">
<th>Employee ID</th>
<th>First Name</th>
<th>Last Name</th>
<th>Salary</th>
<th>Joining Date</th>
<th>Department</th>
</tr>
</thead>
<tbody>
<tr *ngFor="let emp of employees">
<td>{{emp.Employee_Id}}</td>
<td>{{emp.First_Name}}</td>
<td>{{emp.Last_Name}}</td>
<td>{{emp.Salary}}</td>
<td>{{emp.Joing_Date}}</td>
<td>{{emp.Department}}</td>
</tr>
</tbody>
</table>
</div>
Step 12
Add your employee-list.component.html selector in app.component.html
<app-employee-list></app-employee-list>
Step 13
Run your project in browser.